background image

14

Installing the Wine 

Cooler

This appliance is intended to be 
installed in a space between two 
units.

The minimum space required is:

FWC860 – 600mm wide x 580mm deep x 1780mm high

Please note:  When the product is installed, there should be a small 
ventilation gap between the top of the unit and the underside of any 
fitting above (6 mm or ¼”).

This product should not be installed:

1.  In direct sunlight.
2.  Adjacent to a heat source (oven or radiator).
3.  Below a hob unit.
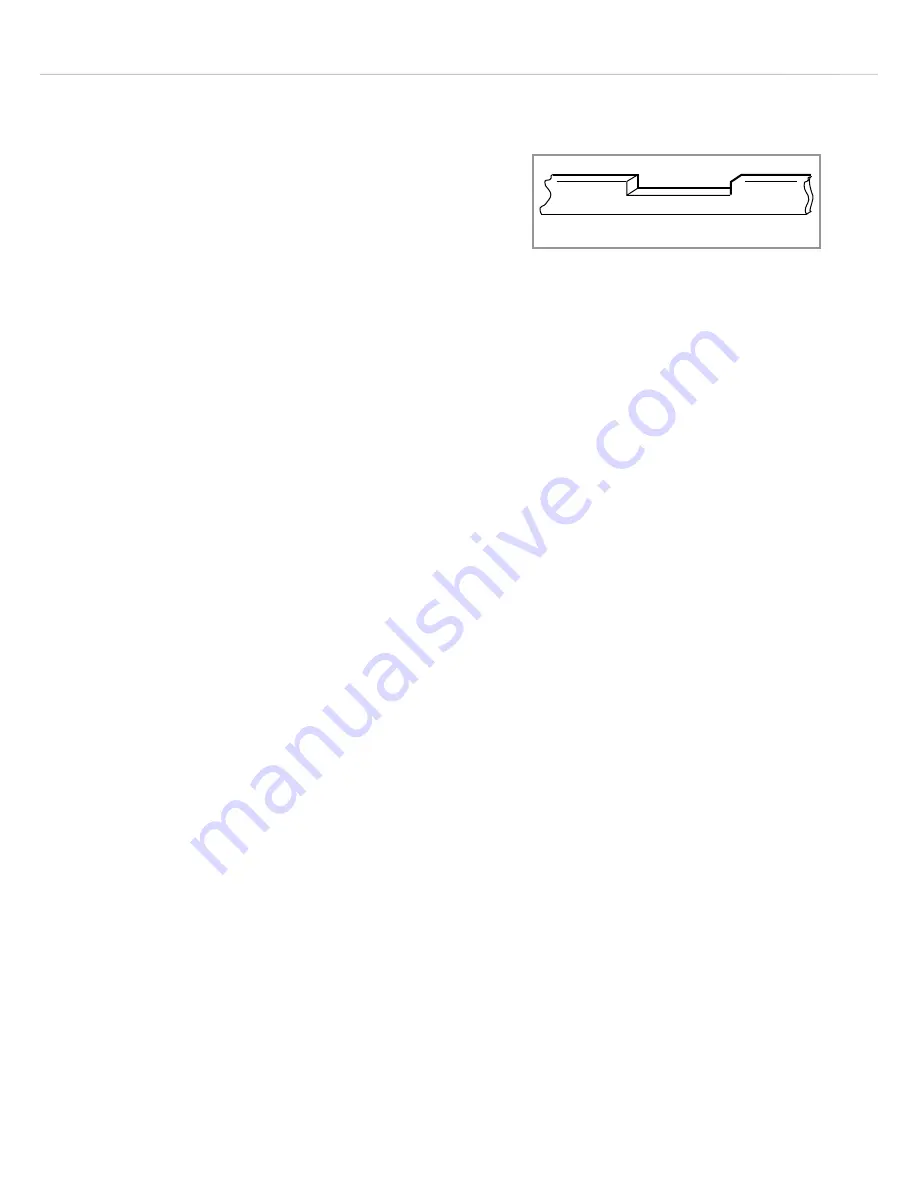
4.   Where a continuous plinth is to be used, it is necessary cut a section 

out so that the ventilation slots at the front of the appliance are not 
obstructed in any way (Fig. 4).

Attach the single piece lower ventilation trim to the plinth area of the 
appliance.

IMPORTANT: Failure to follow the instructions regarding installation 
and ventilation may invalidate the  warranty supplied with your 
appliance.

Fig. 4

Summary of Contents for FWC860

Page 1: ...omer Care Department The Group Ltd Harby Road Langar Nottinghamshire NG13 9HY T 01949 862 012 F 01949 862 003 E customer care cda eu W www cda eu www cda eu FWC860 Wine Cooler Installation Use and Maintenance ...

Page 2: ...meone who is responsible for their safety Under no circumstances should any external covers be removed for servicing or maintenance except by suitably qualified personnel Do not use the appliance if the plug the mains cord or the appliance itself is damaged If the mains cord is damaged you must have it replaced by the manufacturer or an authorised service centre or similarly qualified persons in o...

Page 3: ...hildren being trapped inside the appliance during play or any other risk of injury At the end of its working life the product must not be disposed of as urban waste It must be taken to a special local authority differentiated waste collection centre or to a dealer providing this service Disposing of a household appliance separately avoids possible negative consequences for the environment and heal...

Page 4: ... first use This will disappear as the appliance cools Please note The appliance will work continuously until it gets to the correct temperature If the appliance is switched off you should allow five minutes before switching it on again to prevent the risk of unnecessary damage to the compressor The LED display may not show the selected temperature whilst the appliance first gets to the correct tem...

Page 5: ...storage of wine In the event of a power failure leave the door closed as much as possible to maintain the internal working temperature Should the power failure continue for a prolonged period you should take steps to protect the contents of the wine cooler against a rise in temperature The wine cooler will remember the selected temperature settings and revert to these settings once the power is re...

Page 6: ...d hold the light button for five seconds To view the set temperature touch the appropriate or button at any time and the set temperature will flash in the LED display for five seconds The display shows the current internal temperatures when the wine cooler is on Please note The temperature in the lower zone must be set either the same or higher than the temperature in the upper zone For optimal pe...

Page 7: ...ouch the light button to switch the light on or off Humidity Control The wine cooler is equipped with a humidity control system to maintain optimal humidity within the wine cooler Fill the humidity reservoir approximately 3 4 full with water Place the reservoir over the special lugs toward the back of the top shelf only as shown in fig 2 Ensure it is located correctly to prevent water spillage Che...

Page 8: ...ode Sabbath mode is available for the observance of certain religious holidays This will switch off the displays interior light and audible alarms The cooling process will continue To switch the Sabbath mode on touch and hold the power and light keys simultaneously for five seconds The indicator light will flash four times and confirm the Sabbath mode is on Sabbath mode will switch off automatical...

Page 9: ...cooler will beep five times to confirm dynamic cooling is on Dynamic cooling mode The fan cycles on and off to circulate the air even after the required temperature is reached This ensures consistent humidity and temperature distribution in the wine cooler creating perfect conditions for long term storage Using the dynamic mode increases the level of noise in operation To change to silent mode tou...

Page 10: ... fig 3 Then lift the shelf up and pull forwards To replace the shelves follow the steps above in reverse order Temperature alarm If the temperature rises or falls outside the set temperature range an alarm will sound and the display will flash This could be because The wine cooler has not yet reached the set temperature when first switched on There has been a power failure The wine cooler has been...

Page 11: ... solution of bicarbonate of soda and lukewarm water Clean the shelves separately by hand using soap and water Do not put them in the dishwasher Ensure that the cloth is only moist when cleaning the control panel and electrical parts and that all water is thoroughly dried before reconnecting the power Once cleaning is complete reconnect the mains electrical supply If the appliance is not to be used...

Page 12: ...as not blown The plug socket is functioning correctly To check this plug another electrical appliance in to see if the socket is working The ambient temperature is between 16º to 38ºC The appliance is working but not very well check The appliance is not overloaded The thermostat is set to an appropriate temperature The door is closing properly The door gasket is sealing properly There is enough ve...

Page 13: ...There is power to the appliance The house fuses or circuit breakers are intact and the fuse in the plug has not blown The light button is not set to off Please note The LED lighting cannot be replaced without a service call If the light fails contact CDA Customer Care The door will not close properly check The appliance is level and stable If the door has been removed it may not have been correctl...

Page 14: ...mm or This product should not be installed 1 In direct sunlight 2 Adjacent to a heat source oven or radiator 3 Below a hob unit 4 Where a continuous plinth is to be used it is necessary cut a section out so that the ventilation slots at the front of the appliance are not obstructed in any way Fig 4 Attach the single piece lower ventilation trim to the plinth area of the appliance IMPORTANT Failure...
Page 15: ... Carefully locate the handle in the required position this would normally be the higher of the two 2 Fix this in position using the screws supplied IMPORTANT Take care when installing the handle not to damage the door Any damage caused may not be covered by the warranty supplied with your appliance 574 42 500 Fig 5 ...

Page 16: ... drop after removing the screws Fig 6 2 Gently pull down to remove the glass door from the right top hinge and place it on a padded surface to avoid the risk of damage Then remove the right top hinge 8 Fig 8 3 Pop out the cover caps on the left side of cabinet and use them to cover the screw holes on the right hand side 4 Screw the alternative left top hinge 7 included in the fittings onto the lef...

Page 17: ...e 1 above and attach it to its alternative location in the same hinge bracket Fig 10 7 Rotate the glass door 180 and locate its top onto the hinge pin of the top hinge bracket Whilst holding it in position fit the lower hinge bracket 3 modified in 6 above onto the cabinet and through the spacer 4 on the glass door Fig 11 8 Fit the plastic covers 1 Fig 6 Fig 9 Fig 10 Fig 11 ...

Page 18: ...er and fuse 2 Fit replacement 13A fuse ASTA approved to BS 1362 type into the fuse cover 3 Replace fuse cover Important Do not use the appliance without the fuse cover in position How to connect an alternative plug If the fitted plug is not suitable for your socket outlet then it should be cut off and disposed of safely to avoid possible shock hazard A suitable alternative plug of at least 13 Amp ...

Page 19: ...oloured GREEN and YELLOW The wire which is coloured BLUE must be connected to the terminal which is marked with the letter N or coloured BLACK The wire which is coloured BROWN must be connected to the terminal which is marked with the letter L or coloured RED If in doubt regarding the electrical connection of this appliance consult a qualified electrician Do not shorten the supply cable the applia...

Page 20: ...20 NOTES ...

Page 21: ...21 NOTES ...

Page 22: ...22 NOTES ...

Page 23: ...pliance M 85 kg Energy efficiency class B Annual energy consumption AEc 225 kWh year The energy consumption is based on standard test results for 24 hours Actual energy consumption will depend on how the appliance is used and where it is located Storage volume 355 L Coldest storage temperature 5 C Defrosting type Automatic Climate class ST This appliance is intended to be used at an ambient temper...

Page 24: ...012 F 01949 862 003 E customer care cda eu W www cda eu www cda eu Please contact our Customer Care Department for Service on the details below Customer Care Department The Group Ltd Harby Road Langar Nottinghamshire NG13 9HY T 01949 862 012 F 01949 862 003 E customer care cda eu Copyright CDA 2015 ...

Reviews: