background image

9

Installation

Identification of parts

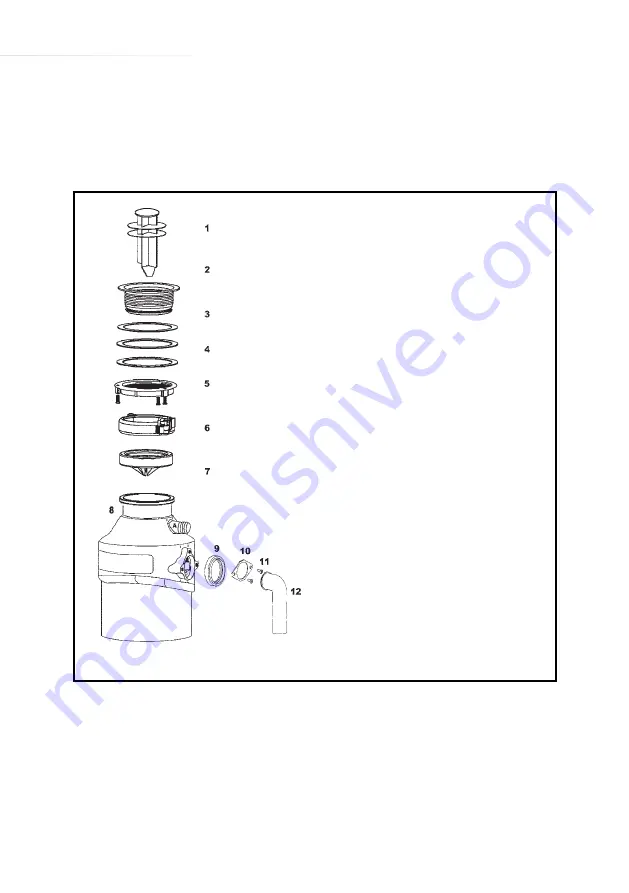
Identify and check all necessary parts, as Fig. 2.

1    Plug / Pusher

2   Sink flange

3   Rubber washer

4   Fibre washer

5   Mounting ring

6   Clamp

7   Splash guard

8   Disposer body

9   Rubber seal

10  Outlet flange

11   Screws

12  Drain tube

Fig. 2

Summary of Contents for akd01

Page 1: ...are Department The Group Ltd Harby Road Langar Nottinghamshire NG13 9HY T 01949 862 012 F 01949 862 003 E customer care cda eu W www cda eu akd01 akd02 Waste Disposers Manual for Installation Use and Maintenance ...

Page 2: ...al sensorial or mental capacity or who lack experience or knowledge about it unless they have had supervision or instructions on how to use the appliance by someone who is responsible for their safety Under no circumstances should any external covers be removed for servicing or maintenance except by suitably qualified personnel Appliance information Please enter the details on the appliance rating...

Page 3: ... OF THE PRODUCT IN ACCORDANCE WITH EC DIRECTIVE 2002 96 EC At the end of its working life the product must not be disposed of as urban waste It must be taken to a special local authority differentiated waste collection centre or to a dealer providing this service Disposing of a household appliance separately avoids possible negative consequences for the environment and health deriving from inappro...

Page 4: ...osive acids or alkalis to enter the appliance Do not allow children to play with or near the appliance and pay particular attention when the waste disposer is operating in the presence of children Operating cleaning and user maintenance of the appliance must not be done by children without supervision If a fault is noticed switch off the appliance and unplug it from the electricity supply There ar...

Page 5: ...t Oyster clam or similar shells Metal obejcts Glass or china Plastic or plastic wrappings including cling film Chemical drain cleaners Paper or cardboard Large bones Toothpicks and other wooden items Excessive quantities of fat or grease Abrasive cleaners such as scouring products and grits including creams such as Cif CDA and its agents cannot be held responsible for any damage or injury caused b...

Page 6: ...lement After the grinding is complete stop the disposer by a firm press of the air switch button Allow the water to continue running for a few seconds to rinse the waste disposer through Turn off the cold water tap After ensuring that your hands are dry turn off the electrical supply to the waste disposer Note The waste disposer is designed to grind a mix of foods at the same time inserting just o...

Page 7: ...n cold water through while the waste disposer is still running and until grinding ceases Turn off the cold water tap Overload Shut down The waste disposer is fitted with a shut down system to prevent internal damage in the event of a solid object or excessive food entering it If this happens the waste disposer will automatically shut down To restart the waste dicposer Switch off the waste disposer...

Page 8: ... Check the fuse and or circuit breaker protecting the circuit The overload shutdown has been activated Press the red reset button on the base of the unit PVC air tube not fully sealed Check the connections at both ends of the PVC air tube The motor cannot be turned even with the hexagonal key The disposer is jammed by a solid object Call CDA Customer Support for assistance The motor is turning but...

Page 9: ...of parts Identify and check all necessary parts as Fig 2 1 Plug Pusher 2 Sink flange 3 Rubber washer 4 Fibre washer 5 Mounting ring 6 Clamp 7 Splash guard 8 Disposer body 9 Rubber seal 10 Outlet flange 11 Screws 12 Drain tube Fig 2 ...

Page 10: ...drain and waste trap previously installed Clean the sink flange area of any putty or other debris Open the clamp 6 and remove the sink flange 2 Fig 1 Unscrew the mounting ring 5 and remove the fibre washer 4 Pass the sink flange 2 through the rubber washer 3 and the sink hole Tighten the mounting ring 5 with fibre washer 4 onto the sink flange then tighten the screws so the sink flange is seated f...

Page 11: ...n this assembly onto the disposer body 8 Fig 4 Waste trap installation recommendations To improve the flow of water all pipes should be cut to length and internally deburred The waste disposer is supplied with inlet A blanked off Fig 5 This inlet may be used to connect a sink overflow using a flexible hose If using this it is necessary to remove the plastic plug as shown in Fig 6 before fitting th...

Page 12: ...in your sink or drill one in the worktop Unscrew the back nut from the push button bellows C and pass the threaded part of the belows through the 35mm hole as above Fit and tighten the back nut to lock the bellows in place Attach one end of the PVC air tube B to the bellows C trim it to length and mount the other end over the spout of the air switch A Air switch B PVC air tube 1m supplied C Push b...

Page 13: ...cal Information Warning This appliance must be earthed The mains lead of this appliance has been fitted with a BS 1363A 3 Amp fused plug To change a fuse in this type of plug follow the steps below 1 Remove the fuse cover and fuse 2 Fit replacement 3A fuse ASTA approved to BS 1362 type into the fuse cover 3 Replace fuse cover Important Do not use the appliance without the fuse cover in position ...

Page 14: ...minal which is marked with letter E or by the Earth symbol or coloured GREEN and YELLOW The wire which is coloured BLUE must be connected to the terminal which is marked with the letter N or coloured BLACK The wire which is coloured BROWN must be connected to the terminal which is marked with the letter L or coloured RED If in doubt regarding the electrical connection of this appliance consult a q...

Page 15: ... in accordance with local water bye laws and any building regulations in force Your guarantee does not cover Damage by misuse neglect or transit Use of parts not used or recommended by CDA Routine maintenance general wear and tear and installation faults Products used for commercial or professional purposes Your waste disposer is guaranteed against defects in materials and or workmanship for 12 mo...

Page 16: ...ntact our Customer Care Department for Service on the details below Customer Care Department The Group Ltd Harby Road Langar Nottinghamshire NG13 9HY T 01949 862 012 F 01949 862 003 E service cda eu W www cda eu ...

Reviews:

Related manuals for akd01