background image


Page - 4 

For more information please email [email protected] or call 1-(352)275-5319 


6.


Restart the water supply.   

7.


Connect  the  power  cable  for  the  motor  to  the 
power source. 

 
8.


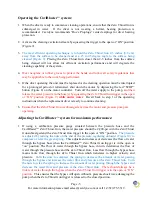
It is recommended that the Zero Thrust Gun trigger 
be  in  the  open  or  “ON”  position  (Figure  9)  when 
starting the motor. 
 

9.


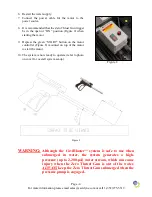
Depress  the  green  “START”  button  on  the  motor 
controller (Figure  8) mounted on top  of the motor 
to start the motor. 

 
10.


The system is now ready to operate (refer to photo 
on cover for overall system set-up). 

Figure 8 


Figure 9


WARNING: 

Although  the  CaviBlaster

TM

  system  is  safe  to  use  when 

submerged  in  water,  the  system  generates  a  high-
pressure (up to 2,200-psi) water stream, which can cause 
injury  when  the  Zero  Thrust  Gun  is  out  of  the  water. 
ALWAYS
 keep the Zero Thrust Gun submerged when the 
pressure pump is engaged.


Summary of Contents for Caviblaster 1222-E50

Page 1: ...Model 1222 E50 Operation Maintenance Manual www cavidyne com ...

Page 2: ... on pump Figure 3 per manufacturer s operating manual Figure 1 Figure 2 Figure 3 5 To supply water to the CaviBlasterTM power unit connect a 1 25 mm diameter feed hose to the cam lock plug on the inline strainer inlet Figure 4 Either fresh water or seawater can be used with this system The water source must supply the CaviBlasterTM with water at a volume of greater than 12 gallons 45 liters per mi...

Page 3: ...s primed turn off the water supply to the system Figure 6 4 Connect the 13 mm high pressure hose to the quick connect plug under the pressure regulating unloader Figure 6 The high pressure hose has a brass quick connect socket on the end The 1222 E CaviBlasterTM can deliver the required pressure utilizing up to 300 feet 100 meters of diameter rubber hose or 600 feet 200 meters of thermoplastic hos...

Page 4: ...he green START button on the motor controller Figure 8 mounted on top of the motor to start the motor 10 The system is now ready to operate refer to photo on cover for overall system set up Figure 8 Figure 9 WARNING Although the CaviBlasterTM system is safe to use when submerged in water the system generates a high pressure up to 2 200 psi water stream which can cause injury when the Zero Thrust G...

Page 5: ... the operating instructions when the replacement diver is ready to continue cleaning 6 Ensure that the Zero Thrust Gun is submerged any time the motor and pressure pump are operating Adjusting the CaviBlasterTM system for maximum performance 1 If using a calibration pressure gauge situated between the pressure hose and the CaviBlasterTM Zero Thrust Gun the water pressure should be 2 200 psi with t...

Page 6: ...ge close the pressure regulating unloader until there is just a trickle of water less than gallon or 1 liter per minute coming out of the bypass with the Zero Thrust Gun trigger in the open or ON position Shutting down the CaviBlasterTM power unit 1 Stop the motor by depressing the red STOP button Figure 8 on the motor controller 2 Shut off the supply of water to the pump 3 Squeeze the Zero Thrust...

Page 7: ...plug 4 Attach the pressure hose and Zero Thrust Gun 5 Connect the power cable to the power source 6 Make sure that the diver is ready to work and that the Zero Thrust Gun is submerged in the water Apply hearing protection if the diver is not wearing a helmet 7 Start the motor 8 Activate the cleaning cavitation stream by squeezing the Zero Thrust Gun trigger to open or ON 9 Proceed with cleaning 10...

Page 8: ...lways wear neoprene or heavy rubber gloves to provide protection to the hands and in particular to the nails The gloves will absorb most of the energy produced by bursting cavitation bubbles and prevent the cavitation bubbles from contacting the operators hands The gloves will also protect operators hands from the initial shockwave when the Zero Thrust Gun is activated Serious harm and injury may ...

Reviews: