background image

-6-

e

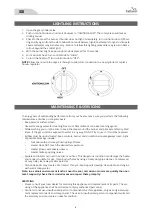
LIGHTLING INSTRUCTIONS

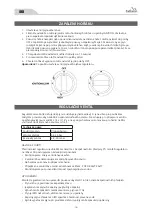
1. 

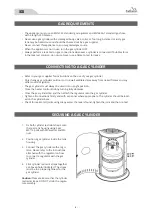
Open the gas cylinder valve.

2.  Push in control knob and turn anti clockwise to “IGNITION&LOW”. The rotary piezo will make a 

clicking sound. 

3.  Check for flame at the burner, if burner does not light immediately, turn control knob to OFF set

-

ting and try again from the start. Allow 30 seconds between ignition attempts for gas to dissipate. 

Several attempts may be necessary.  Failure to follow this lighting procedure may result in flame 

roll out beyond the emitter grid. 

4.  With the burner alight, keep control knob depressed for 15 seconds. 

5. 

For maximum heat, turn control knob to “HIGH”.

6.  To turn the heater off, turn control knob to “OFF”.

NOTE:

 Allow one minute to purge air through to pilot after connection to a new cylinder or replace 

hose & regulator.

MAINTENANCE & SERVICING

To enjoy years of outstanding performance from your heater, make sure you perform the following 

maintenance activities on a regular basis:

• 

Keep exterior surfaces clean.

• 

Use warm soapy water for cleaning. Never use flammable or corrosive cleaning agents.

•  While washing your unit, be sure to keep the area around the burner and pilot assembly dry at all 

times. If the gas control is exposed to water in any way, DO NOT try to use it. It must be replaced.

• 

Airflow must be unobstructed. Keep controls, burner and circulation air passageways clean. Signs 

of possible blockage include:

• 

Gas odor with extreme yellow tipping of flame.

• 

Heater does NOT reach the desired temperature.

• 

Heater glow is excessively uneven.

• 

Heater makes popping noises.

• 

Spiders and insects can nest in burner or orifices. This dangerous condition can damage the heater 

and render it unsafe for use. Clean burner holes by using a heavy duty pipe cleaner. Compressed 

air may help clear away smaller particles.

• 

Carbon deposits may create a fire hazard. If any carbon deposits develop, clean dome and engine 

with warm soapy water.

Note: in a salt-air environment (such as near the sea), corrosion occurs more quickly than nor-

mal. Frequently check the corroded areas and repair them promptly.

SERVICING

•  Please consult your local dealer for servicing this appliance and replacement of its parts. The ser-

vicing of the appliance shall be carried out only by authorised personnel.

• 

Caution: do not use unauthorized parts or components for this appliance, only use original equip

-

ment replacement parts and components. The use of unauthorized parts or components will void 

the warranty and can create an unsafe condition.

Summary of Contents for SILVERINO

Page 1: ...SILVERINO item 13 936 e Patio Heater c Plynov z i s Plynov iari...

Page 2: ...peration if there is evi dence of excessive abrasion or wear or if the hose is damaged and that the replacement hose assem bly shall be that specified by the manufacturer The heater should be inspecte...

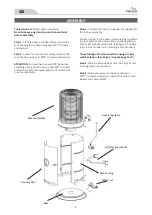
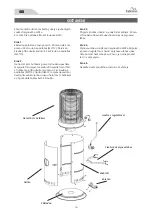
Page 3: ...er assembly Step 3 Connecting hose and regulator if supplied to the burner assembly Put gas cylinder on the base and connecting regulator to a gas cylinder then assembly 2 cylinder belts and ensure ga...

Page 4: ...ition The gas cylinder must always be used in an upright position Close the heater control knob by turning fully clockwise Close the gas cylinder tap and then attach the regulator onto the gas cylinde...

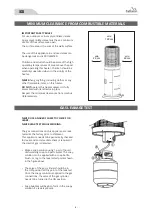
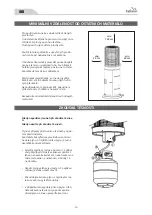
Page 5: ...ce Respect the minimum clearances from combus tible materials GAS LEAKAGE TEST NEVER USE A NAKED FLAME TO CHECK FOR LEAKS NEVER LEAK TEST WHILE SMOKING The gas connections on this appliance are leak t...

Page 6: ...sembly dry at all times If the gas control is exposed to water in any way DO NOT try to use it It must be replaced Airflow must be unobstructed Keep controls burner and circulation air passageways cle...

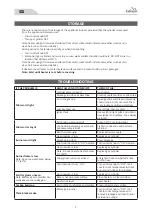
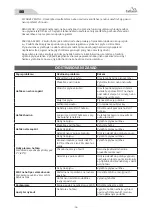
Page 7: ...Gas cylinder low or empty Igniter fails Use match to light pilot and obtain new igniter and replace See below pictures Pilot won t stay lit Dirt build up around pilot Clean dirt from around pilot Con...

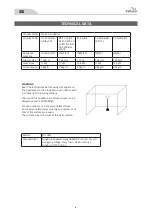
Page 8: ...open The surface area is the sum of the walls surface Product Name Area Patio Heater Country Code CH ES FR GB GR IE IT PT BE CY CZ DK EE FI GR IT LT LV MT NL NO SE SI SK BG RO TR AT CH DE CZ FR GB GR...

Page 9: ...vystaveni p i vysok teplot zejm na pop lenin a z n t Je zak z no v et oble en a tak um s ovat jin ho lav nebo v bu n kapaliny a materi ly v bl zkosti topidla Je zak z no prov d t jak koliv pravy na to...

Page 10: ...i roubujte jej pomoc 5 ks roub a podlo ek M5 10 Upozorn n Pro spr vn zav r n dve p izvedn te jednou rukou horn st s ho kem a a pot dot hn te v ech 5 roub Krok 3 P ipojte k ho ku hadici s reduk n m ve...

Page 11: ...m st mimo otev en pla men nebo jin zdroj zap len P esn pokyny k pou it plynov lahve z sk te od sv ho dodavatele plynu Plynov l hev mus b t v dy pou v na p epravov na i skladov na ve svisl poloze P ed...

Page 12: ...ho kem na sv m m st Respektujte minim ln vzd lenosti od ho lav ch materi l ZKOU KA T SNOSTI Nikdy nepou vejte ohe p i zkou ce t snos ti Nikdy neku te p i zkou ce t snosti Plynov p pojky p stroje jsou...

Page 13: ...lo k ucp n vzduchov ho otvoru Na vstupuje pro p ipojen k ventilu opat en p evle nou matic W 21 8 x 1 14 L a na v stupu hadicovou koncovkou pro hadici na PB s vnit n sv tlost 8mm nebo z vitem G 1 4 L T...

Page 14: ...ada e v poloze PILOT nechejte odvzdu nit alespo 2 minuty nebo dokud neuc t te plyn Mal tlak plynu Plynov l hev je pr zdn Selh n zapalov n Pro zap len pou ijte sirky Ho k zhas n Ne istoty okolo PILOT h...

Page 15: ...0 I3P 37 I3P 50 Velikost trysky 1 64mm 1 64mm 1 55m 1 64mm 1 60mm Tepeln v kon 11kW 11kW 13 5kW 11kW 12 5kW Spot eba plynu 0 8kg h 0 8kg h 0 9kg h 0 8kg h 0 9kg h Model H1109B V robce Ningbo Innopower...

Page 16: ...V robek je v souladu s n e uveden mi p edpisy Sm rnice Evropsk ho parlamentu a Rady 2016 426 ES a normami EN 14543 2005 A1 2007 Certifik t 0063CO7365 0063 19 V robce Ningbo Innopower Hengda Metal Prod...

Page 17: ...kej teplote najm pop len n a z palov Je zak zan ve a oble enie a tie umiest ova in hor av alebo v bu n kvapaliny a materi ly v bl zkosti vykurovacieho telesa Je zak zan vykon va ak ko vek pravy na ohr...

Page 18: ...jte ho pomocou 5 ks skru tiek a podlo iek M5 10 Upozornenie Pre spr vne zatv ranie dver pridvihnite jednou rukou horn as s hor kom a a potom dotiahnite v etk ch 5 skrutiek Krok 3 Pripojte k hor ku had...

Page 19: ...imo otvoren plame alebo in zdroj zap lenia Presn pokyny na pou itie plynovej f a e z skate od svojho dod vate a plynu Plynov f a a mus by v dy pou van prepravuje aj skladovan vo zvislej polohe Pred pr...

Page 20: ...hor kom na svojom mieste Re pektujte minim lnej vzdialenosti od hor a v ch materi lov SK KA TESNOSTI Nikdy nepou vajte ohe pri sk ke tesnosti Nikdy nefaj ite pri sk ke tesnosti Plynov pr pojky pr str...

Page 21: ...duchov ho otvoru Na vstupuje na pripojenie k ventilu opatren prevle nou maticou W 21 8 x 1 14 L a na v stupe hadicovou koncovkou pre hadicu na PB s vn tornou svetlos ou 8mm alebo z vitom G 1 4 L Techn...

Page 22: ...he PILOT nechajte odvzdu ni aspo 2 min ty alebo k m nepoc tite plyn Mal tlak plynu Plynov f a a je pr zdna Vynech vania zapalovania Pre zap lenie pou ite z palky Hor k zhas na Ne istoty okolo PILOT ho...

Page 23: ...P 37 I3P 50 Ve kos trysky 1 64mm 1 64mm 1 55m 1 64mm 1 60mm Tepeln v kon 11kW 11kW 13 5kW 11kW 12 5kW Spotreba plynu 0 8kg h 0 8kg h 0 9kg h 0 8kg h 0 9kg h Model H1109B V robca Ningbo Innopower Hengd...

Page 24: ...V robok je v s lad s n ie uveden mi predpismi Smernica Eur pskeho parlamentu a Rady 2016 426 ES a normami EN 14543 2005 A1 2007 Certifik t 0063CO7365 V robca Ningbo Innopower Hengda Metal Products Co...

Reviews: