


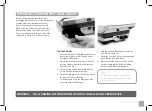


9. U
se
t
h
e
ha
n
dl
e
to
cl
ose
t
h
e
to
p pla
te
. Th
e
to
p pla
te
ha
s
a fl
o
a
tin
g h
in
g
e
s
y
ste
m
t
ha
t
is
d
esi
g
ne
d
to
p
ress
d
o
w
n
e
v
en
ly
on
t
h
e
foo
d.
Th
e
G
ri
ll
in
g H
ei
gh
t
C
ontro
l
on
t
h
e
ri
gh
t
ha
n
d
si
d
e
of
t
h
e
to
p pla
te
is
use
d
to
adj
ust
for
t
h
e
t
h
i
ck
ness
of
t
h
e
foo
d. Th
e
to
p pla
te
m
ust
b
e
fu
lly l
o
w
ere
d
to
ach
ie
v
e
g
ri
ll ma
r
k
s
onto
t
h
e
foo
d.
10. Wh
en
t
h
e
se
l
e
c
te
d
in
g
re
d
ients
a
re
g
ri
ll
e
d,
use
t
h
e
ha
n
dl
e
to
o
p
en
t
h
e
to
p l
i
d. R
e
m
o
v
e
t
h
e
foo
d
usin
g a pla
sti
c
s
pa
tu
la.
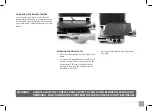
TO USE AS A SANDWICH PRESS
1.
Insert
t
h
e
pl
u
g
into
a 230/240V p
o
w
er
out
l
et
a
n
d
s
w
it
ch
t
h
e
p
o
w
er
on
. Th
e
re
d p
o
w
er
‘O
n
’
l
i
gh
t
w
i
ll
i
ll
u
m
in
a
te
.
2.
E
nsure
t
h
e
R
e
m
o
vabl
e
D
ri
p T
r
ay
is
c
orre
c
t
ly
inserte
d a
n
d p
ositione
d back
into
t
h
e
appl
i
a
n
c
e
.
3.
E
nsure
t
h
e
to
p a
n
d b
otto
m pla
tes
g
ri
ll pla
tes
a
re
se
c
ure
ly l
o
ck
e
d
into
p
osition
.
4.
E
nsure
t
h
e
to
p pla
te
is
in
t
h
e
cl
ose
d p
osition
for
m
ore
e
ffi
c
ient
p
re
h
e
a
tin
g.
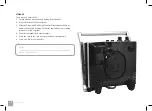
5.
T
urn
t
h
e
Ba
se
Pla
te
T
i
l
t
D
i
al
to
t
h
e
Fla
t
p
osition
.
6.
T
urn
t
h
e
va
ri
abl
e
h
e
a
t
c
ontro
l d
i
al
to
t
h
e
‘Sa
n
dw
i
ch’ p
osition
.
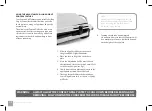
7.
All
o
w
t
h
e
C
ont
ac
t
G
ri
ll
to
p
re
h
e
a
t
unti
l
t
h
e
g
reen
‘READY’ l
i
gh
t
i
ll
u
m
in
a
tes
.
8.
D
urin
g
t
h
is
ti
m
e
, p
re
pa
re
t
h
e
s
a
n
dw
i
ch a
n
d
plac
e
it
onto
t
h
e
ba
se
c
oo
k
in
g pla
te
. Alway
s
plac
e
s
a
n
dw
i
ch
es
to
wa
r
d
s
t
h
e
re
a
r
of
t
h
e
b
otto
m c
oo
k
in
g pla
te
.
9.
Cl
ose
t
h
e
to
p c
oo
k
in
g pla
te
wh
i
ch ha
s
a fl
o
a
tin
g h
in
g
e
t
ha
t
is
d
esi
g
ne
d
to
e
v
en
ly
p
ress
d
o
w
n
on
t
h
e
s
a
n
dw
i
ch. Th
e
to
p pla
te
m
ust
b
e
fu
lly l
o
w
ere
d
to
c
oo
k
s
a
n
dw
i
ch
es
.
Th
e
G
ri
ll
in
g H
ei
gh
t
C
ontro
l
on
t
h
e
ri
gh
t
ha
n
d
si
d
e
of
t
h
e
to
p pla
te
is
use
d
to
adj
ust
for
t
h
e
t
h
i
ck
ness
of
t
h
e
s
a
n
dw
i
ch.
10.
T
o
a
stin
g
s
h
ou
ld
t
ak
e
app
ro
x
i
ma
te
ly
5-8 m
inutes
. Exac
t
to
a
stin
g
ti
m
e
w
i
ll b
e
a ma
tter
of
p
referen
c
e
.
It
w
i
ll al
so
d
e
p
en
d
on
t
h
e
t
yp
e
of
b
re
ad a
n
d fi ll
in
g
use
d.
NOTE:
Th
e
g
reen
‘READY’ l
i
gh
t
w
i
ll cycl
e
on
a
n
d
o
ff d
urin
g
t
h
e
to
a
stin
g p
ro
c
ess
in
d
i
ca
tin
g
t
ha
t
t
h
e
c
orre
c
t
te
mp
er
a
ture
is
b
ein
g ma
int
a
ine
d.
11. Wh
en
t
h
e
s
a
n
dw
i
ch
is
c
oo
k
e
d,
use
t
h
e
ha
n
dl
e
to
o
p
en
t
h
e
to
p pla
te
. R
e
m
o
v
e
t
h
e
s
a
n
dw
i
ch
usin
g a pla
sti
c
s
pa
tu
la. N
e
v
er
use
m
et
al
ton
g
s
or
a k
nife
a
s
t
h
ese
ca
n
ca
use
damag
e
to
t
h
e
non
-
sti
ck c
o
a
tin
g
of
t
h
e
c
oo
k
in
g pla
tes
.
NOTE:
Alway
s
all
o
w
t
h
e
C
ont
ac
t
G
ri
ll
to
p
re
h
e
a
t
unti
l
t
h
e
g
reen
‘READY’ l
i
gh
t
i
ll
u
m
in
a
tes
.
8
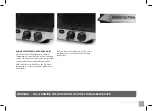
OPERAT
I
NG YOUR CONTACT GR
I
LL GR 8011
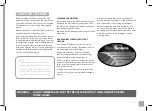
WARNING:
ALWAYS ALLOW THE CONTACT GRILL PLATES TO COOL DOWN BEFORE RELEASING
AND REMOVING
Summary of Contents for GR 8011
Page 1: ...CONTACT G R I L L GR 8011 Instructions for use...
Page 2: ...CONTACT G R I L L...
Page 4: ...Congratulations on the purchase of your new Contact Grill GR 8011 2 CONGRATULATIONS...
Page 8: ...Operating...
Page 16: ...Cleaning...
Page 20: ...18 Recipes...
Page 31: ...NOTE...


