


11
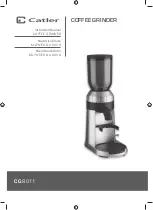
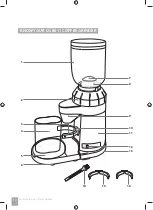
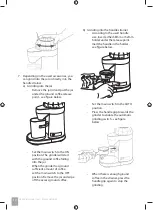
KNOW YOUR CG 8011 COFFEE GRINDER
1.
Coff ee bean hopper
The
coff ee bean hopper with a capacity
of 250g is equipped with a special
lockable system to facilitate handling the
hopper and transferring unused coff ee
beans into the air-tight container.
2.
Control knob to set the milling fi neness
The control knob’s rotary mechanism
allows you to select the correct milling
level from 40 presets. You can easily and
comfortably grind your coff ee for various
uses from French press to espresso
machines.
3.
Handle holder
The
coff ee grinder is supplied with two
holders of diff erent sizes. Thus, you can
grind your coff ee directly into the holder
for both professional and household
coff ee machine.
4.
Ground coff ee jar
5.
Detachable base
Captures excess coff ee during grinding.
6.
Antiskid feet
Anti-skid rubber feet ensure the
grinder’s stability and prevent it from
undesired movement during operation.
7.
Grinder cover
8.
Conic grinder
Your stainless-steel conic grinder is
designed to reach great results at all
times. Thanks to the slow torque, the
millstones can reduce the friction
while grinding the coff ee beans, thus
preventing the millstones from excessive
heating during grinding, which avoids
the deterioration of ground coff ee and
the resulting coff ee drink.
9.
Ground coff ee release chamber
The release chamber is designed to allow
you to grind coff ee directly into the
handle as well as the jar.
10.
Automatic grinding switch
Insert the handle with the strainer
fi tted into the holder. Press the handle
grip towards the grinder to enable the
automatic grinding switch. When there
is enough ground coff ee in the strainer,
press the handle grip again to stop the
grinding.
11.
Stainless grinder housing
The stainless grinder housing with
a built-in motor forms a stable and
powerful grinder base.
12.
Start/stop trigger
Set the main switch to one of the
following positions as needed:
ON position - designed for continuous
grinding into the jar.
OFF position - designed to stop or pause
the operation.
AUTO position - designed mainly for
grinding directly into the handle, the
grinding being enabled by the automatic
grinding switch.
13.
Power cord storage space
There is a holder at the grinder bottom to
store the power cord.
ACCESSORIES
14.
Cleaning brush
15.
58mm handle switch
16.
52mm handle switch
17.
Protective caps
(not shown)
Allow you to easily grind directly into the
handle strainer and prevent the ground
coff ee from falling from the strainer.


