CAT Pumps 1CX Series Service Manual Download Page 5

5

DANGER

A. FLAMMABLE OR EXPLOSIVE LIQUID HAZARD

Do not operate pump with flammable or explosive liquids unless extra ordinary safety precautions are observed. Leaks of flammable or 
explosive liquids, if exposed to elevated temperatures, static electricity, sparks or other hazards, will result in flame or possible explosion, 
causing serious personal injury, death or property damage.

1.   Before operating pump with flammable or explosive liquids, ensure proper maintenance has been performed.
2.  Do not operate pump with flammable or explosive liquids if leaks are detected.
3.   Only pump flammable or explosive liquids that are compatible with pump component materials.
4.   Do not operate pump with flammable or explosive liquids without safe guardsor safety systems to detect leaks, elevated temperatures, spark 

prevention or any other hazards defined by the NFPA systems.

5.  Do not remove Flammable Liquids Product Suitability Hang Tag to assure proper safety.
6.  Follow ATEX guidelines for potentially explosive atmospheres.

WARNING

A. ELECTRICAL SHOCK HAZARD

Do not service pump or electrical equipment while energized. Electricity can cause personal injury, death or property damage.

1.  Adhere to “Lock Out” and “Tag Out” procedures for electrical equipment.
2.  Before commencing pump service, turn power supply off. 
3.  Keep water away from electrical outlets and electrical devices.
4.  Electrical components must be installed by a qualified electrician toavoid risk of electrocution.

B. ROTATING PARTS HAZARD

Do not service pump while energized. Moving, rotating or reciprocating parts can crush and cut, causing personal injury, death or property 
damage.

1.  Adhere to “Lock Out” and “Tag Out” procedures for electrical equipment.
2.   Before commencing pump service, turn power supply off, turn water supply off, squeeze trigger on gun to relieve system pressure. 
3.   For mobile equipment, be sure engines and hydraulics are turned offand secured to avoid accidental start.
4.  Do not operate with safety guards removed.
5.  Always use safety guards on all belt drives, couplings and shafts.

C. HOT SURFACE HAZARD

Do not touch pump, accessories or drive system while operating and until cool down is complete. Touching hot surface areas of the pump, 
accessories or drive system can cause severe burns or personal injury.

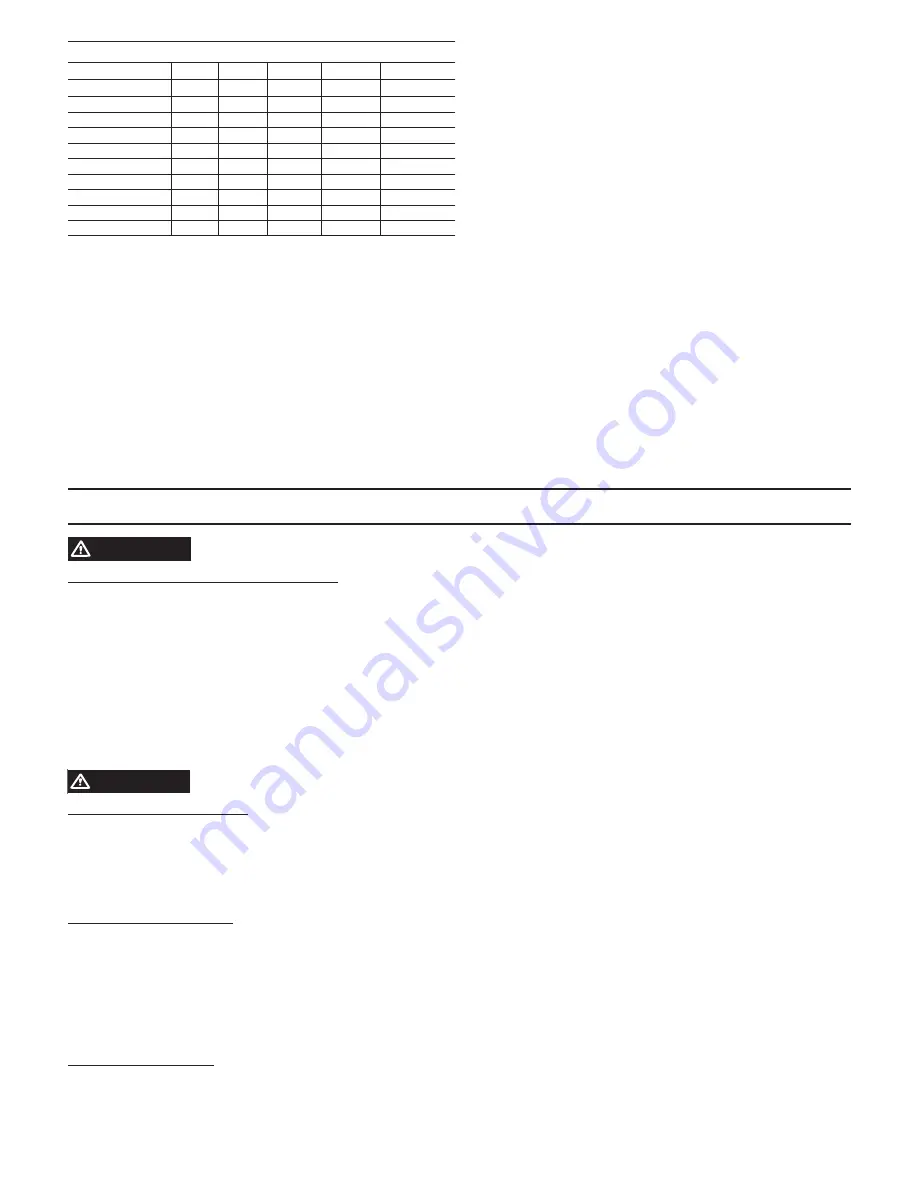
PREVENATIVE MAINTENANCE CHECK-LIST

Check

Daily

Weekly

50 hrs.

500 hrs. * 1,000 hrs. **

Clean Filters

X

Oil Level/Quaility

X

Oil Leaks

X

Water Leaks

X

Plumbing

X

Initial Oil Change

X

Oil Change

X

Seal Change

X

Valve Change

X

Accessories

X

*   If other than Cat Pumps special custom blend, ISO 68 hydraulic oil is used, 

change cycle should be every 300 hours.

**  Each system’s maintenance cycle will be exclusive. If system performance 

decreases, check immediately. If no wear at 1000 hours, check again at 
1500 hours and each 500 hours until wear is observed. Valves typically 
require changing every other seal change.

Duty cycle, temperature, quality of pumped liquid and inlet feed 
conditions all effect the life of pump wear parts and service cycle.

**  Remember to service the regulator at each seal servicing and check all 

system accessories and connections before resuming operation.

GENERAL SAFTEY INFORMATION AND SYMBOLS

Summary of Contents for 1CX Series

Page 1: ...oosen hex valve plug and remove pressure regulator from manifold head NOTE There is no need to separate pressure regulator from hex valve plug 3 Use reverse pliers to remove stacked valve assembly from the valve chamber 4 If the discharge valve assembly separates from the inlet valve assembly use reverse pliers to remove it from the valve chamber IMPORTANTSAFETYINSTRUCTIONS It is the responsibilit...

Page 2: ...ner with deep stepped end over spring and snap onto seat 11 Lubricate and install new o ring onto outside diameter of small inlet seat 12 Place inlet seat on work surface with o ring side down 13 Place valve onto seat with concave side down then spring on valve 14 Install tall spring retainer with deep stepped end over spring and snap onto seat 15 Snap discharge valve assembly onto inlet valve ass...

Page 3: ...rod and remove 3 Remove the ceramic plunger and seal washer from plunger retainer Reassembly 1 Visually inspect the crankcase oil seal for deterioration or leaks Contact Cat Pumps for assistance with replacement See SERVICING THE CRANKCASE 2 Examine seal washer and replace if cut or worn 3 Examine plunger retainer for damaged threads and replace as needed 4 Install new seal washer onto plunger ret...

Page 4: ... are registered trademarks of Henkel Corporation REMOVING PUMP FROM MOTOR NOTE DO NOT remove three 3 HSH screws M6 x 14 that fasten pump crankcase to bearing cover Leakage of crankcase oil will result 1 Remove four 4 HSH screws M6 x 16 that mount the bearing cover to the motor 2 Remove pump bearing cover from motor NOTE If pump does not separate from motor then continue with steps 3 to 5 3 Ensure ...

Page 5: ...of electrocution B ROTATINGPARTSHAZARD Donotservicepumpwhileenergized Moving rotatingorreciprocatingpartscancrushandcut causingpersonalinjury deathorproperty damage 1 Adhere to Lock Out and Tag Out procedures for electrical equipment 2 Before commencing pump service turn power supply off turn water supply off squeeze trigger on gun to relieve system pressure 3 For mobile equipment be sure engines ...

Page 6: ...umbing before operation G OXYGENHAZARD DonotchargePrrrrr O Lators PulsationDampeners withoxygen Oxygenmaycauseanexplosion causingpersonalinjury deathorpropertydamage 1 Use nitrogen only when charging pulsation dampeners DO NOT USE OXYGEN 2 Use proper charging tools to charge pulsation dampeners 3 Charge pulsation dampener within specifications stated on data sheet to assure proper pulsation dampen...

Page 7: ...shaftinreversedirectionmaynotprovideproperlubricationand mayresultindamagetothedrive endcomponents 1 Forward rotation is the top of the crankshaft turning towards the manifold head of the pump 2 Ensure oil is filled to the center red dot on sight gauge for forward rotation 3 Ensure oil is filled to slightly above center red dot on sight gauge for reverse rotation C BELTTENSIONHAZARD Donotoperatepu...

Page 8: ...Tighten filler cap Fill crankcase to specified capacity Pump runs extremely rough Inlet conditions Restricted inlet or air entering the inlet plumbing Correct inlet size plumbing Check for air tight seal Pump valves Stuck inlet discharge valves Clean out foreign material or install new valve kit Pump seals Leaking Hi Pressure or Lo Pressure seals Install new seal kit Increase frequency of service ...

Reviews: