background image

15

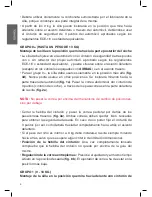
IMPORTANT:

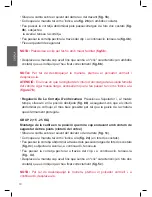
 Press the clip to make it easier (

fig. 5b

).

• Push the handle down until you hear a “click” sound (in both sides) (

fig. 6b

).

NOTE:

 To unlock the handle press the release red lever and move the handle 

upwards.

WARNING:

 In case the female buckle anchorage belt is too long, we suggest to 

pass it through as shown in 

figure 7b

.

• Adjustment of the crotch strap:

 Press the adjuster and at the same time place 

it into the desired position (

fig. 8b

), so that the pelvis is firmly engaged.

GROUP 2 (15 - 25 KGS)

fitting of autoplay in forward-facing position with a three-point safety belt 

(car seat belt)

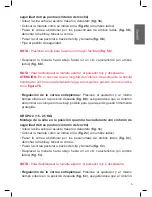
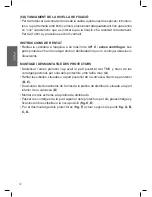
• Fit the child seat on the front or rear seat of the car (

fig. 1c

).

• Move the handle upwards as shown in (

fig. 2c

) (in both sides).

• Pass the waist strap through the guides in both sides (

fig. 3c

), fasten the buckle 

and tighten

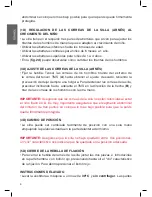
• Pass the chest strap through the lock -off clip (

fig. 4c

) and tighten the belt.

• Push the handle down until you hear a “click” sound (in both sides) (

fig. 5c

).

NOTE:

 To unlock the handle press the release red lever and move the handle 

upwards.

• Adjustment  of  the  crotch  strap: 

press  the  adjuster  and  at  the  same  time 

place it into the desired position (

fig. 6c

), so that the pelvis is firmly engaged.

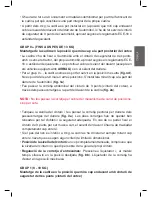
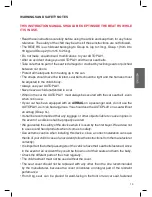
(1D) HARNESS ADJUSTMENT TO CHILD GROWTH

• The  AUTOPLAY  has  in  the  seat    back    three    sets  of  slots  for  adjustment  of 

shoulder straps as your child grows.

• Use lower slots up to 6 months of age.

• Use middle slots for children  from 6  months  to 1 year.

• Use upper slots for children  from  1  to  4  years.

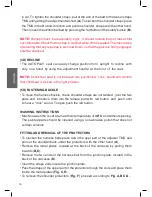
• See in (

fig. 2d

) how to change shoulder straps.

(3D) HARNESS ADJUSTMENT

• It is recommended to adjust harness length to child size before fitting the child seat 

Summary of Contents for beat rs

Page 1: ...nt 17 DEUTSCH ANWENDUNGSHINWEISE Behalten sie sie f r zuk nftige nachfragen auf Lesen sie aufmerksam 22 ITALIANO ISTRUZIONI PER L USO Leggere attentamente e conservare per future referenze 27 PORTUGU...

Page 2: ...1 2 3 press B A 2 1 1 2 1c 2c 3c 4c 5c 1 2 6c...

Page 3: ...A B C E F D...

Page 4: ...ormen versehen sind NOTA Atto solo per essere usato nella serie di veicoli equipaggiati di cintura di sicurezza a tre punti con o senza riavvolgente approvata dalla UN ECE 16 o standard equivalenti AT...

Page 5: ...deje al ni o desatendido en el interior del veh culo La silla de seguridad debe seguir fijada con los cinturones aunque el ni o no viaje en ella en caso contrario deber retirarse del interior del veh...

Page 6: ...o hacia la parte trasera del autom vil fig 1a Pasar la correa abdominal del cintur n de 3 puntos cintur n del coche a trav s de los pasacorreas en la parte delantera de la silla fig 2a NOTA No pasar l...

Page 7: ...egulacion de la correa entrepiernas Presione el ajustador y al mismo tiempo sit elo en la posici n deseada fig 8b asegur ndose que el cintur n abdominal se coloque lo m s bajo posible para que la pelv...

Page 8: ...presionar inclinando hacia adelante el TMS en la direcci n de la flecha B y tirar de las correas de los hombros con la otra mano IMPORTANTE Aseg rese que las correas de la silla no est n retorcidas a...

Page 9: ...no A Retirar las hebillas situadas en la parte posterior de la carcasa tirando de ellas hacia el interior B C Desmontar los dos extremos del arn s de la pletina de distribuci n situada en la parte inf...

Page 10: ...eu mai el nen desat s a l interior del vehicle La cadira de seguretat ha d estar fixada amb els cinturons encara que el nen no viatgi dins seu en cas contrari s haur de retirar la cadira de l interior...

Page 11: ...re de l autom bil fig 1a Feu passar la corretja abdominal del cintur de 3 punts cintur del cotxe a trav s dels passacorretges a la part del davant de la cadira fig 2a NOTA No feu passar la corretja pe...

Page 12: ...com s indica a la figura 7b Regulaci De La Corretja D entrecames Pressioneu l ajustador i al mateix temps situeu lo en la posici desitjada fig 8b assegurant vos que el cintur abdominal es col loqui el...

Page 13: ...RRETGES DE LA CADIRA ARN S Fixeu la sivella Tenseu les corretges de les espatlles estirant de l extrem de la corretja del tensor TMS A fins a obtenir l ajust desitjat tenint la precauci de deixar semp...

Page 14: ...que no contingui abrasius ni dissolvents MUNTAGE I DESMUNTATGE DES PROTECTORS Destensar l arn s prement cap avall la part posterior del TMS y tirant de les corretges pectorals per sota dels protectors...

Page 15: ...been equipped with an airbag on a passenger seat do not use the AUTOPLAY as it can be dangerous You should use the AUTOPLAY on a seat without an airbag Group 0 It shall be recommended that any luggag...

Page 16: ...seat fig 3a Both straps must be tightened to ensure maximum safety If the 3 point belt is too short and the buckle cannot be fastened move the seat back as required Before installing the child seat yo...

Page 17: ...the waist strap through the guides in both sides fig 3c fasten the buckle and tighten Pass the chest strap through the lock off clip fig 4c and tighten the belt Push the handle down until you hear a...

Page 18: ...the right position 5D FASTENING BUCKLE To close the harness buckle check shoulder straps are not twisted joint the two parts and introduce them into the female part with red button and push until to h...

Page 19: ...fant seul dans la voiture Si votre v hicule est quip d un Airbag l avant ne placez en aucun cas le AUTOPLAY sur le si ge avant du passager Ceci pourrait tre tr s dangereux Dans ce cas vous pouvez bien...

Page 20: ...roie pectorale par derri re la fentes post rieures fig 3a Les deux courroies doivent tre bien tendues pour tre suffisamment s res Si la ceinture 3 points devait tre trop courte il suffit de reculer le...

Page 21: ...ure a trois points ceinture du v hicule Placez le si ge auto sur le si ge arri re ou le si ge du passager fig 1c Placer la manette comme il est indiqu sur la fig 2c dans les deux c t s Faire passer la...

Page 22: ...dominale soit positionn e le plus bas possible pour une protection ad quate du bassin 4D CHANGEMENT DE POSITION Le si ge AUTOPLAY peut changer facilement de position d une seule main en poussant la ma...

Page 23: ...is de la plaque de distribution situ e dans la partie inf rieure de la carcasse D Monter les deux extr mit s sur la plaque de distribution Passer les sangles de la partie sup rieure des protecteurs da...

Page 24: ...hr Kind nie unbeaufsichtigt im Auto Die B nder d rfen sich nie verdrehen der Sicherheitsgurt muss gespannt sein und der Leibgurt sich an den K rper des Kindes anpassen Der AUTOPLAY ist auf Sitzen ohne...

Page 25: ...nen verwenden Stellen Sie den Kindersicherheits Autositz entweder auf den Beifahrersitz oder auf den R cksitz entgegen der Fahrtrichtung Abb 1a F hren Sie den Beckengurt des 3 Punkt Sicherheitsgurtes...

Page 26: ...an Achtung Falls die Gurte Mutterteil zu lange sind ampfehlen wir ihnen diese wie auf der Abbildung 7b zu befestigen L ngeneinstellung der beinlasche Dr cken Sie auf den Anpasser und bringen Sie ihn g...

Page 27: ...indem Sie die Gurteinstellertaste B nach hinten dr cken und gleichzeitig mit der anderen Hand den Schultergurt herausziehen Legen Sie das Gurtsystem dem Kind an Schlie en Sie das Gurtschlo Ziehen Sie...

Page 28: ...Sie die dreizackigen Schnallen die sich im oberen Bereich der Schale befinden indem Sie sie nach innen ziehen Abb B C Montieren Sie die beiden Extreme der Haltegurte der Verteilerplatine ab die sich...

Page 29: ...i il vostro bambino in custodito nella macchina Nel caso l automobile sia equipaggiata di un airbag lato passeggero NON utilizzare il AUTOPLAY su questo sedile per escludere ogni rischio Gruppo 0 Il s...

Page 30: ...ella cintura a 3 punti nelle fessure situate sulla parte anteriore del seggiolino fig 2a ATTENZIONE Far passare la cinghia sotto il meccanismo di cambio di posizioni non sopra Chiudere la fibbia della...

Page 31: ...l aggiustatore ed allo stesso tempo lo sistema nella posizione desiderata fig 8b deve collocarsi la cintura abdominale il pi basso possible per proteggere la pelvis GRUPPO 2 15 25 KGS Montaggio dell...

Page 32: ...avanti il TMS nella direzion della saetta e tirare dalle cinghie a bandoliera con l altra mano Poi slentare la cintura addominale premendo il tenditore della fibbia di sicurezza B Accertarsi che le ci...

Page 33: ...ghie pettorali al di sotto dei protettori con l altra mano A Togliere le fibbie situate nella parte posteriore della carcassa tirandole verso l interno B C Smontare le due estremit delle cinghie della...

Page 34: ...a sozinha no interior do ve colo Se o carro estiver apetrechado com AIR BAG saco de ar n o deve instalar se a cadeira no assento de frente GRUPO 0 Se utilizar o autom vel com a AUTOPLAY livre dever le...

Page 35: ...passar a correia peitoral por detr s das fendas traseiras fig 3a As duas correias devem ficar bem tensadas para obter a seguran a adequada No caso de n o poder fechar o cinto de 3 pontos por ser curt...

Page 36: ...car a manete tal e como se indica na fig 2c de ambos os lados Passar a correia abdominal pelas fendas de ambos os lados fig 3c fechar a fivela e esticar o cinto Passar a correia pectoral atrav s do cl...

Page 37: ...ombros unir as duas pe as e introduzi las na parte f mea com o bot o vermelho pressionando at ouvir o clique caracter stico da fixa o Para abrir a fivela pressionar o bot o vermelho INSTRU ES DE LAVAD...

Page 38: ...a nikdy nenech vejte d t bez dozoru uvnit vozidla Autoseda ka mus b t p ipout na p sy i kdy v n d t nesed v opa n m p pad ji odmontujte z vozidla V p pad pou it autoseda ky instalovan proti sm ru j z...

Page 39: ...hovat p s nad polohovac m mechanismem n br pod n m Zapnout p ezku p su a p et hnout hrudn p s za bo n mi chyty p s obr 3a Pro zaji t n bezpe nosti mus b t oba p sy dn napnuty V p pad e je t bodov bezp...

Page 40: ...p s automobilu Polo te autoseda ku na zadn nebo p edn sedadlo obr 1c Um st te oto nou p ku dle obr zku obr 2c z obou stran Prot hn te bedern p sek p es chyty po obou stran ch obr 3c zapn te p ezku a...

Page 41: ...IT Ujist te se e autoseda ka nen mezi dv ma polohami P i nastaven do po adovan polohy usly te cvaknut 5D ZACVAKNUT FIXA N P EZKY Pro zacvaknut fixa n p ezky postroje autoseda ky je nutn d t oba d ly k...

Page 42: ...e v dy aj pri kr tkych vzdialenostiach a nikdy nenechajte die a bez dozoru vo vn tri vozidla Seda ka mus by pripevnen p smi aj ke v nej die a necestuje V opa nom pr pade sa mus vybra z vn tra auta V p...

Page 43: ...stavovanie polohy ale pod n m Zapnite p s a prevle te hrudn as p su cez chytky na zadnej strane seda ky obr zok 3a Obe asti p su musia by dobre napnut aby bola zabezpe en adekv tna bezpe nos Ak nem et...

Page 44: ...2c na oboch stran ch Prevle te bru n as p su chytkami na oboch stran ch obr zok 3c zapnite sponu p su a napnite ho Prevle te hrudn as p su cez sponu a napnite p s obr zok 4c Potla te p ku smerom nado...

Page 45: ...e nastaven v spr vnej poz cii 5D UZAVRETIE UPEV OVACEJ SPONY Spony na p soch uzavriete tak e spoj te obe asti a vlo te ich do proti ahlej asti spony s erven m gomb kom Zatla te a k m nepo ujete klik Z...

Page 46: ...mek l st akkor is az vekkel kell r gz teni ha a gyermek nem utazok benne ellenkez esetben a g pkocsib l ki kell venni Amennyiben a term ket h trafel n zve haszn lja 0 0 Csoport akkor kapcsolja ki az e...

Page 47: ...k feszesnek kell lennie a megfelel biztons g rdek ben Amennyiben nem tudja r gz teni a h rompontos biztons gi vvel annak r vids ge miatt az els l st teljesen h tra kell tolni Ha a gyermek s ly nem ri...

Page 48: ...okat mindk t oldalon az vvezet k n 3c bra kapcsolja be a csatot s h zza meg az vet Vezesse t a hasi vet a kapcson s fesz tse meg 4c bra Nyomja le a foganty t am g egy jellegzetes klikk hangot nem hall...

Page 49: ...gzetes klikk hang jelzi hogy a megfelel helyzetben van 5D A R GZ T CSAT BEKAPCSOL SA A gyerek l s heveder r gz t csatj nak bekapcsol s hoz fogja ssze annak k t r sz t s illessze bele a piros gombos r...

Page 50: ...Nigdy nie nale y pozostawia dziecka bez nadzoru wewn trz samochodu Fotelik powinien by przypi ty pasami bezpiecze stwa nawet wtedy gdy nie siedzi w nim dziecko W przeciwnym razie fotelik nale y wyci...

Page 51: ...by stosowany w innych pozycjach Fotelik powinien by zwr cony w kierunku odwrotnym do kierunku jazdy rys 1a Przeci gn cz biodrow 3 punktowego pasa bezpiecze stwa samochodu przez uchwyty na pas umieszcz...

Page 52: ...przesun wciskaj c czerwony przycisk UWAGA W przypadku gdyby pas mocuj cy z klamr e sk by zbyt d ugi zalecamy przeprowadzi go tak jak przedstawiono na rys 7b Regulacja pasa krokowego Wci nij regulator...

Page 53: ...S W FOTELIKA SZELEK Zapnij zamek uprz y Napnij pasy barkowe poci gaj c za pas napinaj cy TMS A do momentu uzyskania optymalnego napi cia pami taj c jednak o tym aby zbytnio nie cisn dziecka Aby poluzo...

Page 54: ...TA I DEMONTA OCHRANIACZY Poluzowa pasy uprz y jedn r k naciskaj c tyln cz systemu napinania pas w TMS i drug r k poci gaj c za pasy barkowe poni ej ochraniaczy A Wyci gn klamry umieszczone w tylnej cz...

Reviews: