background image

Learning to Play by Playing (For Synthesizer Novices)

E-17

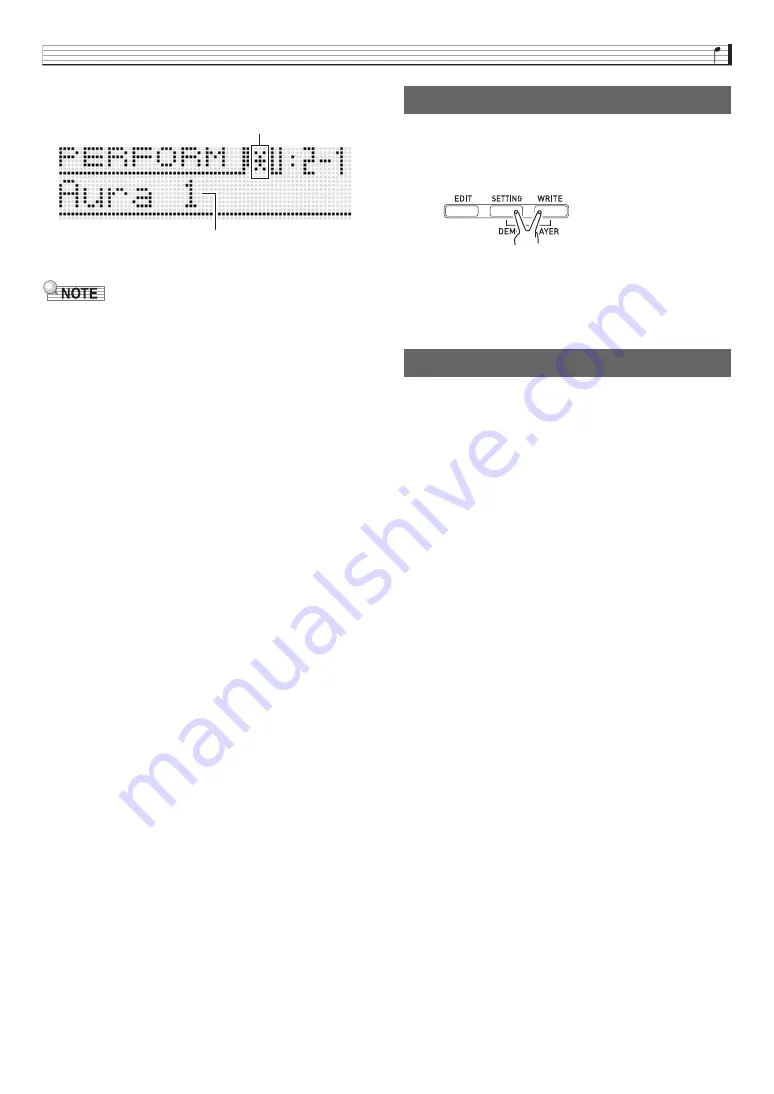
Example: To save the performance to User Bank 2, 

Performance 1

• The edits pending indicator ( ! ) and edits saved indicator 

(

*

) are also used in other modes where data is edited and 

saved (tones, Step Sequencer, etc.)

When you want to perform the song “Aura Lee”, simply recall 
User Performance 2-1 to instantly configure the Synthesizer 
with the four tones you registered above. Try recalling a 
different Performance number and then recall User 
Performance 2-1.

In addition to keyboard tones, you also can register a variety 
of other settings as Performance data. An effective way to use 
banks would be as song-specific banks. For example, Bank 2 
for “Aura Lee”, Bank 3 for another song, etc. For more 
information, see “Using the Performance Mode” on page 
E-62.

Use the procedure below to play a built-in demo song that 
shows off the full versatility of the Synthesizer.

Press 

7

 SETTING

 and 

7

 WRITE

 at the same time.

Next, press 

bq

 ENTER

. This will start demo tune play.

• Use the 

bq


minus (–) and plus (+) buttons

 to select a 

different tune, and 

bk

 START/STOP

 to stop demo tune 

play. For more information, see page E-72.

Tone number and other settings you configure on the 
Synthesizer are retained even when you turn power off. For 
information about returning the Synthesizer to the initial 
factory default settings that are in effect when you purchase it, 
see “Initializing Synthesizer Global Settings and Data” on 
E-71.

This completes the section for synthesizer novices. See the 
other sections of this manual for detailed information about 
the topics covered briefly in this section. Take your time and 
don’t rush, making sure you fully understand as you go along. 
If you have problems with any of the terms used in this 
manual, you can find more information by searching on the 
Web or by consulting a reference book about synthesizers or 
electronic music.

Soon you will be well on your way enjoying 
the full potential of sound creation!

Edits saved indicator

Name indicating “Aura Lee” performance data

Playing a Built-in Demo Song

7

Conclusion

Summary of Contents for XW-P1

Page 1: ...Safety Precautions Before trying to use the instrument be sure to read the separate Safety Precautions E XWP1 E 1B XW P1 USER S GUIDE Please keep all information for future reference...

Page 2: ...ce by one or more of the following measures Reorient or relocate the receiving antenna Increase the separation between the equipment and receiver Connect the equipment into an outlet on a circuit diff...

Page 3: ...ct the AC adaptor before cleaning the product This mark applies in EU countries only Manufacturer CASIO COMPUTER CO LTD 6 2 Hon machi 1 chome Shibuya ku Tokyo 151 8543 Japan Responsible within the Eur...

Page 4: ...es Parameters E 33 Editable Drum PCM Tone Parameters E 34 Controlling Sounds E 35 Using a Pedal E 35 Using the Wheels Bender Modulation E 35 Using the Assignable Knobs E 35 Using Sliders E 36 Using th...

Page 5: ...d Recalling Performances E 62 To register a performance E 62 To recall a performance E 63 Editable Performance Parameter List E 64 Other Useful Functions E 67 Using the Mixer E 67 Instant Adjustment o...

Page 6: ...E 79 Saving and Loading Synthesizer Data to a Computer and Editing Synthesizer Data on a Computer E 80 Reference E 81 Error Messages E 81 Troubleshooting E 82 Specifications E 84 Operating Precaution...

Page 7: ...ed to drawbar organ tones and the parts assigned to the sliders 5 Page E 32 3 Use these knobs to adjust attack decay and other sound parameters Page E 35 4 Use these buttons with the step sequencer to...

Page 8: ...part for editing with the step sequencer or mixer Page E 51 E 67 bk Use these buttons to select a step for step sequencer playback or editing Page E 51 bl Use these buttons to select a tone category...

Page 9: ...the minus and plus buttons to change a displayed value Press the MENU button to display a menu of options for the operation you are currently performing Page E 21 br Use these keys for one touch alter...

Page 10: ...vice for sound output bt Back left ck Back right Connections Memory card page E 73 Computer page E 79 Other electronic music instrument page E 69 1 2 3 5 6 7 4 1 Standard plug monaural 2 Stereo standa...

Page 11: ...ice Use a commercially available connecting cord to connect the output terminal stereo of a CD player or portable audio player to the Synthesizer 4 4 Input external sound using a microphone Connect a...

Page 12: ...turn on power Low Battery Indication The following shows the approximate battery life Approximately 35 hours alkaline batteries using the optional CASIO CP 16 headphones Using a high volume setting pl...

Page 13: ...nds like Tones are divided among eight categories Use the bl buttons to select the category you want For more information see page E 20 Playing with Built in Tones 6 7 Performance Mode Performance Mod...

Page 14: ...e are a total of 10 Solo Synthesizer tone banks numbered 0 through 9 with 10 tones in each bank for a total of 100 Solo Synthesizer tones You can quickly select a bank and a tone number by rotating th...

Page 15: ...ough the letters or toggles between the settings assigned to it For information about what types of characters are supported see page E 91 You also can use the bq minus and plus buttons or the bo dial...

Page 16: ...O until the screen shown below appears on the display Now perform the same procedure as you did when selecting a preset tone to select a preset type and then play it For details about arpeggios see So...

Page 17: ...ery for very complex rhythms You can find out which parts are outputting sound at any time by checking the level meter on the Synthesizer s display As the sequence plays back the 4 buttons 1 to 16 con...

Page 18: ...Tone Mode which you can use for simple Performance editing If the pointer e on the display is not under 1 use the 9 PART minus and plus buttons to move it to 1 After ensuring that the pointer e is loc...

Page 19: ...at the same time Next press bq ENTER This will start demo tune play Use the bq minus and plus buttons to select a different tune and bk START STOP to stop demo tune play For more information see page...

Page 20: ...spond to a zone is called zone parts For example if you select a tone with Synthesizer Zone 2 that tone can be the part that corresponds to both the internal sound source Zone Part 2 or MIDI Channel 2...

Page 21: ...Tones E 19 Zone Part 1 Zone Part 2 Zone Part 3 Zone Part 4 MIDI Channel 1 MIDI Channel 2 MIDI Channel 3 MIDI Channel 4 Zone 1 settings Zone 2 settings Zone 3 settings Zone 4 settings Built in sound s...

Page 22: ...the bqminus and plus buttons at the same time will jump to the first tone in the current selected category see next section Tone Category Overview See the separate Appendix for a complete list of tone...

Page 23: ...g list The edits pending indicator on the display indicates that there are pending edits that have not been saved yet Your edits will be lost if you change to another operation without saving them Adv...

Page 24: ...velope Generator Editable Solo Synthesizer Tone Parameters MIC IN INST IN 1 Synth OSC1 Block EG EG EG Synth OSC Filter Amp 2 Synth OSC2 Block 3 PCM OSC1 Block EG EG EG PCM OSC Filter Amp 4 PCM OSC2 Bl...

Page 25: ...k Instead of an oscillator this block creates sound based on sound input through the Synthesizer s ck MIC IN and INST IN jacks The pitch change range of sound produced by this block is limited 6 Noise...

Page 26: ...2 only PCM Wave Blocks 3 and 4 only Synth wave PCM wave Selects the base wave for a sound generated by the synth OSC or PCM OSC A wave whose name is displayed with L or B next to it will sound at a pi...

Page 27: ...lope Selecting a setting from 1 4U to 4U resets to the timing of the back beat Off 1 4 1 3 1 2 2 3 1 3 2 2 3 4 1 4U 1 3U 1 2U 2 3U 1U 3 2U 2U 3U 4U Ext Trig Block 5 only External trigger When on the e...

Page 28: ...Envelope depth Specifies how the envelope shown below is applied 64 to 0 to 63 Envelope Ent Filter envelope Group of editable envelope Envelope Generator parameters applied to filters For details abou...

Page 29: ...in the vicinity of the cut off frequency to alter the tone 0 to 127 TouchSense V Touch sense Specifies the degree of change in the filter in accordance with change in keyboard playing touch 64 to 0 to...

Page 30: ...h LFO2 only Synced with LFO1 Refer to the cell to the left Rate V Rate Specifies the LFO speed frequency This setting is enabled when the above Sync setting is off 0 to 127 Clk Sync Clock sync Specifi...

Page 31: ...Velocity value of MIDI note on message Ch Pressure MIDI channel after touch Bend Up Upward operation from bs BENDER center Bend Down Downward operation from bs BENDER center Modulation bs MODULATION...

Page 32: ...to 0 to 255 Cutoff Cutoff frequency Specifies the cut off frequency of the layered tone 128 to 0 to 127 TouchSense Touch sense Specifies the degree of change in volume in accordance with change in ke...

Page 33: ...aveType Wave type Specifies a wave type to be used for LFO The details of the selectable waves are the same as those for WaveType of Block 8 LFO1 and Block 9 LFO2 Editable Parameters page E 28 Sin Tri...

Page 34: ...foot drawbar 0 to 8 Ft1 3 5 1 and 3 5 feet Specifies the pull out amount of the 1 3 5 foot drawbar 0 to 8 Ft1 1 3 1 and 1 3 feet Specifies the pull out amount of the 1 1 3 foot drawbar 0 to 8 Ft1 1 f...

Page 35: ...Atk Time Attack time Specifies the time it takes to reach peak value from note on 64 to 0 to 63 Rls Time Release time Specifies the time it takes for a sustained sound to decay after a key is released...

Page 36: ...tone Inst Number Use the 9 PART minus and plus buttons to select the range you want to edit Inst Number Instrument number Selects the drum tone wave assigned to each velocity range See the separate Ap...

Page 37: ...Part 1 tone category Solo Synthesizer tones page E 24 Hex layer tones page E 30 Drawbar organ tones page E 32 PCM melody tones page E 33 PCM drum tones page E 34 The above functions show the abbrevia...

Page 38: ...rmation about fine tuning the pitch in hertz steps Tuning see page E 69 1 To change the pitch in semitone steps hold down br TRANSPOSE as you press the br OCTAVE minus or plus button The setting range...

Page 39: ...DSP effects help to enhance the sound of tones For example distortion can be applied to an electric guitar sound to make it sound more powerful There are 46 different Normal DSP types and the most ap...

Page 40: ...You can select from among preset and user tones for the Normal DSP using the same procedures as those for tone selection For a list of preset Normal DSPs see the separate Appendix Selecting ton applie...

Page 41: ...een from the Normal DSP selection screen page E 38 by pressing 7 EDIT 2 Use the bo dial to select a DSP type number 3 Use the same operation as these for tone editing page E 21 to select and configure...

Page 42: ...on press bm ARPEGGIO again To stop arpeggio HOLD playback press bm ARPEGGIO or change the HOLD function in step 2 of the above procedure to OFF You can use the arpeggio type selection screen to select...

Page 43: ...nge the TYPE NOTE and VELO settings You can also use the 4 1 to 16 buttons to toggle each step on or off While TYPE is selected use the bq minus and plus buttons to turn the TYPE setting on or off You...

Page 44: ...r of keys pressed is less than the number of configured type U settings i e if you press only three keyboard keys for an arpeggio pattern that includes settings for U1 through U6 the arpeggio pattern...

Page 45: ...on the display 2 From among the preset or user arpeggio types select the arpeggio type you want to clear The procedure for selecting an arpeggio type is the same as that for selecting a tone page E 2...

Page 46: ...y Play 1 Hold down bn KEY PLAY until the preset phrase selection screen shown below appears on the display 2 Select the number of the phrase you want to play To select a phrase number perform the same...

Page 47: ...under To change the tempo using the TEMPO buttons page E 45 to make fine adjustments 1 Hold down bn KEY PLAY until the phrase selection screen appears on the display 2 Hold down 7EDIT until bnKEY PLA...

Page 48: ...ting 2 Recording will start when you press the bn REC or when you start to play by performing a pedal knob or wheel operation or play something on keyboard bn REC will light when recording starts 3 Wh...

Page 49: ...tone page E 20 2 Press bn REC This will cause bn REC to flash If NEW is displayed as the Rec Mode setting use the bq minus and plus buttons to change it to OVDB overdubbing This will enter the overdu...

Page 50: ...of the procedure under To play back a preset while an exclamation point is appended to the currently selected phrase number indicating that it is an unsaved user phrase the unsaved user phrase will b...

Page 51: ...rns can be chained together with the Step Sequencer and played back as a loop You can store up to 100 chained sequences Phrase Sequencer playback can be started from the Step Sequencer The following d...

Page 52: ...m 3 Drum 4 Drum 5 Bass Solo 1 Solo 2 Chords Control 1 Control 2 Control 3 Control 4 Beat Sliders page E 52 Master Slider page E 53 Mixer page E 67 Part page E 49 Patterns 1 through 8 page E 49 Note Pa...

Page 53: ...g measure To cancel the stop standby operation described above press the flashing button again 3 If you want to change to a different sequence enter the Step Sequencer Mode and change the sequence ban...

Page 54: ...g Release 1 STEP SEQUENCER and the button lights will go out Even though the button lights go out the notes in the group remain tied To check which steps are tied hold down 1 STEP SEQUENCER and then p...

Page 55: ...QUENCER 2 Hold down 2 FUNC A B until the SLIDER screen shown below appears 3 Use the 9PART minus and plus buttons to select the part whose slider assignments you want to change 4 Press 2 FUNC A B to s...

Page 56: ...n press bq ENTER 3 Input data as described below While sequence playback is in progress Press keyboard keys and perform other operations as required according to the timing of playback While sequence...

Page 57: ...essary if you already pressed 7 EDIT and are already editing a step sequence 2 Press bm MIXER 3 Hold down the button 4 9 to 16 note part buttons that corresponds to the part you want to solo To cancel...

Page 58: ...e setting cannot be selected for Step 1 Off When on NOTE C to G9 When on VELO 1 to 127 Tie Chrd NOTE VELO Selects off OFF on NOTE or tie TIE for a step When on note NOTE and velocity VELOCITY paramete...

Page 59: ...Playback performed with length based on actual percentage Short When step length is changed by Groove adjusts to the shorter length Ctrl Ch Control part only Control Channel Specifies the channel that...

Page 60: ...fies a part to be shifted Dr1 to 5 Bas Sl1 and 2 Chd Clear Ent Track data clear Track Pattern Part Selects a pattern and or part inside a track Pattern 01 to 16 Part Drm1 to 5 Bass Sol1 and 2 Chrd Ctl...

Page 61: ...items available on the screen are described below Copy Copies settings from another slider Use the bq cursor U q w I buttons to move the brackets to an item and then use the bq minus and plus buttons...

Page 62: ...ck or END to end chain playback You can use bk DELETE to delete part of a chain You also can insert part of a chain by pressing bk INSERT To check the currently selected pattern press bk CHAIN and the...

Page 63: ...e to appear on the display 5 Press bq YES The message Complete will appear on the display when initialization is complete Before performing the following procedure insert a memory card into the Synthe...

Page 64: ...ll display the top screen of the performance editing list 4 Select items and change settings on the screen using the same procedures as those used when selecting a tone For details about editing see E...

Page 65: ...up of the Editable Performance Parameter List page E 64 Off On Arpeggio Arpeggio on off Turning on this setting filters out Arpeggio items contained in the Sequencer Parameter group of the Editable Pe...

Page 66: ...pecifies the high range of the keyboard for each zone This setting is used in combination with the Key Range Lo setting to configure key ranges for each zone C 1 to G9 Volume Volume This setting is th...

Page 67: ...hrase Sequencer phrase playback Phrase Record Phrase REC Same function as the Phrase Sequencer bn REC button Rotary Slow Fast Rotary S F Pressing the pedal performs the same operation as drawbar organ...

Page 68: ...nge where Phrase Sequencer key play is effective page E 45 This setting is used in combination with the Phrase Key Range Lo setting to specify the keyboard range where key play is enabled C 1 to G9 Ef...

Page 69: ...instant changes in mixer settings 1 Press bm MIXER This displays the mixer screen 2 Use the 2 KEY SHIFT FUNC A B and 1 8 9 16 buttons to change the part assigned to the 5 1 9 to MASTER sliders Each pr...

Page 70: ...64 to 0 to 63 CoarseTune Part coarse tune Shifts the pitch of notes by semitone units 12 to 0 to 12 FineTune Part fine tune Shifts the pitch of notes by cent units 99 to 0 to 99 BendRange Part bend ra...

Page 71: ...ur Synthesizer and another electronic musical instrument for exchange of MIDI data page E 8 For information about connecting a computer see page E 79 For information about the relationship between eac...

Page 72: ...eyboard Keyboard and other Synthesizer operations MIDI MIDI IN Messages input via bt MIDI IN Refer to the cell to the left MIDI In MIDI IN on off MIDI IN enable While this setting is turned on message...

Page 73: ...n 5 In response to the Sure message that appears press the bq YES button to delete or the bq NO button to cancel You can use the procedure below to initialize Synthesizer global settings and data and...

Page 74: ...This stops playback and exits the playback screen You also can stop playback by pressing the 7 SETTING and WRITE buttons at the same time or by pressing bq EXIT Never touch the memory card loaded in...

Page 75: ...m a computer to the Synthesizer For more information see Connecting to a Computer page E 79 7 bm bo bq 3 bk Supported Data Types Data Type Description File Name Extension User performances page E 62 P...

Page 76: ...rd appears on the display it means there is no memory card in the card slot For details about what appears on the display while a card is loaded see Playing a Music File from a Memory Card page E 78 N...

Page 77: ...card perform one of the steps shown below Formatting a Memory Card Saving Synthesizer Data to a Memory Card To save Synthesizer data to a memory card To save this type of data Perform these steps One...

Page 78: ...you want press the bq ENTER button 7 In response to the Sure message that appears press the bq YES button to save or the bq NO button to cancel 1 Press 7 SETTING 2 Use the bq up q and down w buttons...

Page 79: ...tem selection cursor 0 to Card Load or Load if you want to load all data and then press bq ENTER This causes a menu screen like the one shown below to appear on the display The sample screen below sho...

Page 80: ...TER This causes the CARD UTIL screen to appear 4 Use the bq cursor U q w I buttons to move the item selection cursor 0 to Rename and then press the bq ENTER button This displays a screen for specifyin...

Page 81: ...omputer automatically 4 Start up your computer s music software 5 Configure the music software settings to select one of the following as the MIDI device For information about how to select the MIDI d...

Page 82: ...be able to find a link to Data Editor information on the product introduction page of this product If you cannot find such a link use the search form of the area site where you are located to enter t...

Page 83: ...e E 75 2 There is no loadable or playable data in the MUSICDAT folder 2 Move the file you want to load or play into the memory card s MUSICDAT folder Not SMF0 1 You are attempting to play back SMF For...

Page 84: ...few minutes This happens when Auto Power Off page E 10 is triggered Display The display keeps going out or is flashing Replace the batteries with new ones or switch over to AC adaptor power page E 9...

Page 85: ...tings page E 36 There is digital noise mixed with the sound when I play high notes with a Solo Synthesizer tone This is due to system limitations It does not indicate malfunction The reverb of notes s...

Page 86: ...0 user Phrase Functions Preset Phrases 100 User Phrases 100 Playback Mode One time loop Memory Capacity 128KB Other Overdubbing Step Sequencer Functions Preset Sequences 100 User Sequences 100 Number...

Page 87: ...Sensitivity 200mV Mic In jack Standard jack connect a dynamic microphone only Input Impedance 3k Input Sensitivity 10mV Power Jack 9 5V DC Power Supply 2 way Batteries 6 D size zinc carbon batteries...

Page 88: ...adaptor when a malfunction occurs or whenever else you need to do so The AC adaptor is intended for indoor use only Do not use it where it might be exposed to splashing or moisture Do not place any c...

Page 89: ...n 06 Tremolo Tremolo 07 Phaser Phaser 08 Flanger Flanger 09 Chorus Chorus 10 Delay Delay 11 Reflection Reflect 12 Rotary Rotary 13 RingModulator RingMod 14 Lo Fi Lo Fi 15 Wah Compressor WahCmp 16 Wah...

Page 90: ...tion that applies an overtone to the input signal and distorts it Parameters and Value Ranges 1 Gain 0 to 127 Param A Adjusts the input signal gain 2 Level 0 to 127 Param B Adjusts the output level 04...

Page 91: ...for example the delay time is approximately equal to the length of one beat Delay time is not precisely synced with the beat Important When adjusting the delay time and type certain settings can resu...

Page 92: ...steps 2 and 3 above for the right side part of the dual type DSP parameter name Param in the table under step 2 of this procedure are parameters assigned to the 5 8 16 and MASTER sliders when Hex Lay...

Page 93: ...4 5 Param B 5 Tempo Sync Range Off 1 4 1 3 3 8 1 2 2 3 3 4 1 4 3 3 2 2 06 Ring Modulator Parameters and Ranges 1 Frequency Range 0 to 127 Param A Adjusts the modulation frequency of the ring modulator...

Page 94: ...Velocity O 9nH v 1 127 X 9nH v 0 8nH v O 9nH v 1 127 X 9nH v 0 Note ON Note OFF Mode Mode 3 X 0 127 Mode 3 X Default Messages Altered Model XW P1 Version 1 0 0 1 5 6 38 7 10 11 16 19 64 65 Bank select...

Page 95: ...l Time O O X X Clock Commands Mode 1 OMNI ON POLY Mode 3 OMNI OFF POLY Mode 2 OMNI ON MONO Mode 4 OMNI OFF MONO O Yes X No 2 66 67 70 90 91 93 98 99 100 101 Sostenuto Soft pedal Reverb send Chorus sen...

Page 96: ...MA1203 B Printed in China XWP1 E 1B K This recycle mark indicates that the packaging conforms to the environmental protection legislation in Germany...

Reviews: