


V-R100
– 5 –
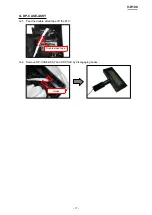
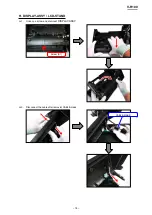
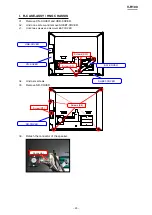
2. DISASSEMBLY
2-1. Cautions
* Please note that the illustrations may differ from actual product due to design changes.
* Please make a back-up copy of the clients’ data before disassembling.
* There are several kinds of screws. Be sure to use the correct type of screws when reassembling. It is
advisable to sort the screws as shown in the below after removing them.
* When disconnecting a connector, do not pull it by its cable. Be sure to hold the connector part.
* Internal battery:
•
Do not disassemble or short-circuit the battery.
• Do not place the battery near a heat source or expose it to direct flame or heat.
•
Place the battery with its (+) and (-) terminals in the correct orientation.
* When assembling, be sure that it is free of dust and other foreign matters. Pay special attention when
replacing the touch panel and LCD.
Summary of Contents for V-R100
Page 1: ...SERVICE MANUAL Ver 3 Aug 2013 V R100 EX 841 OCT 2011 ...
Page 13: ...V R100 10 A 10 Undo three screws and disconnect three ground wires Screw S12 Screws S3 ...
Page 43: ...V R100 40 5 3 PCB E840 1 PCB ...
Page 44: ...V R100 41 E840 E61 PCB E840 E62 PCB E840 IOC PCB ...
Page 45: ...V R100 42 E840 E22 PCB E840 COM PCB E840 ETH PCB E840 E64 PCB E840 E63 PCB E840 PRN PCB ...


