Casio QV-120 Owner'S Manual Download Page 12

45

Playing Back Images

Hiding Protected Memory Pages

This function makes it possible for you to hide protected memory
pages so their images do not appear on the monitor during playback.

To hide protected memory pages

While holding down the [+] button, turn on the camera.

Important!

• You cannot protect or unprotect pages (pages 41~44) while pro-

tected pages are hidden.

• You cannot display multiple images (page 34) while protected

pages are hidden.

• The message “ALL DATA IS PROTECTED!” appears on the moni-

tor when you hide protected memory pages and all pages currently
in memory are protected. It also appears if you delete all unpro-
tected memory pages while protected memory pages are hidden.

To unhide protected memory pages

While holding down the [–] button, turn on the camera.

46

Operation

Deleting Memory Pages

Use  the  procedures  described  in  this  section  to  delete  memory
pages. You can delete individual pages, or all the pages currently
stored in memory.

Warning!

The delete operation cannot be undone!

Before performing any of the procedures described in this section,
make sure that you really do not need the images recorded on the
memory pages you are deleting. Be especially careful when you are
using the all delete operation.

Deleting Images From Memory

• Note that you cannot delete images if they are protected. See page

43 for details on how to unprotect images.

• You cannot delete images from a multi-page display, a display of an

enlarged image, or while Auto Playback is operating.

To delete a single image

1.

Select the Playback Mode and turn on power.

Slide the function switch to the PLAY position.

Slide the POWER switch in the direction indicated by the
arrow.

2.

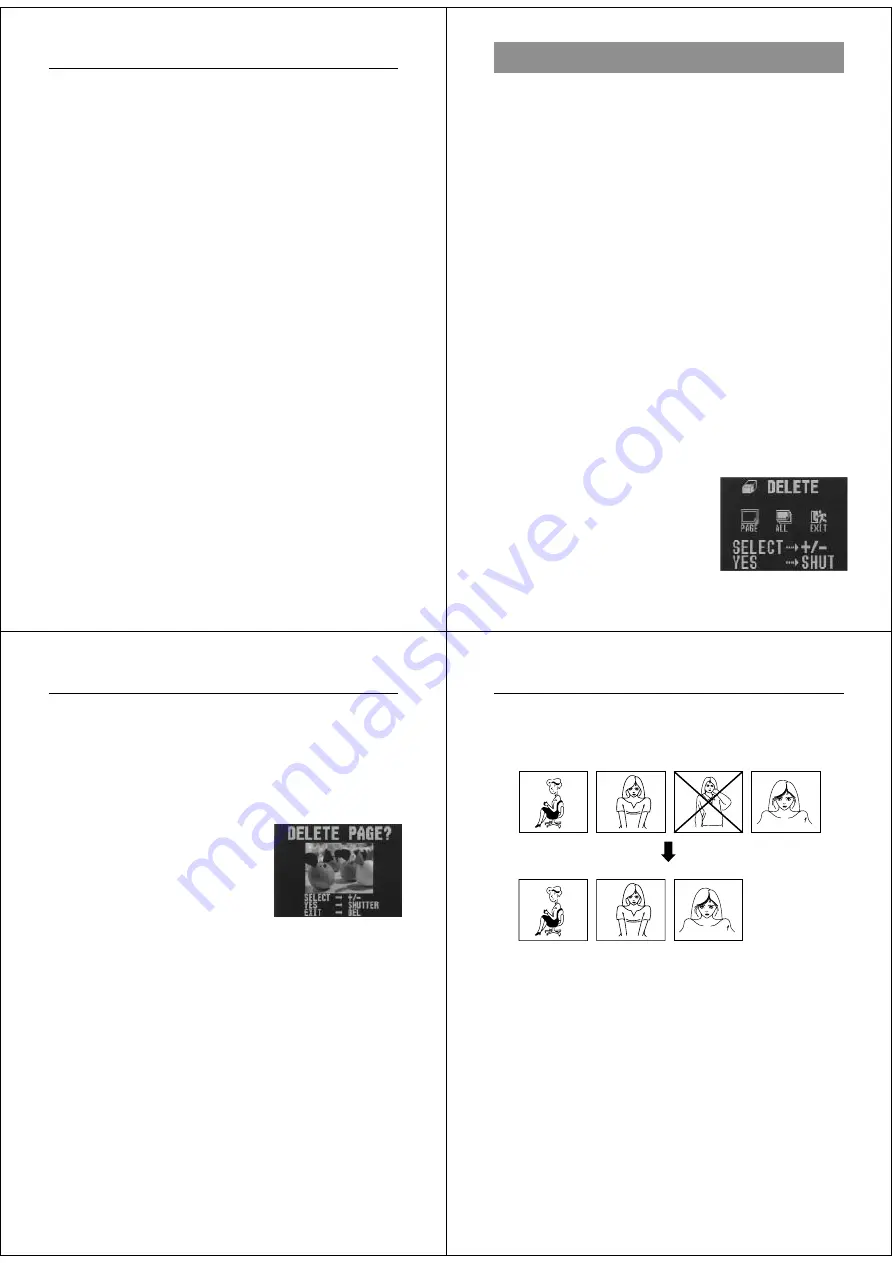
Display the DELETE Menu.

Press the DEL button to display
the DELETE Menu.

47

Deleting Memory Pages

3.

Select “PAGE”.

Use [+] and [–] to select “PAGE”.

To clear the selection screen and quit this procedure, select
the EXIT icon.

4.

Press the shutter button.

5.

Use [+] and [–] to display the image you want to delete.

Any  images  that  are  protected
(page 41) do not appear on the
screen during this operation.

6.

Double check to make sure that you really want to delete
the image that is on the screen.

To abort the delete operation without deleting anything,
press any button other than [+], [–], or the shutter button.

7.

Press the shutter button to delete the page.

After you delete an image, the image on the next page ap-
pears on the screen.

8.

To delete more images, repeat steps 5 through 7.

After you finish deleting all the images you want, press any
button other than [+], [–], or the shutter button to clear the
image delete screen.

48

Operation

Note

• Deleting a page causes the remaining pages to be renumbered.

Blank pages are not left inserted between non-blank pages.

1

2

3

4

1

2

3

Summary of Contents for QV-120

Page 1: ...Record Mode Displays 27 Using the Self Timer 30 Playing Back Images 31 Displaying Images on the Camera s LCD 31 Displaying Images on a TV Screen 32 Page Status Indicators 33 Producing a Multi Page Di...

Page 2: ...ears and further operation of the camera will become impossible If this should happen contact your dealer or the nearest CASIO service provider as soon as possible 7 Operating conditions This camera i...

Page 3: ...brightness of the image on the LCD The brightness is set at the factory to the optimum setting and nor mally does not need adjustment Opening the Terminal Panel Cover 1 1 1 1 1 2 2 2 2 2 3 3 3 3 3 Te...

Page 4: ...f explosion Never mix batteries of different types 15 Power Supply Dead batteries are susceptible to leakage which can cause serious damage to your camera Remove batteries from the camera as soon as y...

Page 5: ...tion 2 Turn on the camera Slide the POWER switch in the di rection indicated by the arrow The POWER switch automatically slides back to its original position when you release it When power comes on th...

Page 6: ...the aperture to F8 Changing the Lens Orientation The lens of the camera is built into a lens body that is designed to rotate This means you can change the angle of the lens without mov ing the rest o...

Page 7: ...rding Images Record Mode Displays The following provides details on the images indicators and mes sages that appear on the LCD in the Record Mode Image Display An image of the object that is picked up...

Page 8: ...ortant If battery power is low camera power may turn off while a count down is in progress If this happens replace the batteries with new ones 31 Playing Back Images Playing Back Images This section d...

Page 9: ...page 45 3 Specify the screen size Use the and buttons to specify the screen size To clear the selection screen and quit this procedure select the EXIT icon 4 Press the shutter button 35 Playing Back I...

Page 10: ...ion Hold down the and buttons until the message AUTO PLAY START appears 39 Playing Back Images Auto play continues to loop through the memory pages This means that when it reaches the last page it sta...

Page 11: ...4 Specify all page protection Use and to select ALL and then press the shutter button A protect indicator appears in the upper left corner of all memory pages when you display the page status indicat...

Page 12: ...ory Note that you cannot delete images if they are protected See page 43 for details on how to unprotect images You cannot delete images from a multi page display a display of an enlarged image or whi...

Page 13: ...minal of a TV video tape deck video printer or other similar devices Use the special video cable that comes with the camera for such connections Connecting to Other Devices The type of connecting cabl...

Page 14: ...both cameras to PLAY 2 Use the and buttons of this camera to find the image you want to send You cannot send images between two cameras while either of their function switches is set to REC You canno...

Page 15: ...e connected directly to a personal computer or video capture board that is equipped with a VIDEO IN terminal RCA pin jack It cannot be connected directly to an S VIDEO ter minal 59 Troubleshooting No...

Page 16: ...le con nection 2 Camera connected to is not turned on 3 Function switch sets to REC Delete opera tion does not start when DEL is pressed All buttons and switches do not operate Very bright or very dar...

Page 17: ...the camera s backlight The camera is equipped with a fluorescent light source to provide the back lighting for its LCD The normal service life of the backlight is approximately six years when the cam...

Reviews: