— 3 —
■
Char
ging Guide
Star
ting from a full charge
, it
should tak
e
appro
ximately six
months of oper
ation without
fur
ther charging under the
conditions descr
ibed belo
w bef
ore
batter
y
drops to Le
v
el 3.
Daily Use (All time v
alues are
appro
ximate
.)
•
Displa
y
Illumination:
1.5
seconds
•
Alar
ms:
10 seconds
•
Signal reception: 4 times
•
Digital displa
y
: 18 hours
Making sure the w
atch is
regular
ly e
x
posed to light ensure
stab
le oper
ation.
•
Char
g
e
Times Required to Ad
v
ance to a Higher Le
vel
Exposure Le
vel
(Brightness)
Outdoor Sunlight
(50,000 lux)
Sunlight Through
a
Windo
w
(10,000 lux)
Da
ylight Through
a
Windo
w
on a Cloudy
Da
y (5,000 lux)
Indoor Fluorescent
Lighting (500 lux)
Appr
o
ximate Char
ging
Time
Le
v
el 4
\
Le
v
el 3
\
Le
v
el 2
\
Le
v
el 1
14 hours
1 hour
3 hours
70 hours
3 hours
14 hours
143 hours
5 hours
57 hours
28 hours
–––
–––
•
Note that the abo
v
e
charging times are f
or ref
erence only
. Actual
charging time depends on a v
a
riety of en
vironmental f
actors
.
■
Char
ging Precautions
A
v
oid charging the w
atch in the f
ollo
wing locations
, and an
ywhere
else where the w
a
tch ma
y become v
e
ry
hot.
•
On the dashboard of an automobile par
k
ed in the sun
•
V
e
ry
close to an incandescent light source or other sources of
heat
•
In a location e
xposed to direct sunlight f
o
r long per
iods
Note that the displa
y panel ma
y become b
lac
k under v
e
ry
high
temper
atures
.
This is tempor
ar
y,
and the displa
y
will appear
nor
m
al again at lo
w
e
r temper
atures
.
Depending on the light source y
ou are using, the
case of the w
a
tch ma
y become quite hot dur
ing
charging.
T
a
k
e
care to guard against b
u
rn
injur
y after
charging.
■
The c
hang
e
the batter
y
P
oint the solar panel (f
ace) of the w
atch at a light source
.
•
Remember that e
v
en a par
tial b
loc
kage of the solar cell reduces
charging efficiency
.
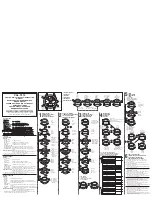
Example:
P
o
sitioning the watc
h
Solar Cell
•
The illustration sho
ws the resin band mode
.
The po
w
e
r supply of this w
atch uses a solar cell to gener
a
te
electr
ical po
w
e
r,
which is stored b
y
a rechargeab
le batter
y.
Using
or stor
ing the w
a
tch where it is not regular
ly e
xposed to light, or
allo
wing it to be b
loc
k
e
d from light b
y
y
o
ur slee
v
e
as y
ou are
w
e
ar
ing it can cause the po
w
e
r of the rechargeab
le batter
y
to r
u
n
do
wn.
T
o
ensure stab
le oper
ation, be sure to allo
w the w
a
tch to be
e
x
posed to light as much as possib
le when y
ou are w
e
ar
ing or
stor
ing it.
Note that all data in memor
y
and all settings are cleared
whene
v
e
r y
ou allo
w the le
v
el of the rechargeab
le batter
y to
drop to Le
v
el 4.
■
Flashing Reco
ver
y
Indicator
If y
ou use the light or alar
ms a number of times during a shor
t
per
iod, a Reco
v
e
ry
indicator flashes on the displa
y
and the
follo
wing oper
ations become disab
led as batter
y
po
w
e
r reco
v
e
rs
.
•
Displa
y
illumination
•
Alar
m and hour
ly time signal
•
Time calibr
ation signal reception
Nor
m
al oper
ation will retur
n
after the batter
y
reco
v
e
rs
.
■
Batter
y Indicator
All functions enab
led.
All functions enab
led.
Displa
y,
displa
y illumination, alar
ms
,
hour
ly time signal, and signal
reception disab
led.
All functions
, including digital
timek
eeping, disab
led.
Le
v
e
l 1
Le
v
e
l 2
Le
v
e
l 3
Le
v
e
l 4
(Off)
•
Exposing the w
a
tch to direct sunlight or other strong light ma
y
cause the batter
y le
v
el indicator to momentarily indicate a le
v
e
l
that is higher than the actual batter
y le
v
e
l. Because of this
, y
o
u
should w
a
it f
or a shor
t while after charging to chec
k the batter
y
le
v
e
l indicator
.
•
Ev
en if the batter
y le
v
el drops all the w
a
y to Le
v
el 4, y
ou will still
be ab
le to recharge the batter
y and use the w
atch again.
•
When recharging from Le
v
el 4, set the current time and date after
the batter
y le
v
el recharges to Le
v
el 3.
At this time y
ou should
contin
ue to e
xpose the w
a
tch to light so it can charge up the Le
v
e
l
2 or Le
v
el 1.
■
Star
t c
har
ging at Le
vel 3!
Batter
y Le
v
el 3 indicates that remaining batter
y po
w
e
r is v
e
ry
lo
w
.
Be sure to e
x
pose the w
atch to light f
o
r recharging as soon as
possib
le after the Le
v
el 3 indicator star
ts to flash.
Recovery Indicator
Power Supply
■
T
o
illuminate the displa
y
1
2
At least
40
°
With the w
a
tch on y
our
wr
ist, position it par
allel
with the g
round.
Rotate y
o
ur ar
m so the w
a
tch is
angled at about 40 deg
rees
, so y
ou
can read its f
ace
.
•
Y
ou should be w
ear
ing the w
a
tch
on the outside of y
our wrist
when using the auto light s
w
itch.
•
Mak
e
sure that the left (9 o
’cloc
k) and
right (3 o
’cloc
k) sides of the w
a
tch are
within
±
15 deg
rees of being par
allel
with the g
round.
The auto light s
w
itch
ma
y not oper
ate proper
ly if the angle is
g
reater
Displa
y Illumination Precautions
•
The light ma
y be difficult to see if y
ou tur
n
it on under br
ight
sunlight.
•
If y
ou press the
L
b
utton or if an alar
m oper
ation star
ts while the
displa
y is illuminated, illumination will tur
n
off
.
•
Y
ou ma
y notice a slight sound from the w
a
tch while the displa
y
is
illuminated.
This is the sound of EL panel vibr
ation, and does not
indicate malfunction.
A
u
to Light Precautions
•
F
requent use of the auto light can r
un do
wn the batter
y.
•
The auto light s
witch ma
y cause the displa
y to illuminate when the
displa
y of the w
atch is shade b
y
y
our slee
v
e
.
•
The displa
y
ma
y not illuminate immediately when y
ou angle the
w
atch to
w
ards y
o
ur f
a
ce
. This does not indicate malfunction.
•
The displa
y
remains lit f
or about 1.5 seconds only
, e
v
en if y
o
u
lea
v
e
the w
atch angled to
w
ards y
our f
ace
.
•
The displa
y
ma
y illuminate unintentionally when y
ou wear the
w
a
tch on the inside of y
our wr
ist, when y
ou shak
e y
our ar
m, or
when y
ou r
a
ise y
our ar
m.
Be sure to turn off the auto light
s
w
itc
h
whene
ver y
o
u do not need displa
y illumination.
•
K
e
ep the auto light s
w
itch tur
ned off whene
v
er y
ou are w
ear
ing
the w
atch on the inside of y
our wr
ist.
•
Electro-static charge and magnetism can interf
ere with auto light
oper
ation and e
v
en mak
e
oper
ation impossib
le
. If this happens
,
lo
w
e
r y
our ar
m to the star
ting position and then r
a
ise it again.
If
y
ou still ha
v
e
troub
le with displa
y illumination, tr
y lo
w
e
ring y
our
ar
m do
wn to y
our side and then r
aise it to y
our f
ace f
or reading.
An EL (electro luminescent) panel is used to illuminate the displa
y
fo
r easy reading in the dark.
An auto light s
w
itch automatically
illuminates the displa
y
when y
ou angle the w
atch to
w
ards y
o
ur
fa
ce f
o
r reading.
■
T
o
illuminate the displa
y
man
u
all
y
Pressing the
LLLLL
b
utton in an
y
mode illuminates the digital
displa
y f
o
r about 1.5 seconds.
•
Pressing the
L
b
utton
illuminates the displa
y
regardless
of whether the auto light s
w
itch is
on or off
.
Y
ou ma
y hear a f
a
int r
attling sound when y
ou mo
v
e
the w
a
tch
around.
This sound is caused b
y
the mo
v
ement of a metal
b
u
lb that controls operation of the auto light s
w
itch, and does
not indicate malfunction.
Illuminating the Displa
y with the
A
uto Light Switc
h
The full auto light s
witch automatically illuminates the displa
y
whene
v
e
r y
ou angle the w
a
tch to
w
ards y
our f
a
ce f
or reading,
b
u
t only when it is dar
k.
•
The full auto light s
w
itch does not illuminate the displa
y
when surrounding light is bright.
The light is v
e
ry
con
v
enient when reading the current time
and other data in the dar
k.
The auto light s
w
itch illuminates the displa
y
in all modes
.
In the
Timek
eeping Mode
, hold do
wn the
L
b
u
tton f
o
r about tw
o
seconds to toggle the auto light s
witch on (auto light s
witch on
indicator displa
y
ed) and off (no indicator displa
y
ed).
A
u
to Light Switch
On Indicator
When the auto light s
w
itch is on, holding do
wn the
L
b
u
tton f
o
r
about tw
o seconds tur
n
s the auto light s
w
itch off (auto light s
witch
indicator not displa
y
e
d).
Display Illumination
Required Dail
y Char
ging
Time
•
The f
ollo
wing is the daily
amount of charging required
each da
y to suppor
t the
oper
ations under
“Daily Use
”.
Exposure Le
vel
(Brightness)
5 min
utes
24 min
utes
48 min
utes
8 hours
Appr
oximate
Char
ging Time
Outdoor Sunlight
(50,000 lux)
Sunlight Through
a
Windo
w
(10,000 lux)
Da
ylight Through
a
Windo
w
on a Cloudy Da
y
(5,000 lux)
Indoor Fluorescent Lighting
(500 lux)