background image

19

E

Printing a Label

For information about the procedure required to print on tape, see the MEP-PC10 PC 
Application User’s Guide.


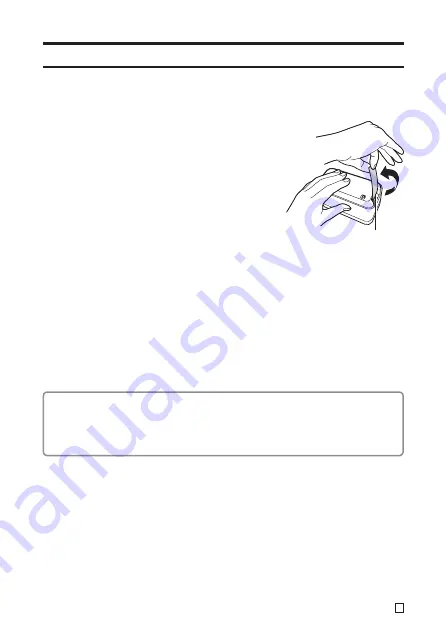
To cut the tape

Holding the tape between your fi ngers as shown 
in the illustration, pull it up against the printer’s 
tape cutter to cut it.

Important!

Check to make sure that printing is completely 
stopped before cutting the tape. Cutting the tape 
while printing is in progress can cause tape jams 
and damage the printer.


To affi x a label to a surface

1.

Use scissors or some other implement to trim the label to the required size, if 
necessary.

2.

Affi x the label to the desired surface.
• Affi xing a label to a surface may cause adhesive to remain on the surface when the 

label is removed.

Important!

Do not affi x labels to the types of surfaces listed below.
Human or animal skin/walls, utility poles, and other surfaces located on other people’s 
property/containers used for heating in a microwave oven

Unsuitable Surfaces (Label may not stick.)

• Rough surfaces
•  Surfaces that are wet, oily, dusty, or covered with other matter
•  Special plastic materials (silicon, polypropylene, etc.)

Tape cutter

Summary of Contents for MEP-U10

Page 1: ...RJA526500 001V01 MEP U10 User s Guide EN Be sure to keep all user documentation handy for future reference ...

Page 2: ...only Este símbolo es válido sólo en países de la UE Manufacturer CASIO COMPUTER CO LTD 6 2 Hon machi 1 chome Shibuya ku Tokyo 151 8543 Japan Responsible within the European Union CASIO EUROPE GmbH Casio Platz 1 22848 Norderstedt Germany ...

Page 3: ... has been done to ensure that the contents of this manual are clear and accurate Please contact CASIO if you have any problem understanding manual contents or should you discover any errors Any reproduction of this manual either in part or its entirety is forbidden Note that any use of this manual for other than personal use without the permission of CASIO COMPUTER CO LTD violates copyright laws C...

Page 4: ...ual and or the program either in part or in their entirety is strictly forbidden without the express written permission of CASIO COMPUTER CO LTD Safety Precautions Thank you for purchasing this product Before using it be sure to read the Safety Precautions contained in this User s Guide Keep this manual handy in a safe place for future reference when required Warning This symbol indicates informat...

Page 5: ...Never place heavy objects on the AC adaptor USB cable or subject it to direct heat Never try to modify the AC adaptor USB cable or subject it to bending Do not twist or pull on the AC adaptor USB cable cord Do not wrap the cord around the adaptor Should the AC adaptor USB cable or its plug ever become damaged contact your original retailer AC Adaptor USB Cable Never touch the AC adaptor USB cable ...

Page 6: ...metal etc getting into the printer creates the risk of fire and electric shock Immediately perform the following steps whenever any of the above symptoms are present 1 Disconnect the USB cable 2 Unplug the AC adaptor from the wall outlet 3 Contact your original retailer Keep Away From Fire Never throw the printer into fire to dispose of it Doing so creates the risk of explosion which can cause fire o...

Page 7: ...pecially the jack Plug the AC adaptor into a power outlet that is near the printer and easily accessible so you can quickly unplug it in case of problems Store the AC adaptor in a dry place Use the power cord that comes with the printer to connect the AC adaptor Do not use the power cord that comes with the printer with any other device Failure to do so can lead to malfunction Connections Plug onl...

Page 8: ...g precautions Avoid using the printer in locations exposed to direct sunlight locations with high humidity locations where static electricity is easily generated locations subjected to sudden extreme temperature changes and locations where it is extremely cold or hot The operating temperature range is 10 C to 35 C 50 F to 95 F Take care to avoid allowing the printer to be subjected to strong impac...

Page 9: ...Software 9 Installing the Software 10 Precautions when Installing and Uninstalling 10 CD ROM Contents 10 Read This Before Installing the Software 10 Viewing User Documentation on the CD ROM 12 Removing the Software from Your Computer 12 General Guide 13 Loading and Removing Tape 13 Connecting the Printer to Your Computer 17 Printing a Label 19 User Maintenance 20 Troubleshooting 21 Specifications 2...

Page 10: ...sories see Optional Accessory List page 23 Using the Printer s Documentation This printer comes with documentation in printed form and documentation provided on a CD ROM Printed Manuals Provided with the Printer MEP U10 Printer User s Guide This Manual PDF File Documentation on the CD ROM Provided with the Printer To view the MEP PC10 PC Application User s Guide you first need to copy the PDF file f...

Page 11: ...ter Avoid storing the disk in a soft case or bag that comes into direct contact with the label side of the disk Warning Never try to use the CD ROM in a device that is not intended for CD ROM reading Playing back the CD ROM on a music CD drive will output sound at a volume that can damage your ears or the speakers of an audio system Operating Environment Required by the Software OS Microsoft Windo...

Page 12: ... administrator account or an account with administrator privileges in order to install or uninstall software CD ROM Contents MEP PC10 PC application software MEP PC10 PC Application User s Guide PDF file Read This Before Installing the Software Important Do not connect the printer to your computer until you install the software on your computer The software may not operate correctly if you install ...

Page 13: ...into the text box on the screen that appears and then click OK If your computer is running Windows 8 Windows 7 or Windows Vista an AutoPlay menu will start up at this time Select Run setup exe under Install or run program from your media or Install or run program When the user account control dialog box appears click Yes or Continue 3 Select the installation language and then click OK This will st...

Page 14: ... or higher is installed on your computer see the preceding section above 2 On the Windows Start menu select Programs and then CASIO Next align the mouse pointer with MANUAL and then click the name of the PDF file you want to view Removing the Software from Your Computer You can use the procedure below to remove the software from your computer To remove the software from your computer 1 On the Windo...

Page 15: ...be loaded in the printer in order to print labels Use the tape that comes with the printer or commercially available tape To load tape 1 Slide the tape compartment cover release lever in the direction of arrow a and open the tape compartment cover At this time take care to avoid catching your fingers on the cutter a Cutter Important Do not try to force the tape compartment cover past its normal ran...

Page 16: ...ecurely onto the bearing When loading tape take care not to touch the cutter Touching the cutter can cause finger cuts The printer head becomes hot during printing Do not touch the printer head when loading tape Important Never try to push tape back in Do not pull on the tape with excessive force Doing so will lead to malfunction of the printer Note that normal printing may not be possible at the l...

Page 17: ...12 mm approx 0 5 in and 9 mm approx 0 4 in wide tape pass the tape inside the tape guides as shown in the nearby figure Tape 9 mm wide tape 12 mm wide tape 4 Close the tape compartment cover Press down on the cover until is clicks securely into place Do not pull on the tape or try to push it back after loading it in the printer ...

Page 18: ...ses a re adherable type adhesive Depending on the surface or object to which it is affixed the tape may detach from the surface or leave glue residue when removed Note that long term display of this tape can result in discoloration When not using tape store it in a plastic bag or it original box Do not leave tape in a motor vehicle parked in sunlight Avoid locations exposed to high temperature high...

Page 19: ...port Even if you connect directly to one of your computer s USB ports your computer may not be able to recognize the printer due to some sort of incompatibility If this happens try connecting to a different USB port on your computer 2 Plug the AC adaptor plug into the printer s AC adaptor terminal 3 Connect the power cord to the AC adaptor 4 Plug the power cord into a household power outlet Import...

Page 20: ...puter is running Windows XP the warning message shown nearby will appear during installation Click Continue Anyway to proceed with the installation To disconnect the printer from your computer 1 Disconnect the USB cable from the computer s USB port and the printer s USB port 2 Unplug the AC adaptor plug from the wall outlet and disconnect the AC adaptor from the printer Important Never disconnect ...

Page 21: ...o affix a label to a surface 1 Use scissors or some other implement to trim the label to the required size if necessary 2 Affix the label to the desired surface Affixing a label to a surface may cause adhesive to remain on the surface when the label is removed Important Do not affix labels to the types of surfaces listed below Human or animal skin walls utility poles and other surfaces located on othe...

Page 22: ...head is hot during and immediately after printing Be sure to allow enough time for it to cool before removing the tape 2 Moisten the swab with alcohol and then use it to wipe the printer head rubber roller and tape cutter surfaces At this time do not directly touch the tape cutter Touching the cutter can cause finger cuts Take particular care when wiping the contact areas of the roller and printer ...

Page 23: ...ty setting is not correct Adjust the print density setting Nothing is printed Printer turns off during printing You are using a non specified AC adaptor Use the specified AC adaptor The printer head is overheated Wait for a while and try printing again later Connection with a computer cannot be established The USB cable is not connected correctly Check the connection and make sure the cable is conne...

Page 24: ...inter Open the tape compartment cover Disconnect the AC adaptor Tape will not cut You are not performing the tape cut procedure correctly See To cut the tape in Printing a label The tape cutter is dirty Clean the tape cutter referring to To clean printer components The tape cutter is dull Have the tape cutter replaced by your retailer or your local CASIO service center Tape is jammed in the tape o...

Page 25: ... 12 mm approx 0 5 in for 18 mm approx 0 7 in wide tape Print length Approximately 30 cm 12 in maximum Power Supply Other Items Operating Power AC adaptor AD A12200L Power Consumption 9 W Dimensions 61 mm W 118 mm D 68 mm H Approx 2 4 4 6 2 7 in Including rubber feet Weight Approx 235 g 0 5 lbs Operating Temperature 10 C to 35 C 50 F to 95 F Optional Accessory List Tape Tape width Tape color 18 mm ...

Page 26: ...leen van toepassing in de Europese Unie Het symbool doorgekruisde afvalbak op wielen op het product geeft aan dat het product aan het einde van haar levensduur niet samen met of in de vorm van huishoudafval mag worden weggegooid Het product moet naar een verzamelplaats milieudepot worden gebracht waar dergelijke producten worden gerecycled Neem voor meer informatie contact op met de relevante over...

Page 27: ...na produkt får inte blandas eller slängas med annat affärsavfall Português Eliminação de Equipamentos Eléctricos e Electrónicos para Uso Doméstico Aplicável somente na União Europeia O símbolo caixote de lixo de rodas com uma linha cruzada em seu produto indica que o produto no fim da sua vida útil não deve ser misturado ou eliminado com o lixo doméstico comum Este produto deverá ser entregue a um...

Page 28: ...ytne predajca alebo distribútor vo Vašej krajine Výrobok by nemal byĢ zmiešaný a vyhodený spolu s ostatným priemyselným odpadom Eesti Kodusas majapidamises kasutuskõlbmatuks muutunud elektri ja elektroonikatarvete kõrvaldamisest Kehtiv vaid Euroopa Ühenduse liikmesriikides Sümbol ristiga maha tõmmatud vagun tootel osutab et käesolevat toodet ei tohi peale selle kasutuskõlbmatuks muutumist visata ä...

Page 29: ...skart f pajjiĪek Minƫabba xi kmiƛih li jistgƫu jkunu perikoluĪi gƫas saƫƫa jekk dan il prodott ma jiƥix mormi kif indikat jista jkun hemm effetti negattivi fuq l ambjent u s saƫƫa Meta inti tarmi dan il prodott kif suppost inti tkun qiegƫed tikkontribwixxi gƫall uĪu mill ƥdid tal prodott gƫar riƛiklaƥƥ u sabiex issalva l materjal li minnu hu magƫmul il prodott u b hekk l ambjent tagƫna jkun qiegƫe...

Page 30: ...MO1209 A Printed in China 2012 CASIO COMPUTER CO LTD CASIO COMPUTER CO LTD 6 2 Hon machi 1 chome Shibuya ku Tokyo 151 8543 Japan ...

Reviews: