background image

45

Snapshot Tutorial

4.

Press [SET].

This will apply your setting(s) and display the easy Mode viewfinder screen, 
indicating the camera is ready to shoot.
If you selected “MENU” in step 2, pressing [SET] will display the REC menu. See 
“Advanced Settings” (page 55) for details about configuring its settings.

• Pressing [ ] (Delete) will exit the Control Panel.

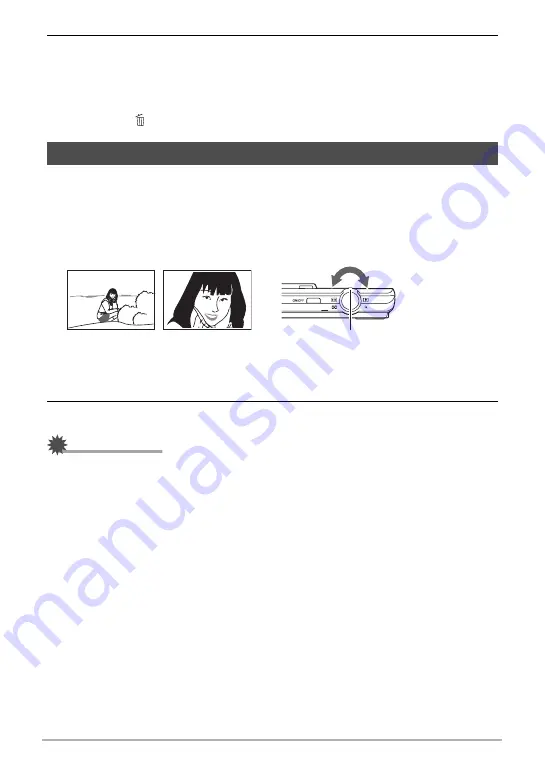
Your camera provides you with 5X optical zoom (that changes the lens focal 
distance), which can be used in combination with digital zoom (that digitally 
processes the center portion of the image to enlarge it) for total zoom capabilities of 
5X to 79.7X. The image deterioration point depends on the image size (page 47).

1.

In the REC mode, slide the zoom controller to zoom.

2.

Press the shutter button to shoot the image.

IMPORTANT!

• Digital zoom is disabled while time stamping (page 109) is turned on.

Shooting with Zoom

w

 (Wide Angle) : Reduces the size of the subject and broadens the range.

z

 (Telephoto) : Enlarges the subject and narrows the range.

w

 Wide Angle

z

 Telephoto

Zoom controller

Summary of Contents for EX-ZS10BE

Page 1: ...be sure to read the precautions contained in this User s Guide Keep the User s Guide in a safe place for future reference For the most up to date information about this product visit the official EXI...

Page 2: ...tact your original retailer Unpacking Digital camera Rechargeable lithium ion battery NP 120 USB AC adaptor AD C53U Power cord Strap USB cable AV cable CD ROM Quick Start Guide The shape of the power...

Page 3: ...y damages lost profits or claims by third parties arising out of the use of Photo Transport Virtual Painter 5 LE for CASIO or YouTube Uploader for CASIO CASIO COMPUTER CO LTD shall not be held liable...

Page 4: ...er on 26 To turn off the camera 26 Holding the Camera Correctly 27 To shoot a snapshot 28 Viewing Snapshots 30 Deleting Snapshots and Movies 31 To delete a single file 31 To delete specific files 32 T...

Page 5: ...gs Quality 64 Specifying Snapshot Image Quality Quality Snapshot 64 Correcting Image Brightness EV Shift 64 Controlling White Balance White Balance 65 Specifying ISO Sensitivity ISO 66 Using Built in...

Page 6: ...F Files 101 User Registration 101 Using an Eye Fi Wireless SD Memory Card to Transfer Images Eye Fi 101 Files and Folders 103 Memory Card Data 104 Other Settings Set Up 106 Turning off Eye Fi Card Com...

Page 7: ...mera in another Country 123 Using a Memory Card 124 To replace the memory card 124 Computer System Requirements for Bundled Software Bundled CD ROM 126 Reset Initial Default Settings 127 When things d...

Page 8: ...Microphone pages 49 77 8Back lamp pages 17 19 26 39 9 r REC button pages 26 28 bk 0 Movie button page 48 blStrap hole page 2 bmConnector cover bn USB AV port pages 17 19 69 80 88 98 bo SET button page...

Page 9: ...emaining movie memory capacity page 48 3Recording mode page 28 4White balance setting page 65 5Continuous shutter page 60 6Image deterioration indicator page 46 7Metering mode page 138 8Snapshot image...

Page 10: ...osure is not correct the setting will turn orange when you half press the shutter button 1Remaining snapshot memory capacity page 136 2Snapshot image size page 35 3Flash page 39 4Self timer page 41 5D...

Page 11: ...page 48 1File type 2Protect indicator page 75 3Folder name file name page 103 4Snapshot image quality page 64 5Snapshot image size page 35 6ISO sensitivity page 66 7Aperture value 8Shutter speed 9Dat...

Page 12: ...or Screen Settings Information display on Displays information about image settings etc REC mode only Information display Date Time on In addition to information about snapshot settings displays movie...

Page 13: ...a Delete A digital camera stores images on a memory card so you can record and delete images a countless number of times Play Record You can use the images you record in a variety of different ways St...

Page 14: ...ne you want and the camera sets up automatically Then all you need to do is press the shutter button for perfect images Anti Shake The camera corrects automatically to minimize image blur due to camer...

Page 15: ...n indicated by the arrow 2 Load the battery With the EXILIM logo on the battery facing downwards in the direction of the lens hold the stopper next to the battery in the direction indicated by the arr...

Page 16: ...USB AC adaptor 1 Turn off the camera Check to make sure that the camera s monitor screen is blank If it isn t press ON OFF Power to turn off the camera 2 After connecting the supplied USB cable to the...

Page 17: ...Back Lamp Operation 4 After charging is complete disconnect the USB cable from the camera and then unplug the adaptor from the power outlet Lamp Status Description Lit Red Charging Flashing Red Abnorm...

Page 18: ...of the USB AC adaptor that comes with the camera is recommended 1 Turn off the camera Check to make sure that the camera s monitor screen is blank If it isn t press ON OFF Power to turn off the camera...

Page 19: ...conditions Back Lamp Operation 3 After charging is complete disconnect the USB cable from the camera and then from the computer Lamp Status Description Lit Red Charging Flashing Red Abnormal ambient t...

Page 20: ...nit BC 120L Never use any other type of charger device Attempting to use a different charger can result in unexpected accident A battery that is still warm due to normal use may not charge fully Give...

Page 21: ...while the battery is dead will cause its date and time settings to be cleared A message telling you to configure time and date settings will appear the next time you turn on the camera after restorin...

Page 22: ...ual in the language you select may not be included with a camera intended for the Japanese market Camera models sold in certain geographic areas may not support display language selection 1 Press ON O...

Page 23: ...to purchase a commercially available memory card for greater capacity The camera does not come with a memory card Images recorded while a memory card is loaded are saved to the memory card When no mem...

Page 24: ...e way in until you hear it click securely into place 3 Close the battery cover Pressing the battery cover against the camera slide it closed For information about how to replace the memory card see pa...

Page 25: ...contents Normally you do not need to format a memory card again However if storing to a card has slowed down or if you notice any other abnormality re format the card Be sure to use the camera to form...

Page 26: ...amount of time Press ON OFF Power You can configure the camera so power does not turn on when you press r REC or p PLAY You also can configure the camera to turn off when you press r REC or p PLAY pag...

Page 27: ...slows down the shutter speed NOTE Take care that your fingers and the strap do not cover any of the areas indicated in the illustration To protect against accidentally dropping the camera attach the w...

Page 28: ...mode Make sure R is on the display If it isn t see page 52 2 Point the camera at the subject You can zoom the image if you want To shoot a snapshot Monitor screen Shutter button r REC Remaining Snapsh...

Page 29: ...an use when you want to shoot an image in which the subject to be focused on is not within the focus frame in the center of the screen When you half press the shutter button the camera automatically a...

Page 30: ...memory Information about the displayed snapshot also is included page 136 You also can clear the information to view only the snapshot page 12 You can zoom in on the image by sliding the zoom control...

Page 31: ...and the audio file You cannot delete files while movie or audio recording is in progress The delete menu will not appear if you press Delete while On is selected for the camera s Disabled setting pag...

Page 32: ...ected file 4 Repeat step 3 to select other files if you want After you are finished selecting files press Delete 5 Use 8 and 2 to select Yes and then press SET This deletes the files you selected To e...

Page 33: ...age composition The actual image will be recorded at the quality set for the image quality setting page 64 Shooting Indoors under Fluorescent Lighting Minute flickering of fluorescent lighting can aff...

Page 34: ...peat steps 2 and 3 5 After all of the settings are the way you want press SET This will apply the settings and return to the REC mode If you selected MENU the REC menu will appear If you selected BS t...

Page 35: ...55 Pixels A digital camera image is a collection of small dots called pixels The more pixels there are in an image the more detail there will be However you generally can do with fewer pixels when pri...

Page 36: ...images that can be stored see page 136 For information about movie image size see page 38 For information about resizing existing snapshots see page 76 Large Number of Pixels More detail but takes up...

Page 37: ...evision screens of the past Your camera can record images that are compatible with the aspect ratio an HDTV screen You should regard the print paper sizes suggested here as guidelines only 200 dpi pri...

Page 38: ...e press SET 2 Use 8 and 2 to select the second Control Panel option from the top Movie Image Quality 3 Use 4 and 6 to select the setting you want and then press SET The 16 9 aspect ratio is available...

Page 39: ...nce with exposure amount of light and brightness conditions Flash Off Flash does not fire Flash On Flash always fires This setting can be used to brighten a subject that normally comes out dark due to...

Page 40: ...ent lighting or some other light source can cause abnormal image colors Select Flash Off for the flash setting when shooting in areas where flash photograph is prohibited Red eye Reduction Using the f...

Page 41: ...elf timer cannot be used together with the following features Movie easy Mode some BEST SHOT scenes Using the Self timer Self timer 10sec Self timer 10 second Self timer 2sec Self timer 2 second Self...

Page 42: ...ay down IMPORTANT The camera performs center focus if it cannot detect a face The only focus mode available while face detection is enabled is Auto Focus AF Face detection may take a bit longer when y...

Page 43: ...3 Use 4 and 6 to select ON and then press SET This enters the easy mode 4 Point the camera at the subject If the camera detects a human face it continually focuses on the face page 42 If the camera do...

Page 44: ...atically fixed at their optimum settings These fixed settings do not affect normal REC menu settings 1 In the easy mode press SET In the easy mode the characters that appear on the setting screen are...

Page 45: ...focal distance which can be used in combination with digital zoom that digitally processes the center portion of the image to enlarge it for total zoom capabilities of 5X to 79 7X The image deteriora...

Page 46: ...f you hold the zoom controller towards z Telephoto the zoom operation will stop when the optical zoom factor reaches its maximum Momentarily releasing the zoom controller and then holding it again tow...

Page 47: ...eterioration of image quality some digital zoom without image deterioration is possible with image sizes of 10M and smaller The range in which you can use digital zoom without image deterioration is i...

Page 48: ...cus is fixed while movie recording is in progress 3 Press 0 Movie again to stop recording Movie recording also will stop automatically if memory becomes full before you press 0 Movie The maximum size...

Page 49: ...by and Y flashing on the monitor screen To avoid loss of movie frames use of a memory card with a maximum transfer speed of at least 10MB per second is recommended page 125 Only digital zoom can be us...

Page 50: ...recording During playback you will be able to jump to the markers in the recording 5 Press the shutter button again to stop audio recording To create another audio recording file repeat steps 4 and 5...

Page 51: ...d PLAY Panel item from the top Playback Start and pressing SET page 71 Voice Recording Playback Controls NOTE See page 31 for information about deleting a voice recording file To play back an audio re...

Page 52: ...nd 2 to select the bottom Control Panel option BS and then press SET page 34 This will display a menu of BEST SHOT scenes The initial default selection is R Auto 3 Use 8 2 4 and 6 to move the boundary...

Page 53: ...ie NOTE The BEST SHOT YouTube scene sets up the camera for recording movies that are optimized for uploading to YouTube Movies recorded with the YouTube scene are stored in a special folder to make th...

Page 54: ...amera model the sample scene is named either For eBay or Auction Images you record using the auction site sample scene are stored in a special folder so you can easily find them on your computer page...

Page 55: ...3 Use 4 and 6 to select the tab where the menu item you want to configure is located 4 Use 8 and 2 to select the menu item you want and then press 6 5 Use 8 and 2 to change the setting of the selected...

Page 56: ...s Menu items Tab REC Menu Operations in This Manual REC menu operations are represented in this manual as shown below The following operation is the same one described under Example REC Menu Screen Op...

Page 57: ...Focus Mode Approximate Focus Range 1 Snapshot Movies Snapshot Movies Q Auto Focus General recording Automatic Fixed focal point Approximately 10 cm to 9 infinity 3 9 to 9 Wide Angle Fixed distance 2...

Page 58: ...face detection page 42 Use of the flash together with Macro Focus can cause the light of the flash to become blocked which may result in unwanted lens shadows in your image Whenever you perform an op...

Page 59: ...o locks exposure AE Procedure r REC SET MENU REC Tab Focus Frame You can use this procedure to select from among five different shapes including a heart shape for the focus frame NOTE Half pressing th...

Page 60: ...n the current image size and image quality settings The speed of Continuous Shutter depends on the type of memory card loaded in the camera and the amount of free space available for storage When shoo...

Page 61: ...e effects of camera or subject movement when movement is severe Anti Shake is disabled during movie recording Procedure r REC SET MENU REC Tab AF Area IMPORTANT Selecting Tracking can cause vibration...

Page 62: ...ned on a textual description will appear on the display for certain icons when you switch between REC functions Functions Supported by Icon Help REC Mode Flash Metering Mode White Balance Self timer E...

Page 63: ...and then back on while the BEST SHOT memory item is enabled all of the other memory items except for zoom position are initialized to the currently selected BEST SHOT sample scene setup regardless of...

Page 64: ...value To cancel exposure compensation change the EV value to 0 0 2 Press SET This applies the exposure compensation value The exposure compensation value you set remains in effect until you change it...

Page 65: ...ions Daylight Overcast etc Controlling White Balance White Balance Auto Configures the camera to adjust white balance automatically Daylight For shooting outdoors on a clear day Overcast For shooting...

Page 66: ...oise in images Procedure r REC SET MENU Quality Tab Color Filter Settings Off B W Sepia Red Green Blue Yellow Pink and Purple Specifying ISO Sensitivity ISO Auto Adjusts sensitivity automatically acco...

Page 67: ...her button increases the speed of the fast forward or fast reverse operation To return to normal playback speed press SET Play pause SET 1 frame forward back 4 6 Holding down either button scrolls con...

Page 68: ...imum image zoom factor is 8X certain image sizes may not allow zooming up to the full 8X Pressing SET will lock the current zoom factor for the on screen image You can then use 4 and 6 to scroll betwe...

Page 69: ...han one video input select the one where the camera is connected 3 Press p PLAY to turn on the camera This will cause an image to appear on the TV screen without anything appearing on the camera s mon...

Page 70: ...e TV screen You can use 8 DISP to change the display contents Recording Camera Images to a DVD Recorder or Video Deck Use one of the following methods to connect the camera to the recording device usi...

Page 71: ...operations you can perform for each of the PLAY Panel items Using the PLAY Panel Exit Exits the PLAY Panel Playback Start The operation that is performed when this item is selected depends on the typ...

Page 72: ...and 2 to select the menu item you want and then press 6 3Use 8 and 2 to change the setting of the selected menu item 4Press SET to apply the setting NOTE Pressing Delete performs one of the following...

Page 73: ...camera Playing a Slideshow on the Camera Slideshow Start Starts the slideshow Time Time from the start to the end of the slideshow 1 to 5 minutes 10 minutes 15 minutes 30 minutes 60 minutes Interval A...

Page 74: ...inal unrotated version of the image will be displayed on the image menu screen Procedure p PLAY Snapshot Screen SET MENU PLAY Tab Red Eye Using the flash to shoot at night or in a dimly lit room can c...

Page 75: ...Protect On Protects specific files 1Use 4 and 6 to scroll through the files until the one you want to protect is displayed 2Use 8 and 2 to select On and then press SET An image that is protected is i...

Page 76: ...he original snapshot Procedure p PLAY Snapshot Screen SET MENU PLAY Tab Trimming You can crop a snapshot to trim parts you do not need and save the result in a separate file The original snapshot is a...

Page 77: ...d To delete audio perform the following operation Dubbing Delete SET Delete IMPORTANT Note that you cannot restore the original audio of an Audio Snapshot after you delete or re record it 1 In the PLA...

Page 78: ...ith this camera Fast forward fast reverse 4 6 Play pause SET Volume adjustment Press 2 and then press 8 2 Display content switching 8 DISP Stop playback 0 Movie Copying Files Copy Built in Card Copies...

Page 79: ...e them printed Printing on a Home Printer Printing Images on a Printer with Memory Card Slot You can use a printer equipped with a memory card slot to print images directly from a memory card For deta...

Page 80: ...rinter s USB port Make sure that you insert the cable connector into the USB AV port until you feel it click securely into place Failure to insert the connector fully can result in poor communication...

Page 81: ...d on the monitor screen 6 Use 8 and 2 to select Print and then press SET Printing will start and the message Busy Please wait will appear on the monitor screen The message will disappear after a short...

Page 82: ...me professional print services may not support DPOF Configuring DPOF Settings Individually for Each Image Procedure p PLAY Snapshot Screen SET MENU PLAY Tab DPOF Printing Select images 1 Use 4 and 6 t...

Page 83: ...not cleared automatically after printing is complete The next DPOF print operation you execute will be performed using the last DPOF settings you configured for the images To clear DPOF settings speci...

Page 84: ...ure DPOF settings page 82 You can turn date stamping on and off each time you print You can configure settings so some images include the date stamp and some don t Configure the Camera s Time Stamp se...

Page 85: ...to a computer automatically over a wireless LAN for viewing Eye Fi page 101 Transfer images stored on your computer to camera memory In addition to images you also can transfer screen shot images from...

Page 86: ...equired 87 Play movies Windows 7 Windows Vista Windows XP SP3 Installation not required Windows Media Player which is already installed on most computers can be used for playback 90 Edit movies Window...

Page 87: ...e computer is not supported Operation may not be possible under certain computer environments You can connect the camera to your computer in order to view and store images snapshot and movie files NOT...

Page 88: ...ctly with the port Your computer may not be able to recognize the camera if you connect via a USB hub Always connect directly to the computer s USB port 5 Turn on the camera The first time you connect...

Page 89: ...it menu select Paste This will paste the DCIM folder and all the image files it contains into your Documents Windows 7 Windows Vista or My Documents Windows XP folder You now have a copy of the files...

Page 90: ...ments does not guarantee proper operation Certain settings and other installed software may interfere with proper playback of movies Never use your computer to modify delete move or rename any image f...

Page 91: ...sible on the computer you can use the AV cable that comes bundled with the camera to connect to the video input terminal of a TV or computer and play back movies that way Installing YouTube Uploader f...

Page 92: ...the movie 3 If it isn t already connect your computer to the Internet 4 Connect the camera to your computer page 87 This will cause charging to start page 16 5 Turn on the camera YouTube Uploader for...

Page 93: ...rograms CASIO Photo Transport This starts up Photo Transport 3 Drag the file s you want to transfer to the Transfer button 4 Follow the instructions that appear on the display to complete the transfer...

Page 94: ...n Keeping the mouse button depressed drag the pointer down to the lower right corner of the area and then release the mouse button 6 Follow the instructions that appear on the display This will send a...

Page 95: ...n install the application When you are prompted to input a serial number during the installation input the following 11 08 900006 deeNEe IMPORTANT Note the following important points when inputting th...

Page 96: ...reen automatically navigate to the CD ROM on your computer and then double click the AutoMenu exe file 2 On the menu screen click the Language down arrow button and then select the language you want 3...

Page 97: ...th your computer To connect the camera to your computer and save files 1 Turn on the camera Next press SET and then display the REC menu page 55 or the PLAY menu page 71 2 On the Set Up tab select USB...

Page 98: ...camera if you connect via a USB hub Always connect directly to the computer s USB port 5 Turn on the camera The camera s back lamp will light green at this time In this mode your Macintosh recognizes...

Page 99: ...Folder Structure on page 104 An image that was rotated on the camera will be displayed on your Macintosh screen in its original unrotated orientation IMPORTANT Never unplug the USB cable or operate th...

Page 100: ...settings and other installed software may interfere with proper playback of movies Movie Playback Precautions Proper movie playback may not be possible on some Macintosh models If you experience probl...

Page 101: ...er Shooting with an Eye Fi wireless SD memory card loaded in the camera makes it possible to transfer image data automatically to a computer via wireless LAN 1 Configure LAN access point transfer dest...

Page 102: ...gress A confirmation message will appear on the monitor screen if you try to turn off the camera while image data transfer is in progress Follow the instructions in the messages page 134 Transfer of a...

Page 103: ...lowed Example File Each folder can contain up to 9999 files named CIMG0001 through CIMG9999 The extension on the file name depends on the file type 26th file name Folders Folders are named from 100CAS...

Page 104: ...ther camera s DCF compliant images to this camera and view them Memory Folder Structure DCIM Folder Recording Folder Image File Movie File Audio File Audio Snapshot Image File Audio Snapshot Audio Fil...

Page 105: ...M folders it to change its name to a date or something similar after you copy it to your computer If you later decided to return the folder to the camera however be sure to change its name back to DCI...

Page 106: ...mutes output See the following for more information REC Menu page 55 PLAY Menu page 71 Turning off Eye Fi Card Communication Eye Fi Configuring Camera Sound Settings Sounds Startup Specifies the star...

Page 107: ...figuring a Startup Image Startup Specifying the File Name Serial Number Generation Rule File No Continue Tells the camera to remember the last used file number A new file will be named using the next...

Page 108: ...press 6 To change the World setting to summer time use 8 and 2 to select DST and then select On Summer time is used in some geographical areas to advance the current time setting by one hour during th...

Page 109: ...is disabled when certain BEST SHOT scenes are being used Procedure SET MENU Set Up Tab Adjust When the date and time settings are what you want press SET to apply them You can specify a date from 200...

Page 110: ...MENU Set Up Tab Language Specify the display language you want 1Select the tab on the right 2Select Language 3Select the language you want Camera models sold in certain geographic areas may not suppo...

Page 111: ...yback or recording During movie recording and playback When both sleep and Auto Power Off are turned on Auto Power Off takes priority Procedure SET MENU Set Up Tab Auto Power Off Auto Power Off turns...

Page 112: ...ou press Delete while Disabled is turned on You can protect against accidental deletion of images by selecting On for Disabled Performing a format operation page 114 will cause all images to be delete...

Page 113: ...ng matches the video signal system of the TV or other video equipment Images cannot be displayed correctly on a TV or video equipment that is not NTSC or PAL Configuring USB Protocol Settings USB Mass...

Page 114: ...will cause all images to be deleted even if file deletion is disabled On selected for Disabled page 112 for some images Make sure the camera s battery is sufficiently charged before starting a formatt...

Page 115: ...re the flash too close to the eyes of the subject Doing so creates the risk of loss of eyesight Monitor Screen Should the monitor screen ever become cracked never touch any of the liquid inside the mo...

Page 116: ...r snowing near the ocean or other body of water or in a bathroom 1 Turn off the camera 2 Remove the battery from the camera 3 Contact your dealer or nearest CASIO authorized service center Dropping an...

Page 117: ...an result in corruption or loss of data in camera memory Rechargeable Battery Use only the USB AC adaptor AD C53U or the specified device to charge the battery Attempting to charge the battery by an u...

Page 118: ...a battery is to be used by young children make sure that a responsible adult makes them aware of the precautions and proper handling instructions and make sure that they handle the battery correctly S...

Page 119: ...Near an air conditioner or in other areas subjected to extreme temperature or humidity Inside of a motor vehicle on a hot day or in an area subjected to strong vibration Condensation Sudden and extrem...

Page 120: ...es the risk of fire 0 Never plug the power cord into an outlet whose voltage rating is different from that marked on the power cord Doing so creates the risk of fire malfunction and electric shock 0 T...

Page 121: ...Note that CASIO COMPUTER CO LTD shall not be held liable for use of this product in any way that infringes on the copyrights of others or that violates copyright laws Note that trademark and register...

Page 122: ...owable charging range before trying again Battery contacts may be dirty Wipe them with a dry cloth Try connecting to a different computer USB port Depending on the setup of your computer you may not b...

Page 123: ...are not using it A battery left in the camera can discharge and go dead which will require some time to charge when you need to use the camera Store batteries in a cool dry place 20 C 68 F or lower To...

Page 124: ...SD memory card you must then turn write protection off whenever you want to record to it format it or delete any of its images If a memory card starts to behave abnormally during image playback you ca...

Page 125: ...mat and delete functions of the camera do not actually delete files from the memory card The original data remains on the card Note that responsibility for the data on a memory card lies with you The...

Page 126: ...in as a user with Administrator privileges Adobe Reader 9 For details about the minimum system requirements for each software application see the Read me files on the CASIO Digital Camera Software CD...

Page 127: ...tem for which there is no reset setting REC Mode REC Tab Quality Tab Reset Initial Default Settings Focus Q Auto Focus Focus Frame CS Off Anti Shake Off AF Area Spot L R Key Off Grid Off Icon Help On...

Page 128: ...Sounds Startup Sound 1 Half Shutter Sound 1 Shutter Sound 1 Operation Sound 1 Operation Play Startup Off File No Continue World Time Timestamp Off Adjust Date Style Language Sleep 1 min Auto Power Off...

Page 129: ...l not turn off Nothing happens when a button is pressed Remove the battery from the camera and then reload it Image Recording Image is not recorded when the shutter button is pressed 1 If the camera i...

Page 130: ...scenery or portraits Use Auto Focus for scenery and portrait shots page 57 3 You may be trying to use Auto Focus or Infinity when shooting a close up shot Use the Macro for close ups page 57 There is...

Page 131: ...out bad Use the following BEST SHOT scenes page 52 when shooting at night Night Scene for shooting night scenery only Night Scene Portrait for shooting people against night scenery Subjects are too d...

Page 132: ...tting may be On Change the setting to Off page 112 Other The wrong date and time are displayed or the wrong date and time are being stored along with image data The date and time setting is off Set th...

Page 133: ...nd date settings configured the first time after purchasing the camera are reset to their factory defaults when remove the camera s battery Load the camera s battery and reconfigure the time and date...

Page 134: ...connect the camera to a printer while the camera s USB settings are not compatible with the USB system of the printer page 80 Files could not be saved because battery is low Battery power is low so a...

Page 135: ...or SDXC memory card loaded in the camera is in the locked position You cannot store images to or delete images from a memory card that is locked There are no files There are no files in built in memo...

Page 136: ...d 1GB 2 Snapshot Recording Capacity 14M 4320x3240 Fine 4 86 MB 2 198 Normal 3 24 MB 4 298 3 2 4320x2880 Fine 4 29 MB 3 225 Normal 2 87 MB 4 336 16 9 4320x2432 Fine 3 57 MB 3 270 Normal 2 40 MB 5 402 1...

Page 137: ...ulate the number of images as a percentage of 1GB A single movie shoot with the For YouTube scene can have a maximum file size of 2048MB or a recording time of up to 15 minutes Image Quality Pixels Ma...

Page 138: ...in 35 mm format Six lenses in five groups including aspherical lens Zoom 5X optical zoom 4X digital zoom 20X in combination with optical zoom Up to 79 7X when HD Zoom and Digital zoom are used in comb...

Page 139: ...arging Time Approximately 5 seconds maximum Recording Snapshots Macro Self timer Continuous Shutter Normal Speed CS BEST SHOT Face Detection Anti Shake Lighting easy Mode Movies normal movie and For Y...

Page 140: ...23 C 73 F one image scroll approximately every 10 seconds 3 Approximate time using a 4GB SDHC memory card for a repeated cycle of 10 minutes recording followed by deletion of the recorded file 4 Appr...

Page 141: ...Rated Voltage 3 7 V Rated Capacitance 600 mAh Operating Temperature Requirements 0 to 40 C 32 to 104 F Dimensions 35 5 W x 40 2 H x 5 0 D mm 1 40 W x 1 58 H x 0 20 D Weight Approximately 14 g 0 49 oz...

Page 142: ...CASIO COMPUTER CO LTD 6 2 Hon machi 1 chome Shibuya ku Tokyo 151 8543 Japan MA1104 C MF...

Reviews: