background image

E-4

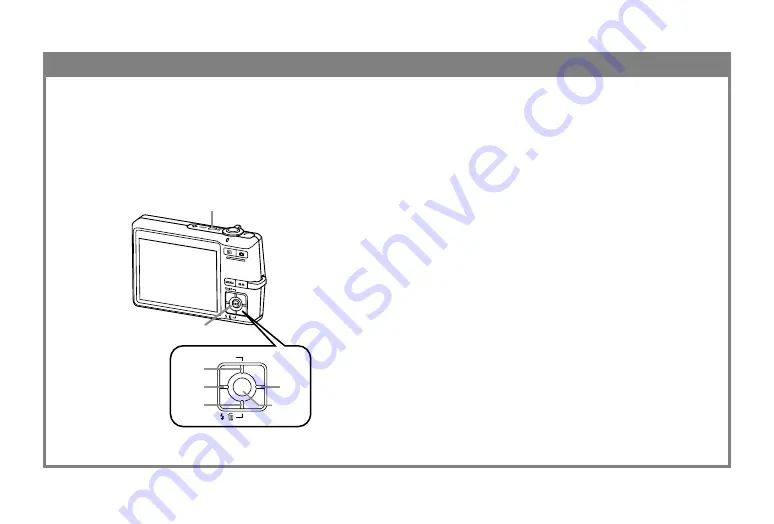
To configure display language and clock settings

1.

Press the power button to turn on the camera.

2.

Use [

], [

], [

], and [

] to select the language you

want.

3.

Press [SET] to register the language setting.

4.

Use [

], [

], [

], and [

] to select the geographical

area you want, and then press [SET].

5.

Use [

] and [

] to select the city you want, and then

press [SET].

6.

Use [

] and [

] to select the summer time (DST)

setting you want, and then press [SET].

7.

Use [

] and [

] to select the date format setting you

want, and then press [SET].

8.

Set the date and the time.

9.

Press [SET] to register the clock settings and exit the
setting screen.

• Be sure to configure the following settings before

using the camera to record images.

• If you make a mistake when setting the language

or clock with the following procedure, you will
need to use the camera’s menu to individually
change the language or clock settings.

DISP

SET

[

]

[

]

[

]

[

]

[SET]

2, 3, 4, 5, 6, 7, 8, 9

1

Summary of Contents for EX-Z700 - EXILIM Digital Camera

Page 1: ...orm as a PDF file on the CD ROM that comes bundled with the EX Z700 Note that to view the EX Z700 User s Guide you will have to install AdobeR Reader Consult your dealer or CASIO distributor if you ar...

Page 2: ...f something is missing contact your dealer as soon as possible Rechargeable Lithium Ion Battery NP 40 USB Cradle CA 29 USB Cable Basic Reference Camera Strap Special AC Adaptor AD C52S AC Power Cord T...

Page 3: ...e battery into the camera 2 Place the camera onto the USB cradle to charge the battery It takes about 180 minutes to achieve a full charge 1 2 3 Stopper 2 CHARGE lamp Charging Lights red Charging Comp...

Page 4: ...elect the summer time DST setting you want and then press SET 7 Use and to select the date format setting you want and then press SET 8 Set the date and the time 9 Press SET to register the clock sett...

Page 5: ...till gently press the shutter button all the way down The camera s built in memory can record only a few images and is intended for testing the camera or for emergency purposes only Using a memory car...

Page 6: ...d to display the image you want to delete 4 Use and to select Delete To exit the image delete operation without deleting anything select Cancel 5 Press SET to delete the image 1 Press PLAY This enters...

Page 7: ...shes twice per second 6 Lens 7 Flash Meaning Self timer countdown 10 to 3 seconds Self timer countdown 3 to 0 seconds Self timer Lamp Red Pattern 1 Pattern 2 Front General Guide The following illustra...

Page 8: ...le scene for automatic camera setup B Strap ring C Flash Delete button REC mode Cycles through the flash mode settings Auto Flash Flash Off Flash On Soft Flash Red eye reduction PLAY mode Displays the...

Page 9: ...r stop a slideshow 5 CHARGE lamp USB cradle Front Bottom G Stopper H Memory card slot I Battery compartment J Battery cover K Tripod screw hole Use this hole when attaching to a tripod L Connector Whe...

Page 10: ...ects the bundled AC adaptor here 7 AV OUT AV output port Connects the AV cable here The other end of the AV cable connects to a TV 8 USB port Connects the special USB cable here The other end of the U...

Page 11: ...WB appears only briefly and then disappears from the display 1 Flash mode indicator Auto Flash Flash Off Flash On Soft Flash Red eye reduction appears momentarily when you select Auto Flash as the fla...

Page 12: ...balance Self timer Recording type EV shift 7 Metering mode indicator None Multi Center Weighted Spot 8 Snapshots Image size 9 Snapshots Memory capacity Movies Remaining recording time 0 Snapshots Ima...

Page 13: ...PLAY mode file type Snapshot Movie Audio Snapshot Voice Recording 2 Image protection indicator 3 Folder name File name Example When a file named CIMG0023 JPG is stored in a folder named 100CASIO 100 0...

Page 14: ...LP Long Play 6 ISO sensitivity 7 Aperture value 8 Shutter speed value 9 Date and time 0 Metering mode indicator Multi Center Weighted Spot A White balance indicator AWB Auto Daylight Overcast Shade Da...

Page 15: ...ash Cont Off 10 sec 2 sec X3 Off Auto Off Spot Multi On Off Focus EV Shift White Balance ISO Self timer Off On Off On Off On Off On Off Focus Continuous Self timer Anti Shake AF Area AF Assist Light L...

Page 16: ...Purple 2 1 0 1 2 2 1 0 1 2 2 1 0 1 2 2 1 0 1 2 Auto Off Screen Sounds Startup File No World Time Timestamp Adjust Date Style Language Sleep Auto Power Off REC PLAY USB Video Out Format Reset Auto 2 A...

Page 17: ...when recording indoors Indoor fluorescent lighting can cause brightness problems Try using another non fluorescent light source No buttons or switches work Remove the battery from the camera Reload t...

Page 18: ...e exposure problems when recording under fluorescent lighting The camera automatically adjusts its sensitivity when lighting is dim This can cause static noise in images recorded under dim lighting Da...

Page 19: ...no responsibility for any loss or claims by third parties which may arise through the use of the EX Z700 CASIO COMPUTER CO LTD assumes no responsibility for any damage or loss caused by deletion of d...

Reviews: