background image

55

OTHER RECORDING FUNCTIONS

3.

Use [

] and [

] to

change the exposure
compensation value,
and then press [SET].

• Pressing [SET] registers

the displayed value.

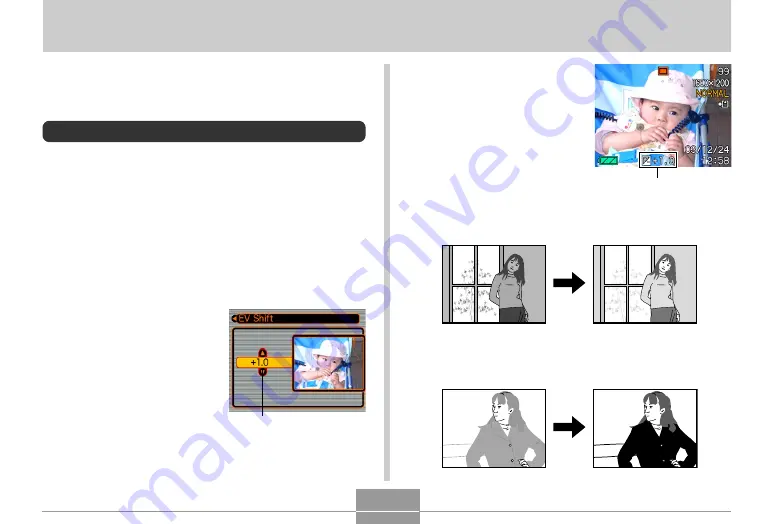
[

] : Increases the EV value. A higher EV value is best

used for light-colored subjects and backlight
subjects.

[

] : Decreases the EV value. A lower EV value is best

for dark-color subjects and for shooting outdoors
on a clear day.

OTHER RECORDING FUNCTIONS

This chapter describes the other powerful features and
functions that are available for recording.

Exposure Compensation (EV Shift)

Exposure compensation lets you change the exposure
setting (EV value) manually to adjust for the lighting of your
subject. This feature helps to achieve better results when
recording a backlit subject, a strongly lit subject indoors, or
a subject that is against a dark background.

EV Shift Range: –2.0EV to +2.0EV
Steps: 1/3EV

1.

In the REC mode, press [MENU].

2.

Select the “REC” tab,
select “EV Shift”, and
then press [

].

Exposure compensation
value

EV value

Summary of Contents for EX-M20U - 1

Page 1: ...DING FUNCTIONS This chapter describes the other powerful features and functions that are available for recording Exposure Compensation EV Shift Exposure compensation lets you change the exposure setting EV value manually to adjust for the lighting of your subject This feature helps to achieve better results when recording a backlit subject a strongly lit subject indoors or a subject that is agains...

Page 2: ... value to 0 0 causes the metering mode to change back to multi pattern metering You can use key customization page 72 to configure the camera to perform exposure compensation whenever you press 왗 and 왘 while in the REC mode Adjusting White Balance The wavelengths of the light produced by various light sources sunlight light bulb etc can affect the color of a subject when it is recorded White balan...

Page 3: ...usting White Balance Manually Select this setting Auto Manual Adjusting White Balance Manually Under some light sources automatic white balance under the Auto setting can take a long time to complete Also the auto white balance range color temperature range is limited Manual white balance helps to ensure that colors are recorded correctly for a particular light source Note that you must perform ma...

Page 4: ...r white balance adjustment is complete Dim lighting or pointing the camera at a dark colored object while performing manual white balance adjustment can cause the procedure to take a long time to complete 5 Press SET This registers the white balance settings and returns to the REC mode Using the BESTSHOT Mode Selecting one of the 15 BESTSHOT scenes automatically sets up the camera for recording a ...

Page 5: ... are provided as samples only Images recorded using a BESTSHOT scene may not produce the results you expected due to shooting conditions and other factors After selecting a BESTSHOT scene you can change to a different one by using 왗 and 왘 to scroll through available scenes When the one you want is displayed press SET NOTE You can use the key customization feature page 72 to configure the camera to...

Page 6: ...ess MENU 2 Select the REC tab select REC Mode and then press 왘 3 Use 왖 and 왔 to select BESTSHOT and then press SET This enters the BESTSHOT mode and displays a sample scene 4 Use 왗 and 왘 to display Register User Scene 5 Press SET 6 Use 왗 and 왘 to display the image whose setup you want to register as a BESTSHOT scene 7 Use 왖 and 왔 to select Save and then press SET This registers the setup Now you c...

Page 7: ...You can check the current setup of a scene by displaying the various setting menus When you register a BESTSHOT user setup it is automatically assigned a file name using one of the formats shown below depending on your camera model EX S20U UES20nnn JPE n 0 to 9 EX M20U UEM20nnn JPE n 0 to 9 To delete a BESTSHOT user setup 1 In the REC mode press MENU 2 Select the REC tab select REC Mode and then p...

Page 8: ...ot mode lets you record images of two people and combine them into a single image This makes it possible for you to include yourself in group images even when there is no one else around to record the image for you Coupling Shot is available in the BESTSHOT mode page 58 First Image This is the part of the image that does not include the person who is recording the first image Second Image Making s...

Page 9: ...use the monitor screen to compose the right side of the image taking care to align the actual background with the semi transparent image of the background of the left side image which remains on the monitor screen When everything is aligned correctly record the image Pressing MENU any time after step 5 of the above procedure cancels the first image and returns to step 5 Semi transparent image ...

Page 10: ...n on the monitor screen 2 Ask someone else to record a shot of you against your original background telling them to compose the image by using the semi transparent monitor screen image as a guide The camera stores the image produced by step 2 only Depending on how the image is actually composed in step 2 its background may not be exactly the same as the one you composed in step 1 Note that Pre sho...

Page 11: ...he background image is not saved in memory at this time The exposure white balance zoom and flash settings are fixed for this type of image 6 Next use the monitor screen to compose the subject with the semi transparent background shown on the monitor screen When everything is aligned correctly record the image This records the image composed on the monitor screen in step 6 The reference background...

Page 12: ... WAVE ADPCM file is WAV Recording Time Up to about 30 seconds per image Audio File Size Approximately 240KB 30 second recording of approximately 8KB per second 1 In the REC mode press MENU 2 Select the REC tab select REC Mode and then press 왘 3 Use 왖 and 왔 to select and then press SET This enters the Snapshot Audio Mode 4 Press the shutter release button to record the image After the image is reco...

Page 13: ...rding Your Voice The Voice Recording Mode provides quick and easy recording of your voice Audio Format WAVE ADPCM recording format This is the Windows standard format for audio recording The file extension of a WAVE ADPCM file is WAV Recording Time Approximately 40 minutes with built in memory Audio File Size Approximately 240KB 30 second recording of approximately 8KB per second 1 In the REC mode...

Page 14: ...u press the shutter release button when memory becomes full or when the battery goes dead Audio Recording Precautions Keep the microphone on the front of the camera pointed at the subject Take care that you do not block the microphone with your fingers Good recording results are not possible when the camera is too far from the subject Operating camera buttons during recording can cause button nois...

Page 15: ...for some reason you can use EV shift exposure compensation to move it left or right in order to achieve better balance Optimum exposure can be achieved by correcting exposure so the graph is as close to the center as possible When the histogram is too far to the left it means that there are too many dark pixels This type of histogram results when the overall image is dark A histogram that is too f...

Page 16: ...ting conditions can cause the histogram to indicate exposure that is different from the actual exposure of the image when it was recorded This histogram does not appear when you are using Coupling Shot page 62 REC Mode Camera Settings Specifying ISO Sensitivity Use the following procedure to select the ISO sensitivity setting that suits the type of image you are recording 1 In the REC mode press M...

Page 17: ...the key customization feature page 72 to configure the camera so the ISO sensitivity setting changes whenever you press 왗 and 왘 while in the REC mode Turning the On screen Grid On and Off You can display gridlines on the monitor screen to help you compose images and ensure that the camera is straight when recording To do this Display the grid Hide the grid Select this setting On Off 1 In the REC m...

Page 18: ...reen for about one second immediately after they are recorded Do not display images immediately after they are recorded Select this setting On Off Assigning Functions to the 왗 and 왘 Keys A key customization feature lets you configure the 왗 and 왘 keys so they change camera settings whenever they are pressed in the REC mode After you configure the 왗 and 왘 keys you can change the setting assigned to ...

Page 19: ...cycle through white balance settings page 56 ISO sensitivity 왗 and 왘 cycle through ISO sensitivity settings page 70 No function assigned Select this REC Mode Flash EV Shift White Balance ISO Off Assigning Functions to the 왖 and 왔 Keys A key customization feature lets you configure the 왖 and 왔 keys so they change camera settings whenever they are pressed in the REC mode After you configure the 왖 an...

Page 20: ... Select this REC Mode Digital Zoom Flash White Balance Self timer Off Specifying Power On Default Settings The camera s mode memory feature lets you specify the power on default settings individually for the REC mode flash mode white balance mode ISO sensitivity and digital zoom mode Turning on mode memory for a mode tells the camera to remember the status of that mode when you turn off the camera...

Page 21: ...mory settings If you turn the camera off while in the BESTSHOT mode the camera s Flash White Balance and ISO Sensitivity will be configured according to the BESTSHOT sample scene when you turn it back on again regardless of mode memory on off setting Resetting the Camera Use the following procedure to reset all of the camera s settings to their initial defaults as shown under Menu Reference on pag...

Reviews: