background image

E-13

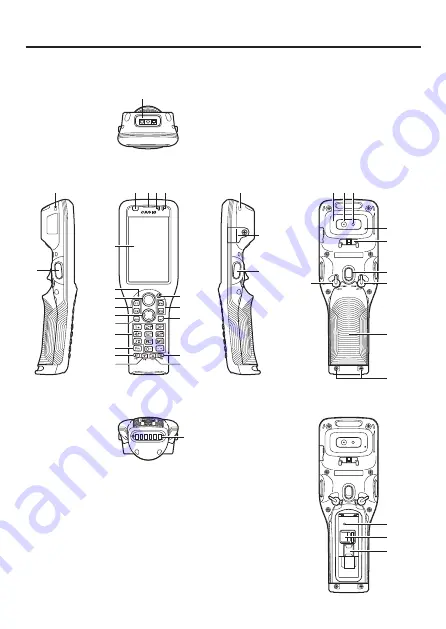
Part Names

Smart Handheld Terminal (DT-X400)

<Top>

<Left>

<Front>

<Bottom>

The illustration shows DT-X400-WC21.

<Right>

<Back>

(With the battery pack cover fitted)

<Back>

(With the battery pack cover removed)

23

19

4

19

24 2526

1 2 3

21

5

10

13

14

15
16

11

17

18

20

22

12

9

8

6
7
9

30

27

28

29
30

31

34

35

36

32

33

Summary of Contents for DT-X400 Series

Page 1: ...Rugged Smart Handheld Terminal User s Guide Series Be sure to read Safety Precautions inside this guide before trying to use your Rugged Smart Handheld Terminal E DT X400 ...

Page 2: ...SD 3C LLC FeliCa is a registered trademark of Sony Corporation All other company or product names mentioned herein are trademarks or registered trademarks of their respective owners This product uses software licensed on the basis of GNU General Public License GPL GNU Lesser General Public License LGPL and other licenses Relevant terms and conditions shall also apply to this software For details o...

Page 3: ...brating Touch Panel Alignment E 24 Using the Laser Scanner DT X400 10 E 25 Adjusting the Laser Light Emission Width E 27 Using the Imager DT X400 20 C21 WC21 C31 WC31 E 28 Using a SIM Card E 29 Using a microSD Card E 32 Handling the NFC E 33 Turning the Power On Off and Sleep E 34 Performing Communications E 35 Rebooting or Resetting the Terminal E 36 DT X400 Specifications E 37 Installing and Rem...

Page 4: ...with respect to the contents or use of this manual and specifically disclaims any express or implied warranties of merchantability or fitness for any particular purpose After Service Should this product ever malfunction contact your original retailer providing information about the product name the date you purchased it and details about the problem ...

Page 5: ...ect or avoidance of the warning and caution statements in the subsequent pages causes the danger of fire electric shock malfunction and damage on the goods as well as personal injury Markings and Symbols The following are the meanings of the markings and symbols used in these Safety Precautions Danger This symbol indicates information that if ignored or applied incorrectly creates the danger of dea...

Page 6: ...yes Ce produit utilise une lumière laser Ne regardez jamais directement la lumiere laser ni ne dirigez la lumiere laser dans les yeux de quelqu un Avoid contact with fire Do not bring the terminal into contact with fire Doing so could cause the battery to burst and result in a fire or injury Storage and Operation Locations Do not store or use the product in any of the locations described below Areas...

Page 7: ...ehicle or while walking Caution LED Light Scanner and Other Light Emitting Functions Do not fire LED light the scanner or other light emitting functions while pointed in the direction of a person operating a motor vehicle Using the Wireless Data Communication Function Warning Interference with the Operation of Other Equipment Using Wireless Data Communication Should you notice radio interference or...

Page 8: ...water or other moisture Do not use a battery that is wet Load a battery with its poles plus and minus facing correctly Should fluid from the battery pack accidentally get into your eyes or on the skin do not rub it Immediately rinse it off with clean tap water and then consult a physician Warning Immediately after noticing any fluid leak abnormal odor overheating discoloration deformation or other ba...

Page 9: ...he power plug into the outlet as far as it will go Continued use creates the risk of fire and electric shock Do not place a flower vase or any other liquid container on top of the AC adaptor or power cord Before leaving the product unattended unplug the AC adaptor from the power outlet and move the product to a location away from animals Caution Check that the connector is properly oriented and then...

Page 10: ...ther than Casio genuine battery packs When buying a battery pack pay due attention to buy a Casio genuine battery pack Regulatory Information Europe Manufacturer CASIO COMPUTER CO LTD 6 2 Hon machi 1 chome Shibuya ku Tokyo 151 8543 Japan Importer Casio Europe GmbH Casio Platz 1 22848 Norderstedt Germany www casio europe com DT X400 Options of DT X400 Please keep all information for future referenc...

Page 11: ...ners gasoline kerosene solvents or oils or substances such as cleaners adhesives paints medications or toiletries that contain those materials to the plastic case or cover may cause discoloration or other damage LCD panel The following are characteristics of the LCD panel and do not indicate a fault The LCD panel is manufactured using high precision technology and features a minimum of 99 99 effect...

Page 12: ...on Note also that even when not being used the battery pack will gradually discharge If this situation continues for a long period several months or more the battery pack will become overdischarged which may impair quality and performance The battery pack gradually deteriorates over time In particular storing or using the fully charged battery pack at high temperatures tends to accelerate battery ...

Page 13: ...use water to leak into the device Check that the waterproof seals on the battery pack cover and USB port cover are free from cracks and other damage Close the battery pack cover lock switch firmly until the switch is in the locked position Avoid opening and closing the battery pack cover or USB port cover in locations near water or exposed to sea breezes and do not open or close them with wet hands...

Page 14: ...d Smart Handheld Terminal DT X400 Series USB Cradle HA S60IO Ethernet Cradle HA S62IO Multiple Battery Charger HA S36DCHG Dual Battery Charger HA S32DCHG Battery Pack HA S20BAT Screen Protect Sheet HA S90PS10 Hand Belt HA S95HB AC Adapter 5V4A AD S50400A AC Adapter 12V5A AD S12500A USB Type C Cable HA S81USBC Options For the latest options list refer to the ON LINE manual available at https suppor...

Page 15: ...Top Left Front Bottom The illustration shows DT X400 WC21 Right Back With the battery pack cover fitted Back With the battery pack cover removed 23 19 4 19 24 2526 1 2 3 21 5 10 13 14 15 16 11 17 18 20 22 12 9 8 6 7 9 30 27 28 29 30 31 34 35 36 32 33 ...

Page 16: ... 13 Numeric Keys Used to enter numeric values and decimal points 14 Fn Key Used to make various settings in combination with the function keys or numeric keys or when starting a pre registered application 15 SP Key Enters a space Can also be assigned any function 16 Volume Down Key Volume down 17 Volume Up Key Volume up 18 Mode Key The key switches the character input mode either characters in low...

Page 17: ...harge the battery pack via either Cradle or Cradle type Battery Charger 34 Reset Switch Cold reset 35 microSD Card Slot Insert microSD card after removing battery pack 36 nanoSIM Card Slot Insert nanoSIM card after removing battery pack Getting Ready to Use In the step 3 be sure to charge the battery pack completely 1 Confirm that all the items listed on page E 12 are included in the package 2 Inst...

Page 18: ...e figure Release film Screen protect sheet Release film 3 Hold tape remove the release film and attach the screen protect sheet to the terminal Screen Tips So that the screen protect sheet is affixed uniformly ensure that its edges are under the lip around the outside of the liquid crystal screen Yes Yes No 4 Hold tape and remove the release film ...

Page 19: ...backup of all important data The battery pack powers normal operation and also provides power required to maintain memory contents while the backup battery provides backup power to maintain memory contents Because of this you should not remove the battery pack if the backup battery is dead Removing the battery pack while the backup battery is dead causes data in the memory to be corrupted or lost ...

Page 20: ...tches to the LOCK position as shown in the illustration Precautions for Use Do not use any battery packs other than the specified one The battery pack has a limited service life Depending on the way the battery pack is charged its degradation may accelerate or its capacity be reduced so that it cannot be used for as long If charging the battery pack does not restore its full functionality this indi...

Page 21: ...ttery pack in the direction indicated by the arrow 7 Install the replacement battery pack following steps 2 to 3 of the battery pack installation procedure Precautions for Use In the Hot Swap mode even if the battery pack is removed your work state is saved up to 4 minutes with the memory RAM backup function The memory RAM backup time may decrease depending on the backup battery charging level In ...

Page 22: ...shing Charging DT X400 cannot start up because the charge remaining in the battery pack is too low Wait until the charging status LED stops flashing and lights orange Charging the battery pack Slide the battery pack into the recess in the cradle and so that the battery pack terminals are aligned with the battery pack power contacts Cradle charging status LED display Red Charging Green Charging comp...

Page 23: ...ernate flashing Standby because the battery pack is faulty is installed incorrectly or is outside the charging temperature range Charging begins when temperature returns to the charging temperature range Precautions for Use Take care not to trap objects such as the strap in the cradle The power data communication terminal and the battery pack power contacts should be cleaned periodically using an i...

Page 24: ... as shown in the illustration Then push the hook ends into the strap holes in the terminal Check that the hook is securely attached 2 Push the metal hand belt fitting so that it engages with the mount on the terminal as shown in the illustration Check that the fitting is securely attached 3 Feed the end of the hand belt through the hand belt hook fold it back to a suitable length and then fasten it ...

Page 25: ...u pull it out of the strap holes as shown in the illustration Attaching the Anti slip Hook How to attach the Anti slip Hook 1 First check that the anti slip hook is oriented so that the projections are facing towards you as shown in the illustration Then push the hook ends into the strap holes in the terminal Check that the hook is securely attached Removing the Anti slip Hook 1 Use the stylus to ...

Page 26: ...thod Press the Fn key and then press the 4 key after confirming that Fn is displayed at the top of the screen The following screen is displayed You can also display this screen by navigating as follows Application drawer TouchCalibration Press the stylus against the center of the target mark mark as indicated on the screen Press the stylus against the target mark on the screen 5 times to display th...

Page 27: ...ays a green light Precautions for Use If you have problem not properly reading a code change the angle and or the distance between the code and the terminal and try reading it again A bar code can be read from a distance of 43mm to 890mm The actual reading distance depends on the symbology and the resolution Soiling on the barcode reader port may prevent successful reading Should the reader port b...

Page 28: ...tance from the bar code so that the bars enter the light when scanning large bar codes Margin Margin Good Good Good Bad Bad Bad Bad Warning Never look directly into the laser light The products with the integrated Laser Scanner module scan bar codes using laser light Never look directly into the laser light or shine the laser light into the eyes ...

Page 29: ... emission width when it is improper Before adjusting the laser print out a copy of the emission width adjustment barcode on page E 28 enlarged to A4 size 1 Navigate to the menus in the following sequence Application drawer Tools ScanSetting ScanSetting appears as shown in the screen 2 Tap Options and tap Laser swing width calibration ...

Page 30: ...1 WC31 1 After turning on the power position the barcode reader close to a bar code and then press the trigger key 2 The laser emits light and scans the bar code If scanning is completed normally Notification LED displays a green light Precautions for Use If you have problem not properly reading a code change the angle and or the distance between the code and the terminal and try reading it again T...

Page 31: ...k before installing or removing a SIM card Installation 1 Turn the terminal off shutdown 2 Remove the battery pack Steps 5 and 6 in the battery pack replacement procedure on page E 19 3 Flip back the SIM card cover 4 Insert the SIM card into the card slot as shown in the figure 5 Close the SIM card cover 6 Install the battery pack Steps 2 and 3 in the battery pack replacement procedure on page E 18 ...

Page 32: ...5 and 6 in the battery pack replacement procedure on page E 19 3 Flip back the SIM card cover 4 Pull the SIM card out of the card slot as shown in the figure 5 Close the SIM card cover 6 Install the battery pack Steps 2 and 3 in the battery pack replacement procedure on page E 18 ...

Page 33: ...all it correctly Using excessive force when installing or removing a SIM card could damage the card Touching the IC area when installing a SIM card could result in damage to the card due to soiling or an electrostatic charge When turning off the smart handheld terminal be sure to select Shutdown and not Hot Swap ...

Page 34: ...d 3 in the battery pack replacement procedure on page E 18 Precautions for Use The front and back of the card are different so the card must be oriented correctly when inserted into the slot Inserting the card incorrectly could damage the card and or the slot Take care when inserting cards When turning off the smart handheld terminal be sure to select Shutdown and not Hot Swap Removal 1 Turn the ter...

Page 35: ... other card The NFC may not read it correctly A metal object near by the NFC Reader may cause the NFC not to read card correctly Take the card out of a wallet if the wallet is with metal object before applying it to the NFC Reader Apply card in parallel with the NFC Reader to touch the NFC Reader with the card The NFC reader function in the terminal uses very weak radio waves that do not require a...

Page 36: ...n after power is turned on remaining power of the battery pack may be low Completely charge the battery pack and then turn the power on again Turning the Power Off Shutdown 1 With the screen displayed hold down the Power key until the Power menu is displayed 2 Tap Power off Sleep Standby 1 Press the Power key with the screen displayed In the sleep state the screen is turned off but the terminal rema...

Page 37: ... terminal in Bluetooth nearby these devices and electrical appliances with their powers being turned on communication may be interrupted or radio receptions may be interfered Normal communication may not be possible in an area near a broadcast trans mitter or wireless transmitter If this happens move the terminal to a different location Normal communication may not be possible in areas exposed to s...

Page 38: ...h the screen turned on hold down the Power key until the Power menu is displayed 2 Tap Reboot Forced Reboot 1 Hold down the Power key until the terminal vibrates approx 12 seconds Reset 1 Open the battery cover and remove the battery pack 2 Hold down the Reset switch Approx 2 seconds Tips Use the stylus pen supplied with the terminal to hold down the Reset switch 3 Re install the battery pack and ...

Page 39: ...ker For voice sound input and voice call at phone WLAN 2 IEEE 802 11a b g n Bluetooth 3 Specification Ver 5 0 WAN 4 LTE W CDMA GSM GPS 5 GPS GLONASS BeiDou NFC 6 Supported Cards ISO1443 TypeA ISO1443 TypeB ISO15693 FeliCa microSD SDXC USB USB 2 0 OTG SIM nanoSIM Card Main Battery Lithium battery rechargeable Sub Battery Lithium battery rechargeable Not replaceable Operating Period 7 30 hours At roo...

Page 40: ...7 level External dimensions Approx 46mm x 197mm x 32mm Weight Approx 260g Vibrator notification of scanner Sensors Proximity sensor Light Ambient sensor Acceleration sensor RTC Maximum monthly rate 2min10sec Use main battery Maximum monthly rate 8min38sec Use sub batery only ...

Page 41: ...13 JAN13 Codabar NW 7 Code39 Interleaved2of5 ITF MSI Code93 Code128 GS1 128 EAN128 GS1 DataBar Omnidirectional RSS 14 GS1 DataBar Limited RSS Limited GS1 DataBar Expanded RSS Expanded GS1 DataBar Stacked RSS 14 Stacked GS1 DataBar Expanded Stacked RSS Expanded Stacked GS1 DataBar Truncated 2D Scanner Imager Method CMOS Imager 1280 800 monochrome Aimer method Laser 650nm 1mW Laser emit angle Redire...

Page 42: ...ataMatrix Maxicode QR Code Micro QR HanXin Code 2 WLAN Speficications Item Specification Remark WLAN 802 11a b g n Frequency Range 2412 MHz 2472 MHz 1 13ch 5180 MHz 5320 MHz 36 64ch 5500 MHz 5700 MHz 100 140ch 5745 MHz 5825 MHz 149 165ch 802 11d Allowed frequency range can be used according to countries or regions Baud rate 802 11a g 54Mbps maximum 802 11b 11Mbps maximum 802 11n HT20 2 4 5GHz 72Mbps...

Page 43: ...DD 41 2496 2690MHz 2496 2690MHz W CDMA Communication Audio Data Packet Baud rate Downlink 42Mbps maximum Uplink 11Mbps maximum Frequency range Band BAND 1 1920 1980MHz 2110 2170MHz BAND 6 830 840MHz 875 885MHz BAND 8 880 915MHz 925 960MHz GSM Communication Audio Data Packet Protocol GSM GPRS EDGE Frequency range Band EGSM900 880 915 MHz 925 960 MHz DCS1800 1710 1785 MHz 1805 1880 MHz 5 GPS Speficic...

Page 44: ...r scanning 1sec 8 Camera Flash is unavailable in 20 ºC 11 ºC Battery pack charge operation 0 50 ºC For the temperature of 0 10 ºC and 40 50 ºC in order to protect battery cell charge control changes Therefore in these temperature environment battery indicator might not become 100 after the charge ends and charge status LED turns green Charging stops if the battery pack s internal temperature is 0 ...

Page 45: ...sed Installation 1 Insert the protruding part of the AC adapter plug into the recess in the top of the AC adapter until the plug clicks into place Removal 1 Push the AC adapter plug release lever in the direction indicated by the arrow in the figure and then pull out the AC adapter plug in the direction of the arrow Precautions for Use Do not insert the plug only into the power outlet Arrow pointin...

Page 46: ...ery pack fault or outside charging temperature range 4 Power Supply Data Communication Terminal Used to supply power to the DT X400 or for data communication 5 Power Supply LED Indicates the power status and the mounting status of the DT X400 Red Power on DT X400 is not installed Green Power on DT X400 mounted correctly 6 Battery Pack Contacts Used to charge the battery pack Installing and Connect...

Page 47: ...n the charging status LED is green and charging is completed Water or other moisture on the power contacts could cause sparking or an electric shock and soiled contacts could block the connection and impair charging functionality To ensure safety clean the power contacts by wiping them off with a dry cloth or cotton bud after you disconnect the AC adapter When disconnecting the AC adapter from the ...

Page 48: ...onnect a corresponding USB peripheral device 4 USB Client Port Used to connect to a computer 5 Selector Switch Used to switch between a USB connection and a LAN connection LAN LAN A USB host B USB client 6 Charging Status LED Battery Pack Shows the charging status Red Charging Green Charging complete Flashing alternately red green Battery pack fault or outside charging temperature range 7 Power Su...

Page 49: ...he AC adapter jack on the back of the Ethernet Cradle 2 Plug the AC adapter into a mains power outlet 3 When using a LAN plug the LAN cable into the LAN port and then connect the cable to the computer or to a hub 4 Align the terminals on the bottom of the DT X400 with the power supply terminals in the Ethernet Cradle before inserting the DT X400 Push the DT X400 fully into the Ethernet Cradle unti...

Page 50: ...unctionality To ensure safety clean the power contacts by wiping them off with a dry cloth or cotton bud after you disconnect the AC adapter When disconnecting the AC adapter from the mains power outlet and DT X400 do so by gripping the connector and not by pulling on the cord Ethernet Cradle HA S62IO Specifications 1 LAN specifications Communications method IEEE 802 3 compliant Media type 10base T ...

Page 51: ...le Battery Charger HA S36DCHG The optional Multiple Battery Charger HA S36DCHG can concurrently charge two battery packs installed in the respective DT X400s Part Names and Operation Side Top Bottom 6 4 3 2 1 4 5 ...

Page 52: ...ment Holes Used to connect Multiple Battery Chargers to each other 5 Power Contacts Power is supplied to the DT X400 via these contacts 6 Power LED This LED indicates the power status and the mounting status of the DT X400 Off Power off Green Power on DT X400 mounted correctly Red Power on DT X400 not mounted Use these bundled items to join multiple chargers together Bottom bracket Screws for bracke...

Page 53: ...e returns to the charging temperature range Orange flashing Charging DT X400 cannot start up because the charge remaining in the battery pack is too low Wait until the charging status LED stops flashing and lights orange Precautions for Use Even if the battery in the DT X400 is already fully charged charging will begin when you set the DT X400 in the Ethernet cradle It may take several minutes for t...

Page 54: ... connector covers of the Multiple Battery Chargers you want to connect to each other 2 Connect the two Multiple Battery Chargers as shown below 3 Fix the side and bottom brackets in place with two screws on each bracket You can repeat the above steps to connect up to 3 Multiple Battery Chargers Attach the connection brackets so that the front side faces outwards The front side has protruding ribs ...

Page 55: ...these as spare for use in future Always disconnect the AC adaptor before joining multiple chargers together Specifications 1 Charging specifications Charging method Constant voltage constant current charging Charging time Approx 4 hours 2 AC adapter specifications Standard AD S12500A Input 100 240V AC 50 60 Hz 1 5A Output 12V DC 5A 3 Operating environment Operating temperature 0 C to 40 C Operating ...

Page 56: ...ble Dual Battery Charger HA S32DCHG can be used to simultaneously charge two battery packs Part Names and Operation Left Right Top Bottom 3 2 1 5 4 3 Use these bundled items to join multiple chargers together Bottom bracket Screws two for brackets Accessories ...

Page 57: ... the charger as safety precaution and wipe off soil on the power contacts with a dry and soft cloth or with cotton swab The battery packs may become warm during charging This is normal and does not indicate a fault Do not cover or place objects on top of the battery charger during charging Do not remove batteries or disconnect the AC adapter during charging Repeatedly installing and removing rechar...

Page 58: ...ltiple Dual Battery Chargers You can connect up to three Dual Battery Chargers Doing so makes it possible to supply power to all the Dual Battery Chargers using one dedicated AC adaptor 1 As shown in the illustrations below remove the connector covers of the Dual Battery Chargers you want to connect to each other Connector covers 2 Connect the two Dual Battery Chargers as shown below 3 Turn over t...

Page 59: ... be used to supply power to the DT X400 Connecting to a computer 1 Connect the USB Type C cable to the USB Type C port on the DT X400 Precautions for Use Water or other moisture on the DT X400 and USB Type C cable power supply data communication terminal could cause sparking or an electric shock and soiling on the terminal could block the connection and impair charging functionality To ensure safe...

Page 60: ...or chemical decomposition by the battery pack itself If the battery pack fails to hold its operating duration after it has been fully charged replace it with a new one The battery pack may reach the end of its service life When buying a battery pack you should purchase a Casio genuine battery pack Battery Pack Specifications Model HA S20BAT Rated Capacity 2900mAh 10 73Wh Rated Voltage 3 7V Dimensi...

Page 61: ...CASIO COMPUTER CO LTD 6 2 Hon machi 1 chome Shibuya ku Tokyo 151 8543 Japan PN430149 001 MO1812 A 2018 CASIO COMPUTER CO LTD ...

Reviews: