background image

E-54

Connecting to a Computer

3.

While holding down the 

cs

 (FUNCTION)


button, press the 

dr

 (USB DEVICE MODE)


button.

This will enter the storage mode, which enables data 
transfer with the connected computer. The 

cs


(FUNCTION)

 button lamp will flash and the display 

will appear as shown below.

To exit the storage mode at any time, press the 

cs


(FUNCTION)

 button. This is the only button 

operation that is supported while the Digital Piano is 
in the storage mode.

You will not be able to enter the storage mode while 
any one of the following operations is in progress.
Metronome, Auto Accompaniment, song playback, 
recorder (on), Auto Accompaniment editing, Music 
Preset editing, data transfer between the Digital 
Piano and USB flash drive.

4.

If your computer is running Windows XP, 
double-click “My Computer”.

*

Under “Devices with Removable Storage”, you should 
be able to see a folder representing Digital Piano 
memory or the USB flash drive loaded in the Digital 
Piano.

*

Windows Vista, Windows 7: Double-click “Computer”.
Mac OS: Skip step 4 and double-click “PIANO” on 

your Mac desktop.

5.

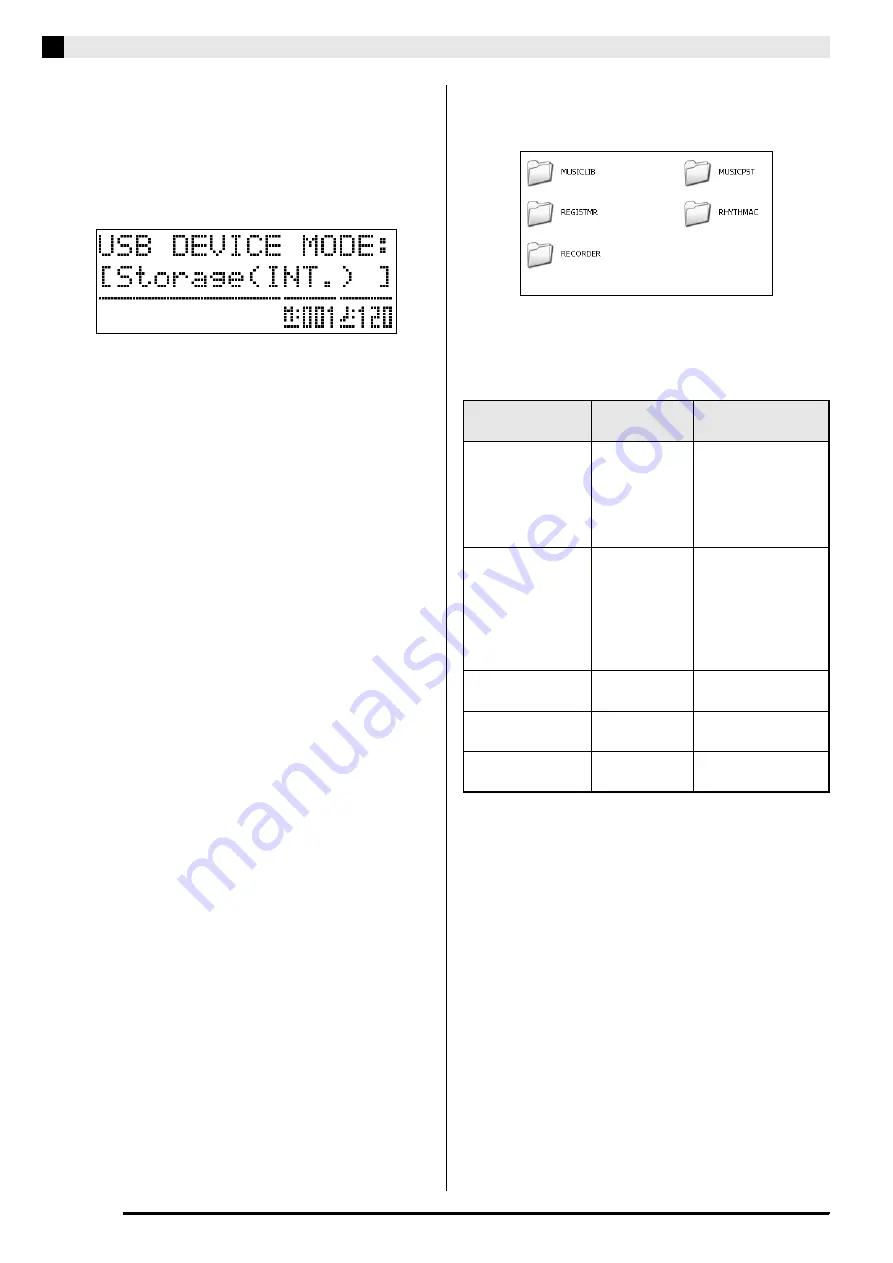
Double-click “PIANO”.

You now should see five data folders, one for each data 
type.

6.

Referring to the table below, open the folder 
that corresponds to the type of data you want 
to transfer.

Data types and contents are the same as those when 
saving Digital Piano data to or loading it from a USB 
Flash Drive. See “USB Flash Drive” (page E-45) for 
more information.

To load this 
type of data

Open this data 
folder

Data File Name

User rhythms 
(page E-18)

RHYTHMAC

BIDRHYnn.AC7 
(nn: 01 to 10)
BIDRHYnn.Z00 
(nn: 01 to 10) 
BIDRHYnn.CKF 
(nn: 01 to 10)

User songs 
(page E-23)

MUSICLIB

BIDSNGnn.MID 
(nn: 01 to 10)
(SMF Format 0 or 
Format 1)
BIDSNGnn.CM2 
(nn: 01 to 10)
(CASIO format)

User Music Presets 
(page E-27)

MUSICPST

BIDMPSnn.MPS 
(nn: 01 to 50)

Recorder songs 
(page E-33)

RECORDER

BIDRECnn.CSR 
(nn: 01 to 05)

Registration 
(page E-31)

REGISTMR

BIDREGAL.CR6

Summary of Contents for AP-650M

Page 1: ...da informaci n para tener como referencia futura Safety Precautions Before trying to use the Digital Piano be sure to read the separate Safety Precautions Precauciones de seguridad Antes de intentar u...

Page 2: ...not operate normally or has been dropped The apparatus shall not be exposed to dripping or splashing and that no objects filled with liquids such as vases shall be placed on the apparatus The power i...

Page 3: ...e Song Recorder E 36 Re recording Part of a Recorder Song Punch in Recording E 37 Recording to a USB Flash Drive Audio Recorder E 39 Other Settings E 41 Configuring Settings E 41 USB Flash Drive E 45...

Page 4: ...E 2 General Guide 1 bn bo bp bq br bs bt ck 5 6 7 8 9 bk bl bm 3 2 4 dk dl dm dn do dp dq dr ds cm cl cn co cp cq cr cs ct er eq dt em en eo ep ek el Bottom Rear Front...

Page 5: ...CCOMP ON OFF PART button ck TEMPO RHYTHM EDITOR MUSIC PRESET buttons cl Display cm GRAND PIANO button cn ELEC PIANO button co ORGAN button cp STRINGS button cq VARIOUS button cr GM TONES button cs FUN...

Page 6: ...data and settings to their initial factory defaults 1 Turn off the Digital Piano 2 While holding down both the cr GM TONES and cs FUNCTION buttons press the 1 P button The Digital Piano will turn on a...

Page 7: ...the standby state If you do not plan to use the Digital Piano for a long time or if there is a lightning storm in your area be sure to unplug the AC adaptor from the power outlet Auto Power Off This D...

Page 8: ...u want Example To select 002 Jazz Organ NOTE Pressing q and w at the same time will jump to tone 001 of the currently selected group Holding down either button changes the tone number at high speed Se...

Page 9: ...lays a different tone Example To split the keyboard between the GM SLAP BASS 1 tone on the left lower range and the GRAND PIANO CONCERT tone on the right upper range 1 Press the dq SPLIT button This c...

Page 10: ...are too high You can use octave shift to shift the octaves of the upper range and lower range upwards or downwards in octave units 1 While holding down the cs FUNCTION button press the cm GRAND PIANO...

Page 11: ...in the range of 3 to 0 to 3 6 Press the cs FUNCTION button This will exit the brilliance screen and cause the FUNCTION lamp to go out NOTE See Other Settings page E 41 for details about using the cs...

Page 12: ...t corresponds to the element whose setting you want to change 2 Use the ct w q buttons to select the settings type you want 3 Press the cs FUNCTION button This exits the element type selection screen...

Page 13: ...methods you can use to change the tempo setting by pressing ck q faster and ck w slower buttons or by tapping a beat with a button To adjust the tempo using ck TEMPO w q buttons 1 Use the ck TEMPO w...

Page 14: ...reverberate Damper Resonance just like the damper pedal on an acoustic grand piano Half pedal operation pressing the pedal part way is also supported z Soft Pedal Pressing this pedal while playing su...

Page 15: ...hile holding down the cs FUNCTION button press the dq SPLIT button This displays the Duet Mode on off screen shown in step 2 under Configuring the Digital Piano for Duet Play page E 13 If the Duet Mod...

Page 16: ...its upper lamp is lit This enables Auto Accompaniment Each press of the button toggles between the RHYTHM and MUSIC LIBRARY lamps 2 Use the Rhythm List page A 5 to look up the group and the number of...

Page 17: ...T STOP button Example To play a C chord 9 Play other chords with left hand as you play the melody with your right hand You can use CASIO Chord or other simplified chord fingering modes to play chords...

Page 18: ...nd the melody For information about the types of chords you can finger and their fingerings see the Fingering Guide page A 10 Fingered 1 Play the component notes of the chord on the keyboard Fingered...

Page 19: ...Auto Accompaniment One Touch Preset gives you one touch access to tone and tempo settings that go well with the currently selected Auto Accompaniment rhythm pattern 1 Hold down the bn RHYTHM button fo...

Page 20: ...ght indicating that the pattern is being edited Each press of bp NORMAL FILL IN toggles between NORMAL and FILL IN and each press of bq VARIATION FILL IN toggles between VARIOUS and FILL IN The applic...

Page 21: ...part drum bass etc accompaniment data with that of the specified rhythm number 1 001 to 190 Rhythm number 2 3 cm Tone Select Tone Switches the part tone instrument to that of the specified tone number...

Page 22: ...rhythm number and rhythm name character you want to change Use the ct w q buttons to select the number or character you want The rhythm name characters you can select are shown below To input a space...

Page 23: ...ll through songs manually with the ct w q buttons 2 Press the bs PLAY STOP button This stops demo song playback Playback of the demo songs will continue in an endless loop until you press the bs PLAY...

Page 24: ...d 5 Press the bs PLAY STOP button This starts playback of the song Press the bq FF button to perform a fast forward operation or the bp REW button for rewind Pressing and releasing either button moves...

Page 25: ...releasing either button moves one measure while holding down a button scrolls at high speed Pressing the br PAUSE button pauses playback Press again to resume song playback 6 Press the bs PLAY STOP b...

Page 26: ...ount at the Beginning of a Song You can configure the Digital Piano to sound a count before playback of a song starts which helps to get the timing right when you are playing along on the keyboard For...

Page 27: ...he USB flash drive that contains the data you want to play back into your Digital Piano s USB flash drive port 1 Press the ds AUDIO RECORDER button This will cause the button s lamp to light 2 While h...

Page 28: ...rhythm etc of the selected Music Preset The following are the settings that are included in a Music Preset 3 Press the bs START STOP button to start Auto Accompaniment with the chord progression of t...

Page 29: ...he Music Preset parameters 5 After editing everything you want press the dm EXIT button This will display a message asking if you want to save the user preset 6 Press the ct YES button This displays a...

Page 30: ...ord The timing of a chord progression is expressed as a series of three values separated by colons such as 001 1 00 indicating measure 1 001 beat 1 and tick 00 2 This series of three values is referre...

Page 31: ...ew step without chord that is equal to the time of the resolution will be inserted temporarily into the Music Preset Fingering a chord for the new step will cause the step to be registered as part of...

Page 32: ...N Sounds the part 5 9 CHORD1 5 ON OFF Chord 1 5 on off Toggles the Chord 1 through 5 parts page E 19 on or off OFF Mutes the parts ON Sounds the parts 10 INTRO CHORD Intro chord Selects from among maj...

Page 33: ...g area in the currently selected bank Registration Data Types z Tone Settings Tone numbers main layer split Layer on off Layer balance Split on off Split point Octave shift Brightness Reverb Chorus Tr...

Page 34: ...area you specify Example Bank 4 Area 1 Recalling a Registration 1 Press the dk BANK button to select the bank that contains the setup you want to recall 2 Use the buttons dl to do to select the area w...

Page 35: ...cycles through modes as shown below 2 Configure the tone rhythm and other settings you want to use The settings you configure here will be included as part of the recorded song data For details about...

Page 36: ...is cut off while recording is in progress everything you recorded up to that point will be deleted Take care so power is not turned off accidentally during recording operations You can record up to fi...

Page 37: ...Track Data The following describes the data that can be recorded to each type of track System Track Tracks 01 through 16 Keyboard notes keyboard tone setting main and pedal operation System Track only...

Page 38: ...with the Song Recorder can be deleted song by song You also can delete a particular track from a song Deleting a Recorder Song 1 Use the 4 SONG RECORDER button to cycle through the Song Recorder modes...

Page 39: ...y the notes and perform the other operations you want This automatically starts punch in recording which will continue until step 5 below Any one of the following also will start punch in recording a...

Page 40: ...for Areas Smaller than One Measure Use the procedure below to specify a punch in recording area that includes a part of a measure Example To re record from beat 3 of measure 2 up to beat 1 of measure...

Page 41: ...flash drive The message A Rec Start will appear on the display a few seconds after recording starts NOTE Do not remove the USB flash drive from the USB flash drive port while the AUDIO RECORDER button...

Page 42: ...letes all of the data of the selected track Note that the delete operation cannot be undone Check to make sure you really do not need the data in Digital Piano memory before you perform the following...

Page 43: ...lable for accessing a parameter directly after you press the cs FUNCTION button without going through the menu See the Shortcut Button column in the table below for the applicable shortcut button of e...

Page 44: ...s 3 5 Temperament Effect Group Tmpr Effect cq 5 1 Temperament Temper Changes the temperament of the keyboard and Auto Accompaniment from the standard equal temperament to another tuning more suitable...

Page 45: ...rd Channel KeyboardCh Selects the keyboard channel which is the channel used to send MIDI data corresponding to Digital Piano keyboard play to an external device 01 to 16 7 2 Accomp MIDI Out AccompOut...

Page 46: ...8 3 Setting Backup BackUp Switching this setting from off to on will save various Digital Piano settings in effect at that time and restore them the next time the Digital Piano is turned on This opera...

Page 47: ...recorded directly to a USB flash drive For details see Recording to a USB Flash Drive Audio Recorder page E 39 Storage of edited Auto Accompaniment data on a USB flash drive MIDI files and CASIO form...

Page 48: ...lfunction Static electricity conducted to the USB flash drive port from your hand or from a USB flash drive can cause malfunction of the Digital Piano If this happens turn the Digital Piano off and th...

Page 49: ...hile this message is on the display Complete appears on the display after formatting is complete Use the following procedure to save Digital Piano data to a USB flash drive Song Recorder songs can be...

Page 50: ...is in one of the data folders described under the procedure in the preceding section of this manual Note that if you put data into a music data play only folder such as the PLAY folder you will not b...

Page 51: ...Insert the USB flash drive into the Digital Piano s USB flash drive port 2 Press the cs FUNCTION button 3 Press the ds AUDIO RECORDER button 4 Use the do i button to switch to the FileRename screen 5...

Page 52: ...g number and song name 5 Use the ct w q buttons to select the song you want 6 Press the bs PLAY STOP button This will start playback Each press of bs PLAY STOP starts and stops playback Fast forward f...

Page 53: ...Full There is not enough space available on the USB flash drive Delete some of the files on the USB flash drive to make room for new data page E 49 or use a different USB flash drive File Full 1 There...

Page 54: ...then start up your computer Do not start up the music software on your computer yet 2 After starting up your computer use a commercially available USB cable to connect it to the Digital Piano 3 Turn o...

Page 55: ...for exchange of MIDI data You can use the procedure below to transfer edited Auto Accompaniment data recorder data and other data from the Digital Piano to a computer for storage You also can transfe...

Page 56: ...be able to see a folder representing Digital Piano memory or the USB flash drive loaded in the Digital Piano Windows Vista Windows 7 Double click Computer Mac OS Skip step 4 and double click PIANO on...

Page 57: ...the Folder Information window click the View tab 4 Under Advanced Settings clear the Hide extensions for known file types check box and then click OK 8 1 To transfer data from Digital Piano memory to...

Page 58: ...cover in place until assembly is complete Removing the tape can cause the keyboard cover to open and close during assembly creating the risk of personal injury to your hands and fingers Take care tha...

Page 59: ...edges of the back panel C to the brackets 5 of side panels A and B At location 6 slip the clip G onto to the screw H before installing the screw 5 Next secure the bottom of the back panel C with the s...

Page 60: ...the piano IMPORTANT The screws J keep the piano from slipping off the stand Never use the piano without the screws J installed 9 Affix the adaptor cord clip M next to the power terminal DC 24V 1 Inse...

Page 61: ...nector on the bottom of the piano Secure the pedal cord with the clip G 3 Plug the power cord of the AC adaptor that comes with the Digital Piano into a household power outlet as shown in the illustra...

Page 62: ...illustration The lid has a support bracket indicated by the star in the illustration attached to its inside surface Check to make sure that the support bracket is standing up fully To close the lid 1...

Page 63: ...e malfunction Use the AC adaptor so its label surface is pointed downwards The AC adaptor becomes prone to emitting electromagnetic waves when the label surface is facing upwards IMPORTANT Before conn...

Page 64: ...hile LINE OUT L MONO jack output is left channel sound It is up to you to purchase connecting cables like the ones shown in the illustration for connection of audio equipment Normally in this configur...

Page 65: ...music software on your computer Next turn the Digital Piano back on and then restart the music software on your computer I cannot record chord accompaniment data on my computer Accomp MIDI Out is tur...

Page 66: ...certain low note or high note With such a tone the notes of the lowest octave will be repeated to the left of the lowest possible note and the highest octave will be repeated to the right of the highe...

Page 67: ...6 4 setups 24 banks Song Recorder Functions Real time recording playback Number of Songs 5 Number of Tracks 17 System Track Tracks 01 through 16 Capacity Approximately 50 000 notes total Up to approxi...

Page 68: ...500LW Auto Power Off Approximately 4 hours after last operation Auto Power Off can be disabled Power Consumption 24V 28W Dimensions Digital Piano and Stand 137 7 W 42 7 D 91 1 H cm 54 1 4 16 35 7 8 in...

Page 69: ...g late at night are closing windows and using headphones Any reproduction of the contents of this manual either in part or its entirety is prohibited Except for your own personal use any other use of...

Page 70: ...1 Do not allow the electrical load output to exceed the label rating 12 Make sure the surrounding area is dry before plugging into a power source 13 Make sure the product is oriented correctly 14 Unpl...

Page 71: ...ANTASY 88 48 012 057 NEW AGE 88 49 013 058 WARM PAD 89 48 014 059 WARM VOX 89 49 015 060 POLYSYNTH PAD 90 49 016 061 ATMOSPHERE PAD 99 48 VARIOUS 001 062 ACOUSTIC BASS 32 48 002 063 RIDE BASS 32 49 00...

Page 72: ...083 191 GM CALLIOPE 82 0 084 192 GM CHIFF LEAD 83 0 085 193 GM CHARANG 84 0 086 194 GM VOICE LEAD 85 0 087 195 GM FIFTH LEAD 86 0 088 196 GM BASS LEAD 87 0 089 197 GM FANTASY 88 0 Group Name Nombre de...

Page 73: ...ach keyboard key when a drum set Sequential Number 237 to 250 is selected Si presiona m ltiples teclas en el extremo izquierdo del teclado mientras est n seleccionados los tonos secuenciales n mero 07...

Page 74: ...lec Low Tom 1 Elec Mid Tom 2 Elec Mid Tom 1 Elec High Tom 2 Elec High Tom 1 Reverse Cymbal Synth1 Kick 2 Synth1 Kick 1 Synth1 Rim Shot Synth1 Snare 1 Synth1 Hand Clap Synth1 Snare 2 Synth1 Low Tom 2 S...

Page 75: ...03 048 FAST BIG BAND 004 049 ORCHESTRA SWING 005 050 SWING 006 051 SLOW SWING 007 052 JAZZ WALTZ 008 053 FOX TROT 009 054 QUICKSTEP 010 055 JAZZ COMBO 1 EUROPEAN 011 056 SCHLAGER 012 057 POLKA 013 058...

Page 76: ...RTET BALLAD BALLAD 001 145 PIANO ROCK BALLAD 002 146 90 s BALLAD 003 147 MODERN BALLAD 004 148 ELECTRIC BALLAD 005 149 SLOW BALLAD 1 006 150 SLOW BALLAD 2 007 151 R B BALLAD 008 152 16 BEAT BALLAD 009...

Page 77: ...ock 70 70 Honky Rock 71 71 Wild Rock 72 72 Alligator 73 73 Movie Rock 74 74 Pop Rock 75 75 16Bt Shuffle 76 76 Heat Up 77 77 Hard Rock 78 78 Grunge Rock 79 79 Modern Rock 80 80 R R 81 81 Piano R R 82 8...

Page 78: ...36 227 Pop Ballad 1 Group Name Nombre del grupo Group Number N merode grupo Sequential Number N mero secuencial Preset Name Nombre de preajuste 37 228 Pop Ballad 2 38 229 PianoBallad1 39 230 PianoBall...

Page 79: ...6 1 1st Mov 010 026 Sonatine Op 20 1 1st Mov 011 027 Sonate K 545 1st Mov 012 028 Sonate K 331 3rd Mov Turkish March 013 029 Rondo K 485 014 030 F r Elise 015 031 Marcia alla Turca 016 032 Sonate Op 1...

Page 80: ...keys to form a chord Con Fingered 3 la nota m s baja digitada se interpreta como nota base No se pueden usar formas invertidas Con Full Range Chord cuando la nota digitada m s baja se encuentre a cier...

Page 81: ...b 5 7 b 5 7sus4 add9 madd9 mM7 dim7 69 6 m6 A B b B F G b G G A b A F C C D b D D E b E Since the chord input range is limited this model may not support some of the chords shown above Debido a que e...

Page 82: ...X 9nH v 0 8nH v Note ON Note OFF Mode Mode 3 X Mode 3 X Default Messages Altered 0 32 1 5 6 38 7 10 11 16 17 18 19 64 65 66 Bank select Modulation Portamento Time Data entry LSB MSB 2 Volume Pan Expr...

Page 83: ...Vibrato rate Vibrato depth Vibrato delay DSP Parameter4 2 DSP Parameter5 2 DSP Parameter6 2 DSP Parameter7 2 Portamento Control High resolution velocity prefix Reverb send Chorus send RPN LSB MSB 2 M...

Page 84: ...s that the packaging conforms to the environmental protection legislation in Germany Esta marca de reciclaje indica que el empaquetado se ajusta a la legislaci n de protecci n ambiental en Alemania MA...

Reviews: