Operation Guide 5259
E-10
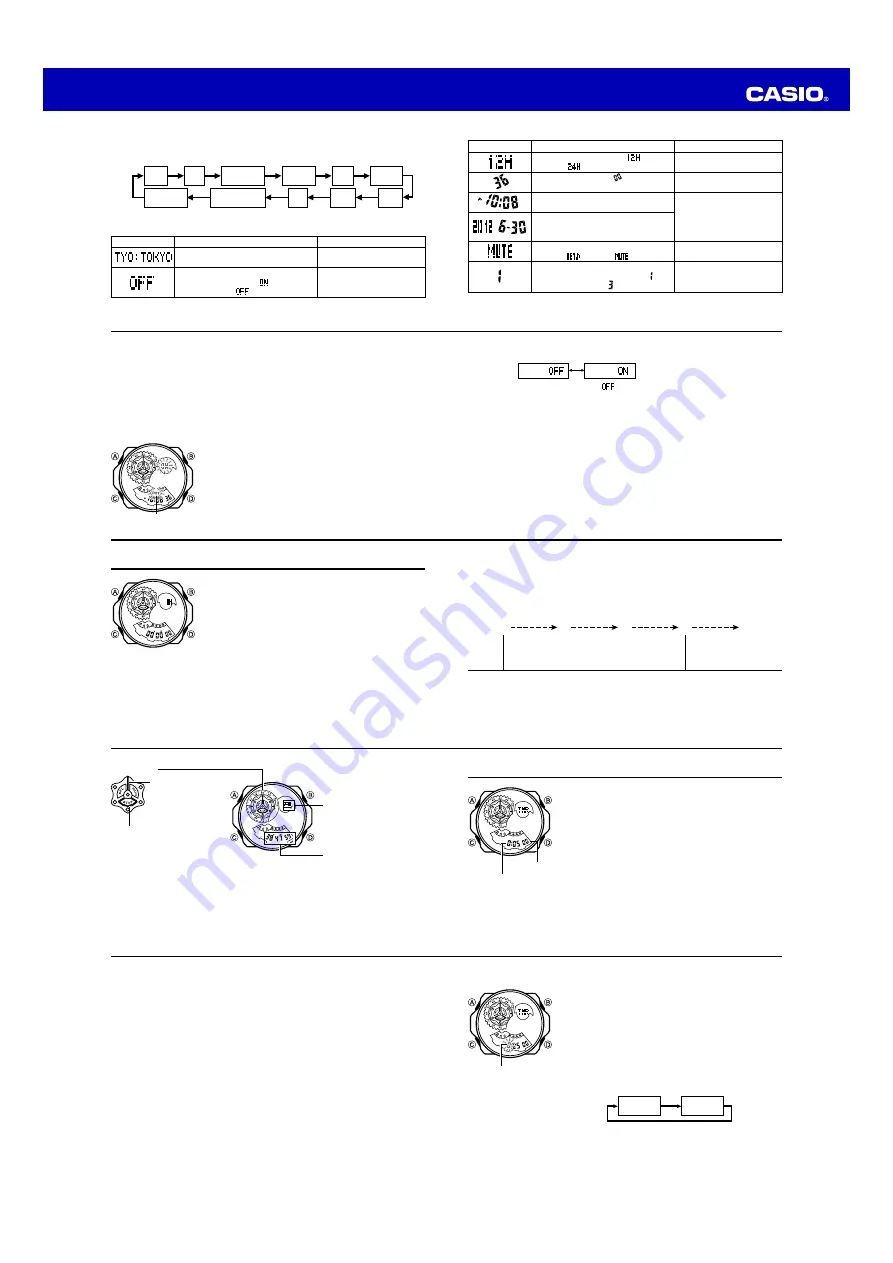
3. Press
C
to change the flashing screen content in the sequence shown below to
select the other settings.
Seconds
12/24-Hour
Format
Hour
Minutes
DST
Month
Year
City
Code
Day
Illumination
Duration
Button
Operation Tone
C
C
C
C
C
C
C
C
C
C
C
4. When the timekeeping setting you want to change is flashing, use
D
or
B
to
change it as described below.
Change the city code
Toggle the DST setting between
Daylight Saving Time (
) and
Standard Time (
).
Use
D
(east) and
B
(west).
Press
D
.
Screen:
To do this:
Do this:
E-11
Screen:
To do this:
Do this:
Toggle between 12-hour (
) and
24-hour (
) timekeeping
Reset the seconds to
Change the hour and minutes
Change the year, month, or day
Toggle the button operation tone
between
(on) and
(off)
Toggle the display illumination
duration between 1.5 seconds ( )
and three seconds (
)
Press
D
.
Press
D
.
Use
D
(+) and
B
(–).
Press
D
.
Press
D
.
E-12
5. Press
A
to exit the setting mode.
•
The day of the week is displayed automatically in accordance with the date (year,
month, and day) settings.
Daylight Saving Time (DST)
Daylight Saving Time (summer time) advances the time setting by one hour from
Standard Time. Remember that not all countries or even local areas use Daylight
Saving Time.
To change the Daylight Saving Time (summer time) setting
1. In the Timekeeping Mode, hold down
A
for about two
seconds until “SET” appears on the display.
•
Note that keeping
A
depressed too long (for about
five seconds) will cause a different type of setting
mode to be entered (page E-33).
2. Press
C
. This will display the DST setting screen.
DST indicator
E-13
3. Use
D
to toggle the DST setting on and off.
DST off ( )
DST on ( )
D
•
The default DST setting is OFF (
).
4. When the setting you want is selected, press
A
to exit the setting mode.
•
The DST indicator appears to indicate that Daylight Saving Time is turned on.
12-hour and 24-hour timekeeping
•
With the 12-hour format, the PM indicator (
P
) appears on the lower display for times
in the range of noon to 11:59 p.m. and no indicator appears for times in the range of
midnight to 11:59 a.m.
•
With the 24-hour format, times are displayed in the range of 0:00 to 23:59, without
the PM indicator (
P
).
•
The 12-hour/24-hour timekeeping format you select in the Timekeeping Mode is
applied in all other modes.
E-14
Stopwatch
You can use the stopwatch to measure elapsed time and
split times.
•
The digital display range of the stopwatch is 999 hours,
59 minutes, 59.99 seconds. The stopwatch continues to
run until you stop it. If it reaches the above limit, it will
restart the time measurement from zero.
•
The stopwatch operation continues even if you exit the
Stopwatch Mode.
•
All of the operations in this section are performed in the
Stopwatch Mode, which you enter by pressing
C
(page
E-7).
E-15
Elapsed Time Measurement
In the Stopwatch Mode, press
D
to start and stop elapsed time measurement.
•
Pressing
A
while elapsed time measurement is in progress will display the current
split time.
D
A
A
D
A
Start
(Stopped)
(Stopped)
(Measurement)
Split
Split
cancel
Display
time reset
Stop
(Measured time
displayed.)
(Split time
displayed.)
(Measured time
displayed.)
E-16
Indicator disk
Elapsed time seconds
•
First 1 minute only
Measurement status
STOP:
Stopped
RUN:
Measuring
•
Except during display of
a split time.
SPL:
Split time displayed
Measured time or split time
Hours
•
Alternates with “SPL” during
split time display.
Minutes, seconds,
1/100 seconds
•
Pressing
D
without resetting the displayed time will restart elapsed time
measurement from where it was last stopped (cumulative elapsed time
measurement).
•
An ongoing elapsed time measurement operation continues even if you exit the
Stopwatch Mode. In this case, the indicator disk indicates the current minutes count.
E-17
Countdown Timer
You can set the countdown timer start time within a range
of one minute to 24 hours. An alarm sounds when the
countdown reaches zero.
•
All of the operations in this section are performed in the
Countdown Timer Mode, which you enter by pressing
C
(page E-7).
Start time
(Hours : Minutes)
Seconds
E-18
To use the countdown timer
Press
D
while in the Countdown Timer Mode to start the countdown timer.
•
When the end of the countdown is reached, the alarm will sound for 10 seconds or
until you stop it by pressing any button.
•
The countdown time is reset to its starting value automatically after the alarm stops.
•
Press
D
while a countdown operation is in progress to pause it.
Press
D
again to resume the countdown.
•
To stop a countdown timer operation completely, first pause it (by pressing
D
), and
then press
A
. This returns the countdown time to its starting value.
E-19
To configure countdown start time settings
1. While the countdown start time is on the display in the
Countdown Timer Mode, hold down
A
for about two
seconds until the hour setting of the countdown start
time starts to flash. This is the setting mode.
•
Holding down
A
will initially cause “Hold” to appear
on the screen. Keep
A
depressed until “Hold”
disappears.
•
If the countdown start time is not displayed, use the
procedure under “To use the countdown timer” (page
E-18) to display it.
2. Press
C
to move the flashing in the sequence shown
below, and select the setting you want to change.
Start Time
(Minutes)
Start Time
(Hours)
C
C
3. Press
A
to exit the setting mode.
Start time
(Hours : Minutes)


