


Operation Guide 3320/3352
2
•
When the digital time DST setting is on, the GMT differential can be set in a range
of –10.0 to +15.0 in 0.5-hour units.
5. Press
A
to exit the setting screen.
Setting the Analog Time
Perform the procedure below when the time indicated by the analog hands does not
match the time of the digital display.
To adjust the analog time
1. In the Timekeeping Mode, press
C
five times to enter
the Hand Setting Mode.
2. Hold down
A
until the current digital time starts to
flash, which indicates the analog setting screen.
3. Press
D
to advance the analog time setting by
20 seconds.
•
Holding down
D
advances the analog time setting at
high speed.
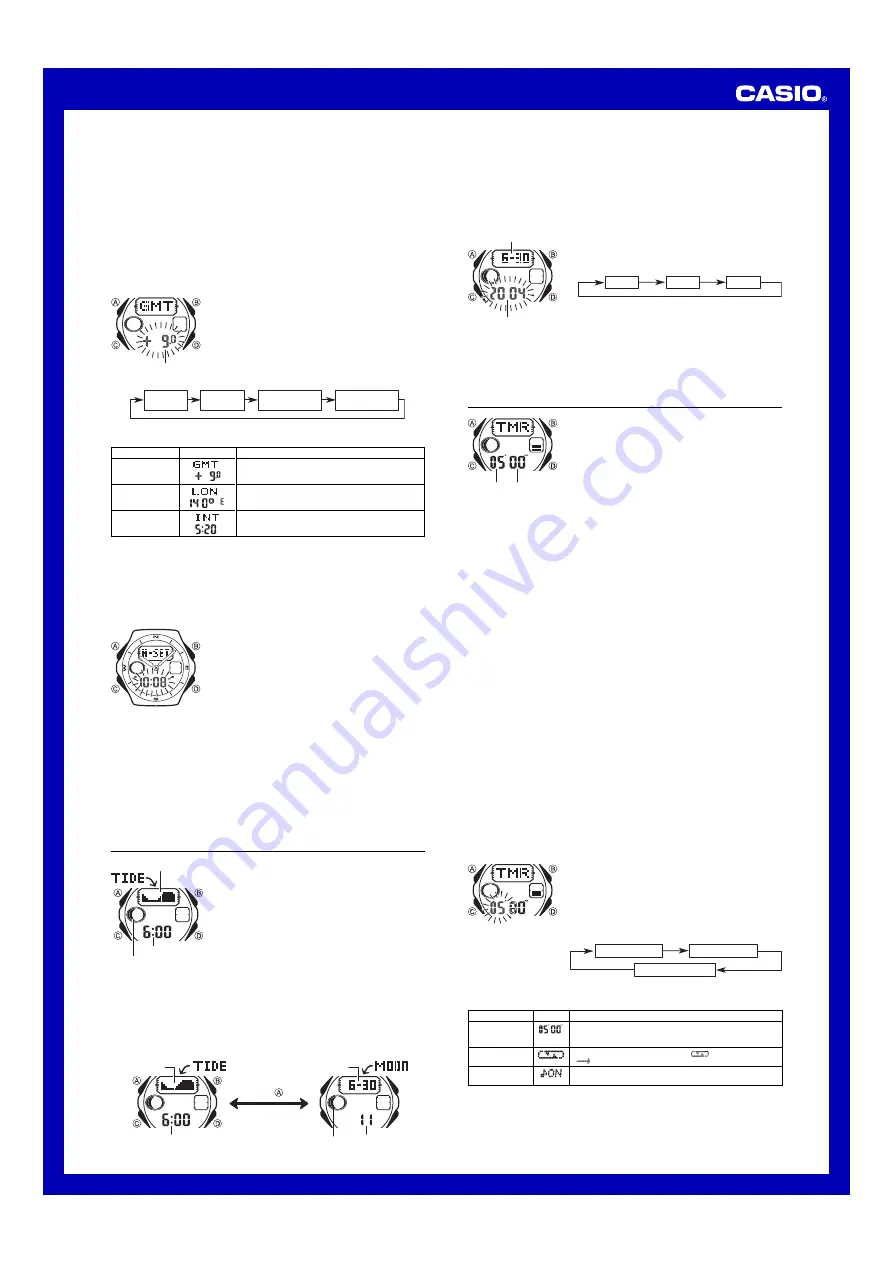
Home Site Data
Tide graph data will not be displayed properly unless Home Site data (GMT
differential, longitude, and lunitidal interval) is configured correctly.
•
The GMT differential is the time difference of the time zone where the site is located
and Greenwich Mean Time.
•
The lunitidal interval is the time elapsing between the Moon’s transit over a meridian
and the next high tide at that meridian. See “Lunitidal Interval” for more information.
•
This watch displays lunitidal intervals in terms of hours and minutes.
•
The “Site/Lunitidal Interval Data List” provides GMT differential, longitude, and
lunitidal interval information around the world.
•
The following is the initial factory default Home Site data (Tokyo, Japan) when you
first purchase the watch, and whenever you have the battery replaced. Change
these settings to match the area where you normally use the watch.
GMT differential (+9.0); Longitude (East 140 degrees); Lunitidal interval (5 hours,
20 minutes)
To configure Home Site data
1. In the Timekeeping Mode, hold down
A
until the
seconds start to flash, which indicates the setting
screen.
2. Press
A
again to display the GMT differential setting
screen.
3. Press
C
to move the flashing in the sequence shown
below to select other settings.
GMT differential
GMT
Differential
Longitude
Luntidal Interval
Hours
Luntidal Interval
Minutes
4. When the setting you want to change is flashing, use
D
and
B
to change it as
described below.
Screen
Setting
GMT Differential
Longitude
Lunitidal Interval
Hours, Minutes
Button Operations
Use
D
(+) and
B
(–) to change the setting.
•
You can specify a value in the range of –11.0 to
+14.0, in 0.5-hour units.
Use
D
(+) and
B
(–) to change the setting.
•
You can specify a value in the range of 179
°
W to
180
°
E, in 1-degree units.
Use
D
(+) and
B
(–) to change the setting.
•
If you need to advance the analog time setting a long way, hold down
D
until the
time starts advancing at high speed, and then press
B
. This locks the high-
speed hand movement, so you can release the two buttons. High-speed hand
movement continues until you press any button. It will also stop automatically
after the time advances 12 hours or if an alarm (daily alarm, Hourly Time Signal,
or countdown beeper) starts to sound.
4. Press
A
to exit the setting screen.
•
The watch will automatically adjust the minute hand slightly to match its internal
second count when you exit the setting screen.
•
To return to the Timekeeping Mode, press
C
.
Moon/Tide Data
Moon/tide data lets you view the Moon age and Moon
phase for a particular date, and tidal movements for a
particular date and time for the Home Site.
•
If you suspect that the Moon/tide data is not correct for
some reason, check the Timekeeping Mode data (current
time, date, and Home Site settings), and make changes
as required.
•
See “Moon Phase Indicator” for information about the Moon
phase indicator and “Tide Graph” for information about
the tide graph.
•
All of the operations in this section are performed in the
Moon/Tide Data Mode, which you enter by pressing
C
.
Tide graph
Time
Moon phase indicator
Tide Data Screen
To view current Moon/Tide Mode data
In the Moon/Tide Data Mode, each press of
A
toggles between the Tide Data screen
and the Moon Data screen.
•
The tide graph shows tidal movements throughout the current date. The flashing
location in the tide graph indicates the tide for the currently displayed time. The
Moon data screen shows the Moon age and Moon phase for the current date.
Tide graph
Month – Day
Tide Data Screen
Moon Data Screen
Time
Moon age
Moon phase
indicator
Press
.
•
While the Tide Data screen is displayed, pressing
D
advances to the next hour.
•
While the Moon Data screen is displayed, pressing
D
advances to the next day.
•
You can also specify a date for tide data or Moon data. For details, see “To specify a
date” below.
•
Whenever you enter the Moon/Tide Data Mode, the screen (Moon Data or Tide
Data) that was displayed when you last exited the mode appears first. The initial
Tide Data screen shows the data for the 6 a.m. for the current date, while the Moon
Data screen shows the data for the current date.
To specify a date
1. In the Moon/Tide Data Mode, hold down
A
until the
year setting starts to flash, which indicates the setting
screen.
2. Press
C
to move the flashing in the sequence shown
below to select the other settings.
Year
Month
Day
3. While a setting is flashing, use
D
(+) or
B
(–) to
change it.
•
You can specify a date in the range of January 1,
2000 to December 31, 2039.
4. Press
A
to exit the setting screen.
5. Press
A
to toggle between the Moon Data screen and Tide Data screen.
Countdown Timer
The countdown timer can be set within a range of one
minute to 60 minutes. An alarm sounds when the
countdown reaches zero. The countdown timer also has
an auto-repeat feature and a progress beeper that signals
the progress of the countdown.
•
All of the operations in this section are performed in the
Countdown Timer Mode, which you enter by pressing
C
.
Configuring the Countdown Timer
The following are the settings you should configure before
actually using the countdown timer.
Countdown start time; Auto-repeat on/off; Progress
beeper on/off
•
See “To configure the countdown timer” for information
about setting up the timer.
Auto-repeat
When auto-repeat is turned on, the countdown automatically restarts from the
countdown start time when it reaches zero. If left running, the countdown is repeated
a total of eight times, after which it stops automatically.
When auto-repeat is turned off, the countdown stops when it reaches zero and the
display shows the original countdown start time.
•
Pressing
D
while an auto-repeat countdown is in progress pauses the current
countdown. You can resume the auto-repeat countdown by pressing
D
, or you can
press
A
to reset to the countdown time starting value.
Countdown Timer Beeper Operations
The watch beeps at various times during a countdown so you can keep informed
about the countdown status without looking at the display. The following describes the
types of beeper operations the watch performs during a countdown.
Countdown End Beeper
The countdown end beeper lets you know when the countdown reaches zero.
•
When the progress beeper is turned off, the countdown end beeper sounds for
about 10 seconds, or until you press any button to stop it.
•
When the progress beeper is turned on, the countdown end beeper sounds for
about one second.
Progress Beeper
When the progress beeper is turned on, the watch uses beeps to signal countdown
progress as described below.
•
Starting from five minutes before the end of the countdown, the watch emits four
short beeps at the top of each countdown minute.
•
30 seconds before the end of the countdown, the watch emits four short beeps.
•
The watch emits a short beep for each of the last 10 seconds of the countdown.
•
If the countdown start time is six minutes or greater, the watch emits a short beep for
each second of the final 10 seconds before the five-minute point is reached. Four
short beeps are emitted to signal when the five-minute point is reached.
To configure the countdown timer
1. While the countdown start time is on the display in the
Countdown Timer Mode, hold down
A
until the current
countdown start time starts to flash, which indicates the
setting screen.
•
If the countdown start time is not displayed, use the
procedure under “To use the countdown timer” to
display it.
2. Press
C
to move the flashing in the sequence shown
below to select other settings.
Start Time
Auto-repeat
Progress Beeper
3. When the setting you want to change is flashing, use
B
and
D
to change it as described below.
Seconds
Minutes
Month – Day
Year
Setting
Start Time
Auto-repeat
Progress Beeper
Screen
Button Operations
Use
D
(+) and
B
(–) to change the setting.
•
You can set a start time in the range of 1 to 60 minutes in
1-minute increments.
Press
D
to toggle auto-repeat on (
displayed) and off
(
displayed).
Press
D
to toggle the progress beeper on (
ON
) and off
(
OF
).
4. Press
A
to exit the setting screen.
•
You can also perform steps 1 and 2 of the above procedure whenever you need to
view the current auto-repeat and progress beeper settings.