


Operation Guide 3070 (B)
10
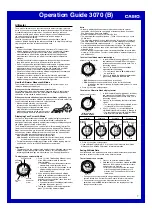
Stopwatch
The stopwatch lets you measure elapsed time,
split times, and two finishes.
•
The display range of the stopwatch is 23 hours,
59 minutes, 59.99 seconds.
•
The stopwatch continues to run, restarting from
zero after it reaches its limit, until you stop it.
•
The stopwatch measurement operation
continues even if you exit the Stopwatch Mode.
•
Exiting the Stopwatch Mode while a split time is
frozen on the display clears the split time and
returns to elapsed time measurement.
•
All of the operations in this section are
performed in the Stopwatch Mode, which you
enter by pressing
D
.
Minutes
Current time
1/100 second
Hours
Seconds
J
J
J
J
J
J
J
J
J
J
J
First runner
finishes.
Display time
of first runner.
J
Elapsed Time
A
A
A
A
C
Start
Stop
Re-start
Stop
Clear
Split Time
A
C
C
A
C
Start
Split
Split release
Stop
Clear
Two Finishes
A
C
A
C
C
Start
Split
Stop
Split release
Clear
To measure times with the stopwatch
Display time of
second runner.
Second runner
finishes.
(
SPL
displayed)
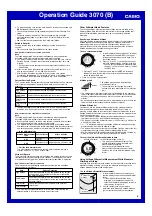
Countdown Timer
You can set the countdown timer within a range
of one minute to 24 hours. An alarm sounds
when the countdown reaches zero.
•
All of the operations in this section are
performed in the Countdown Timer Mode,
which you enter by pressing
D
.
To set the countdown start time
1. While the countdown start time is on the
display in the Countdown Timer Mode, hold
down
E
until the hour setting of the
countdown start time starts to flash, which
indicates the setting screen.
•
If the countdown start time is not displayed,
use the procedure under “To use the
countdown timer” to display it.
Minutes
Current time
Hours
Seconds
2. Press
D
to move the flashing between the hour and minute settings.
3. Use
A
(+) and
C
(–) to change the flashing item.
•
To set the starting value of the countdown time to 24 hours, set
OO
’
OO
.
4. Press
E
to exit the setting screen.
To use the countdown timer
Press
A
while in the Countdown Timer Mode to start the countdown timer.
•
When the end of the countdown is reached, the alarm sounds for five
seconds or until you stop it by pressing any button. The countdown time is
reset to its starting value automatically when the alarm sounds.
•
Press
A
while a countdown operation is in progress to pause it. Press
A
again to resume the countdown.
•
To stop a countdown operation completely, first pause it (by pressing
A
)
and then press
C
. This returns the countdown time to its starting value.
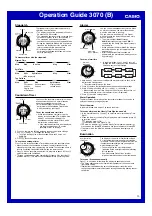
Alarms
You can set five independent daily alarms. When
an alarm is turned on, the alarm tone sounds
when the alarm time is reached.
You can also turn on an Hourly Time Signal,
which will cause the watch to beep twice every
hour on the hour.
•
The alarm number (
ALM-1
through
ALM-5
) indicates an alarm screen.
SIG
is
shown when the Hourly Time Signal screen is
on the display.
•
When you enter the Alarm Mode, the data you
were viewing when you last exited the mode
appears first.
•
All of the operations in this section are
performed in the Alarm Mode, which you enter
by pressing
D
.
Alarm time
(Hour : Minutes)
Alarm number
Current time
To set an alarm time
1. In the Alarm Mode, use
A
and
C
to scroll
through the alarm screens until the one whose
time you want to set is displayed.
2. Hold down
E
until the hour setting of the alarm time start to flash, which
indicates the setting screen.
•
This automatically turns on the alarm.
3. Press
D
to move the flashing between the hour and minute settings.
4. While a setting is flashing, use
A
(+) and
C
(–) to change it.
•
When setting the alarm time using the 12-hour format, take care to set
the time correctly as a.m. (no indicator) or p.m. (
P
indicator).
5. Press
E
to exit the setting screen.
ALM-1
ALM-2
ALM-3
SIG
ALM-5
ALM-4
A
C
Alarm on
indicator
Alarm Operation
The alarm sounds in all modes at the preset time for about 10 seconds, or
until you stop it by pressing any button.
To test the alarm
In the Alarm Mode, hold down
A
to sound the alarm.
To turn an alarm and the Hourly Time Signal on and off
1. In the Alarm Mode, use
A
and
C
to select an alarm or the Hourly Time
Signal.
2. When the alarm or the Hourly Time Signal you want is selected, press
B
to turn it on and off.
Indicates alarm is ON.
Indicates Hourly Time Signal is ON.
•
The alarm on indicator (
) and the Hourly Time Signal on indicator (
)
are shown on the display in all modes while these functions are turned on.
•
If any alarm is on, the alarm on indicator is shown on the display in all
modes.
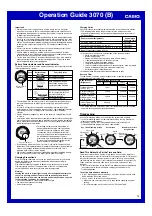
Illumination
The display of the watch is illuminated using an
EL (electro-luminescent) panel for easy reading
in the dark. The watch’s auto light switch turns on
illumination automatically when you angle the
watch towards your face.
•
The auto light switch must be turned on
(indicated by the auto light switch on indicator)
for it to operate.
•
See “Illumination Precautions” for other
important information about using illumination.
Auto light switch
on indicator
To turn on illumination manually
Press
L
in any mode to illuminate the display for about one second.
•
The above operation turns on illumination regardless of the current auto
light switch setting.
•
Illumination is disabled during time calibration signal reception, while
configuring sensor measurement mode settings, and during bearing sensor
calibration.