background image

DISTRIBUTION SYSTEMS - PRIMARY HYDRAULIC POWER SYSTEM 

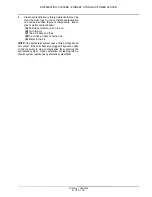
4. 

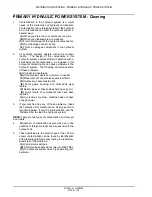
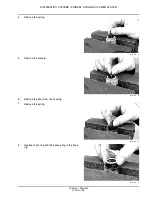
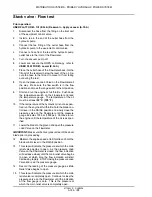
Remove the spring. 

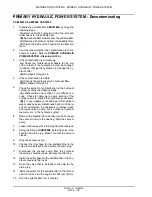
5. 

Remove the plunger. 

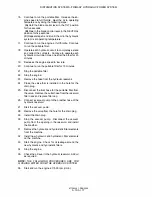
6. 

Remove the body from the housing. 

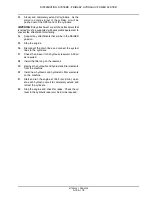
7. 

Remove the spring. 

8. 

Replace the O-ring and the backup ring in the hous­

ing. 

87728445  1  2/28/2008 

A. 1 0.A / 23 

89051121M 

89051124M 

89051130M 

89051133M 

Summary of Contents for 750L

Page 1: ...REPAIR MANUAL 750L 850L 87728445 1 2 28 2008 ...

Page 2: ...MISSION Hydrostatic TRAVELLING Final drive SERVICE BRAKE Hydraulic PARKING BRAKE Hydraulic WHEELS AND TRACKS Tracks BODY AND STRUCTURE USER CONTROLS AND SEAT USER CONTROLS AND SEAT Operator seat USER PLATFORM ENVIRONMENT CONTROL Heating system ENVIRONMENT CONTROL Air conditioning system 87728445 1 2 28 2008 A A 10 A A 12 A A 30 A A 40 A A 50 A B B 10 A B 20 A B 30 A B 50 A B 60 A B 80 A C C 10 B C...

Page 3: ...OSITIONING LIFTING TILTING SWINGING WORKING ARM SINGLE ARM TOOL ATTACHMENT Lift TOOLS AND COUPLERS DIGGING Non articulated digging tools LANDSCAPING Dozer blade 87728445 1 2 28 2008 E 40 D E 50 B G G 10 A G 20 A G 40 A H H 50 B J J 20 B J 40 F Find manuals at http best manuals com search s CASE 87728445 ...

Page 4: ...87728445 1 2 28 2008 Find manuals at http best manuals com search s CASE 87728445 ...

Page 5: ...INTRODUCTION 87728445 1 2 28 2008 1 Find manuals at http best manuals com search s CASE 87728445 ...

Page 6: ...Basic instructions General specification Conversion factors Hydraulic contamination Contents INTRODUCTION 87728445 1 2 28 2008 2 3 7 11 13 Find manuals at http best manuals com search s CASE 87728445 ...

Page 7: ...cess The first category is the Location the second category is the Information Type and the third category is the Product LOCATION is the component or function on the machine that the piece of technical information is going to describe e g Fuel tank INFORMATION TYPE is the piece of technical information that has been written for a particular component or function on the machine e g Capacity would ...

Page 8: ...rking arms backhoes X X X X X X X X X excavators skid steers Combines foraQe harvesters balers X X X X X X X X X X Seeding planting floating spraying X X X X X X X X X equipment Mounted equipment and tools X X X X Chapters Each Chapter is identified by a letter and number combination e g Engine B 10 A The first letter is identical to the Section letter i e Chapter B 10 is inside Section B Power Pr...

Page 9: ...ion unit Information Unit ICE code ICE code classification Distribution systems Primary hydraulic power Stack valve Functional Sectional view data 0 0 A 10 A 18 C 1 0 A 30 LJI I 00 CRIL03J033E01 1 Navigate to the correct information unit you are searching for by identifying the function and information type from the ICE code 1 Function and 2 Information type A corresponds to the sections of the re...

Page 10: ...r description The page footer will contain the following references Publication number for that Manual Section or Chapter Version reference for that publication Publication date Section chapter and page reference e g A 1O A 9 87728445 1 2 28 2008 6 Find manuals at http best manuals com search s CASE 87728445 ...

Page 11: ... Hex Nuts GRADE2 Dry Lubricated SIZE Nm lb ft Nm lb ft 1 4 7 5 5 5 5 7 4 2 UNF 1 4 8 5 6 3 6 4 4 7 UNC 5 16 15 11 11 8 UNF 5 16 16 12 12 9 UNC 3 8 27 20 20 15 UNF 3 8 31 23 23 17 UNC 7 16 43 32 33 24 UNF 7 16 49 36 37 27 UNC 1 2 68 50 47 35 UNF 1 2 75 55 54 40 UNC 9 16 95 70 75 55 UNF 9 16 108 80 81 60 UNC 5 8 136 100 102 75 UNF 5 8 GRADE 5 5 1 or 5 2 GRADE 8 or 8 2 Dry Nm 10 8 13 6 23 26 41 47 68...

Page 12: ... 4407 3250 2983 2200 2224 1640 4827 3560 3621 2670 4475 3300 4949 3650 IMPORTANT DO NOT use these values if a different torque value or tightening procedure is given for a specific application Torque values listed are for general use only Check tightness of fasteners periodically Shear bolts are designed to fail under predetermined loads Always replace shear bolts with identical grade NOTES Grade ...

Page 13: ...3 4 16 46 56 10 15 9mm 5 8inch 7 8 14 77to 85 12 19 0mm 3 4inch 1 1 16 12 107to 119 14 22 2mm 7 8inch 1 3 16 12 127to 140 16 25 4mm 1 0inch 1 5 16 12 131to 156 20 31 8mm 1 1 4inch 1 5 8 12 197to 223 24 38 1mm 1 1 2inch 1 7 8 12 312to 338 Straight Thread with 0 ring Nom SAE Tube OD Hose ID Thread Size Newton Dash Size metres 2 5 16 24 8to 9 3 3 8 24 11to 12 4 6 4mm 1 4inch 7 16 20 20to 25 5 7 9mm 5...

Page 14: ... 684 10 7 8 14 102 to 114 75 to 84 12 1 1 16 12 142 to 160 105 to 117 16 1 5 16 12 237 to 254 175 to 187 Pine Fittina Norn SAEDash Size Thread Size TFFT ITurns For Finaer Tiaht 2 1 8 27 2 0 3 0 3 1 8 27 2 0 3 0 4 1 8 27 2 0 3 0 5 1 8 27 2 0 3 0 6 1 4 18 1 5 3 0 8 3 8 18 2 0 3 0 10 1 2 14 2 0 3 0 12 3 4 14 2 0 3 0 14 3 4 14 2 0 3 0 16 1 11 1 2 1 5 2 5 20 1 1 4 11 1 2 1 5 2 5 24 1 1 2 11 1 2 1 5 2 5...

Page 15: ...969 litre min 0 264 172 litre min 0 219 969 U S to Metric MULTIPLY square foot acre ounce force pound force inch foot mile pound ounce ton acre lb hp hr lb cubic vd horsepower lbs sq in lbs sq in lbs sq in deqree F pound inch pound foot miles hr 0 092 903 0 404 686 0 278 014 4 448 222 25 4 0 304 8 1 609 344 0 453 592 28 35 2241 702 608 277 4 0 593 276 0 745 700 6 894 757 0 069 0 070 303 1 8 F 32 0...

Page 16: ...ce US fluid quart US liquid quart Imperial gallon US qallon Imperial qallon min 16 387 06 0 028 317 0 764 555 29 573 53 0 946 353 1 136 523 3 785 412 4 546 092 3 785 412 87728445 1 2 28 2008 12 BY TO OBTAIN cubic centimeter cubic meter cubic meter milliliter litre litre litre litre litre min ...

Page 17: ...ear rapidly F Relief valves or check valves held open by dirt G Quick failure of components that have been repaired H Cycle times are slow machine does not have enough power If your machine has any of these problems check the hydraulic oil for contamination There are two types of contam ination microscopic and visible Microscopic contamination occurs when very fine particles of foreign material ar...

Page 18: ...INTRODUCTION 87728445 1 2 28 2008 14 ...

Page 19: ...REPAIR MANUAL DISTRIBUTION SYSTEMS 750L 850L 87728445 1 2 28 2008 A ...

Page 20: ...MS A PRIMARY HYDRAULIC POWER SYSTEM 750L 850L SECONDARY HYDRAULIC POWER SYSTEM 750L 850L ELECTRICAL POWER SYSTEM 750L 850L LIGHTING SYSTEM 750L 850L FAULT CODES 750L 850L 87728445 1 2 28 2008 A A 10 A A 12 A A 30 A A 40 A A 50 A ...

Page 21: ...DISTRIBUTION SYSTEMS A PRIMARY HYDRAULIC POWER SYSTEM 10 A 750L 850L 87728445 1 2 28 2008 A 10 A 1 ...

Page 22: ... Hydraulic pump Torque General specification FUNCTIONAL DATA Relief valve Exploded view Sectional view Stack valve Exploded view Filter External view SERVICE PRIMARY HYDRAULIC POWER SYSTEM Cleaning Decontaminating Relief valve Pressure test Pressure setting Disassemble Visual inspection Assemble Stack valve Flow test Remove Disassemble 87728445 1 2 28 2008 A 10 A 2 4 7 7 8 8 8 8 9 9 10 11 12 13 14...

Page 23: ...emble without PTO Visual inspection without PTO Assemble without PTO Disassemble with PTO Visual inspection with PTO Assemble with PTO Preliminary test Install Reservoir Apply vacuum DIAGNOSTIC Sensing system Filter restriction sensor Testing 87728445 1 2 28 2008 A 10 A 3 35 36 37 39 40 41 43 44 48 50 54 61 63 68 69 70 71 ...

Page 24: ...DISTRIBUTION SYSTEMS PRIMARY HYDRAULIC POWER SYSTEM PRIMARY HYDRAULIC POWER SYSTEM Special tools B877558M_1 1 CAS1804 PRESSURE TEST KIT 87728445 1 2 28 2008 A 10 A I 4 ...

Page 25: ...DISTRIBUTION SYSTEMS PRIMARY HYDRAULIC POWER SYSTEM CAS1808 2 CAS1808 FLOWMETER FITTING KIT 87728445 1 2 28 2008 A 10 A 5 ...

Page 26: ...DISTRIBUTION SYSTEMS PRIMARY HYDRAULIC POWER SYSTEM CAS10090 3 CAS10090 HAND PUMP 87728445 1 2 28 2008 A 10 A I 6 ...

Page 27: ...ary sec tion Dozer blade lift speed ICASE AKCELA AW68 HYD FLUID 52 79 C 125 175 F 76 8 L at 207 bar at 2000 RPM 20 3 US gpm at 3000 psi at 2000 RPM 12 15 bar 180 220 psi at 2000 RPM 203 214 bar 2950 3100 psi 214 227 bar 3100 3300 psi with hand pump 457 mm second 18 in second Dozer blade lift time measure from ground level to full 2 seconds heiQht PRIMARY HYDRAULIC POWER SYSTEM Capacity NOTE Transm...

Page 28: ...7 34 6 lb ft 17 7 22 lb ft 106 133 lb in 115 142 lb in CAS1147 2 CENTERING SPRING COMPRESSION TOOL Stack valve Calibration Relief Valves bar Main relief valve 203 214 bar Circuit relief valves tested with hand 214 227 bar pump Stack valve General specification Snool travel Neutral to pressure lift tilt and auxiliary Neutral to pressure angle section Neutral to float lift 7 9 mm 6 6 mm 13 5 mm MM 8...

Page 29: ...housing bolts 271 Nm 200 lb ft PTO shaft retainer 68 Nm 50 lb ft Set screw PTO shaft retainer 9 Nm 80 lb in Shaft cover screws 8 9 Nm 67 77 lb in Hydraulic pump General specification Equipment pump output Rotation 76 8 L min at 207 bar at 2000 RPM 20 3 US gpm at 3000 psi at 2000 RPM Clockwise as seen from end of shaft 87728445 1 2 28 2008 A 10 A 9 ...

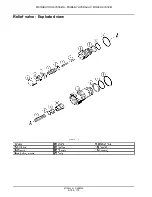
Page 30: ...DISTRIBUTION SYSTEMS PRIMARY HYDRAULIC POWER SYSTEM Relief valve Exploded view 8S99M034 1 87728445 1 2 28 2008 A 10 A 10 ...

Page 31: ...DISTRIBUTION SYSTEMS PRIMARY HYDRAULIC POWER SYSTEM Relief valve Sectional view BS00A057 1 6 et Pressure ad ustin screw 87728445 1 2 28 2008 A 10 A 11 ...

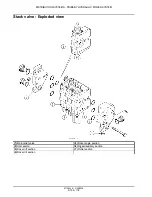
Page 32: ...RAULIC POWER SYSTEM Stack valve Exploded view 1 Main relief valve 2 Inlet secton 3 Dozer lift section 4 Dozer tilt section BC02J007 1 5 Dozer ani 1le section 6 Riooer auxiliary section 7 Outlet section 87728445 1 2 28 2008 A 10 A I 12 ...

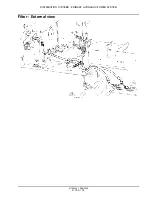
Page 33: ...DISTRIBUTION SYSTEMS PRIMARY HYDRAULIC POWER SYSTEM Filter External view BC04E029 1 87728445 1 2 28 2008 A 10 A 13 ...

Page 34: ...trol valve spools do not return to neutral C Movement of control valve spools is difficult D Hydraulic oil becomes too hot E Pump gears housing and other parts wear rapidly F Relief valves or check valves held open by dirt G Quick failure of components that have been repaired H Cycle times are slow machine does not have enough power 3 If your machine has any of these problems check the hydraulic o...

Page 35: ...icles of metal or dirt in the oil B Air in the oil C The oil is dark and thick D The oil has an odor of burned oil E Water in the oil NOTE The hydrostatic system uses a third port bypass fil ter system If the filter becomes plugged it bypasses back to the reservoir to stop contamination from entering the hydrostatic system Upon completion of cleaning the hy draulic system replace the hydrostatic s...

Page 36: ...der in two different cir cuits Check for damage to seals scoring of the cylinder wall etc Repair the cylinders as necessary B If in your judgment the damage to the cylinders was caused by sever contamination and is not the re sult of normal wear it is necessary to remove clean and repair valves pump lines cylinders hydraulic reservoir etc in the hydraulic system 6 Remove the breather from the rese...

Page 37: ... 23 Remove the hose from the hydraulic reservoir 24 Close the valve that is installed in the hole for the drain plug 25 Disconnect the inlet hose for the portable filter from the valve Remove the outlet hose from the reservoir filter neck and replace filler cap 26 Connect a vacuum pump to the breather hose of the hydraulic reservoir 27 Start the vacuum pump 28 Remove the valve from the hole for th...

Page 38: ...filter elements on the machine 43 Install the drain plug in the bottom of the reservoir 44 Fill the hydraulic reservoir with lubricant refer to PRI MARY HYDRAULIC POWER SYSTEM General specification A 10 A and PRIMARY HYDRAULIC POWER SYSTEM Capacity A 10 A for proper quantities and type 45 Disconnect the line from the OPEN end and CLOSED end of each cylinder 46 Be sure all control levers are in the...

Page 39: ...55 Stop the engine 56 Disconnect the drain lines and connect the system lines to the cylinders 57 Check the oil level in the hydraulic reservoir Add oil as required 58 Install the filler cap on the reservoir 59 Remove the hydraulic and hydrostatic filter elements from the machine 60 Install new hydraulic and hydrostatic filter elements on the machine 61 Start and run the engine at 1500 rpm r min o...

Page 40: ... pressure gauge to the test port coupler 1 4 Make sure the Parking Brakes are applied and the directional control is in the NEUTRAL position 5 Start and run the engine at FULL THROTTLE 6 Hold the hydraulic control lever for the Lift Cylinders in the RAISE position 7 Record the reading on the pressure gauge and check that the pressure reading is within the specification refer to PRIMARY HYDRAULIC P...

Page 41: ... main relief valve to increase the pressure or out of the main relief valve to decrease the pressure 3 Refer to Relief valve Pressure test A 1O A and check the pressure setting Adjust the main relief valve again as necessary 4 When the pressure setting is correct prevent the ad justing screw from turning while the lock nut is tight ened Install the cover on the main relief valve 87728445 1 2 28 20...

Page 42: ...alve in a vise with soft jaws Remove the cap 2 Hold the adjusting screw in position while you loosen the lock nut 3 Remove the adjusting screw Make sure that you count the number of turns required to remove the adjusting screw so that you can install the adjusting screw correctly during Assembly 87728445 1 2 28 2008 A 10 A I 22 89051112M 1 89051115M 2 89051118M 3 ...

Page 43: ...WER SYSTEM 4 Remove the spring 5 Remove the plunger 6 Remove the body from the housing 7 Remove the spring 8 Replace the O ring and the backup ring in the hous ing 87728445 1 2 28 2008 A 1 0 A 23 89051121M 4 89051124M 5 89051130M 6 89051133M 7 ...

Page 44: ...solid sur face so that the poppet can be removed from the housing 10 Replace the O ring on the body 11 Replace the O ring on the adjusting screw 12 Replace the O ring and the backup ring on the pop pet Next operation 87728445 1 2 28 2008 A 10 A I 24 89051135M 8 89051204M 9 89051209M 1 0 8437120M 1 1 ...

Page 45: ...DISTRIBUTION SYSTEMS PRIMARY HYDRAULIC POWER SYSTEM Relief valve Visual inspection A 10 A 87728445 1 2 28 2008 A 10 A 25 ...

Page 46: ...inspection Prior operation Relief valve Disassemble A 10 A 1 Discard all O rings backup rings 2 Clean all parts in cleaning solvent 3 Check the parts of the relief valve Use new parts as necessary Next operation Relief valve Assemble A 10 A 87728445 1 2 28 2008 A 10 A I 26 ...

Page 47: ...M Relief valve Assemble Prior operation Relief valve Visual inspection A 10 A 1 For assembly do the reverse of disassembly refer to Relief valve Disassemble A 1O A Next operation Stack valve Inlet section Assemble A 10 A 87728445 1 2 28 2008 A 10 A 27 ...

Page 48: ...F 10 If the temperature of the hydraulic oil is not as speci fied run the engine at full throttle hold the blade con trol lever in the RAISE position and slowly close the pressure valve on the Flowmeter until the pressure gauge indicates 103 bar 1500 psi Continue to run the engine until the temperature of the oil is as spec ified 11 Lower the blade to the ground and open the pressure Load Valve on...

Page 49: ...ep the pressure at 138 bar 2000 psi Adjust the engine speed to keep the engine running at 2000 r min rpm Read the flow gauge and record the reading 23 Hold the blade control lever in the LOWER Power Down position and adjust the pressure valve on the Flowmeter as required to keep the pressure at 138 bar 2000 psi Adjust the engine speed to keep the engine running at 2000 r min rpm Read the flow gaug...

Page 50: ...ts 33 Tilt the ROPS cab canopy to gain access to the hy draulic spool valve refer to USER PLATFORM Tilt E 34 A 34 Remove the flowmeter return line from the reservoir and replace the filler cap 35 Turn the vacuum pump on 36 Remove the tee fitting from the hydraulic pump hose and the equipment control valve 37 Connect the hydraulic pump hose to the equipment control valve 38 Turn the vacuum pump off...

Page 51: ...This as a preview PDF file from best manuals com Download full PDF manual at best manuals com ...

Reviews:

Related manuals for 750L