background image


25

 | 

P a g e


cascadesciences.com 

|


Tel. 503 847-9047


CONTROL OVERVIEW 


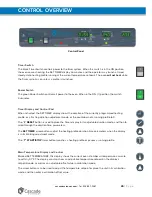
Control Panel


Timer Switch 

The black Timer Switch controls power to the timer system. When this switch is in the ON position, 

the oven ceases heating, the SET TIMER display illuminates, and the operator may launch a timed, 

steady-state heating profile running at the current temperature setpoint. The oven 

will not heat

 while 

the Timer system is on unless a profile is launched. 


Power Switch 

The green Power Switch controls all power to the oven. When in the ON ( I ) position, the switch 

illuminates. 


Timer Display and Control Pad 

When activated. the SET TIMER display shows the duration of the currently programmed heating 

profile, or a flashing duration adjustment mode, or the countdown of a running profile to 0.


The “

//

” 

RESET

 button is used to place the Timer display in its adjustable duration mode, and then to 

scroll through the duration time parameters. 

The 

SET TIMER 

arrow buttons adjust the heating profile duration time parameters when the display 

is in its blinking adjustment mode. 

The “

T” START/STOP 

timer button


launches a heating profile or pauses a running profile. 


Main Temperature Display and Control 

Marked SET TEMPERATURE, this display shows the current oven chamber air temperature accurate 
to 0.1

°

F. The display can also show an adjustable temperature setpoint in the display’s 

setpoint mode, as well as an adjustable offset while in calibration mode. 

The arrow buttons can be used to adjust the temperature setpoint or place the unit in its calibration 

mode, and then enter a calibration offset value. 

Summary of Contents for CDO-5-2

Page 1: ...Installation Operation Manual CDO 5 2 Drying Decarboxylation Oven 220 240 Voltage...

Page 2: ...ertencia Este producto contiene sustancias qu micas incluido el triglicidil isocianurato que el estado de California sabe que causa c ncer as como defectos de nacimiento u otros da os reproductivos Pa...

Page 3: ...3 P a g e cascadesciences com Tel 503 847 9047 CDO Drying and Decarboxylation Oven 220 240 Voltage Installation and Operation Manual Part Number Manual 4861782 Revision November 7 2019...

Page 4: ...17 Required Ambient Conditions 18 Required Clearances 18 Power Source Requirements 19 General Power Safety 20 Lifting and Handling 20 Leveling 21 Install the Oven 21 Installation Cleaning 21 Install t...

Page 5: ...for appropriate professional industrial or educational use T V S D America Inc is an OSHA recognized NRTL and a Standards Council of Canada accredited certification body The units have been tested to...

Page 6: ...6 P a g e cascadesciences com Tel 503 847 9047 CERTIFICATIONS...

Page 7: ...er technical specifications at all times TEMPERATURE PERFORMANCE Range Stability All Temps Ambient 36 to 300 F 0 4 F As set at the factory the oven controller software restricts the maximum operating...

Page 8: ...T Shipping Unit Weight 258 lb 117 kg 208 0 lb 94 3 kg DIMENSIONS By Inches Exterior W D H Interior W D H 31 4 x 28 1 x 38 8 21 0 x 19 4 x 20 7 By Millimeters Exterior W D H Interior W D H 798 x 714 x...

Page 9: ...ECIFICATIONS UNIT DIMENSION DRAWINGS Total Height 38 8 inches 986 mm Width 31 4 inches 798 mm Depth 28 1 inches 714 mm Chamber Interior Depth 19 4 inches 494 mm Width 21 0 inches 533 mm Height 20 7 in...

Page 10: ...10 P a g e cascadesciences com Tel 503 847 9047 SPECIFICATIONS...

Page 11: ...air drying curing and baking applications in professional industrial and educational environments The ovens are not intended for use at hazardous or household locations CONTACTING ASSISTANCE Please h...

Page 12: ...12 P a g e cascadesciences com Tel 503 847 9047 INTRODUCTION...

Page 13: ...claiming damage or loss 1 Carefully inspect the shipping carton for damage 2 Report any damage to the carrier service that delivered the unit 3 If the carton is not damaged open the carton and remove...

Page 14: ...adesciences com Tel 503 847 9047 CDO 5 2 RECEIVING ORIENTATION IMAGES Exhaust Port with Sliding Dampener Main Temperature and OTL Sensor Probes Door Latch Control Panel Chamber Liner Gasket Access Por...

Page 15: ...15 P a g e cascadesciences com Tel 503 847 9047 RECEIVING Unit Back Fan Access Port Stopper Installed Power Cord Inlet Holds 1st Fuse Fuse Holder Holds 2nd Fuse Data Plate...

Page 16: ...unit model number and serial number below for future reference Your distributor or Tech Support needs this information to provide accurate help during support calls and emails The data plate is locat...

Page 17: ...it dimensions may be found on page 7 Check that a suitable electrical outlet and power supply is present page 19 Install the oven in a suitable workspace location Review the lifting and handling instr...

Page 18: ...rces of fast moving air currents High traffic areas Direct sunlight REQUIRED CLEARANCES These clearances are required to provide air flows for ventilation and cooling 6 inches 152 mm of clearance is r...

Page 19: ...t if the supplied voltage varies more than 10 The recommended wall circuit breakers for these units are 20 amps Use a separate circuit to prevent loss of the unit due to overloading or circuit failure...

Page 20: ...ts such as knobs and controls can conduct electricity and cause serious injury Do not bend the power cord excessively step on it or place heavy objects on it A damaged cord can be a shock or fire haza...

Page 21: ...e oven stands level and does not rock Adjust the leveling feet as needed INSTALLATION CLEANING The manufacturer recommends cleaning the shelving and oven chamber prior to installation of the shelving...

Page 22: ...tion 2 Place the shelves on the clips ACCESS PORT STOPPER Verify the port stopper is installed in the access port on the back of the unit The oven will not meet its temperature performance specificati...

Page 23: ...Indicates adjustable temperature Indique temp rature r glable AC Power Rep re le courant alternatif I ON O OFF I indique que l interrupteur est en position marche O indique que le commutateur est en...

Page 24: ...847 9047 SYMBOLS Symbol Definition Indicates the timer Indique le minuterie Start or Stop the Timer Lancer ou arr ter le minuteur Reset the Timer R initialisation de la Minuterie Caution hot surface A...

Page 25: ...or a flashing duration adjustment mode or the countdown of a running profile to 0 The RESET button is used to place the Timer display in its adjustable duration mode and then to scroll through the dur...

Page 26: ...chieve and maintain the temperature setpoint OTL Light Marked OVER TEMPERATURE ACTIVATED this light illuminates whenever the Over Temperature Limit heating cutoff system is routing power away from the...

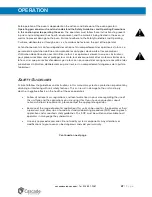
Page 27: ...r ainsi que pour viter d endommager le four Le non respect des consignes de s curit et des pr cautions d utilisation d lib r ment ou par erreur est un comportement dangereux de la part de l op rateur...

Page 28: ...able laws ordinances and regulations Do not operate the oven in an unsafe area with noxious fumes Never allow baking materials to become airborne in the chamber Airborne materials can pass through the...

Page 29: ...l heat radiation for cooling When the oven is powered the chamber air temperature cannot go below the ambient room temperature plus the internal waste heat of the oven Waste heat is generated primaril...

Page 30: ...rom room temperature to 240 F When the timer system is on the oven will not heat unless a profile is running The Over Temperature Limit System The oven is equipped with a heating cutoff system which a...

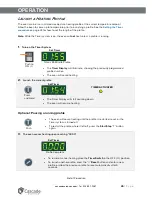
Page 31: ...2 Attach the power cord that came with the unit to the power inlet receptacle on the back of the oven Plug the power cord into the workspace electrical supply outlet 3 Place the oven Power Switch in t...

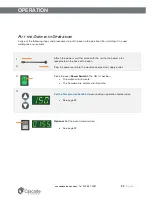
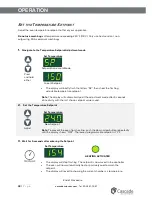
Page 32: ...ashing adjustable temperature setpoint Note The display will automatically exit the adjustment mode after 5 seconds of inactivity with the last shown setpoint value saved 2 Set the Temperature Setpoin...

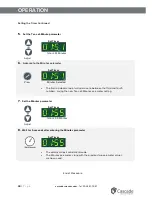
Page 33: ...will illuminate showing the previously programmed profile duration The oven will cease heating 2 Place the Timer Display in its adjustable Set Timer mode Press and hold RESET Set Timer Hours Selected...

Page 34: ...ess Set Timer Minutes Selected The flashing decimal point will advance to between the third and fourth numbers saving the new Tens of Minutes parameter setting 7 Set the Minutes parameter Adjust Set T...

Page 35: ...l illuminate showing the previously programmed profile duration The oven will cease heating 2 Launch the current profile Press and Hold Set Timer The Timer Display will start counting down The oven wi...

Page 36: ...cks are suitable for your application and will not suffer damage when brought to temperature Always set the OTL cutoff system to approximately 10 F above your application temperature setpoint in order...

Page 37: ...ess steel surfaces Do not use chlorine based bleaches or abrasives these will damage the chamber liner Warning Exercise caution if cleaning the unit with alcohol or flammable cleaners Always allow the...

Page 38: ...ng and other non attached items from the chamber when disinfecting Disinfect all surfaces in the chamber making sure to thoroughly disinfect the corners Exercise care to avoid damaging the sensor prob...

Page 39: ...be in place The oven manufacturer recommends Kapton brand tape 0 5 inches width 12 7 mm 2 mil thickness 1 Introduce the reference device thermocouple sensor probes into the oven chamber through the re...

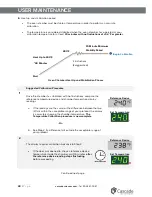
Page 40: ...perature device and chamber temperature display readings a If the readings are the same or the difference between the two 2 falls within the acceptable range of your protocol the display is accurately...

Page 41: ...erature Current Temp Value 4 Adjust the current temperature value to match the reference device a Use the UP and DOWN arrow buttons Set Temperature Corrected Reference Device 5 After entering the corr...

Page 42: ...between the two falls within the acceptable range of your protocol the oven is calibrated for temperature The Temperature Calibration procedure is complete Or b See Step 9 if a difference falls outsi...

Page 43: ...pper High Temperature 7750572 Door Gasket sold by 1 5 feet requires 8 1ft 2 5 meters 3450767 1 5ft Shelf and 4 Shelf Clips 9751229 Fuse T10A 250V 5x20mm Requires 2 fuses 300516 Shelf Clip Individual 1...

Page 44: ......
Reviews: