background image

www.CasablancaFanCo.com

1.888.227.2178

7

42900-01 • 03/18/15 • © 2015 Casablanca Fan Company

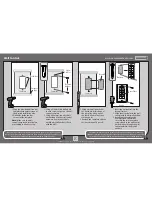
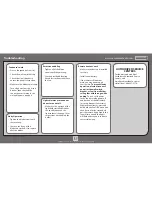
1. Using a 9/64 drill bit, drill a hole 

in each screw cut-out on the wall 

control template. 

2. Using a hammer, tap a drywall 

anchor found in the wall control 

hardware bag into each hole 

until the drywall anchor is flush 

with the wall.

1. Using a drywall punch saw, 

cut out the interior shape of 

the template using one of 

the four drilled corners as a 

starting point.

2. Remove the template and the 

cut-out section of drywall. 

1. Insert the wall control into the 

dry wall cut out.

2. Align the screw holes in the wall 

control with the drywall anchors.

3. Install the cover plate using 

a Phillips Head screwdriver 

to secure the two cover plate 

screws found in the wall control 

hardware bag through the wall 

control and into the drywall 

anchors.  

Wall Control

This device complies with Part 15 of the FCC Rules. Operation is subject to the following 

conditions: (1) this device may not cause harmful interference, and (2) this device must accept 

any interference received, including interference that may cause undesired operation.

If you are using a outlet box for wall control installation, the wires coming from the wall 

control must be grounded using the attached green wire. If not placed in an outlet box, cap 

the green wire coming from the wall control with an included wire nut.

1. Tape the provided wall control 

template with painter’s tape at 

the desired installation area. 

2. Drill holes inside the four 

corners of the template.

Note:

 Make sure the wall 

control template is level before 

proceeding to the next step.

Template

Drywall

Before

After

Cover Plate

Template

Drill Holes

Painter’s 

Tape

Template

Drywall 

Anchors

Screw 

Cut-Out

Summary of Contents for 42900-01

Page 1: ...ling fan It will provide comfort and performance in your home or office for many years This installation and operation manual contains complete instructions for installing and operating your fan We ar...

Page 2: ...e panel w 3 To reduce the risk of fire electrical shock or motor damage use only Casablanca Solid State Speed Controls w 4 To reduce the risk of personal injury do not bend the blade brackets when ins...

Page 3: ...88 227 2178 3 42900 01 03 18 15 2015 Casablanca Fan Company Tools Needed Power Drill optional 9 64 Drill Bit optional Ladder Wire Strippers If mounting to a support structure you will also need these...

Page 4: ...er Use wood screws included when securing to support structure with approved electrical outlet box Drill 9 64 pilot holes in support structure to aid in securing ceiling plate with hardware found in t...

Page 5: ...ompany DO NOT PICK THE FAN UP BY THE WIRES Use the hanging hole on the body of the fan to hang the fan on the hook of the ceiling mounting plate Unlock the canopy cover from the canopy ring tabs to lo...

Page 6: ...gether and place a wire connector over them then twist clockwise until tight Using an orange wire connector from the hardware bag Connect the 3 grounding wires green green yellow stripe or bare copper...

Page 7: ...hardware bag through the wall control and into the drywall anchors Wall Control This device complies with Part 15 of the FCC Rules Operation is subject to the following conditions 1 this device may n...

Page 8: ...e hook and align the hanging slots on both sides of the fan body with the two partially installed canopy screws Slide the two slots on both sides of the fan body between the head of the screws and rot...

Page 9: ...ce by the tab holders locking the canopy ring into place To check your work make sure there is an even gap all the way around between the ceiling and the canopy ring Before going to the next step loca...

Page 10: ...ade using three blade screws and washers found in the hardware bag Repeat this process for all five blades Blades 10 Slide a blade into a slot located on the blade ring Note The blades will only fit p...

Page 11: ...into each light socket When necessary replace with bulbs of the same type and wattage Tab When installing a halogen bulb carefully cut off the end of the plastic sleeve packaging and hold the bulb by...

Page 12: ...ontrol hardware bag with the positive side facing downward Reinstall the battery holder and reinsert the battery door into the wall control Battery Battery Holder Battery Door ON Turn Power The remote...

Page 13: ...anges the air flow pattern In warm weather use a downward air flow pattern In cold weather use b upward air flow pattern a b Reverse Button Press the fan power button off for at least three seconds to...

Page 14: ...ts may damage the finishes Be sure to turn off power to the fan before performing any maintenance or relamping OFF Turn Power Changing the bulbs carefully remove the globe assembly by lifting and rota...

Page 15: ...the wattage of the light bulbs installed matches the specifications on the light sockets see page 14 for instructions on changing the bulbs AUTHORIZED SERVICE CENTERS For the most updated list of Casa...

Page 16: ...e fans operated by a single remote control you must pair the transmitter to each additional receiver The receiver that shipped with your fan is already paired to the transmitter Note To prevent faulty...

Reviews: