background image

24

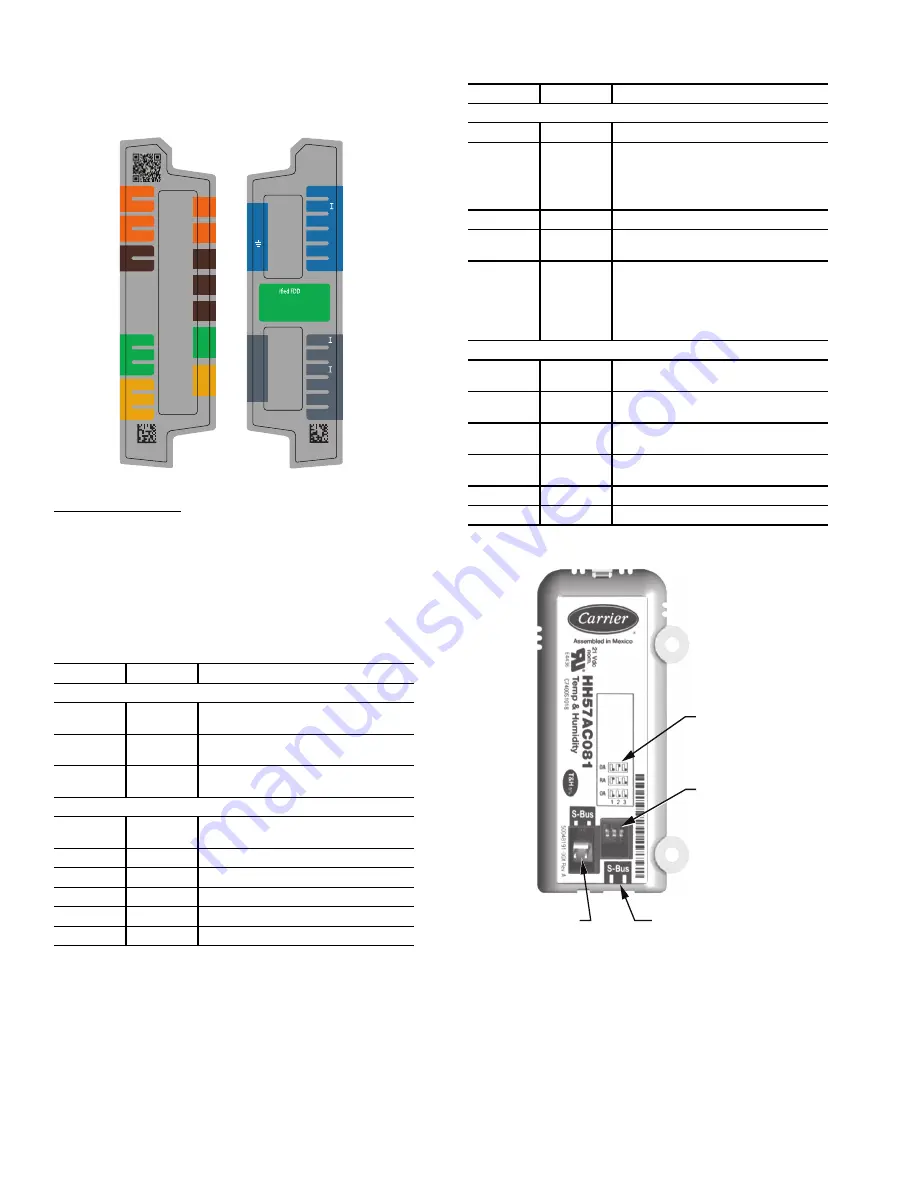
ECONOMIZER  MODULE  WIRING  DETAILS  —   Use

Fig. 38 and Tables 9 and 10 to locate the wiring terminals for

the Economizer module.
NOTE: The four terminal blocks are removable. Slide out each

terminal block, wire it, and then slide it back into place.

Fig. 38 — W7220 Wiring Terminals

S-Bus Sensor Wiring — The labels on the sensors and con-

troller are color coded for ease of installation. Orange labeled

sensors can only be wired to orange terminals on the controller.

Brown labeled sensors can only be wired to S-bus (brown) ter-

minals. Use Fig. 38 and Table 9 to locate the wiring terminals

for each S-Bus sensor.

Use Fig. 38 and Table 12 to set the DIP switches for the de-

sired use of the sensor.

Table 9 — Economizer Module - Left Hand 

Terminal Blocks

* Sylk is a registered trademark of Honeywell International Inc.

Table 10 — Economizer Module - Right Hand 

Terminal Blocks

Use Fig. 39 and Table 11 to locate the wiring terminals for

each enthalpy control sensor.

Fig. 39 — S-Bus Sensor DIP Switches

LABEL

TYPE

DESCRIPTION

Top Left Terminal Block

MAT
MAT

20k NTC 
and COM

Mixed Air Temperature Sensor (Polarity 
Insensitive Connection)

OAT
OAT

20k NTC 
and COM

Outdoor Air Temperature Sensor 
(Polarity Insensitive Connection)

S-BUS
S-BUS

S-BUS 
(Sylk* Bus)

Enthalpy Control Sensor 
(Polarity Insensitive Connection)

Bottom Left Terminal Block

IAQ 2-10

2-10 vdc

Air Quality Sensor Input (e.g. CO

2


sensor)

IAQ COM

COM

Air Quality Sensor Common

IAQ 24V

24 vac

Air Quality Sensor 24 vac Source

ACT 2-10

2-10 vdc

Damper Actuator Output (2-10 vdc)

ACT COM

COM

Damper Actuator Output Common

ACT 24v

24 vac

Damper Actuator 24 vac Source

NA

AUX2- 

OCC

E-GND

EXH1

AUX1-O

Y2-

Y1-

Y2-O

Y1-O

C

R

5004

88

4

8

-002

Rev. A

NA

A2

OCC

EX

A1

Y2I

Y2O

Y1I

Y1O

C

R

Cert

Prod

u

ct

C

a

liforni

a

 Title 24, P

a

rt 6

HJW10

www.energy.c

a

.gov

MAT

MAT

OAT

OAT

S

-BU

S

S

-BU

S

IAQ 2-10

IAQ COM

IAQ 24V

ACT 2-10

ACT COM

ACT 24V

MA
MA

OA
OA

S

B

S

B

S

B

S

B

S

B

S

B

V
C
R

V
C
R

NA

50040

83

9-001

Rev. G

LABEL

TYPE

DESCRIPTION

Top Right Terminal Blocks

AUX2 I

24 vac IN

The first terminal is not used.

OCC

24 vac IN

Shut Down (SD) or HEAT (W) 
Conventional only
and
Heat Pump Changeover (O-B) in Heat 
Pump mode.

E-GND

E-GND

Occupied/Unoccupied Input

EXH1

24 vac 
OUT

Exhaust Fan 1 Output

AUX1 O

24 vac 
OUT

Programmable:
Exhaust fan 2 output
or
ERV
or
System alarm output

Bottom Right Terminal Blocks

Y2-I

24 vac IN

Y2 in - Cooling Stage 2 Input from 
space thermostat

Y2-O

24 vac 
OUT

Y2 out - Cooling Stage 2 Output to 
stage 2 mechanical cooling

Y1-I

24 vac IN

Y1 in - Cooling Stage 2 Input from 
space thermostat

Y1-O

24 vac 
OUT

Y1 out - Cooling Stage 2 Output to 
stage 2 mechanical cooling

C

COM

24 vac Common

R

24 vac

24 vac Power (hot)

DIP
SWITCH
LABEL

DIP
SWITCHES
(3)

S-BUS
2 PIN SIDE
CONNECTOR

S-BUS
TERMINALS
(1 AND 2)

Summary of Contents for WeatherMaker 48TC 04

Page 1: ...ECTORS Step 13 Adjust Factory Installed Options 57 SMOKE DETECTORS ECONOMI ER IV OCCUPANCY SWITCH Step 14 Install Accessories 57 Step 15 Check Belt Tension 57 BELT FORCE DEFLECTION METHOD BELT TENSION METHOD Pre Start and Start Up 58 START UP CHECKLIST CL 1 GENERAL These installation instructions cover the 48TC units with gas heat and electric cooling Units are pre wired and pre charged with envir...

Page 2: ...ns on unit always turn off main power switch to unit and install lock s and lockout tag s Unit may have more than one power switch WARNING Failure to follow this warning could cause personal injury death and or equipment damage Puron R 410A refrigerant systems operate at higher pres sures than standard R 22 systems Do not use R 22 service equipment or components on Puron refrigerant equipment WARN...

Page 3: ...Al E coat Al Cu Louvered Hail Guard W E coat Al Al Al Cu Louvered Hail Guard X E coat Al Al E coat Al Cu Louvered Hail Guard Voltage 1 575 3 60 3 208 230 1 60 5 208 230 3 60 6 460 3 60 Design Revision Factory Design Revision Base Unit Controls 0 Electro mechanical Controls can be used with W7212 EconoMi er IV Non Fault Detection and Diagnostic 1 PremierLink Controller 2 RTU Open Multi Protocol Con...

Page 4: ...4 Fig 2 Unit Dimensional Drawing ...

Page 5: ...5 Fig 2 Unit Dimensional Drawing cont ...

Page 6: ...nstallation must be in accordance with the CAN1 B149 installation codes for gas burning appliances Although unit is weatherproof avoid locations that permit water from higher level runoff and overhangs to fall onto the unit Locate mechanical draft system flue assembly at least 4 ft 1 2 m from any opening through which combustion products could enter the building and at least 4 ft 1 2 m from any ad...

Page 7: ... CURB MOUNT Curb should be level This is nec essary for unit drain to function properly Unit leveling toler ances are show in Fig 4 Refer to Accessory Roof Curb Instal lation Instructions for additional information as required Fig 4 Unit Leveling Tolerances Accessory roof curb details and dimensions are shown in Fig 5 Assemble and install accessory roof curb in accordance with instructions shipped...

Page 8: ...IZATION OF CARRIER CORPORATION 1 DEC 2 DEC 3 DEC ANG MATERIAL AUTHORIZATION NUMBER TITLE 1041738 CURB ASY ROOF ENGINEERING 004 007 ENGINEERING REQUIREMENTS SIZE DRAWING NUMBER REV T 005 Y 002 DRAFTER CHECKER D 48TC400427 B WEIGHT MMC 06 17 11 SHEET 5 OF 5 SURFACE FINISH MFG PURCH MODEL INTERNAL USE ONLY NEXT DRAWING SCALE DISTRIBUTION PURCH N A MMC NOTES 1 ROOFCURB ACCESSORY IS SHIPPED DISASSEMBLE...

Page 9: ...between the roof curb and the base rail inside on the duct end of the unit This will result in the distance between the roof curb and the base rail inside on the condenser end of the unit being approximately 1 4 in 6 4 mm Although unit is weatherproof guard against water from higher level runoff and overhangs Flue vent discharge must have a minimum horizontal clear ance of 4 ft 1220 mm from electr...

Page 10: ...ed The indoor coil access panel is used as the hood top while the hood sides divider and filter are packaged together attached to a metal support tray using plastic stretch wrap and shipped in the return air compartment behind the indoor coil access panel The hood assembly s metal tray is attached to the basepan and also attached to the damper using two plastic tie wraps 2 To gain access to the ho...

Page 11: ...tails Step 10 Install Gas Piping Installation of the gas piping must be accordance with local building codes and with applicable national codes In U S A refer to NFPA 54 ANSI Z223 1 National Fuel Gas Code NFGC In Canada in stallation must be accordance with the CAN CSA B149 1 and CAN CSA B149 2 installation codes for gas burning applianc es This unit is factory equipped for use with Natural Gas fu...

Page 12: ... in NPT gas adapter fitting brass a 1 2 in electri cal bulkhead connector and a 3 4 in electrical bulkhead con nector all factory installed in the embossed raised section of the unit basepan in the condenser section See Fig 15 Fig 15 Thru Base Connection Fittings The thru base gas connector has male and female threads The male threads protrude above the basepan of the unit the female threads protr...

Page 13: ...Piping with Thru Curb Accessory Alternate Layout Fig 19 Gas Piping Thru Base Connections When installing the gas supply line observe local codes pertaining to gas pipe installations Refer to the NFPA 54 ANSI Z223 1 NFGC latest edition in Canada CAN CSA B149 1 In the absence of local building codes adhere to the following pertinent recommendations 1 Avoid low spots in long runs of pipe Grade all pi...

Page 14: ... can be completed after the unit is in place See Fig 22 NOTE If the alternate bottom drain is not used check the drain plug for tightness prior to setting the unit on the roof curb Fig 22 Condensate Drain Piping Details All units must have an external trap for condensate drain age Install a trap at least 4 in 102 mm deep and protect against freeze up If drain line is installed downstream from the ...

Page 15: ... sure located under the main control box The manual switch handle and shaft are shipped in the disconnect enclosure Assemble the shaft and handle to the switch at this point Dis card the factory test leads see Fig 24 Connect field power supply conductors to LINE side termi nals when the switch enclosure cover is removed to attach the handle Fig 24 Location of Non Fused Disconnect Enclosure To fiel...

Page 16: ...mpliance with NEC requirements for multimotor and combination load equipment refer to NEC Articles 430 and 440 the overcurrent protective device for the unit shall be fuse or HACR breaker Canadian units may be fuse or circuit breaker 2 Unbalanced 3 Phase Supply Voltage Never operate a motor where a phase imbalance in supply voltage is greater than 2 Use the following formula to determine the perce...

Page 17: ...122 31 40 31 124 460 3 60 STD 12 15 11 52 13 15 12 53 14 15 14 54 15 20 15 55 MED 12 15 11 52 13 15 12 53 14 15 14 54 15 20 15 55 HIGH 12 15 11 58 13 15 12 59 14 15 14 60 15 20 15 61 575 3 60 STD 9 15 9 42 11 15 11 44 11 15 11 44 13 15 13 46 MED 9 15 9 42 11 15 11 44 11 15 11 44 13 15 13 46 HIGH 9 15 9 46 11 15 11 48 11 15 10 48 13 15 13 50 48TC 06 208 230 1 60 STD 40 60 37 150 42 60 40 152 44 60 ...

Page 18: ...ed DDC Remove the blank cover plate at the convenience outlet Loosen the two screws at the GFCI duplex outlet until ap proximately 1 2 in 13 mm under screw heads are exposed Press the gasket over the screw heads Slip the backing plate over the screw heads at the keyhole slots and align with the gasket tighten the two screws until snug do not over tighten Mount the weatherproof cover to the backing...

Page 19: ...uid tight conduit con nectors and conduit may be attached to the connectors on the basepan Pull correctly rated high voltage and low voltage through appropriate conduits Connect the power conduit to the internal disconnect if unit is so equipped or to the external disconnect through unit side panel Ahole must be field cut in the main control box bottom on the left side so the 24 v control connecti...

Page 20: ...stat 2 conductor cable field sup plied through the hole provided in the unit corner post 2 Feed wires through the raceway built into the corner post see Fig 32 to the 24 v barrier located on the left side of the control box The raceway provides the UL required clearance between high voltage and low voltage wiring 3 Use wire nuts to connect humidistat cable to two PINK leads in the low voltage wiri...

Page 21: ...21 Fig 34 48TC B07 Unit with Humidi MiZer Adaptive Dehumidification System Humidistat Wiring ...

Page 22: ...t Fig 36 48TC B07 Unit with Humidi MiZer Adaptive Dehumidification System Rc Rh W1 G Y2 C O W2 B Y1 OAT RRS SRTN HUM D1 D2 V Vg X C G W2 W1 Y2 Y1 R EDGE Pro THERMIDISTAT Unit CTB THERMOSTAT Connection not required Humidi MiZer FIOP ...

Page 23: ...il able with bus sensors User Interface Provides status for normal operation setup parameters checkout tests and alarm and error conditions with a 2 line 16 character LCD display and four button keypad Electrical Rated Voltage 20 to 30 Vac RMS 50 60 Hz Transformer 100 va maximum system input Nominal Power Consumption at 24 Vac 60 Hz 11 5 VA without sensors or actuators Relay Digital Output Rating ...

Page 24: ...rity Insensitive Connection Bottom Left Terminal Block IAQ 2 10 2 10 vdc Air Quality Sensor Input e g CO2 sensor IAQ COM COM Air Quality Sensor Common IAQ 24V 24 vac Air Quality Sensor 24 vac Source ACT 2 10 2 10 vdc Damper Actuator Output 2 10 vdc ACT COM COM Damper Actuator Output Common ACT 24v 24 vac Damper Actuator 24 vac Source NA AUX2 OCC E GND EXH1 AUX1 O Y2 Y1 Y2 O Y1 O C R 50048848 002 R...

Page 25: ... to the next menu Press the Enter button to display the first item in the currently displayed menu Press the Menu Up Exit button to exit a menu s item and return to the list of menus To use the keypad when working with Setpoints System and Advanced Settings Checkout tests and Alarms 1 Navigate to the desired menu 2 Press the Enter button to display the first item in the currently displayed menu 3 ...

Page 26: ...mum position settings and readings on the checkout menus Time Out and Screen Saver When no buttons have been pressed for 10 minutes the LCD displays a screen saver which cycles through the Status items Each Status items displays in turn and cycles to the next item after 5 seconds 1 and 2 Speed Fan Operation For 1 speed fan dry bulb and enthalpy operation see Tables 15 18 For 2 speed fan operation ...

Page 27: ... measured mixed air from MAT sensor Displays _ _ _ F if not connected short or out of range DA TEMP _ _ _ F 0 to 140 F DISCHARGE AIR TEMPERATURE after Heating section Displays when Discharge Air sensor is connected and displays mea sured discharge temperature Displays _ _ _ F if sensor sends invalid value if not connected short or out of range OA TEMP _ _ _ F 40 to 140 F OUTSIDE AIR TEMP Displays ...

Page 28: ... is NOT connected VENTMAX With 2 speed fan units VENTMAX L low speed fan and VENTMAX H high speed fan settings are required 2 8 V 2 to 10 Vdc DCV MAXIMUM DAMPER POSITION Displays only if a CO2 sensor is connected Used for Vbz ventilation max cfm setpoint Displays 2 to 10 V if 3 sensors RA OA and MA In AUTO mode dampers controlled by CFM 100 to 9990 cfm increment by 10 If OA MA RA and CO2 sensors a...

Page 29: ...tory defaults when set to YES LCD will briefly flash YES and change to NO but all parameters will change to the fac tory default values NOTE RECHECK AUX2 IN and FANTYPE for required 2 speed values ADVANCED SETUP MA LO SET 45 F 35 to 55 F Incremented by 10 SUPPLY AIR TEMPERATURE LOW LIMIT Temperature to achieve Freeze Protection close damper and alarm if temperature falls below setup value FREEZE P...

Page 30: ... or signals an ERV that the conditions are not good for economizing but are for ERV operation SYS 24 Vac out Issues a system alarm CONNECT EXH1 N A N A Closes the power exhaust fan 2 relay EXH1 ALARMS Alarms display only when they are active The menu title ALARMS includes the number of active alarms in parenthesis When using SYLK bus sensors SYLK will appear on the screen and when using 20k OA tem...

Page 31: ...turn Air differential temperature sensor or an Outdoor Air enthalpy sensor is connected 7 SYSTEM SETUP parameters must be configured as noted for 2 Speed unit operation EQUIPMENT CONV AUX2 I W FAN TYPE 2SPEED MENU PARAMETER PARAMETER DEFAULT VALUE PARAMETER RANGE AND INCREMENT NOTES ALARMS CONT SHUTDOWN ACTIVE N A N A AUX2 IN is programmed for SHUTDOWN and 24 V has been applied to AUX 2IN terminal...

Page 32: ...PIED UNOCCUPIED NONE NO OFF OFF HIGH 0v Off 0v Off MIN POS Closed ON OFF HIGH 24v On 0v Off MIN POS Closed ON ON HIGH 24v On 24v On MIN POS Closed NONE YES OFF OFF HIGH 0v Off 0v Off MIN POS Closed ON OFF HIGH 0v Off 0v Off MIN POS to Full Open Closed to Full Open ON ON HIGH 24v On 0v Off MIN POS to Full Open Closed to Full Open DEMAND CONTROLLED VENTILATION DCV OUTSIDE AIR GOOD TO ECONOMIZE Y1 I ...

Page 33: ...ff MIN POS Closed ON OFF HIGH 0v Off 0v Off MIN POS to Full Open Closed to Full Open ON ON HIGH 24v On 0v Off MIN POS to Full Open Closed to Full Open DEMAND CONTROLLED VENTILATION DCV OUTSIDE AIR GOOD TO ECONOMIZE Y1 I Y2 I FAN SPEED Y1 O Y2 O OCCUPIED UNOCCUPIED Below CO2 Set No OFF OFF HIGH 0v Off 0v Off VENTMIN Closed ON OFF HIGH 24v On 0v Off VENTMIN Closed ON ON HIGH 24v On 24v On VENTMIN Cl...

Page 34: ...v Off MIN POS Closed ON OFF LOW 0v Off 0v Off MIN POS to Full Open Closed to Full Open ON ON HIGH 24v On 0v Off MIN POS to Full Open Closed to Full Open DEMAND CONTROLLED VENTILATION DCV OUTSIDE AIR GOOD TO ECONOMIZE Y1 I Y2 I FAN SPEED Y1 O Y2 O OCCUPIED UNOCCUPIED Below CO2 Set No OFF OFF LOW 0v Off 0v Off VENTMIN Closed ON OFF LOW 24v On 0v Off VENTMIN Closed ON ON HIGH 24v On 24v On VENTMIN Cl...

Page 35: ... 0v Off MIN POS Closed ON OFF LOW 0v Off 0v Off MIN POS to Full Open Closed to Full Open ON ON HIGH 24v On 0v Off MIN POS to Full Open Closed to Full Open DEMAND CONTROLLED VENTILATION DCV OUTSIDE AIR GOOD TO ECONOMIZE Y1 I Y2 I FAN SPEED Y1 O Y2 O OCCUPIED UNOCCUPIED Below CO2 Set No OFF OFF LOW 0v Off 0v Off VENTMIN Closed ON OFF LOW 24v On 0v Off VENTMIN Closed ON ON HIGH 24v On 24v On VENTMIN ...

Page 36: ...ly but uses the following input status to determine the speed of the supply fan and controls the OA damper to the required position see Table 24 Table 24 Fan Speed The W heating mode is not controlled by the W7220 but it requires the status to know where to position the OA damper for minimum position for the fan speed The 2 speed fan delay is available when the system is pro grammed for 2 speed fa...

Page 37: ...time of in stallation or at any time during the operation of the system as a test that the system is operable Troubleshooting Alarms The Economizer module provides alarm messages that display on the 2 line LCD NOTE Upon power up the module waits 60 minutes before checking for alarms This allows time for all the configured devices e g sensors actuator to become operational The exception is the SAT ...

Page 38: ...minal block TB1 located on the bottom shelf of the unit control box in front of the Premier Link controller The factory installed PremierLink control includes the supply air temperature SAT sensor The outdoor air temperature OAT sensor is included in the FIOP accesso ry EconoMi er2 package The PremierLink controller requires the use of a Carrier electronic thermostat or a CCN connection for time b...

Page 39: ...39 Fig 45 PremierLink Wiring Schematic ...

Page 40: ...40 Fig 46 PremierLink Wiring Schematic with Humidi MiZer System ...

Page 41: ...unctions can be enhanced with field installation of these accessory control devices Enthalpy control outdoor air or differential sensors Space CO2 sensor Outdoor air CO2 sensor Refer to Table 25 for accessory part numbers PREMIERLINK FIELD CONNECTIONS Field connec tions for accessory sensor and input devices are made at the 16 pole terminal block TB1 located on the control box bottom shelf in fron...

Page 42: ...PSAFE Compressor Safety FILTER Dirty Filter Switch FSD Fire Shutdown IAQ Indoor Air Quality CO2 OAQ Outdoor Air Quality CO2 RH Relative Humidity SFS Supply Fan Status TB1 TERMINAL FIELD CONNECTION INPUT SIGNAL 1 RAT SEN Analog 10k thermistor 2 G Discrete 24VAC 3 RAT SEN Analog 10k thermistor 4 Y1 Discrete 24VAC 5 6 Y2 Discrete 24VAC 7 LOOP PWR Analog 24VDC 8 W1 Discrete 24VAC 9 IAQ SEN Analog 4 20...

Page 43: ...tion re quires a 24 v power source and a common connection Use the R and C terminals on the CTB s THERMOSTAT connection strip for these Connect the thermostat s Y1 Y2 W1 W2 and G terminals to PremierLink TB1 as shown in Fig 52 If the 48TC unit is equipped with factory installed smoke detector s disconnect the factory BLU lead at TB1 6 Y2 be fore connecting the thermostat Identify the BLU lead orig...

Page 44: ...urces Allow at least 3 ft 0 9 m between the sensor and any corner Avoid mounting the sensor where it is influenced by the supply air the sensor gives inaccurate readings if the supply air is blown directly onto the sensor or if the supply air does not have a chance to mix with the room air before it is drawn into the re turn airstream Wiring the Indoor Air Quality Sensor For each sensor use two 2 ...

Page 45: ...eld supplied RED wire into the sensor screw terminal marked Io 4 Connect the field supplied RED wire from the sensor to TB1 13 5 Connect the field supplied BLACK wire from the sensor to TB1 7 Smoke Detector Fire Shutdown FSD This function is available only when PremierLink is configured for Space Sensor Mode The unit is factory wired for PremierLink FSD operation when PremierLink is factory instal...

Page 46: ...ommunication Bus The PremierLink controller connects to the bus in a daisy chain arrangement Negative pins on each component must be connected to respective negative pins and likewise positive pins on each component must be connected to respective positive pins The controller signal pins must be wired to the signal ground pins Wiring connections for CCN must be made at the 3 pin plug At any baud 9...

Page 47: ...2 Johnson N2 and LonWorks3 see Fig 65 and 66 Refer to Table 30 RTU Open Controller Inputs and Outputs for locations of all connections to the RTU Open board Fig 64 RTU Open Multi Protocol Control Board SIGNAL TYPE CCN BUS WIRE COLOR CCN PLUG PIN NUMBER Red 1 Ground White 2 Black 3 CCN Bus J2 1 J2 2 GND WHT 12 14 TB1 J2 3 BLK 16 TB1 TB1 PL RED 1 BACnet is a registered trademark of ASHRAE American S...

Page 48: ...48 Fig 65 Typical RTU Open System Control Wiring Diagram ...

Page 49: ...49 Fig 66 Typical RTU Open System Control Wiring Diagram with Humidi MiZer System ...

Page 50: ...I 24 VAC J5 7 8 Binary Input 9 Zone Temperature n a n a J13 1 4 Rnet CONFIGURABLE INPUTS4 Indoor Air CO2 iaq AI 4 20 mA J4 2 3 or J4 5 6 Analog Input 2 Outdoor Air CO2 oaq AI 4 20 mA Analog Input 1 Space Relative Humidity space_rh AI 4 20 mA Analog Input 10 Supply Fan Status2 sfan_status BI 24 VAC J5 1 2 or J5 3 4 J5 5 6 or J5 7 83 Binary Input 3 5 8 or 9 except where intrinsic input is used Filte...

Page 51: ...ng network or zoning system However it is still recommended that return air duct sensor be installed to allow stand alone operation for back up Refer to the configuration section for details on con troller configurations associated with space sensors 33ZCT55SPT space temperature sensor with override button T 55 33ZCT56SPT space temperature sensor with override button and set point adjustment T 56 ...

Page 52: ... humidity sensor and humidistat are not available for single phase 3 voltage code models Humidi MiZer Control Wiring In units equipped with the Humidi MiZer option there are two pink PNK wires loose in the control box used to control the dehumidification function of the unit These pink wires are meant to be tied to a space hu midistat or thermidistat on an electromechanical unit On RTU Open equipp...

Page 53: ...st output The relay used by the RTU Open board to control power exhaust is a dry contact which means it does not have 24vac This 24vac must be connected to the relay to allow it to operate the power exhaust relay in the PE acces sory A 24vac source must be provided to J11 2 on the RTU Open control board This can be provided by the unit s trans former from various sources The R terminal on the unit...

Page 54: ... to set up service or download appli cation software to the RTU Open controller and includes a USB link cable The link cable connects a USB port to the J12 local access port The Field Assistant s menu structure is simi lar and functions the same as i Vu Open controller See Fig 77 RTU Open Troubleshooting Troubleshooting is accom plished by viewing the communication LEDs The LEDs indi cate if the c...

Page 55: ...detectors may be specified for Supply Air only or for Return Air without or with economizer or in combination of Supply Air and Re turn Air All components necessary for operation are factory provided and mounted The unit is factory configured for im mediate smoke detector shutdown operation additional wiring or modifications to unit terminal board may be necessary to complete the unit and smoke de...

Page 56: ... detector plate into its operating po sition using screws from Step 1 See Fig 81 Step 3 4 Connect the flexible tube on the sampling inlet to the sampling tube on the basepan Additional Application Data Refer to the application data sheet titled Factory Installed Smoke Detector for Small and Medium Rooftop Units 2 to 25 Tons for discussions on addi tional control features of these smoke detectors i...

Page 57: ...o Position motorized outside air damper EconoMi er IV with control EconoMi er2 without control for external signal Power Exhaust Differential dry bulb sensor EconoMi er IV Outdoor enthalpy sensor Differential enthalpy sensor CO2 sensor DDC interface PremierLink Louvered hail guard Motormaster head pressure controls Phase monitor control Refer to separate installation instructions for information o...

Page 58: ...r pulleys aligned Tighten all bolts se curely when finished BELT TENSION METHOD Requires belt tension gauge that measures tension in belt in units of lbs force Fig 83 V Belt Force Label Fig 84 Belt Drive Motor Mounting Pre Start and Start Up This completes the mechan ical installation of the unit Refer to the unit s Service Manual for detailed Pre Start and Start Up instructions Download the lates...

Page 59: ... range Y N _____ Check gas piping for leaks Y N _____ Check that indoor air filters are clean and in place Y N _____ Check that outdoor air inlet screens are in place Y N _____ Verify that unit is level Y N _____ Check fan wheels and propeller for location in housing orifice and verify setscrew is tight Y N _____ Verify that fan sheaves are aligned and belts are properly tensioned Y N _____ Verify...

Page 60: ...C Entering air temperature _______________ F D Liquid line temperature at outlet or reheat coil _______________ F E Confirm correct rotation for compressor Y N _____ F Check for correct ramp up of outdoor fan motor as condenser coil warms Y N _____ 4 Check unit charge per charging chart Y N _____ Jumper 32L Motormaster temperature sensor during this check Remove jumper when complete 5 Switch unit ...

Reviews: