background image

15

Main Menu Screen — To access the Main Menu screen, press

the Main Menu icon 

. Press the icons on the screen to access

the appropriate table or menu. Press the arrows at the bottom

right corner, if present, to navigate through pages of tables. The

options shown on the Main Menu screen depend on the user’s

level of access (see the section User Login Screen on page 14).

Figure 17 shows the Main Menu screen as it appears for the

User level of access.

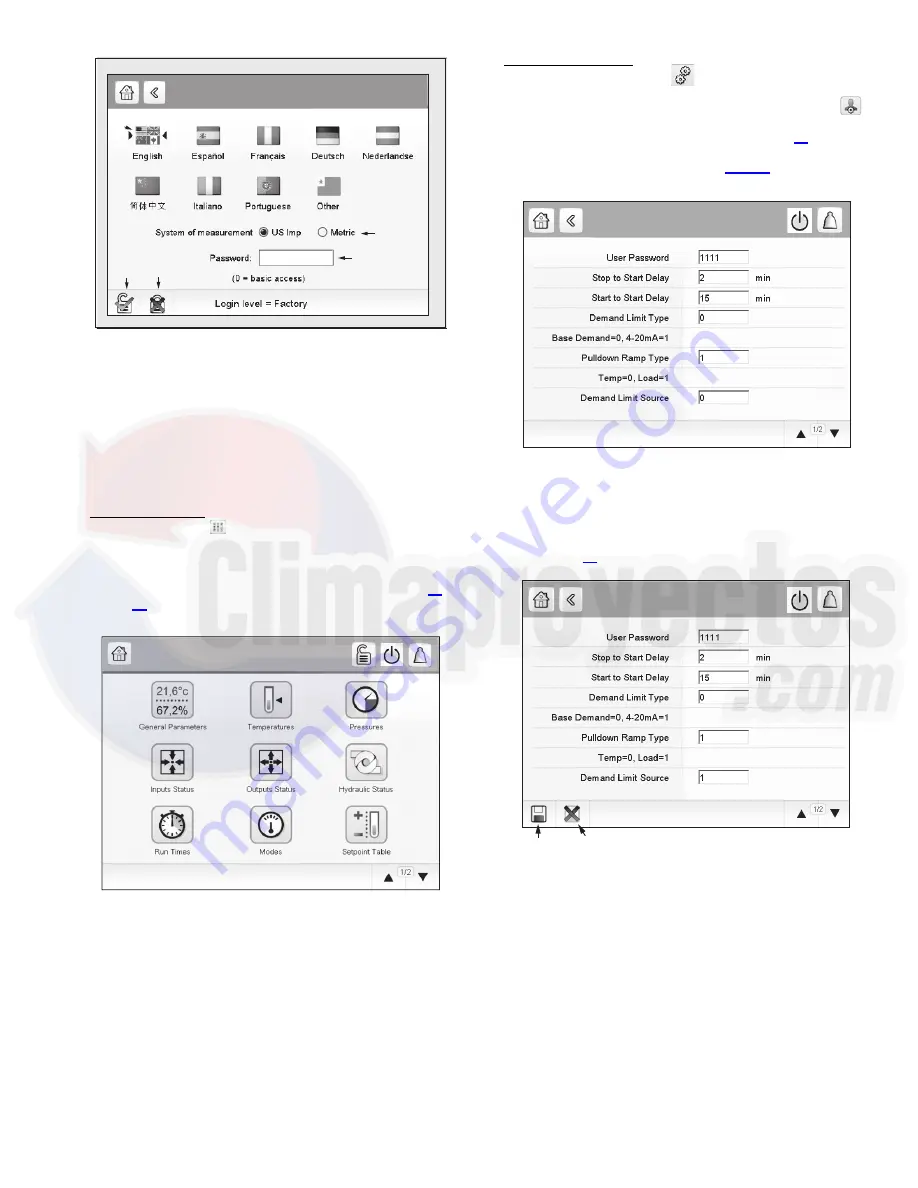
Configuration Screen — To access the Configuration menu,

press the Configuration icon 

 on page 2 of the Main Menu

(User, Service, or Factory access level). The Configuration

menu opens. Then press the General Configuration icon 

on the Configuration menu. Press the arrows at the bottom

right corner to navigate through pages. See Fig. 18. (Certain

configuration settings are available only for Service or Factory

access levels.) Refer to Appendix A, page 63 for more infor-

mation about Configuration options.

After changing a value, press Return. The Save and Cancel

icons are displayed. Press the Save icon to save the changed

value. Figure 19 shows an example.

1

2

3

4

5

User Login Screen

Fig. 16 —  User Login Screen

LEGEND

1

Arrows indicate active language

2

Measurement system (Metric or US Imperial)

3

Enter password

4

Login

5

Log off

a19-2145

Main Menu

Fig. 17 —  Main Menu Screen (User Access)

a19-2146

GEN_CONF - General Configuration

a

19-2

3

76

Fig. 18 —  General Configuration Screen

GEN_CONF - General Configuration

S

AVE

CANCEL

a

19-2

3

77

Fig. 19 — Saving a Change

(General Configuration)

Summary of Contents for AquaEdge 19XR

Page 1: ...ICE BUILD OPTION TIME SCHEDULE BLACK BOX PRESSURE TRANSDUCER CALIBRATION TEMPERATURE SENSOR CALIBRATION ISM VFD INPUT OUTPUT CALIBRATION ALARM EMAIL PROGNOSTICS MASTER SLAVE CONTROL Oil EXV Option 30 Pumpdown Lockout 30 Displaying Data Trends 30 Hydraulic Option 31 WATER FLOW MEASUREMENT WATER PRESSURE DIFFERENCE MEASUREMENT MARINE OPTION S DIAGNOSTICS AND TROUBLESHOOTING 32 49 Displaying Alarms 3...

Page 2: ...puts ISM wiring diagrams are shown in Appendix E WARNING Electrical shock can cause personal injury and death Shut off all power to this equipment during installation Use lock out tag out procedures and be aware that there may be more than one disconnect switch Be sure to tag all discon nect locations to alert others not to restore power until work is completed Even when the main circuit breaker o...

Page 3: ... 2139 1 2 3 4 5 PIC 5 BOTTOM VIEW 1 POWER SUPPLY CONNECTOR 2 LEN CONNECTOR 3 CCN CONNECTOR 4 ETHERNET CONNECTOR 5 USB CONNECTOR PIC 5 CONTROL INTERFACE Carrier Service Call 1 800 379 6484 DESCRIPTION POINT NAME TYPE PIN NUMBER INPUT OUTPUT Communication COMM Dry Contact J7 A B C Input Output Compressor Run Contact RUN_AUX Dry contact J2 11 12 Input Compressor Start Contact STAR_AUX Dry contact J2 ...

Page 4: ...terlock DI2 J13 6 4TB 4 24 VAC Yes NO dry contact Remote Contact Input DI3 J13 7 4TB 6 24 VAC Yes NO dry contact closed indicates start chiller signal Remote Emergency Stop Input DI4 J13 8 4TB 8 24 VAC Yes NO dry contact closed indicates stop chiller signal Stage 1 IGV Increase DO1 J12 7 24 VAC Yes Stage 1 IGV Decrease DO2 J12 10 24 VAC Yes Chiller Alarm Relay DO3 J12 2 24 VAC Yes Chiller Alert Re...

Page 5: ...se DI2 J13 6 24 VAC Spare Safety DI3 J13 7 4TB 12 24 VAC Yes NO dry contact Power Request Feedback DI4 J13 8 24 VAC Yes EC HGBP Solenoid Open DO1 J12 7 24 VAC EC HGBP Close DO2 J12 10 24 VAC Free Cooling Mode DO3 J12 2 24 VAC Yes Power Request Output DO4 J12 5 24 VAC Yes LEGEND CE Compressor End EC Envelop Control HGBP Hot Gas Bypass IOB Input Output Board ME Motor End NO Normally Open DESCRIPTION...

Page 6: ...TE A suitable 24 VAC relay is Carrier part number 19XV05005503 Carrier recommends using a relay with a contact rating of 10 amp sealed RMS or greater LEGEND FOR FIG 2 6 PART NO NO OF PIN 19X4003501 2 PIN 19X4003502 4 PIN 19X4003503 6 PIN 19X4003504 8 PIN 19X4003505 10 PIN 19X4003506 12 PIN ...

Page 7: ...7 Fig 3 IOB 2 ...

Page 8: ...8 Fig 4 IOB 3 ...

Page 9: ...9 Fig 5 IOB 4 ...

Page 10: ...10 Fig 6 19XR6 7 Control Wiring Fig 7 HMI Panel a19 2251 7TB IN HMI PANEL FOR CUSTOMER COMMUNICATION CONNECTION A C G B ...

Page 11: ...11 Fig 8 19XR6 7 Control Panel IOB Layer Fig 9 19XR6 7 Control Panel Bottom Layer 1TB CUSTOMER 3 PHASE POWER CONNECTION FOR CONTROL PANEL 2TB FIELD WIRING CONNECTION FROM STARTER 1TB 2TB ...

Page 12: ...ouch Screen Set tings for the Controller on page 49 for configuration in structions The minimum browser configuration includes Microsoft Internet Explorer version 8 or higher or Mozilla Firefox version 3 5 2 or higher In the advanced connection options add the unit address to the address list Do not use a proxy server Java platform version 6 or higher In the control panel deselect uncheck the opti...

Page 13: ...creen Figure 11 shows the system overview screen Press a component image to see cur rent status For details see Status Display Screens on page 16 ICON MEANING Green Indicates unit is running Gray Indicates unit is off Home Main menu Indicates user is logged off Indicates user is logged in Gray Indicates no alarm or alert is active Red Indicates alarm or alert Back not visible in main menu Previous...

Page 14: ...e are three levels of password access Basic access allows the user to view all data without a password User access gives the user the additional ability to view and change many configuration settings including set points and schedules The default User password is 1111 Service access allows the user to test and change mainte nance settings The default Service Advanced User password is 2222 Factory ...

Page 15: ...figuration icon on the Configuration menu Press the arrows at the bottom right corner to navigate through pages See Fig 18 Certain configuration settings are available only for Service or Factory access levels Refer to Appendix A page 63 for more infor mation about Configuration options After changing a value press Return The Save and Cancel icons are displayed Press the Save icon to save the chan...

Page 16: ...em Overview Home Screen a19 2151 Carrier Service Call 1 800 379 6484 Condenser Status Entering Condenser Water Leaving Condenser Water Condenser Approach Condenser Pressure Condenser Sat Temp Condenser Water Pump Condenser Water Delta P Head Pressure Valve Target a19 2304 Fig 22 Condenser Status Evaporator Status Entering Chilled Water Leaving Chilled Water Evaporator Approach Evaporator Pressure ...

Page 17: ...WORK the chiller can be started and stopped by the CHIL_S_S and CHIL_OCC software points which are written by other equip ment through network commands and network schedule both must be TRUE for chiller to start To shut down the chiller use the EMSTOP software point or stop using the HMI NOTE There is a STOP OVERRIDE point in the GENUNIT table If this point is enabled the chiller cannot be started...

Page 18: ...hen waits until the oil pressure difference OIL PRESS VERIFY TIME operator configured default 40 sec onds reaches a maximum of 18 psi 124 kPa After oil pres sure is verified the control waits 40 seconds for oil prelube and the compressor start relay energizes to start the compressor STATUS NO STATUS NAME DESCRIPTION 0 OFF STATSTOP is STOP no alarm 1 CTLTEST Controls Test is active 2 PUMPDOWN Pumpd...

Page 19: ... Option 1 followed by no Oil Stir as Option 0 Control Points SET POINT The set point can be configured at the Setpoint menu USER access level The set point is determined by the heat cool mode EWT entering water temperature option and ice build option See Table 13 Table 13 Set Point Determination NOTES 1 The ice build option is disabled when heat cool mode is set to Heating 2 When the ice build opt...

Page 20: ...most unchanged If the power outage lasts for more than 3 hours then Temperature Ramp Loading will be used regardless of user configuration and the minimum loading rate 1 F min will be used Two methods of ramp loading are available temperature ramp loading and motor load ramp loading Temperature Ramp Loading Temperature ramp loading limits the rate at which the controlled water temperature de creas...

Page 21: ...r and keep it run ning under low load conditions or to prevent surge conditions Since this also reduces the performance of the machine EC HGBP Control is a user selectable option PIC 5 supports 3 different types of EC HGBP control valve types 1 Continuous modulating valve controlled by two contac tors one to open and another to close If both contactors are open the valve will hold its position Val...

Page 22: ...s sure for compressor frame 6 and 7 the damper must have been open for 20 consecutive seconds RECYCLE CONTROL The chiller may cycle off and wait until the load increases to restart when the compressor is running in a lightly loaded condition This normal cycling is known as recycle In cooling mode a recycle shutdown is initiated when either of the following conditions is true Leaving chilled water ...

Page 23: ... 5 module controls the pump and by starting it helps to prevent the water in the condenser from freezing When the chiller is off and condenser saturated refrigerant temperature is less than or equal to the condenser freeze point the condenser water pump will be energized Alarm State 262 PROTECTIVE LIMIT CONDENSER FREEZE The fault state will clear and the pump will turn off when the condenser satur...

Page 24: ...her delays will be decreased compared to a normal start up COOLING TOWER CONTROL If WATER PRESSURE OPTION in the CONF_OPT table is set to 1 or 2 there will be another optional hydraulic control I O board in the PIC 5 control system to allow PIC 5 control for the water pumps and cooling tower fans high speed and low speed The cooling tower fans are controlled by the pressure differ ence between con...

Page 25: ...lete and the new slope and intercept will be used for the calibrated transducer in the pressure or temperature tables 4 With the transducer at atmospheric pressure zero gage pressure ensure that Calib Press1 0 PSI 0 PSIG 5 Pressurize the transducer to a known pressure between 100 and 250 psig and enter that pressure as read from calibrated gage in the Calib Press2 100 250PSI field and press OK 6 S...

Page 26: ... commissioning the variable fre quency drive Before performing the calibration be sure that VFD Option 1 FS FVD Main Menu Configuration Menu Factory Parameters and that the controller has been connected to the ISM board Objective is to have target speed match actual VFD speed within 5 or better at 70 to 100 speed Note that it is possible for all calibration to be done at the drive J8B must be used...

Page 27: ...Menu ISM Calibration 4 Select J6 0 10V Input The ISM_CAL2 screen is dis played See Fig 42 5 Set Calibration Enable to Enable 6 Input the VFD feedback voltage 7 Input the actual ISM reading 8 PIC 5 will calculate the calibration factor as follows Calibration Factor 1000 VFD feedback voltage ISM actual reading voltage Range 800 to 1200 9 Verify that the PIC control exits calibration mode ALARM EMAIL...

Page 28: ...F_PRG Prognostics Config screen is available from the Alarm Menu See Fig 47 and 48 The Prognostics status screen is available from the Alarm Menu See Fig 49 and 50 a19 22 EMAILCFG E Mail Configuration Recip2 Email Part2 SMTP IP Addr Part 1 SMTP IP Addr Part 2 SMTP IP Addr Part 3 SMTP IP Addr Part 4 Account Email Part1 0 0 0 0 2 3 Fig 44 E Mail Configuration Screen Page 2 EMAILCFG E Mail Configurat...

Page 29: ...he Prog nostics status screen A value more than 0 9 times the configu rable threshold displays the yellow light in the Prognostics sta tus screen A value less than 0 9 times the configurable thresh old displays the green light in the Prognostics status screen When the light is red or yellow the Trans Calibration Done flag is set to NO by the controller After transducer re calibra tion the Trans Ca...

Page 30: ...ated the controller takes the following steps Starts water pumps and confirm flows Monitors evaporator pressure condenser pressure and evap orator refrigerant temperature during pumpout procedures Turns pumps off after pumpdown Proceeds to lock out the compressor The Terminate Lockout feature ends the Pumpdown Lockout after refrigerant is added Press End Lockout on the Pumpdown Lockout menu in ord...

Page 31: ...ng water flow After it receives permission to start feedback the start up will proceed The power request signal will remain active until the compressor is switched on If start feedback has not been received 5 minutes after power request is sent or per mission to start feedback is deactivated before compressor is switched on the start up process will terminate and trigger an alarm If Factory Parame...

Page 32: ...t are active on the unit Table 17 lists alarm codes Resetting Alarms When the cause of the alarm has been identified and corrected the alarm can be reset either au tomatically or manually depending on the type of alarm See Table 17 for alarms that are eligible for automatic reset In the event of a power supply interrupt if Auto Restart Op tion is set to ENABLE in the Option Configuration menu the ...

Page 33: ...ted grounded or shorted wiring Alm 205 ALM 205 Sensor Fault Oil Sump Temp Automatic if the temperature mea sured by the sensor returns to normal Unit shuts down Check sensor resistance Check for proper wiring between oil sump temperature sensor and IOB connector Check for disconnected grounded or shorted wiring Alm 206 ALM 206 Sensor Fault Oil Supply Temp Automatic if the temperature mea sured by ...

Page 34: ...ween Thrust Bearing Oil Temp Sensor and IOB connector Check for disconnected grounded or shorted wiring Check IOB configuration Alm 228 ALM 228 Sensor Fault Common CHWS Temp Automatic if the temperature mea sured by the sensor returns to normal Unit shuts down Check sensor resistance Check for proper wiring between Com mon CHWS Temp Sensor and IOB connector Check for disconnected grounded or short...

Page 35: ...own Compressor is not allowed to start Check Comp Bearing Temp in Tem perature screen Check oil heater and oil cooler for proper operation Check for low oil level partially closed oil supply valves clogged oil filters Check the compressor bearing tempera ture sensor wiring and accuracy to IOB connector Check Comp Bearing Temp Alert setting Alm 231 ALM 231 Prestart Failure High Motor Temperature Ma...

Page 36: ...rol Valve Calibration Not Completed Manual Unit shuts down Compressor is not allowed to start EC valve calibration failed during control test mode or prestart check PROTECTIVE LIMITS Alm 250 ALM 250 Protective Limit Oil Pressure Difference Failure Manual Unit shuts down Check oil pump Check oil filter Check oil pump wiring Alm 251 ALM 251 Protective Limit Low Chilled Water Flow Manual Unit shuts d...

Page 37: ...eck evaporator pressure transducer and evaporator refrigerant liquid tempera ture and leaving chilled water sensors Check for division plate gasket bypass Check for fouled tubes Check pressure transducer and tem perature sensor wiring to the IOB Alm 255 ALM 255 Protective Limit High Motor Temperature Manual Unit shuts down Check compressor motor winding tem perature sensor accuracy and wiring to I...

Page 38: ...tion temperatures across the entire operating range of the chiller Check EVAPORATOR APPROACH and chilled water flow Alm 260 ALM 260 Protective Limit Compressor Start Relay Start Failure Manual Unit shuts down Check motor starter 1M contactor wiring Check ISM current sensors Alm 261 ALM 261 Protective Limit Evaporator Frozen Manual Unit shuts down Check CALC EVAP SAT TEMP EVAP REFRIG LIQUID TEMP an...

Page 39: ...tective Limit Guide Vane Fault Manual Unit shuts down Alarm before start indicates guide vane opening has not closed to less than 4 Alarm while running indicates guide vane position is 1 or 103 Enter Quick Test and conduct Guide Vane Calibration Check wiring between the guide vane feedback potentiometer and IOB terminals Check the 10 000 ohm guide vane posi tion feedback potentiometer or 4 to 20mA...

Page 40: ... resis tor settings Alm 305 ALM 305 Loss of Commu nication with IOB 5 Automatic when communication returns to normal Unit shuts down Check LEN communication cable Check the wiring and termination resis tor settings Alm 306 ALM 306 Loss of Commu nication with IOB 6 Automatic when communication returns to normal Unit shuts down Check LEN communication cable Check the wiring and termination resis tor...

Page 41: ...edium voltage applications only Check voltage potential transformers and VOLT TRANSFORMER RATIO in ISM_CONF screen Check wiring to ISM J3 VL1 J3 VL2 and J3 VL3 Alm 404 ALM 404 ISM Fault Line Current Imbalance Manual Swift Restart eligible Unit shuts down Current imbalance CURRENT IMBALANCE for greater than the CUR RENT IMBALANCE TIME Check set tings in ISM_CONF screen Check ISM_HIST screen Check c...

Page 42: ... settings and GROUND FAULT CT RATIO in ISM_CONF screen Check ISM_HIST screen Confirm that ground fault current trans former orientation is correct and that the correct motor leads have been routed through the ground fault current transformers in the right direction Check for condensation on motor termi nals or inside motor leads Check motor power leads for phase to phase or phase to ground shorts ...

Page 43: ...s Check if main circuit breaker has tripped Check ISM History under the Mainte nance Menu Alm 418 ALM 418 ISM Fault Excessive Acceleration Time Manual Unit shuts down Any line current remains high for an excessive time duration following 1M aux and either 2M aux or transition con tact closure Check that inlet guide vanes are fully closed at start up Check ISM_HIST screen Check Motor Rated Load Amp...

Page 44: ...or termi nals Check motor power leads for phase to phase or phase to ground shorts Disconnect motor from VFD and megger motor Call Carrier Service Alm 433 ALM 433 VFD Fault Line Phase Reversal Manual Unit shuts down Reverse connections of any two line conductors to circuit breaker Alm 434 ALM 434 VFD Fault Motor Overload Trip Manual Unit shuts down Check VFD configurations Any phase current 106 RL...

Page 45: ...o ground distribution bus voltage Increase Line Voltage Imbalance in CFGUMVFD screen Alm 447 ALM 447 VFD Fault Frequency Fault Manual Unit shuts down Check Power Supply If operating from a generator check generator size and speed Check utility power supply Alm 448 ALM 448 VFD Fault VFD Comm Fail Manual Unit shuts down Check VFD communication wiring and connectors Check status lights on DPI Communi...

Page 46: ...ration Confirm that Auto Water Temp Reset Input is between 4 mA and 20 mA Confirm that wiring to IOB connector is not grounded Alt 122 Alt 122 Sensor Alert Auto Demand Limit Input Automatic when the situation returns to normal Alert relay is ON 20 mA DEMAND LIMIT OPT is Enabled Ice Build is not Active and Auto Demand Limit Input on IOB is 2 mA Check 20 mA DEMAND LIMIT OPT and DEMAND LIMIT AT 20 mA...

Page 47: ...etting Check Evaporator Water Flow Check evaporator refrigerant liquid temperature and leaving chilled water temperature sensor resistances and voltage drop Check evaporator refrigerant liquid temperature and leaving chilled water temperature sensor wiring to the IOB terminal block Check for oil loss or low refrigerant charge Check oil reclaim line isolation valves and strainers Confirm that the o...

Page 48: ...Automatic Alert relay is ON Flush condenser Alt 167 ALT 167 Process Alert Customer Alert Automatic Alert relay is ON Check Customer Alert input contact Alt 169 ALT 169 Process Alert High Evaporator Pressure Automatic Alert relay is ON Check evaporator pressure sensor input Check evaporator pressure override configurations MASTER SLAVE ALERTS Alt 170 ALT 170 Master Slave Alert Master Slave Same Add...

Page 49: ... Limit Capacity Inhibit 40 Demand Limit Capacity Decrease 41 Demand Limit Inhibit Clamp 45 Override High Condenser Pressure 47 Override High Motor Temperature 48 Override Low Evap Refrig Temp 50 Override High Bearing Temp 51 Override Low Discharge Superheat 52 Override Manual VFD Speed Target 53 Override High Motor Current 54 Override High Discharge Temp 55 Override Low Source Temp 60 Running Temp...

Page 50: ...page 49 press System The System screen is displayed See Fig 63 Press Info on the System screen to display detailed informa tion about the HMI panel See Fig 64 Fig 59 TCP IP Address Screen a19 2162 Help Network TCP IP Address i 172 30 101 103 1 2 3 4 5 6 7 8 9 clr prv 0 ok Fig 60 Save Changes Fig 61 Startup Connection hmi html 127 0 0 1 5 6 4 3 2 1 6 Fig 62 Edit Connection LEGEND 1 Connection Name ...

Page 51: ...disappears Touch Screen Configuration Language To set the language for touch screen configuration screens press Language on the Setup screen see the section Touch Screen Settings for the Controller on page 49 The Language screen offers the options shown in Fig 68 NOTE The language selection on this screen controls only the display language for interface settings not the language for the unit appli...

Page 52: ...Start up page loads then goes to fault state Network property details are not valid Ethernet network is not available Check the network parameters see the section Ethernet IP Con nection Problems on page 53 Check to see if the orange LED on the unit is flashing Contact your system administra tor Check the Ethernet connection to the local network if the orange LED does not flash While accessing the...

Page 53: ...art Execute type cmd and press Enter then type the command ping followed by the unit IP address In the exam ple shown in Fig 70 the PC receives four positive responses replies In the example shown in Fig 71 the PC receives four nega tive responses request timed out If the PC receives four negative responses check the inter net browser parameters to determine if a proxy server or an au tomatic conf...

Page 54: ...em interface board and check that no red X appears on the icon The connection to the local network must be authorized and in the connected status If this is not the case check the connec tions and authorize repair the network connection JAVA APPLICATION CONFIGURATION Open the Internet configuration window of the PC and double click the Java application icon If Java is not installed a free download...

Page 55: ...55 APPENDIX A PIC 5 SCREEN AND TABLE STRUCTURE Fig A Screen Structure Basic Level All Access No Password Required VFD General Parameters VFD General Parameters ...

Page 56: ...ABLE PAGE NO General Parameters All GENUNIT 57 Temperatures All TEMP 58 Pressures All PRESSURE 58 Inputs Status All INPUTS 59 Outputs Status All OUTPUTS 60 Hydraulic Status All HYDRLIC 61 Run Times All RUNTIME 62 Modes All MODES 62 Setpoint User SETPOINT 62 Configuration Menu User CONFIG 63 Quick Test Service QCK_TEST 75 Maintenance Menu Service MAINTAIN 76 Trending All TRENDING ...

Page 57: ...etwork Cmd Start Stop CHIL_S_S NO YES RW 5 Network Cmd Occupied CHIL_OCC NO YES RW 6 Cooling Heating Select HC_SEL COOL HEAT COOL RW 7 Control Point CTRL_PNT 10 0 to 160 0 F RW 8 Control Point Reset reset 30 00 to 30 00 F RO 9 Actual Setpoint setpoint 10 0 to 150 0 F RO 10 Percent Load Current AMPS_P 0 0 to 999 0 RO 11 Motor Percent Kilowatts KW_P 0 to 100 RO 12 Actual Demand Limit DEM_LIM 10 0 to...

Page 58: ...16 High Speed ME Brg Temp MTRB3 40 0 to 245 F RO 17 High Speed CE Brg Temp MTRB4 40 0 to 245 F RO 18 Comp Motor Winding 1 Temp MTRW1 40 0 to 245 F RO 19 Comp Motor Winding 2 Temp MTRW2 40 0 to 245 F RO 20 Comp Motor Winding 3 Temp MTRW3 40 0 to 245 F RO 21 Oil Sump Temp OILT_SMP 40 0 to 245 F RO 22 Oil Supply Temp OILT_DIS 40 0 to 245 F RO 23 Actual Lift LIFT_A 0 0 to 200 0 F RO 24 VDO High Lift L...

Page 59: ...top Contact E_STOP OPEN CLOSE RO 12 Ice Build Contact ICE_CON OPEN CLOSE RO 13 Chiller Lockout REM_LOCK OPEN CLOSE RO 14 Spare Safety Input SAFETY OPEN CLOSE RO 15 Starter Fault Feedback STARTFLT OPEN CLOSE RO 16 Fire Security Interlock FS_LOCK OPEN CLOSE RO 17 Guide Vane 1 Actual Ohms GV1_OHMS ohms RO 18 Guide Vane 1 Actual Pos GV1_ACT RO 19 Actual VFD Speed Per VFD_ACT RO 20 Diffuser Actual Pos ...

Page 60: ...m Relay ALM OFF ON OFF ON RO 13 Alert Relay ALE OFF ON OFF ON RO 14 Compressor Start Relay COMP_SR OFF ON OFF ON RO 15 Starter Trans Sw Status TRANS OFF ON OFF ON RO 16 Damper Valve Close DMP_CL OFF ON OFF ON RO 17 Damper Valve Open DMP_OP OFF ON OFF ON RO 18 Guide Vane 1 Decrease GV1_DEC OFF ON OFF ON RO 19 Guide Vane 1 Increase GV1_INC OFF ON OFF ON RO 20 EC Valve Close HGBP_OFF OFF ON OFF ON RO...

Page 61: ...w Value CHW_FV 10 0 to 10 0 0 0 psi RW 13 Entering Chilled Water P EVAP_EWP 6 7 to 420 0 psig RO 14 Leaving Chilled Water P EVAP_LWP 6 7 to 420 0 psig RO 15 Chilled Water Delta P chw_pd 6 7 to 420 0 psig RO 16 Chilled Delta P Offset chw_off 10 to 10 00 0 0 psig RW 17 Chilled Water Pulldown Min chw_pull 20 to 20 0 F RO 18 Chilled Water Flow Input CHWF_IN 4 to 20 mA RO 19 Cond Water Flow Input CDWF_...

Page 62: ...IT READ WRITE 1 Normal Shutdown shut_nor NO YES RO 2 Recycle Shutdown shut_rcy NO YES RO 3 Alarm Shutdown shut_alm NO YES RO 4 Recycle Startup str_rcy NO YES RO 5 Temperature Ramping tmp_ramp NO YES RO 6 Load Ramping ld_ramp NO YES RO 7 IGV1 Inhibiting gv1_inh NO YES RO 8 Ice Building ice_act NO YES RO 9 Ice Build Terminated ice_term NO YES RO 10 Ice Build Recy Startup ice_rcy NO YES RO 11 Ramp Lo...

Page 63: ...s Factory FACTORY 68 General Configuration User GEN_CONF 68 Control Identification User CTRL_ID Info only Hydraulic System Config Service HYDRCONF Not used VFD Parameters Service CONF_VFD 68 SRD Configuration Service CONF_SRD 69 IOB Configuration Service CONF_IOB 70 E Mail Configuration Service EMAILCFG 70 Master Slave Config Service CONF_MS 71 Prognostics Config Service CONF_PRG 71 Loadshed Servi...

Page 64: ...tart YES NO NO RW 25 Oil Stir Cycle 19XR6 7 0 No stir 1 30s 30m 2 1m 4hr 3 Comb 0 1 oilstiro 0 to 3 1 RW CCN TABLE NAME CFGSURGE PIC 5 PATH Main Menu Configuration Menu Surge Correction Config LINE PIC 5 DESCRIPTION CCN NAME RANGE DEFAULT VALUE UNIT READ WRITE 1 Surge Line Configuration 0 PR 1 Delta T sgl_cfg 0 to 1 0 RW 2 IGV1 Pos Configuration 0 Degree 1 Percentage gv1c_sel 0 to 1 0 RW 3 Surge D...

Page 65: ... to 40 33 F RW 9 High Evap Press Override ep_ov 90 to 157 140 psig RW 10 High Evap Press Cutout ep_cut 160 to 170 165 F RW 11 Condenser Freeze Point cdfreeze 20 0 to 35 0 34 0 F RW 12 Comp Discharge Alert dgt_alrt 125 to 200 200 F RW 13 Comp Motor Temp Override mt_over 150 to 200 200 F RW 14 Comp Bearing Temp Alert tb_alert 155 to 175 175 F RW 15 Comp Bearing Temp Trip tb_trip 175 to 185 185 F RW ...

Page 66: ...act 2 Both ice_term 0 to 2 0 RW 18 Tower Fan High set point tfh_sp 55 to 105 75 RW 19 Refrigerant Leak Option leak_en DSABLE ENABLE DSABLE RW 20 Refrig Leakage Alarm mA exv_opt 4 to 20 20 RW 21 Oil EXV Option leak_ma DSABLE ENABLE DSABLE mA RW 22 Oil Temp High Threshold oil_high 100 to 140 120 F RW 23 Oil Temp Low Threshold oil_low 90 to 130 110 F RW 24 Gas Torque Factor gt_fact 0 25 to 3 0 1 F RW...

Page 67: ...otor Rated Line Voltage rlv 200 to 13800 460 V RW 10 Current Imbal Threshold cu_th 5 to 100 15 RW 11 Voltage Imbal Threshold vu_th 1 to 10 5 RW 12 Motor Current CT Ratio 1 ct_ratio 3 to 1000 100 RW 13 Volt Transformer Ratio 1 vt_rat 1 to 115 1 RW 14 Current Imbal Persist cu_per 1 to 10 5 sec RW 15 Voltage Imbal Persist vu_per 1 to 10 5 sec RW 16 Line Frequency Faulting lfref_en DSABLE ENABLE DSABL...

Page 68: ...0 to 1 0 RW 17 Electrical Damper Valve dmp_auto DSABLE ENABLE DSABLE RW 18 Marine Option mrn_opt DSABLE ENABLE DSABLE RW 19 Power Request Option pr_opt DSABLE ENABLE DSABLE RW 20 Cont Power Request cpr_opt DSABLE ENABLE DSABLE RW CCN TABLE NAME GEN_CONF PIC 5 PATH Main Menu Configuration Menu General Configuration LINE PIC 5 DESCRIPTION CCN NAME RANGE DEFAULT VALUE UNIT READ WRITE 1 User Password ...

Page 69: ...rrent Imbal Time lcim_per 1 to 10 10 sec RW 18 Motor Current Imbalance mcim_th 5 to 40 40 RW 19 Motor Current Imbal Time mcim_per 1 to 10 10 sec RW 20 Single Cycle Dropout scycd_en 0 to 1 0 RW 21 PWM Switch Frequency 0 2KHZ 1 4KHZ pwm_freq 0 to 1 0 RW 22 Restore Defaults res_def 0 to 1 0 RW 23 LEN Comm Timeout com_tout 0 to 255 10 sec RW 24 Modbus Comm Timeout mod_tout 0 to 255 2 sec RW 25 Gateway...

Page 70: ...5 0 RW 24 IOB3 AI 9 Type 0 to 5 0 RW 25 IOB3 AI 10 Type 0 to 5 0 RW 26 IOB3 AO 1 Type 0 to 2 1 RW 27 IOB3 AO 2 Type 0 to 2 1 RW 28 IOB4 AI 1 Type 0 to 6 0 RW 29 IOB4 AI 2 Type 0 to 6 0 RW 30 IOB4 AI 3 Type 0 to 6 0 RW 31 IOB4 AI 4 Type 0 to 6 0 RW 33 IOB4 AI 5 Type 0 to 6 0 RW 34 IOB4 AI 6 Type 0 to 6 0 RW 35 IOB4 AI 7 Type 0 to 6 0 RW 36 IOB4 AI 10 Type 0 to 6 0 RW CCN TABLE NAME EMAILCFG PIC 5 P...

Page 71: ...BLE NAME CONF_PRG PIC 5 PATH Main Menu Configuration Menu Prognostics Config LINE PIC 5 DESCRIPTION CCN NAME RANGE DEFAULT VALUE UNIT READ WRITE 1 Prog Function Enable prog_en YES NO NO RW 2 Oil Change Done oilch_cm YES NO YES RW 3 Oil Filter Change Done oilfc_cm YES NO YES RW 4 Trans Calibration Done tracl_cm YES NO YES RW 5 Refrigerant Charge Done refch_cm YES NO YES RW 6 Oil Filter PD Threshold...

Page 72: ... TABLE STRUCTURE cont Schedule Menu Navigation MAIN MENU CONFIGURATION MENU SCHEDULE MENU ICON DISPLAYED TEXT ACCESS ASSOCIATED TABLE Local Schedule User Ice Build Schedule User Network Schedule User Fig B Schedule Menu and Submenus ...

Page 73: ...le to set 16 different holiday periods For more information about holiday periods see the Time Schedule section on page 24 Figure C below shows the Holiday Menu and a sample submenu Broadcast Menu Navigation MAIN MENU CONFIGURATION MENU BROADCAST MENU a19 2259 Holiday Menu a19 2260 HOLDY_01 Holiday Menu Fig C Holiday Menu and Submenu BROCASTS Broadcast Menu a19 2350 Fig D Broadcast Menu ...

Page 74: ...figuration Menu CCN TABLE NAME CONNECT PIC 5 PATH Main Menu Configuration Menu CONNECT LINE PIC 5 DESCRIPTION CCN NAME RANGE DEFAULT VALUE UNIT READ WRITE Modbus Configuration 1 Modbus Option mb_opt DSABLE ENABLE DSABLE RW 2 Modbus Server Type 0 IP 1 RS485 ser_type 0 1 1 RW 3 Modbus Server UID ser_UID 1 to 255 1 RW 4 Modbus Metric Unit metric NO YES YES RW 5 Modbus IP Port Number port_nbr 0 to 102...

Page 75: ...ve Actual mA HGBP_AMA mA RO 16 Quick Test EC Valve Pos Q_HGBP_T 0 100 0 0 RW 17 Quick Test ECV Open Q_HGBPOP OFF ON OFF RW 18 Quick Test ECV Close Q_HGBPCL OFF ON OFF RW 19 Quick Test Damper Open Q_DMPOP OFF ON OFF RW 20 Quick Test Damper Close Q_DMPCL OFF ON OFF RW 21 Quick Test Cond Pump Q_CDWP OFF ON OFF RW 22 Condenser Water Flow CDW_FLOW NO YES RO 23 Quick Test Chilled Pump Q_CHWP OFF ON OFF ...

Page 76: ...e VFD Config Service VFD_MCFG 79 Swift Restart Service MAISWRST 79 Master Slave Service MAIN_MS 80 Power Line Parameters Service POWER_I 80 ISM Status Service MAIISMC 81 ISM History Service MAIISMH 81 Power Load Parameters POWER_O 82 UM VFD Status VFD_STAT 83 Maintenance SRD Service MAIN_SRD 83 Maintenance Others Service MAIOTHER 84 Maintenance IOB Service MAIIOB 85 Board Software PN Service MAI_B...

Page 77: ... vfd_dlta RO 17 EC Valve Target Percent hgbp_tp 0 to 100 RO 18 Capacity Inhibit Flag cap_inh NO YES RO 19 Capacity Decrease Flag cap_dec NO YES RO 20 Condenser Water Delta T cdw_dt F RO 21 Chilled Water Delta T chw_dt F RO 22 Pulldown Set Point pull_set RO 23 Demand Limit Inh Clamp deinhclm RO 24 Ramping Demand Limit Val ramp_dem NO YES RO 25 Compressor is Running comp_run NO YES RO 26 Comp1 Run S...

Page 78: ...ALUE UNIT READ WRITE 1 ISM Config Conflict ism_cflt NO YES RO 2 Delete ISM Config del_ismc NO YES NO RW 3 Communication Timeout com_tout 0 to 255 sec RO High Eff Ref Delta Tsat dts_he F RO 4 Starter Type 0 Full Volt 1 Redu Volt 2 Solid State 3 FS VFD star_typ 0 to 3 RO 5 Single Cycle Dropout scycd_en DSABLE ENABLE RO 6 Motor Rated Load Amps rla 10 to 5000 amp RO 7 Motor Locked Rotor Trip mot_lra 1...

Page 79: ... Time ramp_inc 30 sec RO 14 Decrease Ramp Time ramp_dec 30 sec RO 15 Line Voltage Imbalance lvim_th 10 RO 16 Line Volt Imbalance Time lvim_per 10 sec RO 17 Line Current Imbalance lcim_th 40 RO 18 Line Current Imbal Time lcim_per 10 sec RO 19 Motor Current Imbalance mcim_th 40 RO 20 Motor Current Imbal Time mcim_per 10 sec RO 21 Single Cycle Dropout scycd_en DSABLE ENABLE DSABLE RO 22 PWM Switch Fr...

Page 80: ...art 0 to 60 min RO 16 Lag Stop Timer lagstop 0 to 60 min RO 17 Prestart Fault Timer preflt 0 to 30 min RO 18 Pulldown Timer pulltime 0 to 30 min RO 19 Pulldown Delta T Min pull_dt 0 to 100 F RO 20 Lead Lag Hours Delta ll_hr_d 99999 to 99999 hours RO 21 Overrid Control Point ctrpntov 10 to 160 0 F RO 22 Overrid Act Demand Limit demlimov 10 to 100 0 RO CCN TABLE NAME POWER_I PIC 5 PATH Main Menu Mai...

Page 81: ...s_trip NO YES RO 21 Starter Fault strt_flt NO YES RO 22 Motor Amps Not Sensed no_amps NO YES RO 23 Starter Accel Fault accelflt NO YES RO 24 High Motor Amps highamps NO YES RO 25 1CR Stop Complete stop_ok NO YES RO 26 1M 2M Stop Fault 1m2mstop NO YES RO 27 Motor Amps When Stopped ampstop NO YES RO 28 Hardware Failure hardware NO YES RO 29 Calibration Factor Error calfc_er NO YES RO 30 Invalid Conf...

Page 82: ...3 amp 12 Actual VFD Speed Per vfd_act 13 Motor Power Factor motor_pf 14 Motor Kilowatts motor_kw kW 15 Motor Overload motor_ov 16 Motor Kilowatt Hours motorkwh 17 Rectifier Overload rect_ov 18 Inverter Overload inv_ov 19 VFD Enclosure Temp enc_temp F 20 VFD Cold Plate Temp cp_temp F 21 Inverter Temperature inv_temp F 22 Rectifier Temperature rec_temp F 23 Shunt Trip Relay Status tripr 0 to 1 24 Pr...

Page 83: ... NO YES NO RO 18 Motor Acceleration Fault accelflt NO YES NO RO 19 Stop Complete stop_ok NO YES NO RO 20 Stop Fault ampstop NO YES NO RO 21 Rectifier Overtemp rect_ot NO YES NO RO 22 Inverter Overtemp inv_ot NO YES NO RO 23 Motor Current Imbalance motim_i NO YES NO RO 24 Line Voltage Imbalance lineim_v NO YES NO RO 25 Frequency Fault freqflt NO YES NO RO 26 VFD Comm Fault vfd_comm NO YES NO RO 27 ...

Page 84: ... op_shut NO YES RO 22 Oil Pump Req Swift Rst op_srst NO YES RO 23 Evap Pump Req Startup ep_start NO YES RO 24 Evap Pump Req Diagnostic ep_diag NO YES RO 25 Evap Pump Req Frozen ep_freze NO YES RO 26 Evap Pump Req Shutdown ep_shut NO YES RO 27 Evap Pump Req Pumpdown ep_pdown NO YES RO 28 Cond Pump Req Prestart cp_prest NO YES RO 29 Cond Pump Req Startup cp_start NO YES RO 30 Cond Pump Req Override ...

Page 85: ...Supply Volt vol_iob4 V RO 14 IOB4 Num Peak Prev Sec nm_peak4 RO 15 IOB4 Low Voltage Flag low_vol4 NO YES RO 16 IOB4 24VAC Fuse Status fusstat4 CLOSE OPEN RO 17 IOB5 Power Supply Volt vol_iob5 V RO 18 IOB5 Num Peak Prev Sec nm_peak5 RO 19 IOB5 Low Voltage Flag low_vol5 NO YES RO 20 IOB5 24VAC Fuse Status fusstat5 CLOSE OPEN RO 21 IOB6 Power Supply Volt vol_iob6 V RO 22 IOB6 Num Peak Prev Sec nm_pea...

Page 86: ... NO Evap Pressure Sensor Service PRSCAL01 87 Cond Pressure Sensor Service PRSCAL02 87 Eco Pressure Sensor Service PRSCAL03 87 Diff Pressure Sensor Service PRSCAL04 87 Oil Sump Pressure Service PRSCAL05 88 Oil Supply Pressure Service PRSCAL06 88 Evap Entering Water P Service PRSCAL07 88 Evap Leaving Water P Service PRSCAL08 88 Cond Entering Water P Service PRSCAL09 89 Cond Leaving Water P Service P...

Page 87: ...c string 0 psig RW 5 Calib Press2 100 250PSI cal_p2 9 digit numeric string 0 psig RW 6 Calibrated Slope cal_s RO 7 Calibrated Intercept cal_i RO 8 Calibration Completed cal_st NO YES NO RO CCN TABLE NAME PRSCAL03 PIC 5 PATH Main Menu Maintenance Menu Pressure Sensor Calib Eco Pressure Sensor LINE PIC 5 DESCRIPTION CCN NAME RANGE DEFAULT VALUE UNIT READ WRITE 1 Eco Pressure Sensor 2 Calibration Ena...

Page 88: ...ng 0 psig RW 5 Calib Press2 100 250PSI cal_p2 9 digit numeric string 0 psig RW 6 Calibrated Slope cal_s RO 7 Calibrated Intercept cal_i RO 8 Calibration Completed cal_st NO YES NO RO CCN TABLE NAME PRSCAL07 PIC 5 PATH Main Menu Maintenance Menu Pressure Sensor Calib Evap Entering Water P LINE PIC 5 DESCRIPTION CCN NAME RANGE DEFAULT VALUE UNIT READ WRITE 1 Evap Entering Water P 2 Calibration Enabl...

Page 89: ...ON CCN NAME RANGE DEFAULT VALUE UNIT READ WRITE 1 Cond Leaving Water P 2 Calibration Enable cal_en DSABLE ENABLE DSABLE RW 3 Current Pressure cur_pres psig RO 4 Calib Press1 0 PSI cal_p1 9 digit numeric string 0 psig RW 5 Calib Press2 100 250PSI cal_p2 9 digit numeric string 0 psig RW 6 Calibrated Slope cal_s RO 7 Calibrated Intercept cal_i RO 8 Calibration Completed cal_st NO YES NO RO RO Read On...

Page 90: ...ut the operator is prompted by the following message Chiller Lockout in Effect Upon selecting the End Lockout key the following mes sage will be displayed Press OK to Terminate Lockout The CHILLED WATER PUMP and CONDENSER WA TER PUMP shall be energized and water flows will be veri fied And then The Continue text will be displayed Operator should manually check the water flows If op erator presses ...

Page 91: ...sys_kw kW RO 7 System Control Point sys_stlp F RO 8 System Demand Limit sys_dem RO 9 Supply Liquid Temp sys_supt RO 10 Return Liquid Temp sys_rent RO RO Read Only ICON DISPLAYED TEXT ACCESS ASSOCIATED TABLE PAGE NO Reset Alarms All ALARMRST 91 Current Alarms All CUR_ALM History Alarms All ALMHIST1 Prognostics All HEALTH CCN TABLE NAME ALARMRST PIC 5 PATH Main Menu Alarm Menu Alarm Reset LINE PIC 5...

Page 92: ...B 3 0100 0000010110 IOB 4 1100 1100000110 IOB ADDRESS SW1 20 mA SHUNT SW2 IOB 1 Dip Switch Settings a19 2135 IOB ADDRESS SW1 20 mA SHUNT SW2 IOB 2 Dip Switch Settings a19 2134 IOB ADDRESS SW1 20 mA SHUNT SW2 IOB 3 Dip Switch Settings a19 IOB ADDRESS SW1 20 mA SHUNT SW2 IOB 4 Dip Switch Settings a19 2132 DIP SWITCH LEGEND SWITCH ON SWITCH OFF BLACK IS RAISED PORTION OF SWITCH ON Fig F IOB Dip Switc...

Page 93: ...NTERFACE HMI DIP SWITCH SETTINGS cont HMI Dip Switch Settings To access switches remove the access cover on the back of the HMI panel See Fig G Set the HMI dip switches as shown in Fig H Fig G HMI Access Cover a19 2130 Fig H HMI Dip Switch Settings a19 2131 ...

Page 94: ... Microprocessor operational but not communicating LED flashes 3 seconds on 3 seconds off Microprocessor operational and communicating with control system LED flashes at 0 5 Hz rate 1 second on 1 second off in sync 100 ms with all other new con trol modules on the same communication bus Microprocessor in boot mode LED flashes at 0 2 sec onds on 0 2 seconds off Each independent communication port ha...

Page 95: ...ed to be the extended Modbus connector it still can be configured to BACnet with BACnet dongle installed and BACnet option set to enable BACnet IP The 19XR PIC 5 controller supports the BACnet protocol as B ASC BACnet equipment over IP In ad dition BACnet on the PIC 5 controller supports the following features Optional properties such as Change of Value COV Intrinsic Reporting and Commandable prop...

Page 96: ...f ANALOG_VALUE AV or BINARY_VALUE BV type Objects name are assigned by concatenating the CCN table name and CCN point name This enables easy identification and recognition of the points For a detailed list see the BACnet Object table beginning on page 98 In general the equipment configuration parameters are available as Read Only Setpoint parameters can be read and written Read Write CAUTION The c...

Page 97: ...ment and the building management system BACnet Enable parameter in the PIC 5 Configuration Menu is set to No To troubleshoot problems try these measures Open the metal casing of the 19XR PIC 5 controller and verify that the blue BACnet dongle is correctly connected On the Ethernet connector verify that the green LED is ON and the orange LED is blinking Use the Windows ping utility to ping the IP a...

Page 98: ...ONF_OPT_hgbp_sel AV 105 RO EC Selection Disable 0 Surge 1 Low Load 2 Comb 3 CONNECT_bacena BV 37 RO BACnet Enable CONNECT_bacunit BV 38 RO BACnet Metric Unit CONNECT_ident AV 107 RO BACnet Identifier Call Home Configuration CONNECT_network AV 106 RO BACnet Network GENUNIT_AMPS_P AV 4 COV IR RO Percent Load Current GENUNIT_ch_state AV 7 RO Chiller Status Code GENUNIT_CHIL_OCC_rd BV 3 COV IR RO Netw...

Page 99: ...INPUTS_SAFETY BV 14 RO Spare Safety Input INPUTS_STAR_AUX BV 8 RO Compressor Start Contact INPUTS_STARTFLT BV 15 RO Starter Fault Feedback INPUTS_TRIPR BV 17 RO ISM Trip Relay Status INPUTS_VFD_ACT AV 39 RO Actual VFD Speed Per LABONLY_gv1_fc BV 36 RO GV1 Forced MAIN_MS_lag_s_s BV 35 RO Slave Start Stop MAIN_MS_lagstart AV 90 RO Lag Start Timer MAIN_MS_lagstat AV 89 RO Slave Run Status MAIN_MS_lag...

Page 100: ... AV 54 RO Percent Line Voltage POWER_O_alm_code AV 67 RO VFD Alarm Code POWER_O_bus_volt AV 59 RO DC Bus Voltage POWER_O_enc_temp AV 64 RO VFD Enclosure Temp POWER_O_inv_temp AV 65 RO Inverter Temperature POWER_O_lrtem_sw BV 30 RO LR Temp Switch POWER_O_MOT_FREQ AV 58 RO Motor Actual Frequency POWER_O_motor_kw AV 62 RO Motor Kilowatts POWER_O_motor_pf AV 61 RO Motor Power Factor POWER_O_motorkwh A...

Page 101: ...AP_SAT AV 12 COV IR RO Evap Sat Refrig Temp TEMP_EVAP_T AV 13 COV IR RO Evap Refrig Liquid Temp TEMP_LCDW AV 11 COV IR RO Leaving Condenser Water TEMP_LCW AV 9 COV IR RO Leaving Chilled Water TEMP_MTRB AV 20 COV IR RO Thrust Bearing Temp TEMP_MTRB_OIL AV 19 IR RO Thrust Bearing Oil Temp TEMP_MTRB1 AV 21 COV IR RO Low Speed ME Brg Temp TEMP_MTRB2 AV 22 COV IR RO Low Speed CE Brg Temp TEMP_MTRB3 AV ...

Page 102: ...DIX E ISM WIRING DIAGRAMS Fig Q Medium Voltage Across the Line ISM Typical 1TB a19 2297 T1 WYE START T6 T5 T4 T3 T2 COMPRESSOR MOTOR NOTE This diagram is for reference only See actual wiring diagram for details ...

Page 103: ...X E ISM WIRING DIAGRAMS cont Fig R Medium Voltage Autotransformer ISM Typical 1TB A19 2298 T1 WYE START T6 T5 T4 T3 T2 COMPRESSOR MOTOR NOTE This diagram is for reference only See actual wiring diagram for details ...

Page 104: ...X E ISM WIRING DIAGRAMS cont Fig S Medium Voltage Primary Reactor ISM Typical 1TB a19 2299 T1 WYE START T6 T5 T4 T3 T2 COMPRESSOR MOTOR NOTE This diagram is for reference only See actual wiring diagram for details ...

Page 105: ...105 APPENDIX E ISM WIRING DIAGRAMS cont a19 2372 Fig T One Line Diagram of Medium Voltage VFD Power Typical ...

Page 106: ...106 APPENDIX E ISM WIRING DIAGRAMS cont CT INPUTS ACTUAL VFD SPEED RS 485 SIO COM SPEED REF OUT PER JOB REQUIREMENTS 120 VAC USE IOB CONNECTIONS A19 2373 Fig U Medium Voltage VFD ISM I O Typical ...

Page 107: ...107 APPENDIX E ISM WIRING DIAGRAMS cont Fig V Starter Field Wiring Schematic USE 8TB 9 10 IOB3 ...

Page 108: ...t to discontinue or change at any time specifications or designs without notice and without incurring obligations Catalog No 04 53190041 01 Printed in U S A Form 19XR CLT 3T Pg 108 11 16 Replaces 19XR CLT 2T Carrier Corporation 2016 ...

Reviews: