background image

7–11

T-365

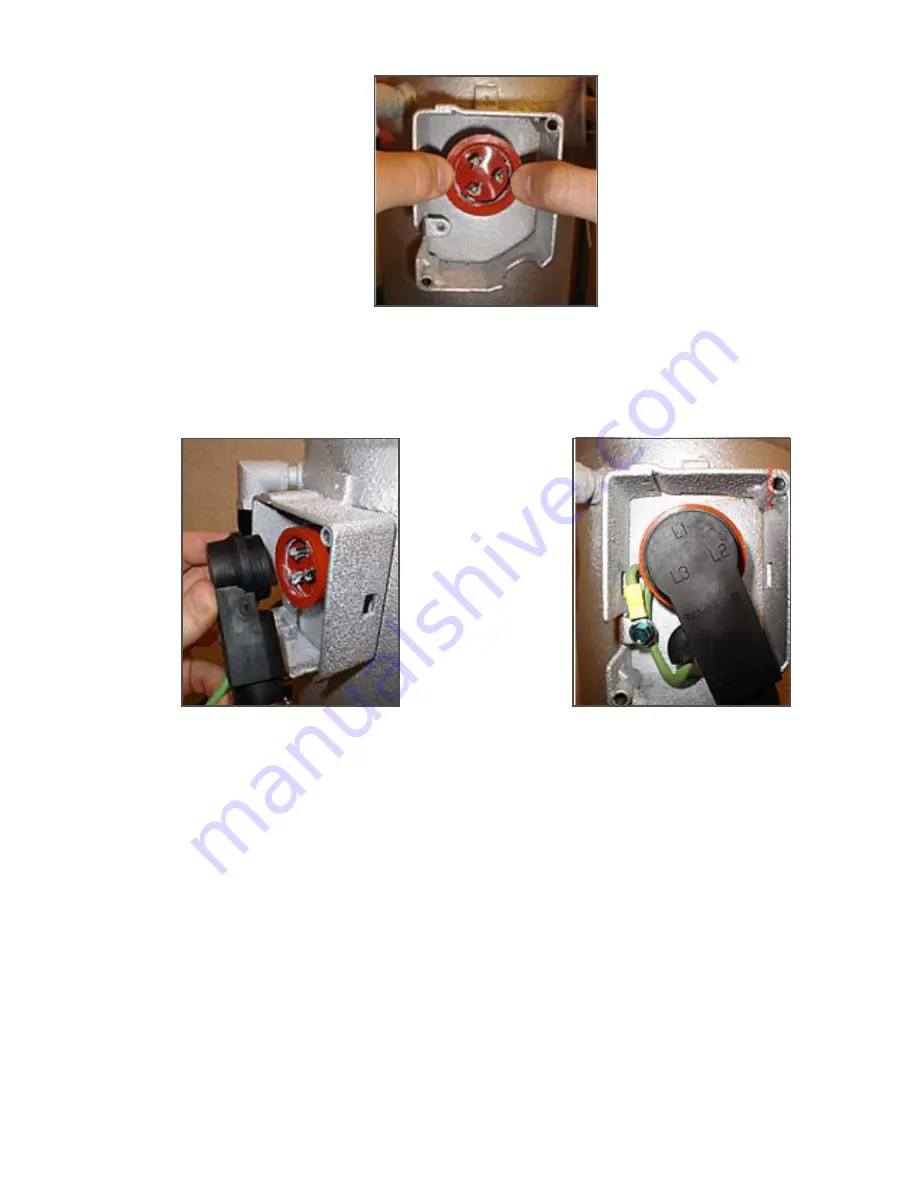
Figure 7.8 Installing Orange Gasket

c. Coat the inside of the power plug (female) connector pins with the Krytox lubricant (

Figure 7.5

, item #13),

and Insert the plug onto the compressor terminal connections. Make sure, the orange gasket has bot-
tomed out onto the fusite and it fits securely onto the terminal pins while fully inserted into the orange
plug as shown in 

Figure 7.9

 and 

Figure 7.10

.

Figure 7.9 Power Plug Connection

Figure 7.10 Power Plug Secured

19.Connect the green ground wire (

Figure 7.10

 above) to the grounding tab located inside the terminal box of

the compressor using the self tapping grounding screw (

Figure 7.5

item #12). Close the compressor termi-

nal box using the terminal cover removed.

20.Evacuate the compressor to 1000 microns (refer to the Operation and Service manual for proper proce-

dures).
If jumper procedure was used in step c, reconnect unit to power and turn on the circuit breaker to again
power the DUV.

21.On completion of the vacuum, remove the magnet and reinstall the DUV coil. 

If a jumper was used, turn off the circuit breaker and disconnect power. Reconnect the X1 wire to the black
transformer wire. Reinstall and secure the KA6 wire to the KA plug at the controller.

22.Mid seat service valves, connect power to the unit; turn the unit ON and run it in full cool mode for 10 min-

utes.

23.Initiate code select 59 (unit pump down). 

Choosing code select 59, the user will be advised to close (front seat) the Liquid Line Valve (king valve). The
display will flash “CLOSE LLV” and “PrESS EntEr.” Upon closing the valve, select the enter key. Pump down
“PdN” will display on the left with the suction pressure on the right. Upon completion of the pump down the
display will flash between “PdN”“DOnE” and “SHUT OFF.”

24.Front seat the suction and discharge service valve and replace the filter drier.

25.Evacuate the suction side and compressor to 1000 microns.

Summary of Contents for 69NT40-561-300

Page 1: ...Container Refrigeration OPERATIONS AND SERVICE MANUAL For 69NT40 561 300 to 399 Container Refrigeration Units T 365 Rev C ...

Page 2: ......

Page 3: ...OPERATIONS AND SERVICE MANUAL For 69NT40 561 300 to 399 Carrier Corporation 2017 Printed in U S A May 2017 ...

Page 4: ......

Page 5: ...or Fan Operation 2 1 2 3 9 Plate Set 2 2 2 4 OPTION DESCRIPTIONS 2 2 2 4 1 Battery 2 2 2 4 2 Dehumidification 2 2 2 4 3 USDA 2 2 2 4 4 Interrogator 2 2 2 4 5 Remote Monitoring 2 2 2 4 6 Quest CCPC 2 2 2 4 7 Communications Interface Module 2 2 2 4 8 Autotransformer 2 2 2 4 9 Gutters 2 2 2 4 10 Handles 2 2 2 4 11 Thermometer Port 2 2 2 4 12 Back Panels 2 3 2 4 13 460 Volt Cable 2 3 2 4 14 230 Volt C...

Page 6: ...Up Compressor Phase Sequence 4 5 4 3 2 Start Up Compressor Bump Start 4 5 4 3 3 Perishable Mode Temperature Control 4 5 4 3 4 Perishable Steady State 4 5 4 3 5 Perishable Idle Air Circulation 4 5 4 3 6 Perishable Heating 4 6 4 3 7 Perishable Pulldown 4 6 4 3 8 Perishable Dehumidification 4 6 4 3 9 Perishable Dehumidification Bulb Mode 4 7 4 3 10 Perishable Economy 4 7 4 3 11 Perishable Mode Coolin...

Page 7: ...SO Trip Header 4 24 4 9 CONTROLLER CONFIGURATION VARIABLES 4 24 4 10 CONTROLLER FUNCTION CODES 4 26 4 11 CONTROLLER ALARM INDICATIONS 4 39 4 12 CONTROLLER PRE TRIP TEST CODES 4 53 OPERATION 5 1 5 1 INSPECTION BEFORE LOADING 5 1 5 2 CONNECT POWER 5 1 5 2 1 Connection To 380 460 VAC Power 5 1 5 2 2 Connection To 190 230 VAC Power 5 1 5 3 ADJUST FRESH AIR MAKEUP VENT 5 2 5 3 1 Upper Fresh Air Makeup ...

Page 8: ...UT 7 1 7 2 MANIFOLD GAUGE SET 7 1 7 3 SERVICE CONNECTIONS 7 2 7 4 PUMP DOWN THE UNIT 7 3 7 5 REFRIGERANT LEAK CHECKING 7 4 7 6 EVACUATION AND DEHYDRATION 7 5 7 6 1 General 7 5 7 6 2 Preparation 7 5 7 6 3 Complete System 7 6 7 6 4 Partial System 7 6 7 7 REFRIGERANT CHARGE 7 7 7 7 1 Checking the Refrigerant Charge 7 7 7 7 2 Adding Refrigerant to System Full Charge 7 7 7 7 3 Adding Refrigerant to Sys...

Page 9: ...MER 7 28 7 24 CONTROLLER 7 29 7 24 1 Handling Modules 7 29 7 24 2 Controller Troubleshooting 7 29 7 24 3 Controller Programming Procedure 7 30 7 24 4 Programming Procedure for Software Versions 5354 Greater With Updated Menu Option menu0115 ml 7 31 7 24 5 Removing and Installing a Controller 7 32 7 24 6 Battery Replacement 7 33 7 25 TEMPERATURE SENSOR SERVICE 7 33 7 25 1 Sensor Checkout Procedure ...

Page 10: ......

Page 11: ... 4 20 Figure 4 12 Alarm Troubleshooting Sequence 4 38 Figure 5 1 Autotransformer 5 2 Figure 5 2 Upper Fresh Air Make Up Flow Chart 5 3 Figure 7 1 Manifold Gauge Set 7 1 Figure 7 2 Manifold Gauge Hose Set 7 2 Figure 7 3 Service Valve 7 3 Figure 7 4 Refrigeration System Service Connections 7 5 Figure 7 5 Compressor Kit 7 9 Figure 7 6 Compressor Ports Connections 7 10 Figure 7 7 Lubricating Orange Ga...

Page 12: ...vaporator Temperature Sensor Positioning 7 39 Figure 7 27 Compressor Discharge Temperature Sensor 7 40 Figure 7 28 Stepper Components 7 41 Figure 7 29 Jumper Assembly 7 42 Figure 7 30 Motor Cup Replacement 7 43 Figure 7 31 Communications Interface Installation 7 44 Figure 8 1 Legend 8 1 Figure 8 2 Unit Wiring Diagram 8 2 Figure 8 3 Wiring Diagram 8 3 Figure 8 4 Wiring Diagram 8 4 ...

Page 13: ...es 4 26 Table 4 4 Controller Pre Trip Test Codes 4 53 Table 4 5 DataCORDER Function Code Assignments 4 61 Table 4 6 DataCORDER Pre Trip Result Records 4 61 Table 4 7 DataCORDER Alarms 4 63 Table 7 1 Valve Override Control Displays 7 28 Table 7 2 Sensor Resistance 7 35 Table 7 3 Sensor Resistance CPDS 7 36 Table 7 4 R 134a Temperature Pressure Chart 7 45 Table 7 5 Recommended Bolt Torque Values Dry...

Page 14: ......

Page 15: ... until all circuit breakers and start stop switches are turned off and power supply is disconnected In case of severe vibration or unusual noise stop the unit and investigate 1 4 MAINTENANCE PRECAUTIONS Beware of unannounced starting of the evaporator and condenser fans Do not remove the condenser fan grille or evaporator access panels before turning power off disconnecting and securing the power ...

Page 16: ...or and condenser fans The unit may cycle the fans and compressor unexpectedly as control requirements dictate WARNING Do not attempt to remove power plug s before turning OFF start stop switch ST unit circuit breaker s and external power source WARNING Make sure the power plugs are clean and dry before connecting to power receptacle WARNING Make sure that the unit circuit breaker s CB 1 CB 2 and t...

Page 17: ...sure optimal unit performance CAUTION Do not remove wire harnesses from controller modules unless you are grounded to the unit frame with a static safe wrist strap CAUTION Unplug all controller module wire harness connectors before performing arc welding on any part of the container CAUTION Do not attempt to use an ML2i PC card in an ML3 equipped unit The PC cards are physically different and will...

Page 18: ...t be sure set is brought to suc tion pressure before disconnecting CAUTION The scroll compressor achieves low suction pressure very quickly Do not use the compressor to evacuate the system below 0 psig Never operate the compressor with the suction or dis charge service valves closed front seated Internal damage will result from operating the compressor in a deep vacuum CAUTION Take necessary steps...

Page 19: ...te located on the back wall of the condenser section The plate provides the unit model number the unit serial number and the unit parts identification number PID The model number identifies the overall unit configuration while the PID number provides information on specific optional equipment factory provisioned to allow for field installation of optional equipment and differences in detailed part...

Page 20: ...EFROST and IN RANGE Unless otherwise indicated the receptacle is mounted at the control box loca tion 2 4 6 Quest CCPC Compressor Cycle Perishable Cooling CCPC is a method of temperature control used during steady state perish able cooling that cycles the compressor on and off according to supply return air temperature conditions 2 4 7 Communications Interface Module The unit may be fitted with a ...

Page 21: ...mbly is available with a vent positioning sensor VPS and may also be fitted with screens 2 4 18 Labels Safety Instruction and Function Code listing labels differ depending on the options installed Labels available with additional languages are listed in the parts list 2 4 19 Controller Two replacement controllers are available 1 Re manufactured Controller is the equivalent of a new OEM controller ...

Page 22: ......

Page 23: ... container in response to cargo respiration When transporting frozen cargo loads the vent will be closed The upper left access panel con tains the vent slide and motor assembly It may be removed to allow entry into the evaporator section where the CO2 sensor and drive pack are located Figure 3 1 Refrigeration Unit Front Section 1 Access Panel Evap Fan 1 2 Fork Lift Pockets 3 Control Box 4 Unit Dis...

Page 24: ...ive and CO2 sensing lines are installed on the rib of the upper grill Most evaporator components are accessible by removing the upper rear panel as shown in the illustration or by removing the evaporator fan access panels see Figure 3 2 Figure 3 2 Evaporator Section 1 Evaporator Fan Motor 1 EM1 2 Return Recorder Sensor Temperature Sensor RRS RTS 3 Humidity Sensor HS 4 Evaporator Fan Motor 2 EM2 5 ...

Page 25: ...Section 1 Compressor 2 Compressor Discharge Temperature Sensor CPDS Location 3 Discharge Connection 4 Suction Connection Location 5 Compressor Terminal Box 6 Oil Drain Location 7 Economizer Connection 8 Discharge Pressure Transducer DPT 9 DUV DLV Connection 10 Digital Loader Valve DLV 11 Suction Pressure Transducer SPT 12 Evaporator Pressure Transducer EPT 13 High Pressure Switch HPS 14 Discharge ...

Page 26: ...ser fan pulls air from around the coil and discharges it horizontally through the condenser fan grille Figure 3 4 Air Cooled Condenser Section 1 Grille and Venturi Assembly 2 Condenser Fan 3 Condenser Coil Cover 4 Condenser Coil 5 Condenser Fan Motor 6 Receiver 7 Sight Glass 8 Filter Drier 9 Economizer 10 Economizer Solenoid Valve ESV 11 Economizer Expansion Valve 12 Warning Label location 13 Serv...

Page 27: ...d to communication and return information over the ships main power line Refer to the master system technical manual for further information Figure 3 5 Control Box Section 1 Compressor Contactor CH 2 Compressor Phase A Contactor PA 3 Compressor Phase B Contactor PB 4 Heater Contactor HR 5 Controller DataCORDER Module Controller 6 Remote Monitoring Receptacle 7 Start Stop Switch ST 8 Controller Bat...

Page 28: ...ARNING EXPLOSION HAZARD Failure to follow this WARNING can result in death serious personal injury and or property damage Never use air or gas mixtures containing oxygen O2 for leak testing or operating the product Charge Only With R 134a Refrigerant must conform to AHRI Standard 700 specification Refrigerant R 134a Conforming to AHRI standard 700 specifica tions CAUTION Charge water cooled conden...

Page 29: ... cold 6 8 to 77 2 ohms 20 C 68 F Type Sheath Evaporator Fan Motors 380 VAC 3 PH 50 Hz 460 VAC 3 PH 60 Hz Full Load Amps High Speed 1 07 0 9 Full Load Amps Low Speed 0 47 0 47 Rotations Per Minute High Speed 2850 rpm 3450 rpm Rotations Per Minute Low Speed 1425 rpm 1725 rpm Voltage and Frequency 360 460 VAC 1 25Hz 400 500 VAC 1 5Hz Bearing Lubrication Factory lubricated additional grease not requir...

Page 30: ...r Red wire Output Brown wire Ground Input voltage 5 VDC Output voltage 0 to 3 3 VDC Output voltage readings verses relative humidity RH percentage 30 0 99 V 50 1 65 V 70 2 31 V 90 2 97 V Table 3 2 Safety and Protective Devices UNSAFE CONDITION DEVICE DEVICE SETTING Excessive current draw Circuit Breaker CB 1 25 amp Manual Reset Trips at 29 amps 460 VAC Circuit Breaker CB 2 50 amp Manual Reset Trip...

Page 31: ...0 and minimum capacity is when the DLV is open 0 of the time and the DUV 100 of the time If the system capacity has been decreased to the lowest allowable capacity the unit will enter a trim heat mode of operation during which the controller will pulse the evaporator heaters in sequence with the compressor digital signal in order to absorb the excess capacity 3 5 2 Economized Operation In the econ...

Page 32: ...LIQUID LINE SERVICE VALVE ECONOMIZER SOLENOID VALVE ECONOMIZER TXV ELECTRONIC EXPANSION VALVE DIGITAL UNLOADER VALVE ECONOMIZER RECEIVER COMPRESSOR SIGHT GLASS LIQUID LEVEL MOISTURE INDICATOR STANDARD OPERATION DISCHARGE PRESSURE TRANSDUCER DISCHARGE TEMPERATURE SENSOR ECON TXV SENSING BULB EVAPORATOR PRESSURE TRANSDUCER SUCTION PRESSURE TRANSDUCER DIGITAL LOADER VALVE ...

Page 33: ...R LIQUID LINE SERVICE VALVE ECONOMIZER SOLENOID VALVE ECONOMIZER TXV ELECTRONIC EXPANSION VALVE DIGITAL UNLOADER VALVE ECONOMIZER RECEIVER COMPRESSOR SIGHT GLASS LIQUID LEVEL MOISTURE INDICATOR ECONOMIZED OPERATION DISCHARGE PRESSURE TRANSDUCER DISCHARGE TEMPERATURE SENSOR ECON TXV SENSING BULB EVAPORATOR PRESSURE TRANSDUCER SUCTION PRESSURE TRANSDUCER DIGITAL LOADER VALVE ...

Page 34: ......

Page 35: ...he desired cargo temperature and humidity The DataCORDER software functions to record unit operating parameters and cargo temperature parameters for future retrieval Coverage of the temperature control software begins with Section 4 2 Coverage of the Data CORDER software is provided in Section 4 8 The keypad and display module serve to provide user access and readouts for both of the controller fu...

Page 36: ...ost switch was toggled on Enter Confirms a selection or saves a se lection to the controller Arrow Up Change or scroll a selection up ward Pre trip advance or test inter ruption Arrow Down Change or scroll a selection down ward Pre trip repeat backward Return Supply Displays non controlling probe tem perature momentary display Celsius Fahren heit Displays alternate English Metric scale momentary d...

Page 37: ...s illumi nated the temperature displayed in the AIR TEMPERATURE display is the reading at the supply air probe This LED will flash if dehumidification is enabled RETURN Yellow LED Energized when the return air probe is used for control When this LED is illumi nated the temperature displayed in the AIR TEMPERATURE display is the reading at the return air probe This LED will flash if dehumidificatio...

Page 38: ...s Provide battery powered ability to access or change selected codes and set point without AC power con nected Provide the ability to reprogram the software through the use of a memory card 4 2 1 Configuration Software CnF Variables Configuration software is a variable listing of the components available for use by the operational software This software is factory installed in accordance with the ...

Page 39: ...p starts A compressor bump start may also occur after a defrost cycle has been completed During Bump Start the EEV will close Relays TS TG TN TE and TV will be de energized opened The result of this action will close the ESV and shut all fans off The compressor will start for 1 second then pause for five sec onds This sequence will be repeated two more times After the final bump start the unit wil...

Page 40: ...eration Perishable Mode 4 3 8 Perishable Dehumidification Dehumidification is provided to reduce the humidity levels inside the container the dehumidification set point range is from 50 to 95 Dehumidification is activated when a humidity value is set at Cd33 During dehumidification operation the condenser fan speed is fixed in high speed The yellow SUPPLY LED will flash ON and OFF every second to ...

Page 41: ...Cd30 4 3 9 Perishable Dehumidification Bulb Mode Bulb mode is an extension of dehumidification which allows changes to the evaporator fan speed and or defrost termination set points Bulb mode is active when Cd35 is set to Bulb Once bulb mode is activated the user may then change dehumid ification evaporator fan operation from the default speed alternates from low to high each hour to constant low ...

Page 42: ...predetermined tolerance above set point Cd30 the green IN RANGE light is illuminated c Condenser fan speed will change dependent on the following conditions Change high speed to low speed LC Compressor loading ratio falls below 38 Change low speed to high speed Compressor loading ratio above 45 If compressor discharge pressure is above 200psig and condenser fan speed is high speed then it will rat...

Page 43: ... energized The evaporator fans continue to run to circulate air throughout the container c The safety heater termination thermostat HTT is attached to an evaporator coil circuit and will open the heating circuit if overheating occurs Figure 4 7 Perishable Mode Heating NOTICE The EEV and DUV are independently operated by the microprocessor For full diagrams and legend see Section 8 4 3 13 Perishabl...

Page 44: ... point minus 0 2 C 0 4 F and the compressor has run for at least five minutes the unit will transition to the frozen idle mode The compressor is turned off and the evaporator fans continue to run to circulate air throughout the container If temperature rises above set point 0 2 C 0 4 F the unit will transition back to the frozen steady state mode Figure 4 8 Controller Operation Frozen Mode 4 3 17 ...

Page 45: ...noid valve ESV low speed evaporator fan motors ES energized and the white COOL light illuminated See Figure 4 9 b When the return air temperature decreases to a predetermined tolerance above set point the green INRANGE light is illuminated c When the return air temperature decreases to 0 2 C 0 4 F below set point contacts TC TS and TN are opened to de energize the compressor economizer solenoid va...

Page 46: ...sing the MANUAL DEFROST INTERVAL key for greater than 5 seconds 2 Timer The Defrost Interval Timer reaches the user selectable Interval The user selected intervals are OFF 3 6 9 12 24 hours AUTO or PuLS factory default is 3 hours Refer to code select CD27 Table 4 2 a Automatic defrost starts with an initial defrost at three hours and then adjusts the interval to the next defrost based on the accum...

Page 47: ...evaporator fans NOTICE The controller then closes contacts TH to supply power to the heaters The orange DEFROST light and heat light are illuminated and the COOL light is also de energized Figure 4 10 Defrost The EEV and DUV are independently operated by the microprocessor Complete schematics and legends are located in Section 8 Defrost will terminate when the DTS reading rises above one of two mo...

Page 48: ...ed to inform of a possible DTS failure 4 4 PROTECTION MODES OF OPERATION 4 4 1 Evaporator Fan Operation Opening of an evaporator fan internal protector will shut down the unit 4 4 2 Failure Action Function code Cd29 may be operator set to select action the controller will take upon system failure The factory default is full system shutdown Refer to Table 4 3 4 4 3 Generator Protection Function cod...

Page 49: ... pulldown phase and a CCPC pulldown phase During setpoint pulldown supply air temperature is controlled according to the unit s nominal supply air setpoint During CCPC pulldown the supply air temperature is lowered somewhat relative to the nominal setpoint Evap orator fans are forced to operate at high speed Steady state CCPC control maintains the same lowered supply air temperature that was used ...

Page 50: ...quence of tests or Manual Mode which allows the operator to select and run any of the individual tests CAUTION Pre trip diagnostics should not be performed with critical temperature cargoes in the con tainer CAUTION When PRE TRIP key is pressed economy dehumidification and bulb mode will be deactivated At the completion of Pre trip activity economy dehumidification and bulb mode must be reac tivat...

Page 51: ...ainer ID Change Software Upgrades Alarm Activity Battery Low battery pack Data Retrieval Defrost Start and End Dehumidification Start and End Power Loss with and without battery pack Power Up with and without battery pack Remote Probe Temperatures in the Container USDA Cold treatment and Cargo probe recording Return Air Temperature Set Point Change Supply Air Temperature Real Time Clock Battery In...

Page 52: ...uration variables is provided in Table 4 2 Descriptions of DataCORDER operation for each variable setting are provided in the following paragraphs 4 8 3 Sensor Configuration dCF02 Two modes of operation may be configured the Standard Mode and the Generic Mode Standard Mode In Standard Mode the user may configure the DataCORDER to record data using one of seven standard configu rations The seven st...

Page 53: ...s factory set at Greenwich Mean Time GMT 4 8 5 Thermistor Format dCF04 The user may configure the format in which thermistor readings are recorded The short resolution is a 1 byte for mat and the long resolution is a 2 byte format The short requires less memory and records temperature with vari able resolutions depending on temperature range The long records temperature in 0 01 C 0 02 F steps for ...

Page 54: ...troller Software 5327 Controller Serial 04163552 Bill of Lading 1 Origin Origin Date Destination Discharge Date Comment DataLINE Tool Probe Calibration Readings USDA1 0 0 USDA2 0 0 USDA3 0 0 Cargo 0 0 Temperature Units Centigrade ________________________________________________________________________________________ May 31 2007 Setpoint 1 66 Container Serial 04189552 9 Sensors Logged at 15 Minute...

Page 55: ...aCORDER is powered up when the unit is turned on via the Stop Start switch 2 Controller DC battery pack power If a battery pack is installed the DataCORDER will power up for commu nication when an interrogation cable is plugged into an interrogation receptacle 3 External DC battery pack power A 12 volt battery pack may also be plugged into the back of the interroga tion cable which is then plugged...

Page 56: ...floppy disks and CD This software allows interrogation configuration variable assignment screen view of the data hard copy report genera tion cold treatment probe calibration and file management Refer to Data Retrieval manual 62 10629 for a more detailed explanation of the DataLINE interrogation software The DataLINE manual may be found on the internet at www container carrier com b DataBANK Card ...

Page 57: ...er to the Data Retrieval manual 62 10629 for more details b Pre cool the container to the treatment temperature or below c Install the DataCORDER module battery pack if not already installed d Place the three probes The probes are placed into the pulp of the product at the locations defined in the fol lowing table as the product is loaded e To initiate USDA recording connect the personal computer ...

Page 58: ...ettings of the ISO trip header through the ISO Trip Header screen The ISO Trip Header screen is displayed when the user clicks on the ISO Trip Header button in the Trip Func tions Group Box on the System Tools screen F9 function Provides the user with a shortcut for manually triggering the refresh operation Before sending modi fied parameter values the user must ensure that a successful connection...

Page 59: ...nsor Out In CnF28 Enable Bulb Mode NOr bULb CnF31 Probe Check SPEC Std CnF33 Enable Snap Freeze OFF SnAP CnF34 Temperature Unit Display bOth F CnF41 Enable Low DTT Setting Out In CnF44 Autoslide Enable Out LO UP CnF45 Low Humidity Enabled Out In CnF47 Vent Position OFF UP LOW CUStOM CnF49 OEM Reset Option OFF 0 off 1 std 2 spec 3 cust CnF50 Enhanced Bulb Mode Interface 0 out 1 in CnF51 Timed Defro...

Page 60: ...nt algorithm The current mea sured is used for control and diagnostic purposes For control processing the highest of the Phase A and B current values is used for current limiting purposes For diagnostic processing the current draws are used to monitor component energization Whenever a heater or a motor is turned ON or OFF the current draw increase reduction for that activity is measured The curren...

Page 61: ... battery voltages greater than 7 0 volts FAIL will be displayed for battery voltages between 4 5 and 7 0 volts and will be displayed for battery voltages less than 4 5 volts After the result is displayed for four seconds btest will again be displayed and the user may continue to scroll through the various codes Cd20 Config Model This code indicates the dash number of the model for which the Con tr...

Page 62: ...rost termination the next time the DTT contacts are OPEN or the next time power to the control is interrupted If the previous value or the new value is OFF the newly selected val ue will be used immediately If any Auto Pretrip sequence is initiated Cd27 will be set to AUTO un less CnF49 OEM Reset is set to Custom AND CnF64 Evaporator Fan Pulsing Logic configuration variable is set to IN in which c...

Page 63: ...mum current draw allowed on any phase at any time Limiting the unit s current reduces the load on the main power supply When desirable the limit can be lowered Note howev er that capacity is also reduced The five values for 460 VAC opera tion are 15 17 19 21 or 23 amperes The factory default setting is 21 amperes Cd33 Humidity Setpoint This is the value in percent to which the system will dehumidi...

Page 64: ...d on Replaced by Cd48 interface if CnF50 Enhanced Bulb Mode Interface is active Display Only Functions Cd38 through Cd40 are display only functions Cd38 Secondary Supply Tempera ture Sensor Cd38 will display the current supply recorder sensor SRS reading for units configured for four probes If the unit is configured with a Data CORDER Cd38 will display If the DataCORDER suffers a fail ure AL55 Cd3...

Page 65: ...pen and close to allow the user to inspect its operation If CAL is selected the controller will zero calibrate the CO2 sensor input If the unit is not configured with AutoFresh the Cd43 will display Refer to Section 5 4 3 for description of operational parameters Display Only Function Cd44 is a display only function Cd44 eAutoFresh Values CO2 Sensor Status Code Cd44 displays the eAutoFresh CO2 and...

Page 66: ...ional needs of the container Cd45 Vent Position Sensor VPS Position Values 0 to 240 for UPPER 0 to 225 for LOWER This function code will be dashed out if not configured for VPS When configured for VPS Cd45 displays the current vent position in units of 5 CMH units displayed as CM or CFM units displayed as CF depending on the selection of Cd46 Airflow display units Cd28 Metric Imperial or the press...

Page 67: ...dification mode leaves OFF Evaporator speed select goes to Alt for units without PWM Com pressor Control Cnf57 Out Evaporator speed select goes to Hi for units with PWM Compressor Control Cnf57 In DTT setting goes to 25 6 C or 18 0 C depending on Cnf41 Whenever dehumidification mode is set to bUlb DTT setting goes to 18 0 C if it had been set higher Whenever dehumidification mode is set to dEhUM D...

Page 68: ...face down into a hierarchy of parameter selection menus act treat days probe and spnew setting Pressing ENTER key in any of the parameter selection menus com mits to selection of the currently displayed parameter and causes the interface to descend into the next parameter selection menu All parameter selection menus alternate between a blank display and the current selection in the right hand disp...

Page 69: ...rrent selection menu is cancelled but any previously committed changes are retained Available parameters and parameter ranges are a function of configu ration options and previously selected parameters as indicated above Parameter with the exception of ASC may not be altered if Cd53 is re entered if ASC is On When ASC has completed including reaching the last setpoint done on the left display and ...

Page 70: ...lash between STArT PdN and PrESS EnTEr Upon entering Cd59 the operator will be required to acknowledge that they want to initiate the pump down control The display will flash between STArT P dN and PrESS EnTEr Once the decision to continue is confirmed pump down logic will begin and will take com plete control of the unit until pump down either succeeds or fails This operation can not be halted on...

Page 71: ...onfigured OFF Cd63 Enhanced Economy Mode Cd63 is used to enable Enhanced Economy Mode EEM Following a power cycle the state of the function select code is retained at its state prior to the power cycle if CNF72 Default ON else if Default OFF this will be set to OFF If On this function select code will be set to OFF when any trip start occurs or any pretrip test is initiated Event 120 shall be logg...

Page 72: ...t configuration See alarm details repair Correct all faults Yes Yes Yes Yes No Yes No Yes No No No No Correct Refrigerant issue Unit OK Yes No Refer to CONNECT POWER Section 4 2 Refer to CONNECT POWER Section 4 2 Refer to CONTROLLER SOFTWARE Section 3 2 Refer to Configuration Software Variables Section 3 2 1 Refer to Controller Alarm Indications Table 3ï6 Refer to Pre trip Diagnostics Section 3 7 ...

Page 73: ...TOR FAN MOTOR ASSEMBLY Section 7 14 1 AL05 MANUAL DEFROST SWITCH FAILURE Cause Controller has detected continuous Manual Defrost Switch activity for five minutes or more Component Keypad Power cycle the unit Troubleshooting Resetting the unit may correct problem monitor the unit Corrective Action If the alarm reappears after 5 minutes replace the keypad AL06 KEYPAD OR KEYPAD HARNESS FAIL Cause Con...

Page 74: ...associated failure action Troubleshooting Refer to eAutoFresh manual Corrective Action The alarm is triggered off when voltage is within operating range AL14 PHASE SEQUENCE DETECT FAULT Cause Controller is unable to determine the correct phase relationship Component N A Troubleshooting Power cycle the unit Corrective Action Resetting the unit may correct problem monitor the unit Component Wiring T...

Page 75: ...shooting Confirm supply voltage frequency is within specification and bal anced according to Electrical Data Section 3 3 Corrective Action Correct power supply Component Operating Conditions Troubleshooting Make sure system pressures are relevant to operating conditions Corrective Action Check air flow of condenser Check Refrigerant charge refer to REFRIGERATION SYSTEM SERVICE Section 7 3 Componen...

Page 76: ...arge Pressure Transducer DPT Troubleshooting Confirm accurate DPT pressure readings refer to MANIFOLD GAUGE SET Section 7 2 Corrective Action Replace DPT if defective Component Suction Pressure Transducer SPT Troubleshooting Confirm accurate SPT pressure readings refer to MANIFOLD GAUGE SET Section 7 2 Corrective Action Replace SPT if defective Component Monitor unit Troubleshooting Alarm is displ...

Page 77: ...7 12 Component Condenser Fan Troubleshooting Check Condenser Fan for proper operation Corrective Action Correct as required Component Discharge Pressure Transducer DPT Troubleshooting Confirm accurate DPT pressure readings refer to MANIFOLD GAUGE SET Section 7 2 Corrective Action Replace DPT if defective Component Non condensables in the refrigeration system Troubleshooting With the unit off allow...

Page 78: ...ch as AL16 AL24 Troubleshooting Check compressor operation Corrective Action If the alarm persists it may indicate a failing compressor replace the compressor refer to COMPRESSOR Service Section 7 8 AL20 CONTROL CONTACTOR FUSE F3 Cause Control power fuse F3A or F3B is open Component Check F3A if the fuse is open Troubleshooting Check PA PB CH coils for short to ground if short is found Corrective ...

Page 79: ...porator Motor Troubleshooting Shut down unit disconnect power check Evaporator Motor IP at plug connection pins 4 6 Corrective Action Replace defective evaporator fan motor refer to EVAPORATOR FAN MOTOR Service Section 7 14 AL23 LOSS OF PHASE B Cause Controller fails to detect current draw Component Incoming Power Troubleshooting Check incoming power source Corrective Action Correct power source a...

Page 80: ...or Assembly Service Section 7 11 AL26 ALL SENSORS FAILURE SUPPLY RETURN PROBES Cause Sensors out of range Component All sensors detected as out of range Troubleshooting Perform Pre trip P5 Corrective Action If P5 passes no further action is required If P5 fails replace the defective sensor as determined by P5 refer to TEMPERATURE SENSOR Service Section 7 25 AL27 ANALOG TO DIGITAL ACCURACY FAILURE ...

Page 81: ...E SET Section 7 2 Corrective Action Replace DPT if defective AL29 AUTOFRESH FAILURE Cause Alarm 29 is triggered if CO2 or O2 level is outside of the limit range and the vent position is at 100 for longer than 90 minutes Component Alarm LED will be activated and user intervention is required Troubleshooting Refer to eAutoFresh manual Corrective Action The alarm is triggered off when atmospheric con...

Page 82: ...low a unit fitted with rechargeable batteries to operate for up to 24 hours to charge rechargeable batter ies sufficiently Once fully charged the alarm will deactivate Corrective Action To clear the alarm press ENTER and ALT simultaneously at the start up of Cd19 Battery Check If alarm persists replace the battery pack refer to Section 7 24 6 Battery Replacement AL54 PRIMARY SUPPLY SENSOR STS Caus...

Page 83: ...placement Section 7 25 Component Refrigeration System Troubleshooting Check unit for air flow restrictions Corrective Action Clean or remove any debris from coils AL59 HEATER TERMINATION THERMOSTAT HTT Cause Heat Termination Thermostat HTT is open Component Heat Termination Thermostat HTT Troubleshooting Check for 24 volts at test point TP10 if no voltage at TP10 after unit has reached set point H...

Page 84: ...ng Check unit for air flow restrictions Corrective Action Clean or remove any debris from coils Troubleshooting Check unit for proper operation Corrective Action Repair as needed Component Power supply Troubleshooting Confirm supply voltage frequency is within specification and bal anced according to ELECTRICAL DATA Section 3 3 Corrective Action Correct power supply Component Current limit set too...

Page 85: ...g compressor refer to COMPRESSOR Service Section 7 8 AL67 HUMIDITY SENSOR Cause Humidity Sensor HS reading out of range Component Humidity Sensor HS Troubleshooting Make sure the humidity sensor is properly connected in the socket Corrective Action Make sure the humidity sensor wires have not been damaged Monitor replace HS if alarm persists AL69 EVAPORATOR TEMP SENSOR ETS1 Cause Evaporator Temper...

Page 86: ...e Action Power cycle unit Control Temperature is in In range Any Pre trip mode resets the timers ERR INTERNAL MICROPROCESSOR FAILURE Cause The controller performs self check routines If an internal failure occurs an ERR alarm will appear on the display This is an indication the controller needs to be replaced Error Description ERR 0 RAM failure Indicates that the controller working memory has fail...

Page 87: ...e will be alternately displayed with the set point whenever the supply voltage is less than 75 of its proper value OLD CNTRL HARDWARE DOES NOT INCLUDE A TRIAC ON THE KA06 OUTPUT Cause ML3 controllers with configuration variable 57 set to 3 will generate this message This message will swap being the number one priority message with the highest priority message in the list above Table 4 4 Controller...

Page 88: ...ts and display failures there are no test codes or results associated with this phase of Pretrip To know if the test passes the operator must observe that the LCD display elements and the in dicator lights behave as described below CODE TITLE DESCRIPTION P1 0 Heaters Turned On Heater starts in the off condition current draw is measured and then the heater is turned on After 15 seconds the current ...

Page 89: ...current draw test is in the specified range P3 1 Low Speed Evapo rator Fan Motors Off Low speed evaporator fans are then turned off After 10 seconds the current draw is measured The change in current draw is then recorded Test passes if change in current draw test is in the specified range CODE TITLE DESCRIPTION P4 0 High Speed Evap orator Fan Motors On Evaporator fans start in the off condition c...

Page 90: ...rimary supply and primary return probes Turn the heat ers on for 60 seconds then measure the temperature difference between the primary supply and primary return probes for up to 120 additional seconds This is a Pass Fail test The test passes if differential of STS is 0 25 C higher than RTS Test P5 0 must pass before this test is run P5 7 Primary vs Sec ondary Evaporator Temperature Sen sor Test T...

Page 91: ...Suction Thermis tor Test If the Suction Temperature Sensor CPSS both is configured ON and is in valid the test fails Otherwise the test passes P6 2 Discharge Pres sure Transducer Test If Alarm 65 is active any time during the first 45 second period the test fails Otherwise the test passes P6 3 Suction Pressure Transducer Test If Alarm 66 is active the test fails Otherwise the test passes P6 4 Comp...

Page 92: ...it running the condenser fan is turned off and a 900 sec ond 15 minute timer is started The right display shows Discharge Pressure if the sensor is configured and valid else Discharge Temperature The unit needs to disable Discharge Pressure limit and enable Current Limit checks The test fails immediately if Ambient Temperature Sensor invalid Composite Return Temperature Sensor invalid HPS is open ...

Page 93: ...The left display will read P8 1 the right display will show the supply air tem perature The unit will then start to pull down the temperature to the 0C set point The test passes if the container temperature reaches set point before the 180 minute timer expires On units where the CO2 Sensor Status indicates that a CO2 sensor is pres ent calibration of the CO2 sensor will be attempted during P8 1 On...

Page 94: ...ring this test the control temperature will be shown on the right display The test fails if the 180 Minute timer expires before the control temperature reaches setpoint 0 3 C If the test fails it will not auto repeat There is no pass display for this test Once the control temperature reaches setpoint the test proceeds to test 10 1 P10 1 Frozen Mode Pull down Test Control temperature must be at lea...

Page 95: ...Left 4 Right 4 The DataCORDER serial number consists of eight characters Function code dC26 contains the first four characters Function code dC27 contains the last four characters This serial number is the same as the controller serial number dC28 Minimum Days Left An approximation of the number of logging days remaining until the Data CORDER starts to overwrite the existing data dC29 Days Stored ...

Page 96: ...ass Fail Skip 6 3 Suction Pressure Sensor Test Pass Fail Skip 6 4 Compressor Current Draw Test Pass Fail Skip 6 5 Compressor Leak Test Pass Fail Skip 6 6 Economizer Valve Test Pass Fail Skip 6 7 Digital Unloader Valve Test Pass Fail Skip 6 9 Liquid Injection Valve Test If Equipped Pass Fail Skip 6 10 Electronic Expansion Valve Test Pass Fail Skip 7 0 High Pressure Switch Closed Pass Fail Skip Resu...

Page 97: ...point is outside of its specified range The DataCORDER is configured by default to record the supply and return recorder sensors The DataCORDER may be configured to record up to eight additional network data points An alarm number AL78 to AL85 is assigned to each configured point When an alarm occurs the Data CORDER must be interrogated to identify the data point assigned When a humidity sensor is...

Page 98: ...en detected in the process of writing daily data to the non volatile FLASH memory dAL90 Future Expansion This alarm is for future expansion and is not in use at this time dAL91 Alarm List Full The DataCORDER alarm queue is determined to be full eight alarms Table 4 7 DataCORDER Alarms To Access Press ALT MODE key then ALARM LIST key CODE NO TITLE DESCRIPTION ...

Page 99: ...eanliness Wash with fresh water refer to Section 7 10 3 Open control box door Check for loose electrical connections or hardware 4 Check color of moisture liquid indicator 5 2 CONNECT POWER WARNING Do not attempt to remove power plug s before turning OFF start stop switch ST unit circuit breaker s and external power source WARNING Make sure the power plugs are clean and dry before connecting to po...

Page 100: ...which will vary depending on the container and how the con tainer is loaded Units may be equipped with a vent position sensor VPS The VPS determines the position of the fresh air vent upper or lower as equipped and sends data to the controller display 5 3 1 Upper Fresh Air Makeup Vent Two slots and a stop are designed into the Upper Fresh Air disc for air flow adjustments The first slot allows for...

Page 101: ...ir flow adjustments The first slot allows for a 0 to 25 air flow the second slot allows for a 25 to 100 air flow To adjust the percentage of air flow loosen the hex nut and rotate the disc until the desired percentage of air flow matches with the arrow Tighten the hex nut To clear the gap between the slots loosen the hex nut until the disc clears the stop On some models the air slide is supplied w...

Page 102: ...and closing of the mechanical air vent slide The opening and closing of the slide is determined by the mode selected through Cd43 The modes of operation are OFF USER TEST DELAY and GASLIMIT Each mode of operation has submenus with selectable parameters Not all parameters are available in each submenu Upon power up the controller will fully close the eAutoFresh air vent Nine seconds after power up ...

Page 103: ...sor When CAL is selected the display will flash CAL The operator is to hold the ENTER key for 5 seconds The display will stop flashing and read CAL for 5 seconds The microprocessor will read the CO2 value and then compare that value to a known zero value If the sensor is within the calibration parameter range the microprocessor will determine the appropriate offset for the sensor If the sensor is ...

Page 104: ... rate Use the UP or DOWN arrow key to scroll to the desired FLO rate The range is from 0 to 220CM 0 to 129CF in increments of 5 and 3 respectively Press ENTER to set the value and begin operation Operational Parameters Sub Menu Options FLO indicates the opening to which the slide will move based on the stored value in CMH in increments of 5 or CFM depending on the selection of Cd46 Airflow display...

Page 105: ...d39 in accordance with desired operating parameters Refer to Table 4 3 5 7 3 Start Temperature Recorder DataCORDER 1 Check and if required set the DataCORDER Configuration in accordance with desired recording parameter Refer to Section 4 8 3 2 Enter a Trip Start To enter a Trip Start do the following a Depress the ALT MODE key When the left display shows dC depress the ENTER key b Scroll to Code d...

Page 106: ...ode will automatically termi nate When initiated via communications a Pre trip test may not be interrupted with an arrow key but the Pre trip test can be terminated with the PRE TRIP key 1 Press the PRE TRIP key to accesses the Pre trip test selection menu 2 TO RUN AN AUTOMATIC TEST Scroll through the selections by pressing the UP ARROW or DOWN ARROW keys to display AUTO AUTO 1 AUTO 2 or AUTO 3 as...

Page 107: ...ture probes If a significant difference in temperature readings is detected between probes a defrost cycle followed by another probe check may be initiated Any continued disagreement between probes will prompt the controller to invalidate the failed temperature probe and the backup probe will be used for temperature control In Perishable Mode both pairs of supply and return probes are monitored fo...

Page 108: ......

Page 109: ...ressure switch open Section 6 7 Heat termination thermostat open Replace Malfunction of current sensor Replace 6 2 UNIT OPERATES LONG OR CONTINUOUSLY IN COOLING Condition Possible Cause Remedy Refer ence Section Container Hot load Normal Defective box insulation or air leak Repair Refrigeration system Shortage of refrigerant Section 7 3 Evaporator coil covered with ice Section 6 6 Evaporator coil ...

Page 110: ...Possible Cause Remedy Refer ence Section No operation of any kind Start Stop switch OFF or defective Check Circuit breaker OFF or defective Check External power source OFF Turn ON No control power Circuit breaker or fuse defective Replace Control Transformer defective Replace Evaporator fan internal motor protector open Section 7 14 Heat relay defective Check Heater termination thermostat open Sec...

Page 111: ...ctive or heat termination thermostat open Replace Heater contactor or coil defective Replace Will not initiate defrost manually Keypad is defective Replace Defrost temperature sensor open Replace Initiates but relay DR drops out Low Line Voltage Section 3 3 Initiates but does not defrost Heater contactor or coil defective Replace Heater s burned out Section 7 13 6 7 ABNORMAL PRESSURES Condition Po...

Page 112: ...ck Failed digital unloader valve DUV Replace 6 8 ABNORMAL NOISE OR VIBRATIONS Condition Possible Cause Remedy Refer ence Section Compressor Compressor start up after an extended shutdown Normal Brief chattering when manually shut down Compressor operating in reverse Section 6 14 Loose mounting bolts or worn resilient mounts Tighten Replace Loose upper mounting Section 7 8 1 Liquid slugging Section...

Page 113: ... Refer ence Section Vent not opening Unit not Configured for eAutoFresh Operation No action Cd43 in Off mode Section 5 4 2 Wiring disconnected Check wiring Stepper drive defective Section 7 27 2 Stepper motor defective Section 7 27 4 Unit operating in frozen mode Section 5 4 3 Gas Limit mode unavailable Check CO2 sensor Section 5 4 3 Wiring disconnected Check wiring Unit operating in frozen mode S...

Page 114: ... 16 Failed digital unloader valve DUV Replace Loose or insufficiently clamped sensor Replace High suction pressure with low su perheat Foreign material in valve Section 7 16 Failed suction pressure transducer SPT or evaporator pressure transducer EPT Replace EEV control malfunction Replace Improperly seated powerhead Ensure power head is locked and in place Liquid slugging in compressor Failed suc...

Page 115: ...High discharge temperature Gas Cooler coil dirty Section 7 10 1 Gas Cooler fan rotating backwards Section 7 11 Gas Cooler fan inoperative Section 7 11 1 Refrigerant overcharge or non condensibles Section 7 3 Discharge service valve partially closed Open Electronic expansion valve EEV control malfunction Section 7 16 1 Failed suction pressure transducer SPT or evaporator pressure transducer EPT Rep...

Page 116: ......

Page 117: ...perature recorder service and general service Refer to the Table of Contents to locate specific topics Figure 7 1 Manifold Gauge Set 7 2 MANIFOLD GAUGE SET The manifold gauge set see Figure 7 1 is used to determine system operating pressure add refrigerant charge and to equalize or evacuate the system When the Suction Pressure Valve is frontseated turned all the way in the suction low pressure can...

Page 118: ... Hose Set 1 RED Refrigeration and or Evacuation Hose SAE J2196 R 134a 2 Hose Fitting 0 5 16 Acme 3 YELLOW Refrigeration and or Evacuation Hose SAE J2196 R 134a 4 Hose Fitting with O ring M14 x 1 5 5 High Side Field Service Coupling Red Knob 6 BLUE Refrigeration and or Evacuation Hose SAE J2196 R 134a 7 Low Side Field Service Coupling Blue Knob 7 3 SERVICE CONNECTIONS The compressor suction compres...

Page 119: ...nnecting Removing the Manifold Gauge Set 1 While the compressor is still ON backseat the high side service valve 2 Midseat both hand valves on the manifold gauge set and allow the pressure in the manifold gauge set to be drawn down to low side pressure This returns any liquid that may be in the high side hose to the system 3 Backseat the low side service valve Backseat both field service couplings...

Page 120: ...n which puts moisture in the system 8 After repairs have been made be sure to perform a refrigerant leak check refer to Section 7 5 and evacu ate and dehydrate the low side refer to Section 7 6 1 9 Check refrigerant charge refer to Section 7 7 7 5 REFRIGERANT LEAK CHECKING WARNING EXPLOSION HAZARD Failure to follow this WARNING can result in death serious personal injury and or property damage Nev...

Page 121: ...3 If possible keep the ambient temperature above 15 6 C 60 F to speed evaporation of moisture If the ambient temperature is lower than 15 6 C 60 F ice might form before moisture removal is complete Heat lamps or alternate sources of heat may be used to raise the system temperature 4 Additional time may be saved during a complete system pump down by replacing the filter drier with a sec tion of cop...

Page 122: ...Midseat the refrigerant system service valves 6 Open the vacuum pump and electronic vacuum gauge valves if they are not already open Start the vacuum pump Evacuate unit until the electronic vacuum gauge indicates 2000 microns Close the electronic vacuum gauge and vacuum pump valves Shut off the vacuum pump Wait a few minutes to be sure the vacuum holds 7 Break the vacuum with either clean dry refr...

Page 123: ... tinue with the following paragraphs to add or remove refrigerant as required 7 7 2 Adding Refrigerant to System Full Charge 1 Evacuate unit and leave in deep vacuum Refer to Section 7 6 2 Place cylinder of R 134a on scale and connect charging line from cylinder to liquid line valve Purge charging line at liquid line valve and then note weight of cylinder and refrigerant 3 Open liquid valve on cyl...

Page 124: ...troller c Disconnect the X1 wire from the 24VAC side of transformer black wire and locate it away for the trans former d Jumper between the black transformer wire to the KA6 wire removed from the connector e Connect power to unit and turn circuit breaker on DUV coil is now energized 4 Connect a refrigerant recovery machine and and recover any refrigerant out of the compressors and DUV line followi...

Page 125: ...ST Washers 8 Resilient Mount 9 Mylar Washers 10 Wire Ties 11 Power Cable Gasket 12 Ground Connection Screw 13 Power Cable Lubricant Krytox Not Shown 13 Put the new SST washers Figure 7 5 item 7 on each side of the resilient mounts Figure 7 5 item 8 and the new mylar washer Figure 7 5 item 9 on the bottom of it as shown in Figure 7 7 Install the four base mounting screws loosely 14 Place the new te...

Page 126: ...e orange gasket Figure 7 5 item 11 surfaces with the Krytox lubricant Figure 7 5 item 13 as shown in Figure 7 7 Figure 7 7 Lubricating Orange Gasket b Install the orange gasket part onto the compressor fusite with the grooved or threaded side out as shown in Figure 7 8 Ensure that the gasket is seated onto the fusite base Service Valve Connection Torque Value 1 Suction and Discharge Rotalocks 108 ...

Page 127: ...rocedure was used in step c reconnect unit to power and turn on the circuit breaker to again power the DUV 21 On completion of the vacuum remove the magnet and reinstall the DUV coil If a jumper was used turn off the circuit breaker and disconnect power Reconnect the X1 wire to the black transformer wire Reinstall and secure the KA6 wire to the KA plug at the controller 22 Mid seat service valves ...

Page 128: ...en See Figure 7 11 Figure 7 11 High Pressure Switch Testing 4 Set nitrogen pressure regulator at 26 4 kg cm2 375 psig with bleed off valve closed 5 Close valve on cylinder and open bleed off valve 6 Open cylinder valve Slowly close bleed off valve to increase pressure on switch The switch should open at a static pressure up to 25 kg cm2 350 psig If a light is used the light will go out If an ohmme...

Page 129: ...the coil continue washing until the water runs clear 6 After the coil is clean rinse the condenser fan to remove any dirt build up from the blades 7 Replace the condenser fan grille ensuring that it is centered around the fan 7 10 2 Condenser Coil Removal 1 Using a refrigerant reclaim system remove the refrigerant charge WARNING Do not remove the condenser fan grille before turning power OFF and d...

Page 130: ...ket bolts b Refit the top support bracket bolts as well as the top grille extension support c Refit the bottom support bracket bolts 3 Braze the condenser coil inlet connection 4 Insert the receiver pipe work onto the coil outlet and loosely secure the receiver assembly to the side sup port bracket with the retained hardware 5 Braze the outlet connection to the receiver assembly 6 Install a new fi...

Page 131: ...ER FAN AND FAN MOTOR The condenser fan rotates counter clockwise viewed from front of unit The fan pulls air through the condenser coil and discharges the air horizontally through the front of the unit 7 11 1 Condenser Fan Motor Remove Replace WARNING Do not remove the condenser fan grille before turning power OFF and disconnecting the power plug 1 Remove the condenser fan grille retain all bolts ...

Page 132: ...infill panels 16 Refit the condenser fan grille ensuring the grille is properly centered around condenser fan 7 12 FILTER DRIER To check filter drier 1 Test for a restricted or plugged filter drier by feeling the liquid line inlet and outlet connections If the outlet side feels cooler than the inlet side then the filter drier should be changed 2 Check the moisture liquid indicator if the indicator...

Page 133: ...t breakers CB 1 CB 2 and disconnect main power supply before working on moving parts 1 Before servicing unit make sure the circuit breakers CB 1 and CB 2 and start stop switch ST are in the OFF position and the power plug is disconnected 2 Remove the upper back panel 3 Determine which heater s need replacing by checking resistance of each heater set Refer to Section 3 3 for heater resistance value...

Page 134: ...four 1 4 20 x 3 4 long bolts that are located under the fan that support the motor and stator housing Remove the motor and plastic spacer 7 14 3 Assemble the Evaporator Fan Assembly 1 Assemble the motor and plastic spacer onto the stator NOTICE When removing the black nylon evaporator fan blade care must be taken to assure that the blade is not damaged In the past it was a common practice to inser...

Page 135: ...s that the inside of the unit be thoroughly cleansed prior to reuse Carrier Transicold has identified a fully biodegradable and environmentally safe alkaline cleaning agent Tri Pow r HD for the unit This will assist in helping to remove the corrosive fumigation chemicals and dislodging of the corrosive elements This cleaner is available from the Carrier Transicold Performance Parts Group PPG and c...

Page 136: ...4 VALVE REMOVAL The preferred method of removing the valve is to cut the connection between the brazed section and the valve using a small tube cutter Remove valve Alternately use a wet rag to keep valve cool Heat inlet and outlet connections to valve body and remove valve 5 Clean the valve stem with mild cleaner if necessary Installing an EEV Reverse steps 1 through 4 above to install a new valve...

Page 137: ...REMOVAL The preferred method of removing the solenoid valve is to cut the connection between the brazed section and the valve using a small tube cutter Remove valve Alternately heat inlet and outlet connections to valve body and remove valve 3 Clean the valve stem with mild cleaner if necessary c Installing the Solenoid Valve 1 Fit the new solenoid valve into position and braze Use a wet rag to ke...

Page 138: ...n 7 6 b Turn unit power off and remove power from the unit c Remove cushion clamps located on the inlet and outlet lines d Remove insulation Presstite from expansion valve bulb e Unstrap the bulb located on the economizer line f VALVE REMOVAL The preferred method of removing the valve is to cut the connection between the brazed section and the valve using a small tube cutter Remove valve Alternate...

Page 139: ...trans former 4 Jumper between the black transformer wires to the KA6 wire removed from the connector 5 Connect power to unit and turn circuit breaker on DUV coil is now energized 6 Pressure should drop 7 Power circuit breaker off reconnect wires and reinstall fuses If the valve opens and closes properly the failure mode is with the compressor and it should be changed at the earliest opportunity 7 ...

Page 140: ...l it may fall out when lifted from the valve body Take care that the spacer is not lost the valve will not function correctly without it d Remove clamps holding the DLV to the discharge line e Loosen the nuts attaching the DLV to the top of the compressor f VALVE REMOVAL The preferred method of removing the solenoid valve is to cut the connection between the brazed section and the valve using a sm...

Page 141: ...g the coil and spacer Ensure to retain the spacer as it is required for proper operation of the valve Position coil away from valve body 8 Using a tubing cutter cut the DLV refrigerant line as marked in Figure 7 18 Figure 7 18 DLV Installation 9 Unbolt the valve from the mounting bracket and remove the valve assembly from the unit 10 Clean pipework stubs on both unit and valve assembly in preparat...

Page 142: ... the 24VAC side of transformer black wire and locate it away for the trans former d Jumper the black transformer wire to the KA6 wire removed from the connector e Connect power to unit and turn circuit breaker on DUV coil is now energized 4 Using a refrigerant recovery machine remove the refrigerant from the unit Refer to the Operation and Ser vice manual of the selected recovery machine for prope...

Page 143: ...wire to the KA plug at the controller 26 Weigh the proper refrigerant charge into the unit as per the units operation and service manual and perform a leak check of the system 27 Reposition and secure the wires and suction line insulation 28 Replace the guard under the control box 29 If changed under the units warranty tag part with unit information and cause of failure 30 If possible collect unit...

Page 144: ...breakers CB 1 and CB 2 are in the ON position If the circuit breakers do not hold in check voltage supply 3 There is no internal protector for this transformer design therefore no checking of the internal protector is required 4 Using a voltmeter and with the primary supply circuit ON check the primary input voltage 460 VAC Next check the secondary output voltage 230 VAC The transformer is defecti...

Page 145: ...l dissipate any potential static buildup on the body The dissipation mat will provide a static free work surface on which to place and or ser vice the modules 2 Disconnect and secure power to the unit 3 Place strap on wrist and attach the ground end to any exposed unpainted metal area on the refrigeration unit frame bolts screws etc 4 Carefully remove the module Do not touch any of the electrical ...

Page 146: ...en or closed TP 8 Not used in this application TP 9 The chassis unit frame ground connection TP 10 Enables the user to check if the heat termination thermostat HTT contact is open or closed Figure 7 21 Controller Section of the Control Box 7 24 3 Controller Programming Procedure CAUTION The unit must be OFF whenever a programming card is inserted or removed from the controller programming port 1 T...

Page 147: ...ler memory The sta tus LED will flash quickly and the display will remain blank as the controller loads the new software When complete the controller will reset and power up normally 11 Wait for default display setpoint on the left and control temperature on the right 12 Confirm software is correct using keypad code select 18 to view Cd18 XXXX 13 Turn power off Operational software is loaded Proce...

Page 148: ...rrent field and move to the next value the CODE SELECT key will allow modification of the previous value 6 Press the ENTER key on the keypad The date and time will not be committed until start up procedures are completed on the next power up Procedure for Setting the Container ID NOTICE The characters will be preset to the container ID already on the controller If none exist the default will be AA...

Page 149: ...ve both the high voltage shield and clear plastic rain shield if installed 3 Disconnect the battery wires from the KA plug positions 14 13 11 4 Using Driver Bit Carrier Transicold part number 07 00418 00 remove the 4 screws securing the display module to the control box Disconnect the ribbon cable and set the display module aside NOTICE The battery wires must face toward the right 5 Remove the old...

Page 150: ...ll sensor if it is not continue with the following 3 Turn unit OFF and disconnect power supply 4 Refer to Section 7 24 and remove controller to gain access to the sensor plugs 5 Using the plug connector marked EC that is connected to the back of the controller locate the sensor wires RRS RTS SRS STS AMBS DTS or CPDS as required Follow those wires to the connector and using the pins of the plug mea...

Page 151: ...3 9 165 1 537 26 7 16 144 200 5 5 42 24 700 37 8 100 5 828 76 7 170 1 402 25 6 14 134 800 6 6 44 23 390 38 9 102 5 571 79 4 175 1 281 24 4 12 126 100 7 7 46 22 160 40 0 104 5 327 82 2 180 1 171 23 3 10 118 100 8 9 48 20 990 41 1 106 5 095 85 0 185 1 072 22 2 8 110 500 10 50 19 900 42 2 108 4 874 87 8 190 983 21 1 6 103 600 11 1 52 18 870 43 3 110 4 665 90 6 195 902 20 4 97 070 12 2 54 17 900 44 4 ...

Page 152: ...94 8 1 753 8 17 6 426 904 70 158 0 15 067 148 298 4 1 670 6 21 2 383 706 72 161 6 14 078 150 302 0 1 591 4 24 8 345 315 74 165 2 13 158 152 305 6 1 508 2 28 4 311 165 76 168 8 12 306 154 309 2 1 430 0 32 0 280 824 78 172 4 11 524 156 312 8 1 362 2 35 6 253 682 80 176 0 10 793 158 316 4 1 302 4 39 2 229 499 82 179 6 10 122 160 320 0 1 247 6 42 8 207 870 84 183 2 9 494 162 323 6 1 193 8 46 4 188 494...

Page 153: ...tubing over the cable and place the two small pieces of heat shrink tubing one over each wire before adding crimp fittings as shown in Figure 7 23 Figure 7 23 Sensor and Cable Splice 7 If required slide the cap and grommet assembly onto the replacement sensor 8 Slip crimp fittings over dressed wires keeping wire colors together Make sure wires are pushed into crimp fittings as far as possible and ...

Page 154: ...e alarms refer to Section 5 8 7 25 3 Sensors STS and SRS Re Installation To properly position a unit supply sensor Supply Temperature Sensor STS or Supply Recorder Sensor SRS the sensor must be fully inserted into the probe holder This positioning will give the sensor the optimum amount of exposure to the supply air stream and will allow the Controller to operate correctly Insufficient probe inser...

Page 155: ...ated in a tube holder under insulation as illustrated in Figure 7 26 When the combo sensor is removed and reinstalled it must be placed in a tube holder by applying thermal grease Insulating material must completely cover the sensor to ensure the correct temperature is sensed Figure 7 26 Evaporator Temperature Sensor Positioning 7 25 7 Sensor CPDS Re Installation To replace the Compressor Discharg...

Page 156: ... or the panel is defective To confirm a defective panel assure that the wing nut is secure and then power cycle the unit If the alarm immedi ately reappears as active the panel should be replaced The alarm should immediately go inactive check the 4 minute stability requirement If the alarm reoccurs after the four minutes and the panel was known to have been stable then the sensor should be replace...

Page 157: ... to the following sections to check out the controller To check with a SMA 12 portable stepper drive tester The SMA 12 portable stepper drive tester Carrier Transicold P N 07 00375 00 is a battery operated stepper drive which will open and close the auto slide which allows a more thorough check of the motor Checking the Slide Motor 1 Turn unit OFF 2 Disconnect the four pin connector from the Stepp...

Page 158: ...tive lead to pin B or TP 9 of the controller 4 Turn ON the unit for 40 seconds and watch the voltmeter There should be approximately 24 to 32 VDC shown on pin A 5 There should be zero volts on pin B 6 After a short delay the reading should rise to approximately 24 to 32 VDC on pin E 7 Pins C and D will have zero to 5 volts transistor logic TTL signals present however this can only be checked with ...

Page 159: ...the replacement motor cup assembly in the panel using original screws Torque screws to 0 29 mkg 25 1 Inch pounds 6 Reapply sealer to the inside and the outside of the motor cup assembly 7 Mount the upper lower rails slide plate and gasket plate using original hardware Apply thread sealant and torque screws to 0 29 mkg 25 1 Inch pounds 8 Mount grille assembly using original hardware Apply thread se...

Page 160: ...g kit Carrier Transicold part number 76 00685 00 must be installed Installation instructions are packaged with the kit To Install the Module WARNING Installation requires wiring to the main unit circuit breaker CB1 Make sure the power to the unit is off and power plug disconnected before beginning installation 1 CB1 is connected to the power system see wiring schematic Ensure that the unit power i...

Page 161: ... 0 20 70 21 71 1 490 2 5 00 4 90 6 21 3 7 25 5 0 26 0 26 75 24 78 7 542 6 5 53 5 43 4 20 4 6 31 7 0 32 0 32 80 27 86 7 597 8 6 10 5 98 2 19 5 6 36 6 0 39 0 39 85 29 95 3 657 1 6 70 6 57 0 18 6 5 44 8 0 46 0 45 90 32 104 3 719 1 7 33 7 19 2 17 7 6 52 4 0 53 0 52 95 35 114 0 786 0 8 01 7 86 4 16 8 6 59 3 0 60 0 59 100 38 124 2 856 4 8 73 8 56 6 14 9 7 66 9 0 68 0 67 105 41 135 0 930 8 9 49 9 31 8 13...

Page 162: ...3 10 24 23 1 9 2 6 1 4 20 75 6 3 8 5 5 16 18 132 11 14 9 3 8 16 240 20 27 1 7 16 14 372 31 42 1 2 13 516 43 58 3 9 16 12 684 57 77 3 5 8 11 1104 92 124 7 3 4 10 1488 124 168 1 Non Free Spinning Locknuts etc 1 4 20 82 5 6 9 9 3 5 16 18 145 2 12 1 16 4 3 8 16 264 22 0 29 8 7 16 14 409 2 34 1 46 2 1 2 13 567 6 47 3 64 1 9 16 12 752 4 62 7 85 5 8 11 1214 4 101 2 137 2 3 4 10 1636 8 136 4 184 9 ...

Page 163: ...CONTACTOR HIGH SPEED SHORTING M2 FLA FULL LOAD AMPS HPS HIGH PRESSURE SWITCH Gï9 HR HEATER CONTACTOR Nï7 Lï15 HS HUMIDITY SENSOR OPTIONAL Fï23 HTT HEAT TERMINATION THERMOSTAT Eï15 SYMBOL DESCRIPTION ICF INTERROGATOR CONNECTOR FRONT Tï23 ICR INTERROGATOR CONNECTOR REAR Tï24 IP INTERNAL PROTECTOR Eï14 Fï11 Gï14 IRL IN RANGE LIGHT OPTION Kï15 LC CONDENSER FAN CONTACTOR LOW SPEED K15 OS O2 SENSOR H24 ...

Page 164: ...T 365 8 2 Figure 8 2 Unit Wiring Diagram Based on Drawing 62ï11755 ...

Page 165: ...8 3 T 365 Figure 8 3 Wiring Diagram Based on Drawing 62ï11755 ...

Page 166: ...T 365 8 4 Figure 8 4 Wiring Diagram Based on Drawing 62ï11755 ...

Page 167: ... O ࣖ 䜞Ԭ O O O O O O 傢䗴θু㕟ᵰф伄 㓺Ԭ O O O O O O ᓜ ᗤ ಞ 㔕 X O O O O O ᯣ䐥ಞф 䀜ಞ O O O O O O ুಞ O O O O O O Ֆ ಞ X O O O O O 䙐䇥㓺Ԭ O O O O O O 䰶㓺Ԭ X O O O O O 㔼㓵 Ⓠ O O O O O O O O X O O O ḽㆴф㔓㕎ᶆᯏ O O O O O O 䜞Ԭ X O O O O O ᵢ㺞Ṳ ᦤד SJ T 11364 Ⲻ㿺ᇐ㕌 Ⱦ Oφ㺞 䈛ᴿᇩ 䍞 䈛䜞Ԭᡶᴿൽ䍞ᶆᯏѣⲺ 䠅ൽ GB T 26572 㿺ᇐⲺ䲆䠅㾷 ԛсȾ Xφ㺞 䈛ᴿᇩ 䍞㠩ቇ 䈛䜞ԬⲺḆжൽ䍞ᶆᯏѣⲺ 䠅䎻 GB T 26572 㿺ᇐⲺ䲆䠅㾷 Ⱦ 62 66122 00 Rev A ...

Page 168: ......

Page 169: ...mote Monitoring Receptacle 5 6 Connection To 190 230 VAC Power 5 1 Connection To 380 460 VAC Power 5 1 Control Box 2 1 Control Box Section 3 5 Controller 2 3 4 3 7 29 Controller Alarm Indications 4 39 Controller Alarms 4 15 Controller Configuration Variables 4 24 Controller Function Codes 4 26 Controller Pre Trip Test Codes 4 53 Controller Sequence and Modes of Operation 4 5 Controller Software 4 ...

Page 170: ...intenance Precautions 1 1 Manifold Gauge Set 7 1 O Operating Precautions 1 1 Operational Software Cd Function Codes 4 4 Option Descriptions 2 2 P Perishable Dehumidification 4 6 Perishable Dehumidification Bulb Mode 4 7 Perishable Economy 4 7 Perishable Heating 4 6 Perishable Idle Air Circulation 4 5 Perishable Mode System Pressure Regulation 4 15 Perishable Mode Trim Heat 4 9 Perishable Mode Cool...

Page 171: ...7 38 Service Connections 7 2 Servicing the eAutoFresh Air Filter 7 41 Servicing the eAutoFresh Drive System 7 43 Specific Hazard Statements 1 1 Standard Operation 3 9 Start Temperature Recorder DataCORDER 5 7 Start Up Compressor Bump Start 4 5 Start Up Compressor Phase Sequence 4 5 Starting and Stopping Instructions 5 6 Starting the Unit 5 7 Start Up Inspection 5 7 Stopping the Unit 5 7 T Temperat...

Page 172: ......

Page 173: ......

Page 174: ...ng Industrial Systems a business unit of United Technologies Corporation Stock symbol UTX Carrier Transicold Division Carrier Corporation P O Box 4805 Syracuse NY 13221 USA www carrier transicold com Original Instructions ...

Reviews: