background image

6

1

T-364

SECTION 6

SERVICE

NOTE

Use a refrigerant recovery system whenever

removing refrigerant. When working with refrig-

erants you must comply with all local govern-

ment environmental laws. In the U.S.A., refer to

EPA section 608.

WARNING

EXPLOSION HAZARD Failure to follow this

WARNING can result in death, serious

personal injury and / or property damage.
Never use air or gas mixtures containing

oxygen (O

2

) for leak testing or operating the

product.
Charge only with R

134a: Refrigerant must

conform to AHRI Standard 700

specification.

6.1 SECTION LAYOUT

Service procedures are provided in this section

beginning with refrigeration system service, then

refrigeration system component service, electrical

system service, temperature recorder service and

general service. Refer to the Table of Contents to locate

specific topics.

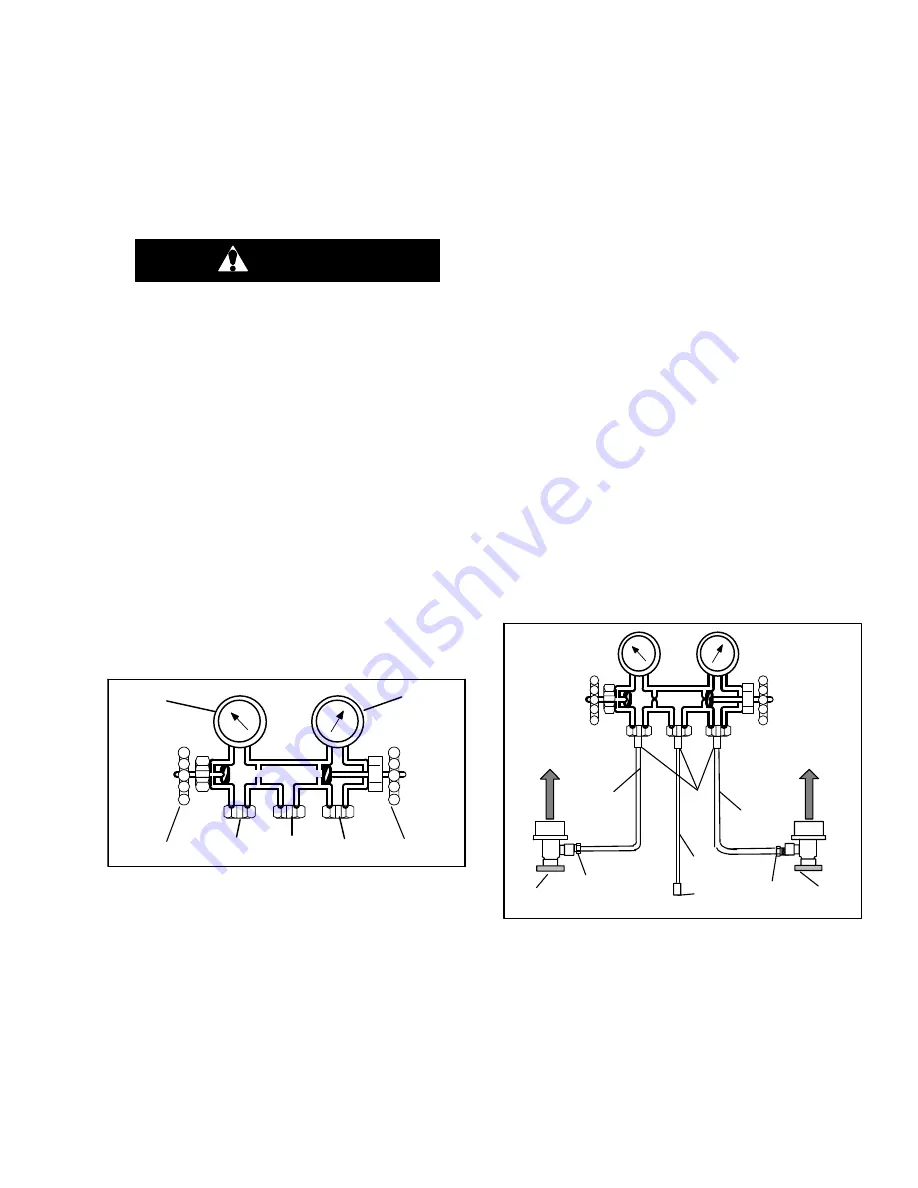
6.2 MANIFOLD GAUGE SET

The manifold gauge set (see Figure 6

1) is used to

determine system operating pressure, add refrigerant

charge, and to equalize or evacuate the system.


1

2

3

4

5

6

7

1. Suction Pressure Valve (shown backseated)

2. Suction Pressure Gauge

3. Discharge Pressure Gauge

4. Discharge Pressure Valve (shown frontseated)

5. High Side Connection

6. Utility Connection to:

a. Refrigerant cylinder

b. Vacuum Pump

c. Oil Container

7. Low Side Connection

Figure 6

1 Manifold Gauge Set

When the Suction Pressure Valve (1) is frontseated

(turned all the way in), the suction (low) pressure can be

checked at the Suction Pressure Gauge (2).

When the Discharge Pressure Valve (4) is frontseated,

the discharge (high) pressure can be checked at the

Discharge Pressure Gauge (3).
When both valves are backseated (all the way out), high

pressure vapor will flow into the low side.
When the Suction Pressure Valve (1) is open and the

Discharge Pressure Valve (4) shut, the system can be

charged through the Utility Connection (6). Oil can also

be added to the system.
A R-134a manifold gauge/hose set with self-sealing ho-

ses (see Figure 6

2) is required for service of the mod-

els covered within this manual. The manifold gauge/

hose set is available from Carrier Transicold. (Carrier

Transicold part number 07-00294-00, which includes

items 1 through 6, Figure 6

2.)

If the manifold gauge/hose set is new or was exposed to

the atmosphere, it will need to be evacuated to remove

contaminants and air as follows:
1. Backseat (turn counterclockwise) both field service

couplings (see Figure 6

2) and midseat both hand

valves.

2. Connect the yellow hose to a vacuum pump and re-

frigerant 134a cylinder.

3. Evacuate to 10 inches of vacuum and then charge

with R-134a to a slightly positive pressure of 0.1 kg/

cm

2

 (1.0 psig).

4. Frontseat both manifold gauge set valves and dis-

connect from cylinder. The gauge set is now ready

for use.

Â

Â

ÂÂ

ÂÂ

Â

Â

To High Side
Access Valve

Â

4

1

4

5

7

3

To Low Side
Access Valve

2

2

6

1. RED Refrigeration and/or Evacuation Hose

 (SAE J2196/R-134a)

2. Hose Fitting (0.5-16 Acme)

3. YELLOW Refrigeration and/or Evacuation Hose

 (SAE J2196/R-134a)

4. Hose Fitting with O-ring (M14 x 1.5)

5. High Side Field Service Coupling (Red Knob)

6. BLUE Refrigeration and/or Evacuation Hose

 (SAE J2196/R-134a)

7. Low Side Field Service Coupling (Blue Knob)

Figure 6

2 R-134a Manifold Gauge/Hose Set

Summary of Contents for 69NT40-561-201

Page 1: ...T 364 Rev A OPERATION SERVICE MANUAL For 69NT40 561 201 Evergreen Container Refrigeration Units Container Refrigeration ...

Page 2: ......

Page 3: ...OPERATION AND SERVICE MANUAL CONTAINER REFRIGERATION UNIT Model 69NT40 561 201 Carrier Corporation 2021 Printed in U S A March 2021 ...

Page 4: ...n 1 1 1 3 8 Plate Set 1 1 1 3 9 Battery 1 1 1 3 10 Dehumidification 1 1 1 3 11 USDA 1 1 1 3 12 Interrogator 1 1 1 3 13 Remote Monitoring 1 1 1 3 14 Communications Interface Module 1 2 1 3 15 Gutters 1 2 1 3 16 Handles 1 2 1 3 17 Back Panels 1 2 1 3 18 460 Volt Cable 1 2 1 3 19 Cable Restraint 1 2 1 3 20 Upper Air Fresh Air Make Up 1 2 1 3 21 Labels 1 2 1 3 22 Controller 1 2 1 3 23 Condenser Grille...

Page 5: ...Pulldown 3 4 3 3 5 Perishable Steady State 3 4 3 3 6 Perishable Idle Air Circulation 3 4 3 3 7 Perishable Heating 3 4 3 3 8 Perishable Dehumidification 3 5 3 3 9 Perishable Mode Cooling Sequence of Operation 3 6 3 3 10 Perishable Mode Heating Sequence of Operation 3 7 3 3 11 Perishable Mode Trim Heat 3 7 3 3 12 Frozen Mode Temperature Control 3 7 3 3 13 Frozen Steady State 3 7 3 3 14 Frozen Idle M...

Page 6: ...arms 3 17 3 7 14 ISO Trip Header 3 17 3 8 CONTROLLER CONFIGURATION VARIABLES 3 18 3 9 CONTROLLER FUNCTION CODES 3 19 3 10 CONTROLLER ALARM INDICATIONS 3 26 3 11 CONTROLLER PRE TRIP TEST CODES 3 34 OPERATION 4 1 4 1 INSPECTION Before Loading 4 1 4 2 CONNECT POWER 4 1 4 2 1 Connection To 380 460 VAC Power 4 1 4 3 ADJUST FRESH AIR MAKEUP VENT 4 1 4 3 1 Upper Fresh Air Makeup Vent 4 1 4 3 2 Vent Posit...

Page 7: ...ICE 6 1 6 1 SECTION LAYOUT 6 1 6 2 MANIFOLD GAUGE SET 6 1 6 3 SERVICE CONNECTIONS 6 2 6 4 PUMP DOWN THE UNIT 6 2 6 5 REFRIGERANT LEAK CHECKING 6 3 6 6 EVACUATION AND DEHYDRATION 6 3 6 6 1 General 6 3 6 6 2 Preparation 6 3 6 6 3 Complete System 6 3 6 6 4 Partial System 6 4 6 7 REFRIGERANT CHARGE 6 4 6 7 1 Checking the Refrigerant Charge 6 4 6 7 2 Adding Refrigerant to System Full Charge 6 4 6 7 3 A...

Page 8: ...1 6 17 ECONOMIZER SOLENOID VALVE 6 12 6 18 ECONOMIZER EXPANSION VALVE 6 12 6 18 1 Economizer Expansion Replacement 6 12 6 19 DIGITAL UNLOADER VALVE 6 13 6 20 VALVE OVERRIDE CONTROLS 6 14 6 21 CONTROLLER 6 15 6 21 1 Handling Modules 6 15 6 21 2 Controller Troubleshooting 6 15 6 21 3 Programming Procedure 6 15 6 21 4 Removing and Installing a Controller 6 17 6 21 5 Battery Replacement 6 17 6 22 TEMP...

Page 9: ...r Fresh Air Make Up Flow Chart 4 2 Figure 6 1 Manifold Gauge Set 6 1 Figure 6 2 R 134a Manifold Gauge Hose Set 6 1 Figure 6 3 Service Valve 6 2 Figure 6 4 Refrigeration System Service Connections 6 3 Figure 6 5 Compressor Kit 6 5 Figure 6 6 High Pressure Switch Testing 6 6 Figure 6 7 Heater Arrangement 6 9 Figure 6 8 Evaporator Fan Assembly 6 10 Figure 6 9 Electronic Expansion Valve 6 11 Figure 6 ...

Page 10: ...ontroller Function Codes 3 19 Table 3 6 Controller Alarm Indications 3 26 Table 3 7 Controller Pre trip Test Codes 3 34 Table 3 8 DataCORDER Function Code Assignments 3 40 Table 3 9 DataCORDER Pre trip Result Records 3 41 Table 3 10 DataCORDER Alarm Indications 3 42 Table 6 1 Valve Override Control Displays 6 14 Table 6 2 Sensor Resistance 6 18 Table 6 3 Sensor Resistance CPDS 6 19 Table 6 4 R 134...

Page 11: ......

Page 12: ...it or contain er disconnect all wire harness connectors from the modules in control boxes Do not remove wire harness from the modules unless you are grounded to the unit frame with a static safe wrist strap In case of electrical fire open circuit switch and extin guish with CO2 never use water SPECIFIC WARNING AND CAUTION STATEMENTS To help identify the label hazards on the unit and explain the le...

Page 13: ...g to the main unit circuit breaker CB1 Make sure the power to the unit is off and power plug disconnected before beginning installation CAUTION Charge receiver according to nameplate specifications to ensure optimal unit per formance CAUTION Do not remove wire harnesses from con troller modules unless you are grounded to the unit frame with a static safe wrist strap CAUTION Unplug all controller m...

Page 14: ...e set be sure set is brought to suction pressure before disconnecting CAUTION The scroll compressor achieves low suction pressure very quickly Do not use the compressor to evacuate the system below 0 psig Never operate the compressor with the suction or discharge service valves closed frontseated Internal damage will result from operating the compressor in a deep vacuum CAUTION Take necessary step...

Page 15: ......

Page 16: ...it is fitted with suction and discharge refrigerant temperature sensors The sensor readings may be viewed on the controller display 1 3 3 Pressure Readout The unit is fitted with evaporator suction and discharge pressure transducers The transducer readings may be viewed on the controller display 1 3 4 Compressor The unit is fitted with a scroll compressor equipped with suction and discharge servic...

Page 17: ... bungee cord style cable restraint is available for storage of the power cables 1 3 20 Upper Air Fresh Air Make Up The unit is fitted with an upper fresh air makeup assembly The fresh air makeup assembly is equipped with a vent positioning sensor VPS 1 3 21 Labels Safety Instruction and Function Code listing labels are supplied in English and Traditional Chinese 1 3 22 Controller Two replacement c...

Page 18: ... ventilation for commodities that require fresh air circula tion A manually operated venting system is located in the upper left access panel 1 2 4 10 14 11 8 9 15 16 5 6 7 12 13 3 1 Access Panel Evap Fan 1 2 Fork Lift Pockets 3 Control Box 4 Unit Display 5 Control Panel 6 Remote Monitoring Receptacle 7 Start Stop Switch ST 8 Compressor 9 Compressor Cover 10 Supply Temperature Supply Recorder Sens...

Page 19: ...llustration or by removing the evaporator fan access panels see Figure 2 1 1 2 3 4 5 6 7 8 9 10 11 12 13 1 Evaporator Fan Motor 1 EM1 2 Return Recorder Sensor Temperature Sensor RRS RTS 3 Humidity Sensor HS 4 Evaporator Fan Motor 2 EM2 5 Evaporator Coil Heaters Underside of Coil 6 Evaporator Coil 7 Electronic Expansion Valve EEV 8 Evaporator Temperature Sensors Location ETS1 ETS2 9 Interrogator Co...

Page 20: ... com pressor 1 2 3 4 5 6 7 8 9 10 11 12 13 14 15 COMPRESSOR COVER REMOVED FOR CLARITY 1 Compressor 2 Compressor Discharge Temperature Sensor CPDS Location 3 Discharge Connection 4 Suction Connection Location 5 Compressor Terminal Box 6 Oil Drain Location 7 Economizer Connection 8 Discharge Pressure Transducer DPT 9 Digital Unloader Valve DUV 10 Suction Pressure Transducer SPT 11 Evaporator Pressur...

Page 21: ...ser fan pulls air from around the coil and dis charges it horizontally through the condenser fan grille 1 2 3 4 6 7 8 9 10 11 13 14 5 12 Two locations 1 Grille and Venturi Assembly 2 Condenser Fan 3 Condenser Coil Cover 4 Condenser Coil 5 Condenser Fan Motor 6 Receiver 7 Sight Glass 8 Filter Drier 9 Economizer 10 Economizer Solenoid Valve ESV 11 Economizer Expansion Valve 12 Warning Label location...

Page 22: ...le will respond to communication and return information over the ships main power line Refer to the master system technical manual for further information CF ES EF HW CH PA PB HR 1 2 3 4 10 12 15 6 13 11 14 9 5 7 8 1 Compressor Contactor CH 2 Compressor Phase A Contactor PA 3 Compressor Phase B Contactor PB 4 Heater Contactor HR 5 Terminal Block HW 6 Controller DataCORDER Module Controller 7 Remot...

Page 23: ...re Switch Cut Out 25 1 0 kg cm2 356 10 psig Cut In 18 0 7 kg cm2 256 10 psig WARNING EXPLOSION HAZARD Failure to follow this WARNING can result in death serious personal injury and or property damage Never use air or gas mixtures containing oxygen O2 for leak testing or operating the product Charge Only With R 134a Refrigerant must conform to AHRI Standard 700 specification f Refrigerant R 134a Co...

Page 24: ...gh Speed 1 07 9 Full Load Amps Low Speed 0 47 0 47 Nominal Horsepower High Speed 0 36 0 63 Nominal Horsepower Low Speed 0 05 0 8 Rotations Per Minute High Speed 2850 rpm 3450 rpm Rotations Per Minute Low Speed 1425 rpm 1725 rpm Voltage and Frequency Tolerance 360 460 VAC 1 25 Hz 400 500 VAC 1 5 Hz Bearing Lubrication Factory lubricated additional grease not required Rotation CW when viewed from sh...

Page 25: ... following safety devices open a circuit breaker s b fuse F3A F3B 7 5A or c evaporator fan motor in ternal protector s IP Table 2 1 Safety and Protective Devices UNSAFE CONDITION DEVICE DEVICE SETTING Circuit Breaker CB 1 25 amp Manual Reset Trips at 29 amps 460 VAC Excessive current draw in the control circuit Fuse F3A F3B 7 5 amp rating Excessive current draw by the controller Fuse F1 F2 5 amp r...

Page 26: ...im heat mode of operation during which the controller will pulse the evaporator heaters in sequence with the com pressor digital signal in order to absorb the excess capa city 2 5 2 Economized Operation In the economized mode see Figure 2 7 the frozen and pull down capacity of the unit is increased by sub cooling the liquid refrigerant entering the electronic ex pansion valve Overall efficiency is...

Page 27: ... ECONOMIZER TXV ELECTRONIC EXPANSION VALVE DIGITAL UNLOADER VALVE ECONOMIZER RECEIVER COMPRESSOR SIGHT GLASS LIQUID LEVEL MOISTURE INDICATOR STANDARD OPERATION DISCHARGE PRESSURE TRANSDUCER DISCHARGE TEMPERATURE SENSOR ECON TXV SENSING BULB EVAPORATOR PRESSURE TRANSDUCER SUCTION PRESSURE TRANSDUCER Figure 2 6 Refrigeration Circuit Schematic Standard Operation ...

Page 28: ...ECONOMIZER TXV ELECTRONIC EXPANSION VALVE DIGITAL UNLOADER VALVE ECONOMIZER RECEIVER COMPRESSOR SIGHT GLASS LIQUID LEVEL MOISTURE INDICATOR ECONOMIZED OPERATION DISCHARGE PRESSURE TRANSDUCER DISCHARGE TEMPERATURE SENSOR ECON TXV SENSING BULB EVAPORATOR PRESSURE TRANSDUCER SUCTION PRESSURE TRANSDUCER Figure 2 7 Refrigeration Circuit Schematic Economized Operation ...

Page 29: ......

Page 30: ... of the DataCORDER software is provided in paragraph 3 7 The keypad and display module serve to provide user access and readouts for both of the controller functions temperature control and DataCORDER The functions are accessed by keypad selections and viewed on the display module The components are designed to permit ease of installation and removal TO DISPLAY CONTROL MODULE DISPLAY MODULE KEYPAD...

Page 31: ...ge or scroll a selection up Pre trip advance or test interrupt Arrow Down Change or scroll selection down ward Pre trip repeat backward RETURN SUPPLY Display non controlling probe tem perature momentary display Celsius Fahrenheit Display alternate English Metric scale momentary display When set to F pressure is displayed in psig and vacuum in hg P ap pears after the value to indicate psig and i ap...

Page 32: ... of set point and supply or return air temperatures c Provide ability to read and if applicable modify the configuration software variables operating software Function Codes and Alarm Code indications d Provide a Pre trip step by step checkout of refrigera tion unit performance including proper component operation electronic and refrigeration control opera tion heater operation probe calibration p...

Page 33: ...ose Relays TS TQ TN TE and TV will be de energized opened The res ult of this action will close the ESV and shut all fans off The compressor will start for 1 second then pause for five seconds This sequence will be repeated two more times After the final bump start the unit will pre position the EEV to the correct starting position pause and start up 3 3 3 Perishable Mode Temperature Control In Pe...

Page 34: ...eater debounce timer three minutes has timed out 4 Heater termination thermostat HTT is closed If the above conditions are true for at least one hour the evaporator fans will switch from high speed to low speed Evaporator fan speed will then switch every hour as long as the 4 conditions are met If any condition except item 1 becomes false OR if the relative humidity sensed is 2 below the dehumidif...

Page 35: ...ly air temper ature approaches set point See Figure 3 5 d When unloaded cooling starts EEV control will trans ition from a full cool superheat set point to a lower modulated cool superheat set point Once unloading starts the EEV controls evaporator superheat based on the system duty cycle where instantaneous super heat will vary e When the supply air temperature has fallen to within 1 9 C 3 4 F of...

Page 36: ... energize the evaporator heaters in sequence with the compressor digital signal 3 3 12 Frozen Mode Temperature Control In Frozen Mode the controller maintains the return air temperature at set point the yellow RETURN indicator light is illuminated and the default reading on the display window is the return temperature sensor RTS reading When the return air temperature enters the in range temperatu...

Page 37: ...essor motor CH economizer solenoid valve ESV low speed evaporator fan motors ES ener gized and the blue COOL light illuminated See Figure 3 9 b When the return air temperature decreases to a pre determined tolerance above set point the green IN RANGE light is illuminated c When the return air temperature decreases to 0 2 C 0 4 F below set point contacts TC TS and TN are opened to de energize the c...

Page 38: ...he time interval to 12 hours for the first two defrosts and then adjust to 24 hours thereafter All defrost interval times reflect the number of com pressor run time hours since the last defrost cycle The minimum defrost interval in the automatic setting is three hours while the maximum is 24 refer to Section 3 3 19 Defrost Intervals for more information In frozen mode the amount of actual time nec...

Page 39: ... rises above the DTT set point The DTT is not a physical component It is a controller setting that acts as a thermostat closing allowing defrost when the DTS reading is below the set point and opening terminating or preventing defrost when the DTS temperature read ing is above set point The DTT set point is set to 25 6 C 78 F When a re quest for defrost is made through the manual defrost switch co...

Page 40: ...s greater than 43 3 C 110 F return air temperature is less than 17 5 C 5 F and the compressor discharge temper ature is greater than 117 7 C 244 F Dome temperature control logic will disengage when re turn air temperature and ambient temperature return to allowed limits or when the compressor turns off 3 4 5 Compressor Low Pressure Protection If the suction pressure low limit is triggered the DUV ...

Page 41: ... selections and viewed on the display module The unit is also fitted with interrogation connections see Figure 3 1 which may be used with the Carrier Transicold DataReader to download data A personal computer with Carrier Trans icold DataLINE software installed may also be used to download data and configure settings The DataCORDER consists of Configuration Software Operational Software Data Stora...

Page 42: ...anging the configuration to generic and selecting which data points to record may be done using the Carrier Transicold Data Retrieval Program 1 Control mode 2 Control temperature 3 Frequency 4 Humidity 5 Phase A current 6 Phase B current 7 Phase C current 8 Main voltage 9 Evaporator expansion valve percentage 10 Discrete outputs Bit mapped require special handling if used 11 Discrete inputs Bit ma...

Page 43: ...ll of Lading 1 Origin Origin Date Destination Discharge Date Comment DataLINE Tool Probe Calibration Readings USDA1 0 0 USDA2 0 0 USDA3 0 0 Cargo 0 0 Temperature Units Centigrade ________________________________________________________________________________________ May 31 2007 Setpoint 1 66 Container Serial 04189552 9 Sensors Logged at 15 Minute Interval Sensor Format Resolution Figure 3 11 Stan...

Page 44: ...nterrogation cable is plugged into an interrogation receptacle 3 External DC battery pack power A 12 volt battery pack may also be plugged into the back of the interrogation cable which is then plugged into an interrogation port No controller battery pack is required with this method 4 Real Time Clock demand The DataCORDER is equipped with a charged battery pack and when AC power is not present th...

Page 45: ...d at the rear left hand side of the unit Four or five re ceptacles are provided The four 3 pin receptacles are for the probes The 5 pin receptacle is the rear connec tion for the Interrogator The probe receptacles are sized to accept plugs with tricam coupling locking de vices A label on the back panel of the unit shows which receptacle is used for each probe The standard DataCORDER report display...

Page 46: ...Press the ENTER key The alarm list will clear and will be displayed 4 Press the ALARM LIST key AL will show on the left display and on the right display when there are no alarms in the list 5 Upon clearing of the alarm queue the alarm light will be turned off 3 7 14 ISO Trip Header DataLINE provides the user with an interface to view modify current settings of the ISO trip header through the ISO T...

Page 47: ...F28 Enable Bulb Mode NOr CnF31 Probe Check Std CnF32 Enable Single Evaporator Fan Option Not Allowed CnF33 Enable Snap Freeze OFF CnF34 Temperature Unit Display bOth CnF41 Enable Low DTT Setting Out CnF44 Autoslide Enable Out CnF45 Low Humidity Enabled Out CnF46 Quench Liquid Injection Valve Type nC 1 nc CnF47 Vent Position UP CnF49 OEM Reset Option OFF CnF51 Timed Defrost Disable 0 out CnF55 TXV ...

Page 48: ...isplay Cd11 Compressor Dis charge Temperature Compressor discharge temperature sensor reading using compressor dome tem perature is displayed Cd12 Compressor Suction Pressure Reading for evaporator pressure transducer EPT is shown on the left display Press ENTER at Cd12 to show reading for compressor suction port pressure on right display Cd14 Compressor Dis charge Pressure Compressor discharges p...

Page 49: ...rol is interrupted If the previous value or the new value is OFF the newly selected value will be used immediately If any Auto Pretrip sequence is initiated Cd27 will be set to AUTO unless CnF49 OEM Reset is set to Custom AND CnF64 Evaporator Fan Pulsing Logic con figuration variable is set to IN in which case Cd27 will be set to PuLS Cd28 Temperature Units Degrees C or Degrees F This code determi...

Page 50: ...L55 Cd38 will display the supply recorder sensor reading Cd39 Secondary Return Temperature Sensor Cd39 will display the current return recorder sensor RRS reading for units con figured for four probes If the unit is configured with a DataCORDER Cd39 will display If the DataCORDER suffers a failure AL55 Cd39 will display the return recorder sensor reading Cd40 Container Identification Number If a v...

Page 51: ...n the unit has a perishable setpoint and Economy Mode is active at the start of each cooling or heating cycle high speed evaporator fans will run for 3 minutes After three minutes the evaporator fans will be switched to low speed any time that the supply temperature is within 0 25 C of the setpoint and the return temperature is less than or equal to the supply temperature the user se lected Cd47 v...

Page 52: ... interface reverts to normal system display and the current selection menu is cancelled but any previ ously committed changes are retained Available parameters and parameter ranges are a function of configuration op tions and previously selected parameters as indicated above Parameter with the exception of ASC may not be altered if Cd53 is re entered if ASC is On When ASC has completed including r...

Page 53: ...omplete control of the unit until pump down either succeeds or fails This operation can not be halted once it begins without power cycling the unit After pump down logic has been initiated the operator will be notified to close the Liquid Line Valve the display will flash between CLOSE LLV and PrESS EnTEr Once complete the display will read P dN to the left and the current suction pressure to the ...

Page 54: ...rrect all faults Yes Yes Yes Yes No Yes No Yes No No No No Correct Refrigerant issue Unit OK Yes No Refer to CONNECT POWER Section 4 2 Refer to CONNECT POWER Section 4 2 Refer to CONTROLLER SOFTWARE Section 3 2 Refer to Configuration Software Variables Section 3 2 1 Refer to Controller Alarm Indications Table 3 6 Refer to Pre trip Diagnostics Section 3 6 Refer to REFRIGERATION SYSTEM SERVICE Secti...

Page 55: ... of the keypad keys is continuously activity Keypad or Harness Power cycle the unit Resetting the unit may correct problem monitor the unit If the alarm reappears replace the keypad and harness AL07 Fresh Air Vent Open with Frozen Set Point The VPS is reading greater than 0 CMH while unit is in frozen mode Vent Position Sensor VPS Manually reposition vent and confirm using Cd45 Refer to VENT POSIT...

Page 56: ... REFRIGERATION SYSTEM SERVICE Section 6 3 Monitor Unit Alarm is display only the alarm may clear itself during operation If alarm remains active or is repetitive replace compressor at next available opportunity refer to COMPRESSOR Service Section 6 8 AL17 Compressor Pressure Delta Fault Compressor has attempted to start in both directions and fails to generate sufficient pressure differential betw...

Page 57: ...mperature High Discharge temperat ure exceeds 135 C 275 F for 10 minutes within the last hour Restrictions in the refrigeration system Ensure the Discharge Ser vice Valve is fully open Open the Discharge Ser vice Valve as needed Check the unit for air flow restrictions Clean or remove any debris from coils Non condens ables in the refri geration system With the unit off allow system to stabilize t...

Page 58: ... Shut down unit disconnect power check resistance of compressor windings at contactor T1 T2 T2 T3 Monitor unit if alarm remains active or is repetitive replace the compressor at the next available opportunity refer to COMPRESSOR Service Section 6 8 AL25 Condenser IP Condenser fan motor internal protector IP is open Insufficient Air Flow Shut down unit and check condenser fan for obstruc tions Remo...

Page 59: ... action is successful all alarms are inactive alarm 51 will be reset Power cycle the unit If the alarm persists it indicates defective controller memory Replace defective controller refer to Controller Service Section 6 21 AL52 EEPROM Alarm List Full Alarm list queue is full Active Alarms Repair any alarms in the queue that are active Indicated by AA Clear alarms refer to CONTROLLER ALARMS Section...

Page 60: ...e refer to Sensor Replacement Section 6 22 2 AL60 Defrost Temperature Sensor DTS Failure of the Defrost Temperature Sensor DTS to open Defrost Temperature Sensor DTS Test the DTS refer to Sensor Checkout Proced ure Section 6 22 1 Replace the DTS if defective refer to Sensor Replacement Section 6 22 2 AL61 Heater Current Draw Fault Improper current draw during heat or defrost mode Heater s While in...

Page 61: ...the humidity sensor wires have not been damaged Monitor replace HS if alarm persists AL69 Evaporator Temp Sensor ETS1 Evaporator Temperat ure Sensor ETS1 out of range Evaporator Tem perature Sensor ETS1 Test the ETS1 refer to Sensor Checkout Proced ure Section 6 13 2 Replace Evaporator Temperature Sensor ETS1 if defective AL70 Secondary Supply Sensor SRS Secondary Supply Sensor SRS is out of range...

Page 62: ...he controller program has stopped executing ERR 3 N A N A ERR 4 N A N A ERR 5 A D failure The controller s Analog to Digital A D converter has failed ERR 6 IO Board failure Internal program update failure ERR 7 Controller failure Internal version firmware incompatible ERR 8 DataCORDER failure Internal DataCORDER memory failure ERR 9 Controller failure Internal controller memory failure In the even...

Page 63: ...current draw test is in the range specified P1 1 Heaters Turned Off Heater starts in the off condition current draw is measured and then the heater is turned on After 15 seconds the current draw is measured again The change in current draw is then recorded Test passes if the change in current draw test is in the range specified P2 Tests Condenser Fan Current Draw Condenser fan is turned on then of...

Page 64: ...specified range NOTE If this test fails P5 0 and FAIL will be displayed If both Probe tests this test and the PRIMARY SECONDARY pass display will read P5 PASS P5 1 Supply Probe Test This test if for units equipped with secondary supply probe only The temperature difference between primary supply probe and secondary supply probe is compared Test passes if temperature comparison falls within the spe...

Page 65: ...stallation Verifica tion Test This is a Pass Fail test of humidity sensor installation sensor is present Test passes if Vout is greater than 0 20 Volts for the humidity sensor Test fails if Vout is less than 0 20 Volts for the humidity sensor Test P5 10 must pass before this test is run P5 12 Humidity Sensor Range Check Test This is a Pass Fail test of the Humidity Sensor Range Test passes if Vout...

Page 66: ...nly P7 Tests High Pressure Tests Unit is run at full capacity without condenser fan running to make sure that the HPS opens and closes properly P7 0 High Pressure Switch HPS Opening Test Test is skipped if sensed ambient temperature is less than 7 2 C 45 F return air temperature is less than 17 8 C 0 F or the water pressure switch is open With the unit running the condenser fan is turned off and a...

Page 67: ... 6 C 60 F The set point is changed to 0 C 32 F and a 180 minute timer is started The left display will read P8 1 the right display will show the supply air temperature The unit will then start to pull down the temperature to the 0 C set point The test passes if the container temperature reaches set point before the 180 minute timer expires P8 2 Perishable Mode Maintain Tempera ture Test Test P8 1 ...

Page 68: ...mer is started The control will then be placed in the equivalent of normal heating If the container temperature is above 7 2 C at the start of the test then the test proceeds immediately to test 10 1 During this test the control temperature will be shown on the right display The test fails if the 180 Minute timer expires before the control temperature reaches setpoint 0 3 C If the test fails it wi...

Page 69: ... Left 4 Right 4 The DataCORDER serial number consists of eight characters Function code dC26 contains the first four characters Function code dC27 contains the last four characters This serial number is the same as the controller serial number dC28 Minimum Days Left An approximation of the number of logging days remaining until the Data CORDER starts to overwrite the existing data dC29 Days Stored...

Page 70: ...arge Pressure Transducer Test Pass Fail Skip 6 3 Suction Pressure Transducer Test Pass Fail Skip 6 4 Compressor Current Draw Test Pass Fail Skip 6 5 Compressor Leak Test Pass Fail Skip 6 6 Economizer Valve Test Pass Fail Skip 6 7 Digital Unloader Valve Test Pass Fail Skip 6 10 Electronic Expansion Valve Test Pass Fail Skip 7 0 High Pressure Switch Closed Pass Fail Skip Result AMBS DPT or CPT if eq...

Page 71: ...l network data points An alarm number AL78 to AL85 is assigned to each configured point When an alarm occurs the DataCORDER must be interrogated to identify the data point assigned When a humidity sensor is installed it is usually assigned to AL78 dAL86 RTC Battery Low The real time clock RTC backup battery is too low to adequately maintain the RTC reading A real time clock failure is critical to ...

Page 72: ...start stop switch ST unit circuit breaker s and external power source WARNING Make sure the power plugs are clean and dry before connecting to power receptacle 4 2 1 Connection To 380 460 VAC Power 1 Make sure start stop switch ST on control panel and circuit breaker CB 1 in the control box are in position 0 OFF 2 Plug the 460 VAC yellow cable into a de energized 380 460 VAC 3 phase power source E...

Page 73: ...ected during the four minute stability period AL50 will be generated This provides the user with the ability to change the vent setting without generating multiple events in the DataCORDER 4 4 CONNECT REMOTE MONITORING RECEPTACLE If remote monitoring is required connect the remote monitor plug at the unit receptacle see Figure 2 5 When the remote monitor plug is connected to the re mote monitoring...

Page 74: ...ppear as AUtO in the display Otherwise AUtO1 will indicate the short sequence and AUtO2 will indicate the long sequence The test short sequence will run tests P0 through P6 The long test sequence will run tests P0 through P10 A detailed description of the Pre trip test codes is listed in Table 3 7 page 3 34 If no selection is made the Pre trip menu selection process will terminate automatically Ho...

Page 75: ... also run at the end of a defrost cycle the defrost light will remain on during this period If supply probes are within limits and return probes are within limits the unit will return to nor mal operation During normal operation the controller continuously monitors and compares adjacent temper ature probe readings The probe check procedure consists of running the evaporator fans for up to eight mi...

Page 76: ...ace Malfunction of current sensor Replace Compressor hums but does not start Low line voltage Check Single phasing Check Shorted or grounded motor windings 6 8 Compressor seized 6 8 5 2 UNIT OPERATES LONG OR CONTINUOUSLY IN COOLING Container Hot load Normal Defective box insulation or air leak Repair Refrigeration system Shortage of refrigerant 6 3 Evaporator coil covered with ice 5 6 Evaporator c...

Page 77: ...ostat open 6 13 Unit will not heat or has insuffi cient heat Heater s defective 6 13 Heater contactor or coil defective Replace Evaporator fan motor s defective or rotating backwards 6 13 6 14 Evaporator fan motor contactor defective Replace Controller malfunction 5 9 Defective wiring Replace Loose terminal connections Tighten Low line voltage 2 3 5 5 UNIT WILL NOT TERMINATE HEATING Unit fails to ...

Page 78: ...t charge 6 3 No evaporator air flow or restricted air flow 6 13 Excessive frost on evaporator coil 5 6 Evaporator fan s rotating backwards 6 14 3 EEV control malfunction Replace Failed digital unloader valve DUV Replace Suction and discharge pres sures tend to equalize when unit is operating Compressor operating in reverse 5 12 Compressor cycling stopped Check Failed digital unloader valve DUV Rep...

Page 79: ...ucer EPT Replace Suction service valve partially closed Open Filter drier partially plugged 6 12 Low refrigerant charge 6 3 No evaporator air flow or restricted air flow 6 13 Excessive frost on evaporator coil 5 6 Evaporator fan s rotating backwards 6 14 3 EEV control malfunction 6 16 Failed digital unloader valve DUV Replace Loose or insufficiently clamped sensor Replace High suction pressure wit...

Page 80: ...ABNORMAL TEMPERATURES High discharge temperature Condenser coil dirty 6 10 Condenser fan rotating backwards 6 11 Condenser fan inoperative 6 11 Refrigerant overcharge or noncondensibles 6 3 Discharge service valve partially closed Open Electronic expansion valve EEV control malfunction Replace Failed suction pressure transducer SPT or evaporator pressure transducer EPT Replace Discharge temperatur...

Page 81: ......

Page 82: ... 4 is frontseated the discharge high pressure can be checked at the Discharge Pressure Gauge 3 When both valves are backseated all the way out high pressure vapor will flow into the low side When the Suction Pressure Valve 1 is open and the Discharge Pressure Valve 4 shut the system can be charged through the Utility Connection 6 Oil can also be added to the system A R 134a manifold gauge hose set...

Page 83: ...oving the Manifold Gauge Set a While the compressor is still ON backseat the high side service valve b Midseat both hand valves on the manifold gauge set and allow the pressure in the manifold gauge set to be drawn down to low side pressure This returns any liq uid that may be in the high side hose to the system c Backseat the low side service valve Backseat both field service couplings and fronts...

Page 84: ...on system can have many undesirable effects The most common are cop per plating acid sludge formation freezing up of metering devices by free water and formation of acids resulting in metal corrosion 6 6 2 Preparation a Evacuate and dehydrate only after pressure leak test refer to Section 6 5 b Essential tools to properly evacuate and dehydrate any system include a vacuum pump 8 m3 hr 5 cfm volume...

Page 85: ...E Use a refrigerant recovery system whenever removing refrigerant When working with refrig erants you must comply with all local govern ment environmental laws In the U S A refer to EPA Section 608 a Connect the gauge manifold to the compressor dis charge and suction service valves b Bring the container temperature to approximately 0 C 32 F or below Then set the controller set point to 25 C 13 F c...

Page 86: ...e to the com pressor and slide the new compressor into the unit Refer to Figure 6 5 1 3 4 2 10 9 8 7 11 12 7 6 2 5 1 Compressor 2 Teflon Seal for Valve Connection 2 3 O Ring Unloader Connection 4 Compressor Dis charge Temperature Sensor 5 O Ring Economizer Connection 6 Base Mounting Bolts 7 SST Washers 8 Resilient Mount 9 Mylar Washers 10 Wire Ties 11 Power Cable Gasket 12 Ground Connection Screw ...

Page 87: ...g the self tapping grounding screw Close the compressor terminal box using the ter minal cover removed in step t u Backseat all service valves connect the power to the unit and run it for at least 20 minutes v Perform a leak check of the system 6 9 HIGH PRESSURE SWITCH 6 9 1 Checking High Pressure Switch WARNING Do not use a nitrogen cylinder without a pressure regulator NOTE The high pressure swi...

Page 88: ...ket and the first cable tie approx 150mm 6 from the side support bracket i Remove and retain sufficient putty from around the drain lines to allow the tubes to be slid back through the side support bracket j Remove filter drier k Unbraze the inlet connection to coil l Remove the cushion clamps securing the liquid line to the top and bottom receiver brackets retain all clamps and securing hardware ...

Page 89: ...n motor wiring CAUTION Take necessary steps place plywood over coil or use sling on motor to prevent motor from falling into condenser coil d Note the number of shims on each side of the motor as the same configuration will be required to refit the new motor e Remove the fan motor mounting hardware and re move motor f Loosely mount the new motor using new lock nuts g Connect the fan motor wiring t...

Page 90: ...efriger ant charge 6 13 2 Evaporator Heater Replacement The heaters are wired back to a terminal block If a heater failure occurs during a trip the heater set containing that heater may be disconnected at the terminal block When isolating an individual heater it is important to ensure it is disconnected from the terminal block and the heater contactor to isolate it completely The next Pre trip P1 ...

Page 91: ...ice can no longer be used as the blade is made up of a material that will be damaged It is recommended that an impact wrench be used when removing the blade Do not use the impact wrench when reinstalling as galling of the stainless steel shaft can occur b Apply Loctite to the 1 4 20 x 3 4 long bolts and torque to 0 81 mkg 70 inch pounds c Place one 5 8 flat washer on the shoulder of the fan motor ...

Page 92: ...e cleaner and surrounding area floor etc When rinsing where heavy foaming solution is present it is very important to take the time to thor oughly rinse the equipment and surroundings g Always rinse the empty coil cleaner bottle cap tightly and dispose of properly 6 16 ELECTRONIC EXPANSION VALVE The electronic expansion valve EEV is an automatic device which maintains required superheat of the ref...

Page 93: ...acer on the valve stem 2 Lubricate both o rings with silicone provided in the kit 3 Install bottom coil o ring on the valve stem 4 Install the solenoid coil on the valve stem 5 Place the top coil o ring on the coil mounting screw and secure the coil to the valve using a torque wrench Torque the screw to 25 in lbs 6 Connect coil wires using butt splices and heat shrink tubing 6 18 ECONOMIZER EXPANS...

Page 94: ... of the valve and the 12 VDC coil that needs to be re installed into the solenoid valve coil When re moving the coil it may fall out when lifted from the valve body Take care that the spacer is not lost the valve will not function correctly without it 4 Remove clamps holding the DUV to the discharge line 5 Loosen the nuts attaching the DUV to the top of the compressor 6 VALVE REMOVAL The preferred...

Page 95: ... a Press the CODE SELECT key then press an AR ROW key until Cd41 is displayed in the left window The right window will display a controller communica tions code b Press the ENTER key The left display will show a test name alternating with the test setting or time remain ing Use an ARROW key to scroll to the desired test Press the ENTER key SELCt will appear in the left display c Use an ARROW key t...

Page 96: ...tic mat e The strap should be worn during any service work on a module even when it is placed on the mat 6 21 2 Controller Troubleshooting A group of test points TP see Figure 6 13 are provided on the controller for troubleshooting electrical circuits see schematic diagram section 7 A description of the test points follows NOTE Use a digital voltmeter to measure AC voltage between TP s and ground ...

Page 97: ...ective card is being used the display will blink the message bAd CArd Turn start stop switch OFF and remove the card 7 Press the ENTER key on the keypad 8 The display module will go blank briefly and then dis play 551 00 based on the operational software installed 9 Press the UP or DOWN ARROW key to scroll through the list to obtain the proper model dash num ber If a defective card is being used t...

Page 98: ...tem 8 d Slide new battery pack and bracket into the control box slot e Reconnect battery wire connector to control box and replace wire ties that were removed 6 22 TEMPERATURE SENSOR SERVICE Service procedures for the return recorder return tem perature supply recorder supply temperature ambi ent defrost temperature evaporator temperature and compressor discharge temperature sensors are pro vided ...

Page 99: ... 73 9 165 1 537 26 7 16 144 200 5 5 42 24 700 37 8 100 5 828 76 7 170 1 402 25 6 14 134 800 6 6 44 23 390 38 9 102 5 571 79 4 175 1 281 24 4 12 126 100 7 7 46 22 160 40 0 104 5 327 82 2 180 1 171 23 3 10 118 100 8 9 48 20 990 41 1 106 5 095 85 0 185 1 072 22 2 8 110 500 10 50 19 900 42 2 108 4 874 87 8 190 983 21 1 6 103 600 11 1 52 18 870 43 3 110 4 665 90 6 195 902 20 4 97 070 12 2 54 17 900 44 ...

Page 100: ...1 753 8 17 6 426 904 70 158 0 15 067 148 298 4 1 670 6 21 2 383 706 72 161 6 14 078 150 302 0 1 591 4 24 8 345 315 74 165 2 13 158 152 305 6 1 508 2 28 4 311 165 76 168 8 12 306 154 309 2 1 430 0 32 0 280 824 78 172 4 11 524 156 312 8 1 362 2 35 6 253 682 80 176 0 10 793 158 316 4 1 302 4 39 2 229 499 82 179 6 10 122 160 320 0 1 247 6 42 8 207 870 84 183 2 9 494 162 323 6 1 193 8 46 4 188 494 86 1...

Page 101: ...Shrink Tubing 1 4 Heat Shrink Tubing 2 or 3 as required Figure 6 15 Sensor and Cable Splice g If required slide the cap and grommet assembly onto the replacement sensor h Slip crimp fittings over dressed wires keeping wire colors together Make sure wires are pushed into crimp fittings as far as possible and crimp with crimp ing tool i Solder spliced wires with a 60 tin and 40 lead Rosincore solder...

Page 102: ...allation Reinstall the return sensor Return Temperature Sensor RTS or Return Recorder Sensor RRS as shown in Figure 6 17 For proper placement of the return sensor be sure to position the enlarged positioning section of the sensor against the the side of the mounting clamp 1 50 in 38 1cm Mounting Clamp Return Sensor Figure 6 17 Return Sensor Positioning 6 22 5 Sensor DTS Re Installation The Defrost...

Page 103: ...real time via the Cd55 The fresh air vent position sensor alarm AL50 will oc cur if the sensor reading is not stable for four minutes or if the sensor is outside of its valid range shorted or open This can occur if the vent is loose or the panel is defective To confirm a defective panel assure that the wing nut is secure and then power cycle the unit If the alarm immediately reappears as active th...

Page 104: ...sioned a provision wiring kit Carrier Transicold part number 76 00685 00 must be installed Installation in structions are packaged with the kit To install the module WARNING Installation requires wiring to the main unit circuit breaker CB1 Make sure the power to the unit is off and power plug disconnected before beginning installation a CB1 is connected to the power system see wiring schematic Ens...

Page 105: ...1 28 22 6 19 9 137 2 1 40 1 37 24 4 21 4 147 6 1 50 1 48 26 3 22 9 157 9 1 61 1 58 Temperature Pressure F C psig kPa kg cm2 bar 28 2 24 5 168 9 1 72 1 69 30 1 26 1 180 0 1 84 1 80 32 0 27 8 191 7 1 95 1 92 34 1 29 6 204 1 2 08 2 04 36 2 31 3 215 8 2 20 2 16 38 3 33 2 228 9 2 33 2 29 40 4 35 1 242 0 2 47 2 42 45 7 40 1 276 5 2 82 2 76 50 10 45 5 313 7 3 20 3 14 55 13 51 2 353 0 3 60 3 53 60 16 57 4...

Page 106: ...in lbs 9 6 in lbs 20 in lbs 23 in lbs 75 in lbs 11 ft lbs 20 ft lbs 31 ft lbs 43 ft lbs 57 ft lbs 92 ft lbs 124 ft lbs 0 6 1 1 2 0 2 5 8 4 15 28 42 59 78 127 171 NONFREE SPINNING LOCKNUTS ETC 1 4 5 16 3 8 7 16 1 2 9 16 5 8 3 4 20 18 16 14 13 12 11 10 82 5 in lbs 145 2 in lbs 22 0 ft lbs 34 1 ft lbs 47 3 ft lbs 62 7 ft lbs 101 2 ft lbs 136 4 ft lbs 9 3 16 4 23 47 65 86 139 188 ...

Page 107: ...21 G 21 FLA FULL LOAD AMPS HPS HIGH PRESSURE SWITCH G 9 HR HEATER CONTACTOR N 7 L 15 HW HEATER CONTACTOR R 8 LEGEND SYMBOL DESCRIPTION HS HUMIDITY SENSOR OPTIONAL F 23 HTT HEAT TERMINATION THERMOSTAT E 15 ICF INTERROGATOR CONNECTOR FRONT T 23 ICR INTERROGATOR CONNECTOR REAR T 24 IP INTERNAL PROTECTOR E 14 F 11 G 14 IRL IN RANGE LIGHT OPTION K 15 PA UNIT PHASE CONTACTOR K 9 L 7 K 12 PB UNIT PHASE C...

Page 108: ...7 2 T 364 Based on Drawing 62 11753 Figure 7 2 SCHEMATIC DIAGRAM ...

Page 109: ...7 3 T 364 Based on Drawing 62 11753 Figure 7 3 UNIT WIRING DIAGRAM Sheet 1 of 2 ...

Page 110: ...7 4 T 364 Based on Drawing 62 11753 Figure 7 3 UNIT WIRING DIAGRAM Sheet 2 of 2 ...

Page 111: ......

Page 112: ... Power 4 1 Connecting the Remote Monitoring Receptacle 4 2 Control Box 1 1 Control Box Description 2 5 Controller 1 2 3 3 CONTROLLER ALARM INDICATIONS 3 26 Controller Alarms 3 11 Controller Alarm Codes 3 26 Controller Configuration Codes 3 18 Controller Function Codes 3 19 CONTROLLER PRE TRIP TEST CODES 3 34 Controller Service 6 15 CONTROLLER SOFTWARE 3 3 D DataBANK Card 3 16 DataCORDER 3 12 4 3 D...

Page 113: ... Control 3 7 Frozen Mode Cooling Sequence of Operation 3 8 Frozen Steady State 3 7 Fumigation 6 10 G General Unit Description 2 1 Generator Protection 3 11 Gutters 1 2 H Handles 1 2 Heater debounce timer 3 6 Heater Service 6 9 High Pressure Switch Service 6 6 High Temperature Low Pressure Protection 3 11 I Inspection 4 1 Interrogator 1 1 Introduction 1 1 ISO Trip Header 3 17 K Keypad 3 2 L Labels ...

Page 114: ... SERVICE CONNECTIONS 6 2 Software Programming Procedure 6 16 Standard Operation Refrigeration Circuit 2 9 Start up Compressor Bump Start 3 4 Start up Compressor Phase Sequence 3 4 Start Up Inspection 4 3 Starting Instructions 4 2 Stopping Instructions 4 3 STS SRS 2 1 Supply Temperature Supply Recorder Sensor 2 1 Surface corrosion 6 10 System Pressure Regulation 3 11 T Temperature Readout 1 1 Tempe...

Page 115: ......

Page 116: ......

Page 117: ...Carrier Transicold Division Carrier Corporation P O Box 4805 Syracuse NY 13221 USA https www carrier com container refrigeration ...

Reviews: