


10
Gas Heat (48HC)
Inspect the gas heat section of the unit. Verify the number of
burners match the number of heat exchanger openings and the
burner assembly is properly aligned. If the orifices were
changed out for elevation or Liquid Propane purposes, verify
proper installation. Visually inspect other components in heat
section.
Verify gas pressures before turning on heat as follows:
1. Turn off field-supplied manual gas stop, located external
to unit.
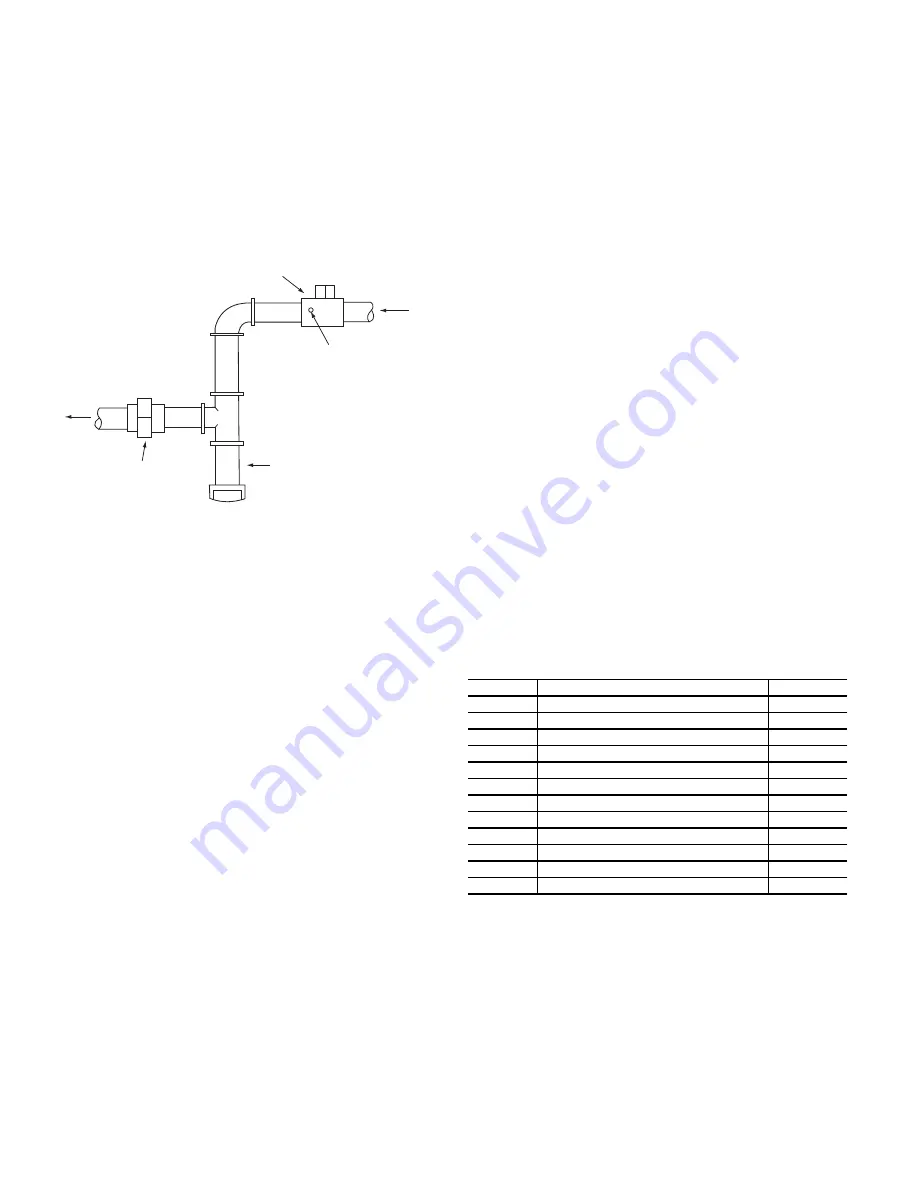
2. Connect pressure gauge to supply gas tap, located on field-
supplied manual shutoff valve. (See Fig. 6.)
Fig. 6 — Field Gas Piping
3. Connect pressure gauge to manifold pressure tap.
4. Turn on field-supplied manual gas stop. Enter Service Test
mode by setting
Service Test
TEST
to “ON” using the
scrolling marquee display. Temporarily install the jumper
wire between “R” and “W1” on TB. Use the Service Test
feature to set Service
Test
HEAT
HT.1
to ON (first
stage of heat) using the scrolling marquee.
5. After the unit has run for several minutes, verify the sup-
ply gas pressure is adequate per the base unit installation
instructions. If not, adjust accordingly.
NOTE: Supply gas pressure must not exceed 13.0-in. wg.
6. Set
Service Test
HEAT
HT.1
to OFF using scrolling
marquee.
7. Remove jumper wire if the unit will be operating under
thermostat mode. The jumper must remain if a space tem-
perature sensor (T-55, T-56, T-58, or System Pilot device)
will control the unit.
8. Exit Service Test mode by setting
Service Test
TEST
to
“OFF” using the scrolling marquee.
Units with EnergyX
®
System
BASE UNIT EVAPORATOR FAN
First follow the base unit instructions to balance the RTU in-
door fan. The ERV (Energy Recovery Ventilator) fans should
be off during base unit fan set-up. Before start-up and testing
the ERV, verify that the
Comfort
Link controller minimum
damper positions are set to 0 and if not change them to 0.
Con-
figuration
→
AIR.Q
→
AQ.MN
= 0, and
Configuration
→
ECON
→
MP.MX
= 0. The ERV communicates with the
Comfort
Link controller therefore the scrolling marquee can be
used for test mode and configuration of the ERV. The follow-
ing sections explain ERV testing and configuration. It is im-
portant that these configurations are set correctly in order for
the ERV module to properly control the air performance. Final-
ly, with service test disabled run unit under normal operation,
verify proper supply airflow with ERV and indoor fan running.
START-UP CHECK LIST
Use the EnergyX Unit Start-Up Checklist (see page CL-1) in
conjunction with the base unit Start-Up checklist from the base
Controls book. Fill in all blank data entries that are applicable
to the exact unit being installed. The ERV model and serial
numbers are printed in the ERV control box. Save the checklist
for future service and maintenance use. It is recommended that
a copy of the checklist be left with the unit in the literature slot
on the base unit control box access door.
ERV TEST MODE
ERV Test points should be used when starting up an EnergyX
unit to verify proper ERV component operation. It can also be
used for troubleshooting. To test the ERV, use the scrolling
marquee to put the
Comfort
Link RTU into test mode. Then go
to Test Independent outputs (
Service Test
→
INDP
). Table 3
shows a list of test points that can be tested as independent out-
puts. There are five ERV tests which can be performed sepa-
rately or together while in test mode. Use the scrolling mar-
quee to change the value of the test point. Follow the
Com-
fort
Link Controls, Start-Up, Operation, and Troubleshooting
manual for testing the base rooftop unit.
The 5 ERV specific test points are OAU 2-position Damper,
OAU Wheel Test, OAU OA Fan Speed test, OAU PE Fan
Speed Test and OAU Tempering Heater Test. The 2-position
damper can be opened and closed with the
OA.DM
point. The
2-position damper accessory can be installed on the exhaust
opening of the ERV. The ERV wheel motor can be turned on
and off with the WHL point. The ERV’s outside air (
OA.OF
)
and building exhaust air (
OA.XF
) motors can be ramped up
and down during test mode their corresponding fan speed test
points. Table 3 shows the test mode test points in the order they
appear under test mode. Communication failures will not allow
these ERV test points to be changed. The
Comfort
Link control-
ler will show active alarms during test mode.
NOTE: If a 2-position damper is installed, it must be opened in
test mode while operating the exhaust test.
ERV CONFIGURATION
The ERV configuration menu can be accessed using the
Com-
fort
Link controller scrolling marquee. Enter the Outside Air
Unit Configurations (
Configuration
→
OAU
) menu. Table 12
shows the list of complete outside air unit configurations that
can be changed and the defaults from the factory. The critical
job specific configurations are listed below and should be
changed at start up for the specific job site. See the operation
section for details all configurations.
OAU Unoccupied Operation (U.RUN)
This allows the ERV to run during the unoccupied period when
the rooftop fan is brought on.
MANUAL SHUT OFF
(FIELD SUPPLIED)
PRESSURE TAP
(1/8˝ NPT PLUG)
GAS
SUPPLY
SEDIMENT TRAP
UNION
TO
UNIT
Table 3 — Service Test Mode Independent Test
Points
ITEM
EXPANSION
RANGE
INDP
Test Independent Outputs
ECON
Economizer Position Test
0 to 100
E.CAL
Calibrate Economizer
Off/On
PE1
Power Exhaust 1 Test
Off/On
PE.2
Power Exhaust 2 Test
Off/On
ALRM
Alarm Relay Test
Off/On
CCH
Crankcase Heat Test
Off/On
OA.DM
OAU 2-Position Damper
Close/Open
WHL
OAU Wheel Test
0 to 100
OA.OF
OAU OA Fan Speed Test
0 to 100
OA.XF
OUA PE Fan Speed Test
0 to 100
OA.HT
OAU Tempering Heater Test
0 to 100
Summary of Contents for /50HC 04-28
Page 69: ...69 Fig 24 Typical Control Diagram for 48HC 04 14 Units 48HC 08 09 shown ...
Page 70: ...70 Fig 25 Typical Power Diagram for 48HC 04 14 Units 48HC 08 09 shown ...
Page 71: ...71 Fig 26 Typical Control Diagram for 50HC 04 14 Units 50HC 14 shown ...
Page 72: ...72 Fig 27 Typical Power Diagram for 50HC 04 14 Units 50HC 14 Non Humidi MiZer shown ...
Page 73: ...73 Fig 28 Typical Control Diagram 48HC 17 28 Units ...
Page 74: ...74 Fig 29 Typical Control Diagram 50HC 17 28 Units ...
Page 75: ...75 Fig 30 Typical Humid MiZer Power Diagram and Component Arrangement 48 50HC 17 28 Units ...
Page 76: ...76 Fig 31 Typical Non Humid MiZer Power Diagram and Component Arrangement 48 50HC 17 28 Units ...
Page 89: ...89 Fig 42 Modulating ERV Wiring Schematic ...
Page 90: ...90 Fig 43 EnergyX ERV Control Box Component Layouts ...
Page 101: ...101 Fig 59 Exhaust Fan Assembly Removal Exhaust Fan Assembly ...
Page 141: ......