background image

GB - 9

42 GW

E N G L I S H

• The unit control circuit only allows opening of the motorized

valve when the fan motor is working.
(See wiring diagrams)

• When the thermostat asks for cooling, terminal 2 of TB3 (cold

water) is supplied with 230V.
When it asks for heating, terminal 3 of TB3 (hot water) is
supplied with 230V.

• In both cases terminal 1 of TB3 (possible air renewal fan

motor) is also supplied with 230V.

• The control circuit ensures that the condensate discharge

pump works continuously while the thermostat, asking for
cooling, keeps the cold water regulating valve open.

WARNING :
The valve is not only necessary to control the room
temperature, but also to stop the cold water flow to the coil
in case of an abnormal condensing water level rise in the
drain pan.

• If there is an abnormal condensing water rise in the drain pan

(for example: possible defective drain, pump malfunction, fan
motor not working) causing the opening of the float switch
contact (FS), the control circuit  either operates the conden-
sate drain pump, or at the same time closes the regulating
valve, stopping the cold water flow towards  the coil and
avoiding further condensation.

Control

The water flow has to be controlled:
• by installing the motorized thermo-electric valves supplied

as accessory

or
• by installing motorized field supplied valves.

Motorized valve and control

Instructions for mounting of motorized
thermo-electric valve assembly

(see "Components" table)

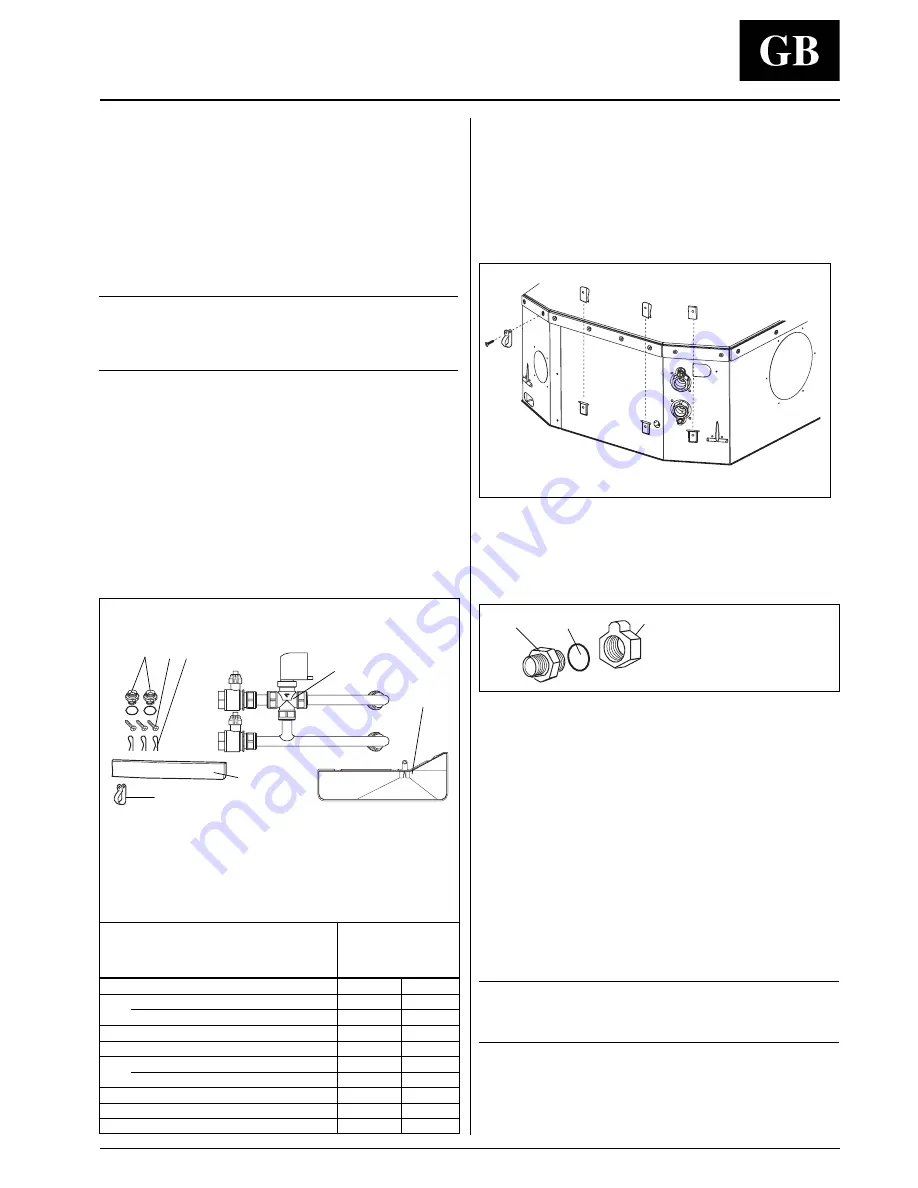
• The thermo-electric valve must be mounted on the unit after

the unit installation.
For this operation follow figures, depending on model.

• Insert the clips supplied in the unit side slots.

Electric connections

• To connect valves to the electric panel pass cables through

the electric panel grommet and connect them to the terminal
board TB3 as per the wiring diagrams.

Water connections

• Position gas reducers (see table) on the coil connection after

slightly lubricating the O-ring.  Mount the O-ring towards the
coil coupling.

• Connect the valve group to the coil and fully tighten fittings.

Fittings should be tightened with a torque of 29.4 Nm.

• Insulate the valve assembly.

• Pass cables through the cable holder G and fix them to the

case using the already pre-assembled screws.

• Mount the drain pan below the valve assembly, inserting the

discharge pipe into the special hole; align and fix it to the 3
clips previously assembled using the three screws supplied.

• Insulate the 3 screws and the drain pan lower part using the

insulating material F.

• To connect the steel pipes to the system, ensure they are

aligned and supported to avoid excess strain on the unit. If
the system is filled with water, check all fitting seals.

NOTE:
The seal efficiency of the valve assembly is factory tested.
Any system losses are therefore due to an incorrect
installation.

A

B C

E

F

G

 Water inlet

 Water outlet

D

Motorized thermo-electric valve assembly and components

004

012


Mod.  42GW

008

016

010

020

               2-pipe

Ref. Description

q.ty

q.ty

A

Adaptor 3/4 " gas with O-ring

2

Adaptor 1" gas with O-ring

1

B

Self tapping screw

3

3

C

Clip

3

3

D

Valve 3/4" gas pre-assembled

1

Valve 1" gas pre-assembled

1

E

Auxiliary drain pan

1

1

F

Insulating material

1

1

G

Cable holder

1

1


Adaptor

O-ring

Coil coupling


Summary of Contents for 42GWC004-3

Page 1: ...42GW 60 Hz L L O Y D S R E G I S TER QUALIT Y A S S U R A N C E IS O 900 1 INSTALLATION MANUAL...

Page 2: ...formation 4 Avoid 5 Installation 6 8 Water connections 8 Motorized valve and control 9 11 Electrical connections 11 12 Wiring diagram 13 Fresh air renewal and conditioned air supply to adjacent room 1...

Page 3: ...25 280 1 5 0440 88 160 825 112 70 125 825 120 150 298 237 52 100 50 160 110 90 155 575 158 7 0 720 550 515 25 2 5 620 100 150 575 42GW 004 008 010 012 016 020 Unit 17 5 19 19 36 38 38 Frame Grille ass...

Page 4: ...2GW9005 42GW9006 Air discharge closing 40GK 900 003 40 40GK 900 013 40 Active carbon filter 40GK 900 002 40 40GK 900 012 40 Electrostatic filter 40GK 900 001 40 40GK 900 011 40 Drain pan 42GW9009 42GW...

Page 5: ...ions or errors in the electrical or water connections Failure to observe the installation instructions or use of the unit under conditions other than those indicated in Table Operating limits of the u...

Page 6: ...erence of 200 mm from the top of the unit flattening or kinking the refrigerant pipes or condensate pipes installation in areas with high frequency waves only partial insulation of the piping Non leve...

Page 7: ...close one or two air outlets use the special kit Install the unit as centrally as possible in the room the air flow direction can be controlled by manually regulating the louvres position according to...

Page 8: ...opylene or neoprene of 5 to 10 mm thickness If more than one unit is installed in the room the drain system can be made as shown in the drawing Align and level the unit by adjusting the nuts and lockn...

Page 9: ...he connection with a spanner The upper coil connection is supplied with an air purge valve the lower connection with a water purge valve suitable for a 10 mm wrench or screw driver The coil is only pa...

Page 10: ...unit installation For this operation follow figures depending on model Insert the clips supplied in the unit side slots Electric connections To connect valves to the electric panel pass cables throug...

Page 11: ...hich causes the down stroke of the piston the valve opens after about 3 minutes about to allow water to circulate in the coil If the room temperature satisfies the thermostat or if the electric power...

Page 12: ...work every time the cold water valve is opened supplying TB1 terminal 7 and 8 from TB1 terminal 4 When the system is filled with water verify all couplings for tightness The manufacturer does not acce...

Page 13: ...ons Wiring diagram legend Low speed Medium speed High speed Power supply line Heating selection Common thermostat heating Cooling selection Common thermostat cooling Neutral fan Neutral in Neutral out...

Page 14: ...C C Y G Y G G G C C B B Y G Y G R R R R 1 2 3 4 5 6 7 9 1 2 3 6 7 8 10 11 5 4 3 2 1 TB3 TB1 HR F1 CR PR PCB IFM PS 1 2 FS 2 1 C2_F C2_M 2 1 3 2 C1_F 1 C1_M 1 2 3 6 5 4 3 2 1 C3_M 6 C3_F 5 4 3 2 1 1 2...

Page 15: ...rugated aluminium externally covered with anti condensate material fibre glass of 12 25 mm thickness To complete the installation all non insulated ducts must be covered with anti condensate insulatio...

Page 16: ...tioned air supply to an adjacent room Diagram of conditioned air supply to an adjacent room one louvre closed In case of two louvres closed the fresh air flow towards the adjacent room is 50 higher co...

Page 17: ...ing the cover panel The inspection or replacement of internal components such as fan motor coil condensate discharge pump float switch electric heater if fitted involve the removal of the condensate d...

Page 18: ...nzio 9 20058 Villasanta MI Italy Tel 039 3636 1 The manufacturer reserves the right to change any product specifications without notice Order No 14254 74 December 2001 Supersedes Order No 14254 74 Jul...

Reviews: