


WARNING: DO NOT TURN THE ENGINE ON IF THE
VEHICLE IS INSIDE A GARAGE OR ENCLOSED
SPACE, ENGINE EMISSIONS MAY CAUSE SERIOUS
INJURY OR DEATH. ONLY TURN THE ENGINE ON
WHEN THE VEHICLE IS OUTSIDE.
Step 1:
Note the make/model/year of the vehicle as well as the
transponder’s serial number. You will need this information in
Step 4.
Step 2:
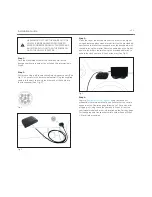
While the vehicle is off, locate the vehicle’s diagnostic port (See
Fig 1). It’s usually in the driver’s side footwell. Plug the supplied
cable into the port, then plug the other end of the cable into
the transponder (See Fig. 2).
Installation Guide
Fig. 2
Fig. 1
Fig. 3
Step 3:
Clean the top of the dashboard near the driver’s side A-pillar
using automotive glass cleaner or similar. Use the provided ad-
hesive strip to mount the transponder on the dashboard, with
the cable facing the A-pillar. Route the cable along the A-pillar,
down to the driver’s footwell using the provided cable ties to
bundle the slack cable so it is out of the way (See Fig. 3).
Step 4:
Login to
fleetsystemsusa.e1og.com
using your account
credentials that were emailed to you. Ensure that the vehicle
appears on the Fleetmap page (allow up to 15 minutes after
plugging in). Using the notes you took in Step 1, fill out the
year/make/model and other information on the Settings page
for the appropriate transponder serial number. Repeat Steps
1-4 for all other vehicles.
v2.1