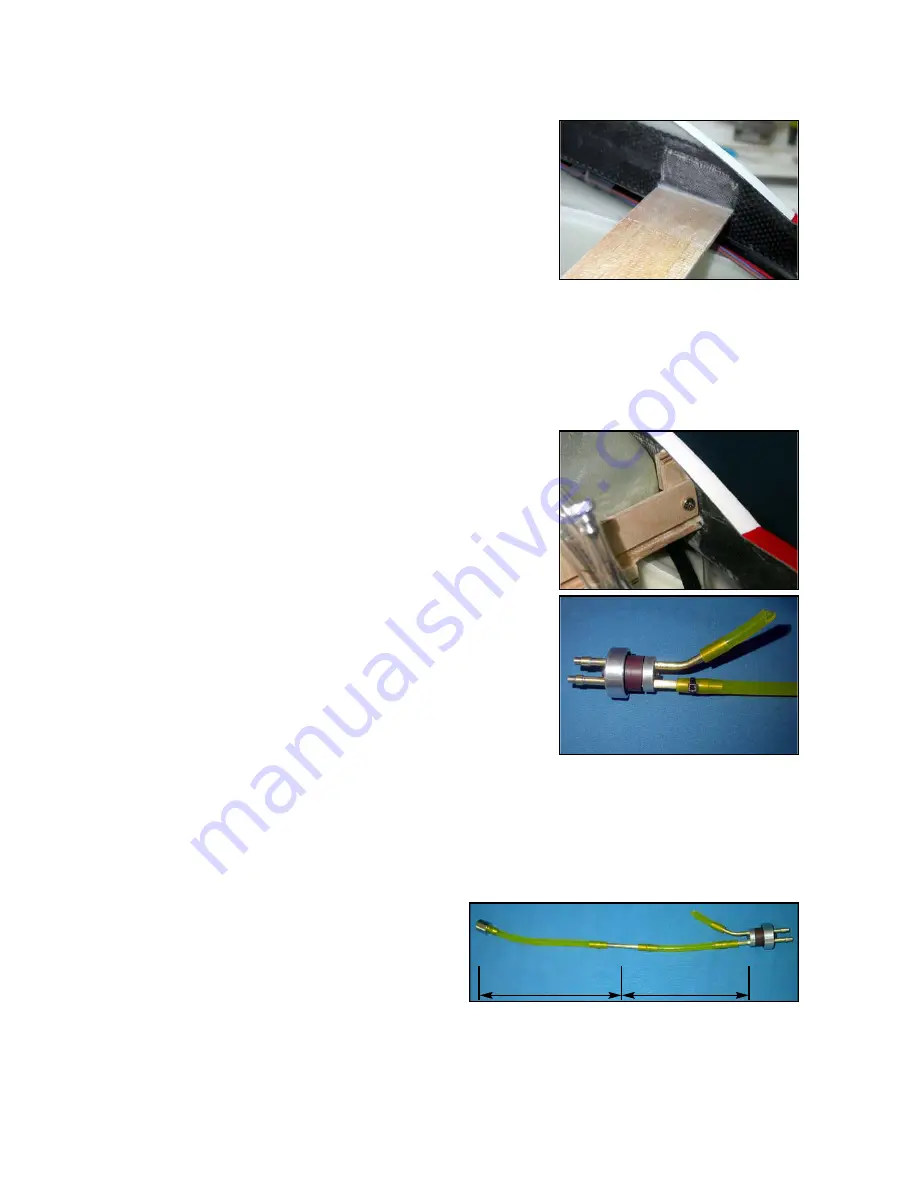
6mm in front of the tank. Check that it is horizontal and
then tack glue to the fuselage sides with a couple of drops
of thin CA. Remove the temporary packers and the tank.
Prepare the inside surface of the fuselage and tank sup-
port by sanding and cleaning, and glue the support in per-
manently with 30 min. epoxy. When cured, reinforce the
joints with small patches of the fibreglass cloth and lami-
nating epoxy in the same way as the rear tank support.
The ‘stop‘ to prevent the tank moving forward is made
from a milled plywood strip (151 x 15mm) screwed into the
front of 2 blocks glued against the fuselage sides. Each
block is made from 2 pieces of 3mm plywood laminated
together with CA. (see photo right and P8). Prepare the
surfaces of the fuselage, and glue the blocks to the sides
with 30 minute epoxy. You may need to sand or file them a
little to clear the edges of the fuel tank.
Assemble the included aluminium tank cap hardware with
2 of the Ø 4mm brass tubes as shown. Solder the short
lengths of Ø 5mm brass tube on all the ends of the 4mm
tube to act as ‘barbs’ and prevent the fuel tube sliding off.
Make up the connections exactly as shown, using Tygon or
equivalent flexible tubing that is suitable for kerosene fuel.
The tube to the clunk must be joined in the middle with a
length of the brass tube where it passes through the fibre-
glass baffle - otherwise it will be cut in a few seconds! The
length from the back of the stopper to the centre of the
brass tube should be 125mm, and after assembly check
that the baffle cannot touch the Tygon tube in any position.
For extra safety you can add a small tie-wrap or length of
stainless steel tying wire around each connection.
If fitting
only
the fuselage tank, it is most con-
venient if you fit the overflow/vent tube in the
bottom of the fuselage immediately behind
the wing, to one side of the Ventral fin.
This is so that you can put the fuselage on its
nose for assembly on the airfield, even when
there is fuel in the tanks and it will not drain
out. See ‘Wing Tank’ section for assembly of
the vent tube.
Hopper Tank:
Included in the kit is a 180ml hopper tank, and all the hardware required to complete and install
it in the CNC milled plywood mount at the back of the cockpit area for easy visibility and main-
tenance. Assemble the mount from the plywood parts as shown in photo below with thin CA, and
then glue permanently with 30 minute epoxy. The hopper tank is secured in position using a short
17
(above) Front fuel tank support
glue joints reinforced with F’glass
cloth and laminating epoxy.
(below) Front stop is a milled ply-
wood strip, screwed to small
milled blocks glued against the
fuselage sides.
(above) Detail view of the fuel tank cap assem-
bly, with the short lengths of 4mm I.D tube sol-
dered on to act as ‘barbs’ and prevent the tub-
ing sliding off.
(below) From the back of the cap hardware to
the centre of the brass tube should be 125mm
(5”) to place it at the baffle position.
150 mm
125 mm
Summary of Contents for Ultra Flash
Page 1: ......
Page 3: ......
Page 32: ......
Page 40: ...38 template of NACA style inlet for additional air in outer thrust tube full size 65mm approx...


