background image

CS 3800 Family User and Installation Guide (TA3975)_Ed02

25

Setting Up the CS 3800 Wired Scanner

To set up the CS 3800 Wired scanner, follow these steps:

1

Install the imaging software on the computer. To install the 

CS Imaging


Software

CS 

Orthodontic Imaging

 software, or 

CS OMS Imaging

 software, see the relevant installation 

guides.

2

Request the 

CS ScanFlow

 software from 

www.carestreamdental.com/en-us/forms/update-central/.

3

Click the link in the email sent to you, and double-click the 

InstallationWizard.iso

 file to extract the 

files.

4

Double-click 

autorun.exe

. A license agreement window is displayed.

5

Acknowledge the license agreement. The 

System Check

 window is displayed.

6

When the System Check finishes, click 

. The 

Prerequisites

 window is displayed.

7

When the Prerequisites check finishes, click 

. The 

CS ScanFlow Maintenance Toolkit


window is displayed, and the installation begins.

8

When the installation has finished, the 

Tutorials

 window is displayed. Click on the video for the 

type of scanner you are using to view a setup video. When finished, click 

. The 

Finish


window is displayed. 

9

Click 

Exit

.

10

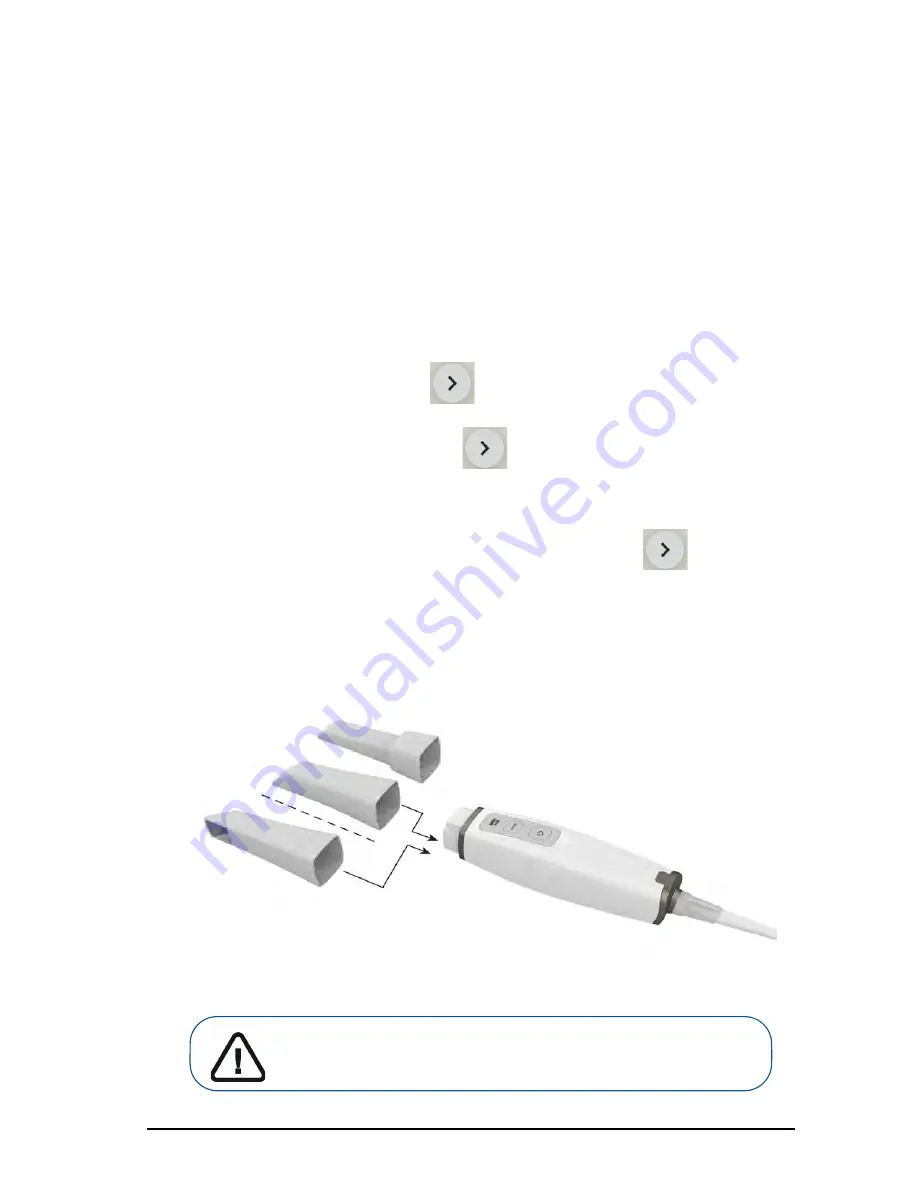
Firmly slide one of the tips onto the end of the scanner. Ensure that the indentation on the base of 
the tip aligns with the raised notch on the top of the scanner.

Important:  Do not cover the air inlet on the back of the scanner; 
otherwise, the system will overheat.

Summary of Contents for CS 3800

Page 1: ...CS 3800 User and Installation Guide...

Page 2: ...e most effective use of your system The CS 3800 Family comprises CS 3800 Wireless CS 3800 Wired All trademarks and registered trademarks are the property of their respective holders The CS 3800 Wirele...

Page 3: ...CS 3800 Family Shade Calibration Unit Overview 17 Chapter 3 Setting Up the Scanner Setting Up the CS 3800 Wireless Scanner 19 Setting Up the WiFi Adapter 22 Charging the Batteries in the Battery Charg...

Page 4: ...iv...

Page 5: ...you looking for information that was not in this document Take our short survey and help us make this document better To open the questionnaire click http guest cvent com d sdqtll 3B WARNING Warns yo...

Page 6: ...2 Chapter 1 Conventions in This Guide...

Page 7: ...erview Figure 1 CS 3800 Wireless Components Overview 1 Reusable tips There are three types of tips Normal facing downward Side facing left and Posterior facing downward Note The posterior tip allows f...

Page 8: ...the handpiece charging station The backup power cable can be used instead of the battery to power the scanner The backup power cable is plugged into the output port of the handpiece charging station 7...

Page 9: ...canner General Care Figure 2 CS 3800 Wireless Front Protective Cover Figure 3 CS 3800 Wireless Posterior Protective Cover Important Use the front protective cover when the CS 3800 Wireless is not in u...

Page 10: ...u are not using the scanner place it in the charging station either vertically or horizontally to store it Figure 4 CS 3800 Wireless Placed Vertically in Charging Station With Battery Only Figure 5 CS...

Page 11: ...and a 5V output port for the backup power cable When the scanner is inserted in the charging station the indicator light of the charging station Blinks in ORANGE when the battery is near empty Blinks...

Page 12: ...n take it out of the charging station and press the power button for one second Note The scanner powers off when left idle for 5 minutes when not charging and on battery power Note DO NOT charge the b...

Page 13: ...3800 Wireless battery charging station optional can charge up to two batteries at the same time The indicator on the battery charging station Blinks in ORANGE when the battery is near empty Blinks in...

Page 14: ...10 Chapter 2 CS 3800 Family Overview Figure 10 Battery Charging Station Figure 11 Batteries in Battery Charging Station...

Page 15: ...or tip allows for more comfortable scanning in hard to reach areas The posterior tip is designed for quadrant scanning only and should not be used to scan a complete arch See the CS 3800 Family Safety...

Page 16: ...ntains a USB Type C port and a socket to which the lock is secured 6 Detachable cable One end of the cable is plugged into the scanner and secured with the lock and the other end is plugged into a USB...

Page 17: ...amily User and Installation Guide TA3975 _Ed02 13 CS 3800 Wired Scanner General Care Figure 13 CS 3800 Wired Front Protective Cover Important Use the front protective cover when the CS 3800 Wired is n...

Page 18: ...w CS 3800 Wired Holder Overview The holder can be used as a desktop or a wall mount holder Place the scanner in the holder when you are not using it Figure 14 CS 3800 Wired in Desktop Holder Figure 15...

Page 19: ...ne second Note The scanner goes into inactive mode when left idle for 5 seconds if set on a desk for example To use it again pick it up and press the power button for one second Note The CS ScanFlow i...

Page 20: ...n the area where the cable connects to the scanner Figure 16 Correct CS 3800 Wired Scanner Cable Storage Do not wrap the cable around the handle of the scanner or create any sharp bends in the cable F...

Page 21: ...Attach the shade calibration unit to the normal tip using the Normal opening Attach the shade calibration unit to the side tip using the Side opening Push the shade calibration unit to the end when a...

Page 22: ...18 Chapter 2 CS 3800 Family Overview...

Page 23: ...extract the files 4 Double click autorun exe A license agreement window is displayed 5 Acknowledge the license agreement The System Check window is displayed 6 When the System Check finishes click Th...

Page 24: ...r adapter into an outlet Place the scanner in the charging base When using the backup power cable mount the backup power cable onto the scanner and then insert the other end of the backup power cable...

Page 25: ...CS 3800 Family User and Installation Guide TA3975 _Ed02 21 12 Press the power button three seconds to power on the scanner Ensure the power indicator turns blue...

Page 26: ...you use the handpiece To charge the batteries follow these steps 1 Insert the DC power supply into the jack on the battery charging station and insert the power adapter into an outlet 2 Remove the bat...

Page 27: ...g downward A or to the side facing left B Ensure that the indentation on the base of the tip aligns with the raised notch on the top of the scanner Important Scanner tips received from the manufacture...

Page 28: ...to power on the scanner 4 On the CS ScanFlow interface select the Upper Jaw acquisition mode OR On the scanner press the mode button for one second to select the acquisition mode The mode indicator L...

Page 29: ...window is displayed 5 Acknowledge the license agreement The System Check window is displayed 6 When the System Check finishes click The Prerequisites window is displayed 7 When the Prerequisites chec...

Page 30: ...s rear cover are aligned 12 Rotate the plastic lock clockwise until it clicks to lock the cable 13 Insert the other end of the detachable cable into the USB Type C port of your computer Important DO N...

Page 31: ...CS 3800 Family User and Installation Guide TA3975 _Ed02 27 14 Press the power button three seconds to power on the scanner Ensure the power indicator turns blue...

Page 32: ...r A 4 Remove the adhesive tape protection B 5 Place the taped side of the holder on the clean surface C and press firmly several times for correct adherence The maximum adherence is obtained after two...

Page 33: ...a wall mount holder follow these steps 1 Select an area that you can access easily 2 Insert screws through the appropriate holes in the holder to affix it to a solid surface Important If the holder is...

Page 34: ...d A or to the side facing left B Ensure that the indentation on the base of the tip aligns with the raised notch on the top of the scanner Important Scanner tips received from the manufacturer are NOT...

Page 35: ...hree seconds to power on the scanner 4 On the CS ScanFlow interface select the Upper Jaw acquisition mode OR On the scanner press the mode button for one second to select the acquisition mode The mode...

Page 36: ...32 Chapter 3 Setting Up the Scanner...

Page 37: ...ries regularly If you limit the holding time at 134 C to not more than 4 minutes you can autoclave the tip up to 110 cycles See the CS 3800 Family Safety Regulatory and Technical Specifications User G...

Page 38: ...34 Chapter 4 Maintenance...

Page 39: ...ke sure the tip is firmly installed and there are no dark edges on the live video The tip is installed but not detected No live video is displayed and the Scanner Tip Loose icon is displayed at the lo...

Page 40: ...36 Chapter 5 Troubleshooting...

Page 41: ...Samantha Bush Wiltron House Rutherford Close Stevenage Hertfordshire SG1 2EF United Kingdom Authorized Representative in Brazil Carestream Dental Brasil Eireli Rua Romualdo Davoli 65 1 Andar Sala 01 S...

Page 42: ...38 Chapter 6 Contact Information Carestream Dental Spain S L U Paseo de la Castellana 79 Madrid 28046 Espa a Carestream Dental Italy S r l Via Mario Idiojmi 3 3 Assago 20090 MI Italia...

Page 43: ...2 Carestream Dental LLC For more information visit carestreamdental com To give documentation feedback visit carestreamdental com documentationfeedback Carestream Dental LLC 3625 Cumberland Blvd Ste 7...

Reviews: