


T
RAVEL
'
R
Installation
Manual
Carefree of Colorado
6
052540-002r14
M
OUNTING THE
A
WNING
CAUTION
It is recommended that at least three people install the awning due to its
size and weight.
(Refer to the General Layout on page 1.)
1. Check the location the awning is to be mounted. Ensure that the awning will not interfere with other
equipment on the vehicle, such as a slide out room, light fixtures, exhaust vents etc.
2. On the awning rail, mark the location of the centerline of the motorized arm assembly.
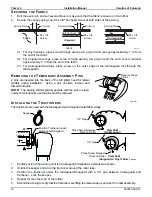
3. Unroll the canopy one wrap.
NOTE:
While the awning fabric is fairly robust, care must be taken not to snag it on the awning rail.
4. With one person holding each arm, the third person should thread the polyrod (the plastic rod on the
edge of the fabric) into the awning rail, starting at one end. Carefully move across the vehicle, gently
pulling the fabric into the rail, until the awning is in the pre-determined location.
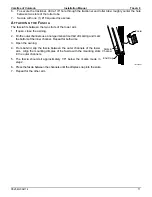
5. Position the motorized arm on the coach: Align the center of the
motorized arm with the centerline marked in step 2. Butt the top of the
rear channel against the awning rail as shown.
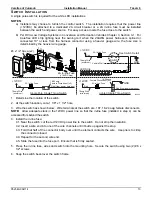
IMPORTANT
NOTE: For Uniguard and Alumaguard installations,
the centerline of the roll bar must be 3/4" ± 1/4" above the centerline
of the awning rail. If the arm cannot be positioned as shown and
meet this requirement because of trim below the awning rail, the
installer must remove the trim where the arms mount or install a new
awning rail below the trim.
6. Hold the arm assembly perpendicular to the awning rail and drill a 5/32” hole through the #2 mounting
hole and attach the motorized arm using a 1/4 x 1 1/2” lag screw
NOTE:
For the bottom 3 mounting holes: when attaching into structure, use 1/4 x 1 1/2 screws; if not
attaching into structure, use the furnished moly rivets. Moly rivets require a 1/4" hole in place of
the 5/32" pilot hole.
The upper mounting holes (all configurations) must be attached into structure using the screws
provided.
OEM Installations:
If structural backing is not available for the upper mounting holes, it will be
necessary to use the aftermarket top brackets to attach into the structural members at the roof line.
Travelr012
or