background image

BX

90


31

TROUBLESHOOTING, CARE AND MAINTENANCE

5.1 

General Instructions


WARNING


+

Do not make any improper changes to the equipment.


CAUTION


+

Damaged or worn components may affect your safety and the life of the equipment. 

Therefore, immediately replace damaged or worn components. In such a case, contact the 

contract partner. The equipment must not be used until it has been repaired. If necessary, 

use only original spare parts.


ATTENTION


+

In addition to the instructions and recommendations for maintenance and care given here, 

additional service and/or repair work may be necessary; this must only be carried out by 

authorised service technicians.

5.2 

Faults and Fault Diagnosis

The equipment undergoes regular quality controls during production. Nevertheless, faults or 

malfunctions may occur. Frequently, individual parts are responsible for these disturbances, an 

exchange is usually sufficient. Please refer to the following overview for the most common errors and 
how to correct them. If the equipment still does not function properly, contact your contract partner. 

Error

Cause

Repair

Cracking near the 

pedal

Loose pedals

Tighten the pedals

Equipment wobbles

Equipment is not level

Adjust the supporting feet

Handlebar/saddle 

wobbles

Screws are loose

Tighten screws

Display does not turn 

on

Power supply disrupted

Check all screw connections and see if 

the plug is plugged in

No pulse reading


+

Sources of interference 

in the room


+

Unsuitable chest strap


+

Chest  strap  is  incorrectly         

positioned


+

Empty batteries 


+

Eliminate sources of interference (e. 

g. mobile phone, loudspeaker, etc.) 


+

Use a suitable chest strap (see 

recommended accessories)


+

Reposition the chest strap and/or 

moisten the electrodes


+

Change the batteries

Summary of Contents for Ergometer BX90

Page 1: ...CSTBX90 01 04 Ergometer BX90 Assembly and Operating Instructions Art No CST BX90...

Page 2: ...BX90 2...

Page 3: ...anual Programmeme 24 3 4 2 Profile Programmemes 24 3 4 3 Watt Programmeme 25 3 4 4 User Profile Programmemes 26 3 4 5 Random Profile Programmemes 27 3 4 6 Heart Rate Programmemes 27 3 4 7 Target Heart...

Page 4: ...BX90 4 7 RECOMMENDED ACCESSORIES 35 8 ORDERING SPARE PARTS 36 8 1 Serial Number and Model Name 36 8 2 Parts List 37 8 3 Exploded Drawing 41 9 WARRANTY 42 10 CONTACT 44...

Page 5: ...s No 1 for home fitness International Headquarters Flensburger Stra e 55 24837 Schleswig Germany Management Christian Grau Sebastian Campmann Dr Bernhard Schenkel No HRB 1000 SL Local Court Flensburg...

Page 6: ...ect any mistakes Please pay close attention to the safety and maintenance instructions given here The contract partner cannot be held liable for damage to health accidents or damage to the equipment w...

Page 7: ...t adjustable in 5 watt increments Total number of training programmemes 24 Manual programmemes 1 Pre set programmemes 12 Watt controlled programmemes 1 Heart rate controlled programmemes 4 User define...

Page 8: ...quipment may not be used by children under the age of 14 Children should not be allowed unsupervised access to the equipment Persons with disabilities must have a medical license and must be under str...

Page 9: ...ug is damaged or defective contact your contract partner Until repair the equipment must not be used ATTENTION The equipment requires a mains connection of 220 230 V with 50 Hz mains voltage The equip...

Page 10: ...and behind the equipment The training room should be well ventilated during training and not be exposed to any draughts Choose the place in which to set up the equipment such that there is enough free...

Page 11: ...Do not open the packaging when it is lying on its side Ensure to have sufficient room for movement in each direction during assembly The assembly of the equipment must be carried out by at least two a...

Page 12: ...plaints the contractual partner must be contacted directly CAUTION If parts of the scope of delivery are missing or damaged the assembly must not be carried out 2 3 Assembly Before assembly take a clo...

Page 13: ...M8 M6 M14 M15 M13 M17 T OOL 706 707 002 704 160 368 300 003 004 300 125 306 110 109 R L 718 307 014 013 221A 707 391A 414 13...

Page 14: ...on the floor 2 Remove all loose components 3 Refer to the checklist and check that everything is present L L NOTICE To protect the BX90 while assembling we suggest that you do not remove the Protectiv...

Page 15: ...en firmly 2 Remove the polystyrene block and place it under the front end of the machine Step 4 1 With the front end now raised off the floor remove packing material 2 Undo 2 x BOLT and remove the tra...

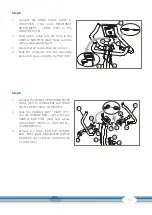
Page 16: ...tep 7 L L NOTICE Make sure the HAT COVER 160 has already been slid into the HANDLE BAR POST 002 before going to the following steps 1 Hold the HANDLE BAR POST 002 in the correct position over the MAIN...

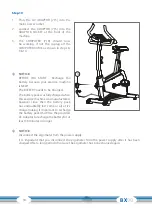
Page 17: ...3 Check that all connections are correct 4 Slide the computer onto the mounting plate and secure using the 4 x BOLT 307 Step 9 1 Connect the HANDLE BAR HAND PULSE CABLE 707 to HANDLEBAR and HAND PULSE...

Page 18: ...ATTERY needs to be Charged The battery pack was fully charged when thisexercisemachinewasmanufactured however since then the battery pack has undoubtedly lost some or all of it s charge making it impo...

Page 19: ...d Generator System This exercise machine is equipped with Eddy Current Brake Motorized Resistance System The Flywheel is lined with an Aluminum Strip and a Bank of Magnets are moved by a Geared Electr...

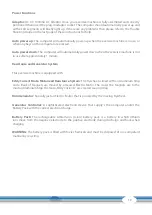
Page 20: ...ay TIME Training time displayed during training Minutes and seconds STOP MODE The STOP MODE Indicator will be lit when you Pause or Stop your workout RPM and SPEED RPM Revolutions Per Minute SPEED kil...

Page 21: ...er and input User Data PULSE Your heart rate pulse is displayed in beats per minute bpm either via the Hand Pulse Sensors or a 5 kHz Chest Band NOTE The letter P indicates that the computer is NOT rec...

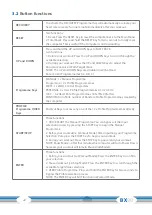
Page 22: ...H R C 4 x Heart Rate Programmemes 55 75 90 TAG RANDOM An infinite number of Random Profile Programmemes created by the computer PROFILE Programme QUICK Keys Shortcut Keys to access any one of the 12...

Page 23: ...TER Key to confirm your selection 2 AGE Press the UP and DOWN Keys to select your Age in years Then press the ENTER Key to confirm your selection 3 HEIGHT Press the UP and DOWN Keys to select your Hei...

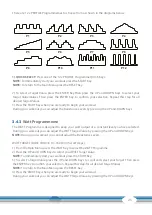
Page 24: ...y to immediately begin your workout NORMAL START with Target Value options 1 From the Main Menu press the MANUAL Key to select the MANUAL Programme 2 Press the UP and DOWN Keys to select your Resistan...

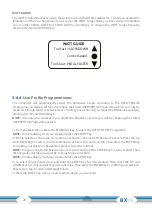
Page 25: ...meme The WATT Programme is designed to keep your watt output at a constant level you have selected During your workout you can adjust the WATT Target Value by pressing the UP and DOWN Keys NOTE During...

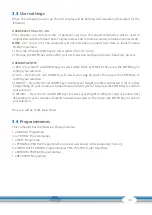
Page 26: ...me as well 1 From the Main Menu press the PERSONAL Key to select the USER PROFILE Programme NOTE To immediately start your workout press the START Key 2 Profile Selection There are 16 columns each wit...

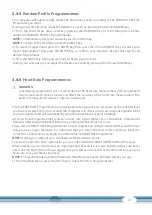
Page 27: ...serves only as a training aid The HEART RATE Programmemes are designed to keep your heart rate pulse at the constant level you have selected Every 30 x seconds the computer will check your heart rate...

Page 28: ...standard 5 kHz bandwidth Chest Band or by holding the Hand Pulse Sensors NOTE During your workout you cannot adjust the Resistance Levels To select a heart rate that is optimal for you see CALCULATING...

Page 29: ...n the RECOVERY Programme is an excellent cardiovascular fitness level indicator 1 Immediately upon completing your workout press the RECOVERY Key 2 The computer will analyze your heart rate recovery f...

Page 30: ...tion wheels the equipment must be disassembled before transportation 4 2 Transportation Wheels ATTENTION If you want to transport your equipment over particularly sensitive and soft floor coverings su...

Page 31: ...faults or malfunctions may occur Frequently individual parts are responsible for these disturbances an exchange is usually sufficient Please refer to the following overview for the most common errors...

Page 32: ...ike is a 0 charge which will eventually kill the battery pack KEEP THE BATTERY PACK CHARGED 40 80 Lithium ion Li ion batteries don t suffer the memory effect like the old nickel cadmium and nickel met...

Page 33: ...come incapable of holding a charge TOO COLD 0 C 32 F The Lithium ion Li ion battery pack will not charge below freezing TOO HOT 45 C 113 F The Lithium ion Li ion battery pack will charge but you will...

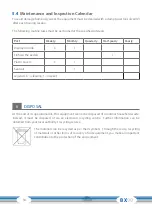
Page 34: ...I Plastic covers C I Seat rail I Legends C cleaning I inspect 6 DISPOSAL At the end of its operational life this equipment cannot be disposed of in normal household waste Instead it must be disposed...

Page 35: ...you use a compatible chest strap as this ensures optimum transmission of the heart rate You may want to buy additional grips or weights for multi gyms Our range of accessories offers the highest qual...

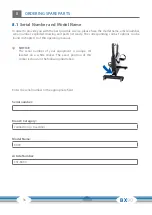
Page 36: ...list ready The corresponding contact options can be found in chapter 10 of this operating manual L L NOTICE The serial number of your equipment is unique It s located on a white sticker The exact pos...

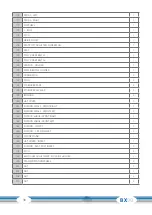
Page 37: ...HANDLE 1 016 VERTICAL SEAT ADJUSTER BUSHING 2 017 CASING 1 018 HORIZONTAL SEAT ADJUSTER SLIDER 1 019 BALL BEARING 1 020 TENSION WHEEL BRACKET 1 021 HORIZONTAL SEAT ADJUSTER SPACER 1 022 EMS CONTROLLER...

Page 38: ...33 PLUG 2 134 STABILIZER PADS 2 135 STABILIZER LEVELER 2 149 BUSHING 2 160 HAT COVER 1 161 SHROUD SMALL FRONT RIGHT 1 162 SHROUD SMALL FRONT LEFT 1 163 SHROUD LARGE FRONT RIGHT 1 164 SHROUD LARGE FRON...

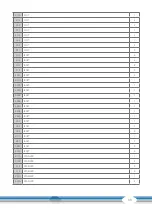
Page 39: ...LT 2 307 BOLT 4 312 BOLT 2 334C BOLT 2 341A BOLT 1 342A BOLT 1 344A BOLT 1 344B BOLT 1 346A BOLT 1 360A BOLT 1 360B BOLT 1 362A BOLT 1 363 BOLT 1 364 BOLT 1 368 BOLT 4 371A BOLT 1 387 BOLT 2 388A BOLT...

Page 40: ...ABLE 1 707 HANDLEBAR HAND PULSE CABLE 2 708 DC MOTOR CABLE 1 709 SENSOR MAGNET 1 711 BATTERY WITH CABLE 1 712 A C ADAPTOR CABLE 1 712A BATTERY AC ADAPTOR CABLE 1 713 HORIZONTAL SEAT ADJUSTER SPRING 1...

Page 41: ...41 8 3 Exploded Drawing...

Page 42: ...web shop begin on delivery of the fitness equipment The respective warranty periods for your equipment can be found on its product website Repair Costs According to our choice there will either be a r...

Page 43: ...control you will need to give the serial number of your equipment when contacting the service team Where possible please have your serial number and your customer number ready when you call our servic...

Page 44: ...hop fr Mo Fr 08 00 18 00 Sa 09 00 18 00 PL BE TECHNICAL SUPPORT SERVICE TECHNICAL SUPPORT SERVICE 22 307 43 21 49 4621 42 10 948 info fitshop pl Mo Fr 08 00 18 00 Sa 09 00 18 00 02 732 46 77 49 4621 4...

Page 45: ...anies and physio practices with professional equipment for endurance and strength training Sport Tiedje offers a wide range of fitness equipment from renowned manufacturers high quality in house devel...

Page 46: ...BX90 46 Notes...

Page 47: ...47...

Page 48: ...Ergometer BX90...

Reviews: