


PD300MHR
Mechanical Height Rod Installation
The Mechanical Height Rod is packed in its own carton inside the main carton. Before starting
installation, please unpack carefully and remove all plastic wrappings, foam fillers and cardboard
material. You should have the following components:
(1) Detecto Mechanical Height Rod (MHR)
(2) Mounting Brackets
(1) Hardware Pack, containing:
(4) #8-32x1/2” Pan Head Screws (mounting bar to bracket)
(4) #8-32 Hex Nuts
(4) M4x10 PM Screws (bracket to column)
(4) Lock Washers (bracket to column)
(2) #8-32 Hex Head Screw (MHR to mounting bar)
(1) Wrench
#8-32 Pan Head Screw
#8-32 Hex Head Screw
#8-32 Hex Nut
M4x10 Machine Screw
Wrench
Lock Washer
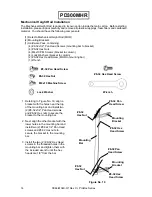
1. Referring to Figure No. 19, align a
bracket with the holes near the top
of the mounting bar and install two
(2) #8-32x1/2” Pan Head screws
and #8-32 Hex nuts to secure the
bracket to the mounti
#8-32 Pan
Head Screw
ng bar.
g
bar.
h
hex
heads are 1/8" from the bar
2. Next, align the other bracket with the
lower holes in the mounting bar and
install two (2) #8-32x1/2” Pan Head
screws and #8-32 Hex nuts to
secure the bracket to the mountin
3. Install the two (2) #8-32 Hex Head
screws in the threaded holes in the
mounting bar and tighten them wit
the included wrench until the
#8-32
Hex Nut
Mounting
Bracket
Mounting
Bar
#8-32 Hex
Head Screw
#8-32 Pan
Head Screw
Figure No. 19
Mounting
Bracket
#8-32
Hex Nut
#8-32 Hex
Head Screw
0044-M340-O1 Rev C
ProDoc Series
14