


NOTE: Check the wall for studs and electrical wires using a Wall Stud Finder. If wall studs are present,
the bracket can be mounted directly without the need of wall anchors.
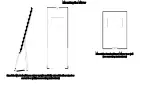
1. Determine where and how high to hang the mirror. Consider the location of your outlet and cord
length.
2. Use a pencil to make a light point on the wall for the top-center of the mirror.
3. Wardrobe/Fitness Mirror:
Measure down 1.5” from the point and pencil a second mark.
Standard Mirror:
Measure down 5” from the point and pencil a second mark.
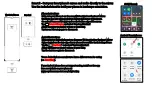
4. Center the wall bracket under the second mark and pencil in the 3 holes. We recommend using
a level to help align the bracket.
5. Drill holes with a 1/4” drill bit.
6. Insert drywall anchors inside each drilled hole.
7. Align mounting bracket over the anchors.
8. Insert screws into each anchor and tighten.
9. The wall bracket should now be secured.
10. Plug the USB-C cable into the back of the mirror
BEFORE
hooking the mirror on the wall bracket.
Be careful not to crimp or pinch the cable.
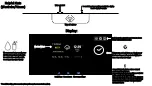
Mounting Instructions
Tools Required:
Pencil
Drill with 1/4” bit
Philips head screwdriver
Level (recommended)
Wall Bracket
Mirror hooks onto wall bracket
*
The bumpers were designed to protect the backing of the mirror and your wall. It is normal that the mirror is
not flushed against the wall.