background image

20

washing machine

maintenance and cleaning

After each wash, leave the door open
for a while to allow the air to circulate
freely inside the machine.

From time to time, depending on the
hardness of your water, it is
recommendable to run a full wash cycle
using a decalcifying product. 

This will

extend the life of your washing
machine.

MAINTENANCE

The washing machine should be
disconnected from the mains
electricity supply before any cleaning
or maintenance is carried out.

Clean the detergent dispenser whenever
there is any washing product residue left
inside.

a

Pull outwards on the detergent

dispenser to remove it completely.

b

Use warm water and a brush to

clean the compartments.

c

Also clean the additive

compartment siphons, having
removed them first. Once they
have been cleaned, put them back
making sure that they fit right in to
the back.

Put the dispenser back into the

washing machine.

A dirty or incorrectly fitted siphon will
prevent the additives from being taken
in and leave water inside the
compartment at the end of the wash.

Important

Important

1

CLEANING THE DETERGENT DISPENSER

c

b

SELEC

T

a

SELEC

T

Summary of Contents for WDi2202

Page 1: ...Instruction manual for fully integrated electronic condenser washer dryer Model code WDi2202 Contact Caple on 0844 8003830 or for spare parts www 4caple co uk ...

Page 2: ......

Page 3: ...4 5 6 10 20 22 25 WARNINGS SPECIFICATIONS INSTALLATION AND ASSEMBLY USING THE APPLIANCE PRACTICAL TIPS MAINTENANCE AND CLEANING SAFETY AND TROUBLESHOOTING ENVIRONMENTAL WARNINGS washingmachine contents ...

Page 4: ...r their after sales service or similar qualified personnel to avoid hazards Do not use an extension lead or adaptor plug to connect the washing machine to the mains Do not climb onto the washing machine or lean on the loading door when it is open The machine must only be used for the purpose for which it is designed Follow the washing instructions recommended by the manufacturer of the garment to ...

Page 5: ...5 washingmachine Water inlet hose specifications ACCESSORIES Power cord Control panel Detergent dispenser Stainless steel drum Accessible filter Drain hose Hatch Adjustable feet SELECT ...

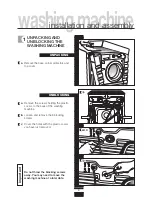
Page 6: ...ng screws c Cover the holes with the plastic covers you have just removed installation and assembly Do not throw the blocking screws away You may need to move the washing machine at a later date Important a c a Remove the base corner protectors and top cover 1 UNPACKING AND UNBLOCKING THE WASHING MACHINE UNBLOCKING UNPACKING SELECT ...

Page 7: ... restricted 2 CONNECTION TO THE MAINS WATER SUPPLY DRAINAGE CONNECTION It is important that the drain hose bend is correctly fastened to the outlet to prevent any risk of it becoming detached and causing flooding If your washing machine has a hot water intake connect the hose with the red threaded end to the hot water tap and to the electrovalve with the red filter The washing machine must be conn...

Page 8: ...aching the plug is the same as that on the plate Do not remove the specifications plate The information on it is important ELECTRICAL CONNECTION LEVELLING It is very important to correctly earth the washing machine The electrical installation plug socket fuses or automatic switch and counter must be correctly dimensioned for the maximum power indicated on the specifications plate Do not plug the w...

Page 9: ...is to check that the installation the connections and the drainage are all correct and to thoroughly clean the inside of the washing machine before any wash programmes are run see the operating instructions on the following pages a Select the normal programme at 60ºC b Press the Start Stop button 9 4 PRE CLEANING b a ...

Page 10: ...ure all the pockets are empty Any small objects may block the drain pump Prewash Wash Wash PREPARATION 1 PREPARING GARMENTS FOR WASHING 30 60 90 40 Cold Important We recommend loading the washing machine to its full capacity This means savings on water and energy Whenever possible we recommend that you wash garments of different sizes within the same wash programme This improves the washing action...

Page 11: ...es to be washed How heavily the clothes are soiled The hardness of the water Information on water hardness in your area can be obtained from the competent local authorities We recommend the use of a decalcifying product if the water hardness is high in your area 11 2 USING DETERGENT AND ADDITIVES eco note using the appliance and practical tips DETERGENT AND ADDITIVES Important Remember that concen...

Page 12: ...proceed as follows a Starting from the off 0 position the washing machine turns on when selecting the desired wash programme see programme table start stop button spin and anti crease button additional function button time delay button programme selector command drying time button detergent dispenser screen SELECT ...

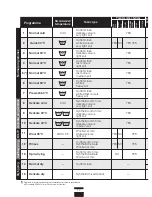
Page 13: ...ime is as follows a Select drying time in minutes using the drying time button The time will appear on the display increasing each time the drying time button is pressed If you select a wash dry option the load must not be over 4 kg 1 5 kg for delicate wash programmes Important Normal cold Quick 30ºC Normal 30ºC Normal 40ºC Normal 60ºC Normal 90ºC Prewash 60ºC Auxiliary Wool Delicate P R O G R A M...

Page 14: ...delicate colours medium soil Wool wool mix whites colours light soil Cotton cotton mix Synthetic Delicate Wool wool mix Cotton cotton mix Synthetic Delicate Wool wool mix Cotton Linen Synthetic mixed fabrics Programme for wash and energy consumption assessment in accordance with standard EN60456 press intensive wash button 1 2 3 4 5 6 7 8 9 10 11 12 13 14 15 Normal cold Quick 30ºC Normal 30ºC Norm...

Page 15: ...inal spin Normal wash rinses automatic additive absorption if desired and long final spin SHORT wash rinses automatic additive absorption if desired and long final spin 15 NOTE the KWh and litre consumptions and programme durations may vary depending on the type and amount of clothes mains water pressure etc 6 1 5 6 6 6 6 6 3 3 3 1 6 6 4 3 1 5 Approx duration minutes 0 15 49 0 20 30 0 40 49 0 65 4...

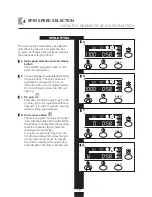
Page 16: ... be reduced at 100 r p m intervals to 400 r p m for display models On non display models the LED will light up c No spin Press the spin button again to get to the no spin option A programme without a final spin It is used to prevent creasing when washing special fabrics d Anti crease option The wash programme stops on the last rinse with the clothes left in water When the function is deactivated t...

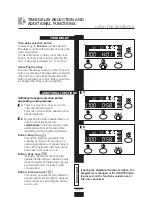
Page 17: ... By pressing the button several times you can choose between several combinations of one two and up to three additional functions at the same time depending on the programme selected Button Easy iron This option prevents garments from creasing by means of carrying out a special programme with special turns to fluff out the garments after spin drying and make them easier to iron Button Extra rinse ...

Page 18: ...he wash programme has been selected together with all its options Activating the block function a The block function is activated by pressing the Start Stop button and holding it down for at least 3 seconds The display will show if it is activated Deactivating the block function b The block function is cancelled when the wash programme comes to an end If you want to deactivate the block function b...

Page 19: ...l the washing machine by adjusting the feet to reduce the noise caused by spin drying Try and wash clothes of different sizes in the same wash programme to favour the distribution of the clothes inside the drum during spin drying All the models have a safety system for spin drying that prevents spin drying from being carried out if the distribution of the clothes inside the drum is too concentrate...

Page 20: ...is carried out Clean the detergent dispenser whenever there is any washing product residue left inside a Pull outwards on the detergent dispenser to remove it completely b Use warm water and a brush to clean the compartments c Also clean the additive compartment siphons having removed them first Once they have been cleaned put them back making sure that they fit right in to the back Put the dispen...

Page 21: ...ntainer under the drain pump filter to collect any water that comes out of it d Half or quarter turn the filter to the left Water will start to come out e When all the water has drained out of the washing machine turn the filter several times until it can be completely removed by gently pulling on it f Remove the objects or fluff caught in the filter or the drain pump Put the filter and the filter...

Page 22: ...or is properly shut The washing machine is not plugged into the mains or there is no voltage in the mains supply The Start Stop button has not been pressed If the washing machine door is not properly shut F04 will appear on the display This may be due to the following The blocking and transport screws have not been removed The washing machine has not been correctly levelled Indicator FO1 FO2 CO3 F...

Page 23: ...locked building drainage pipes blocked or incorrect pump electrical connection Solution if the pump is blocked gain access to it as described in section 2 maintaining and cleaning the appliance If this failure is detected F02 will appear on the display This may be due to an uneven distribution of clothes in the drum and may cause an excessive level of vibrations The solution is to select a spin dr...

Page 24: ...uidance purposes only and may be affected by the conditions under which the selected programme is being run e g initial water temperature size of load or unbalance caused by the garments during spin drying The washing machine can detect other indications When this happens a number of other indicators appear on the display F05 F06 F10 If this happens call the Official Technical Service Why is there...

Page 25: ... health derived from incorrect disposal This will enable the materials in them to be treated and recycled obtaining important savings in energy and resources To highlight the obligation of collaborating with selective waste collection the product is marked with a symbol to warn against using traditional containers for disposing of the appliance For further information contact your local authority ...

Page 26: ......

Page 27: ......

Page 28: ...01 10 LJ6A035V7 B026A4200 ...

Reviews: