Caple RIF89 Instruction Manual Download Page 7

Turn temperature regulator counterclockwise to the lo west 

setting=lightest cooling;   
(Turn the reg

u

lator c

o

unterclockwise to the most 

w

ill 

power off the refrigerator, compressor will stop)   
Turn temperature regul

a

tor counter


cl

o

ckwise to the 

highest setting=coldest setting;   
Temperature setting sh

o

uld conform to the follo

w

ing 

conditions:  
· Ambient temperature; 


· Quantity of food stored;     

· Door openings;   

Through obs ervation,  you’ll soon l

e

arn ho

w

 to select a n 

appropriate temperature setting.   
Appropriate temperature setting is v ery important for foo d 

storing. Microbes can get food spoiled very quickly, unless 

there growth is sprouted b

y

 low temperature environment. 

It is recommended to set the temperature to 18°C or lower 

which ma

y

  effectively  eliminate food spoil

i

ng process b

y


microbes.  

d).Stopping 


Turn temperature regulator counterclockwise to the most.   
The compressor should stop by then.   
Unplug from wall outlet.   

7.Freezer compartment 


3-star or 4-star freezer are suitable for storing deep frozen   
food (already frozen befor e added to the freezer), storing 

fresh food for  a short  period (2-3 weeks) by freezing it, or  

making ice, ice cream and water ice.   
Recommended expiration date of food must be observed.   
Freezer can be used to produce ice cubes.   

1.Temperature  within the fr

e

ezer ca

n

 be  adjuste

d

 b

y


setting temper ature regu

l

ator. F

o

r  fresh fo od and foo

d


which needs to be stored for a long period, -18°C or below 

is recomme nded, as micr obes can  barely survive u

n

der 

this temperature. Once tem perature is highe

r

 than -10°C, 

microbes  will start to  caus e spoil ing of food,  and storage 

period of foo d  will b e effecti vely red uced. If you n

e

ed to 

freeze fo

od

  which  is alr

e

ady  partly or t

o

tally tha

w

ed, 

please co

o

k it  before  adding it  to the freez

e

r ag

a

in. T

h

high temper

a

ture of co

o

king  process c

a

n  eliminate most  

microbes.  


2    The higher the temperatu

r

e regulator is set, the lo wer 

the temperature within the freezer will be.   

3  Normall

y

, w

h

en fo

o

d re

q

uires o

n

ly s

h

ort perio

d

 of 

storage, select a medium setting.   

4  Norma

l

ly, when food requires a long period of storage, 

s

elect a high setting.   

NOTE! 


·    Never add can

n

ed or bottled carbon dioxide drinks to the 

freezer, as carbon di

o

xide ma

y

 e

x

pand 

wh

en u

n

der 

freezing, and lead to

 an

 explosion hazard.   

·    Bottled food which n

e

eds immediate cooling should be 

stored in the fr

e

ezer for no  more than o

n

e h

o

ur before 

they’re taken out, otherwise bottles may burst.   

·  Ice cream


or ice should 

b

e

 a

l

lowed sev

e

ral 

minutes b

e

fore usin

g

, as li

p

s and to

n

gue ma

y

  get 

frostbite (chap  ma

y

 occ

u

r in  skin). Mean while, av

o

id 

touching inner walls of freezer with wet hands.   


IMPORTANT! 


·    Food to be added to freezer must be well wrapped.   

·    Observe expiration date of frozen food.   

·    Only 

high quality fresh food

  is suita

bl

e for freez

er


storage.  

·    Food stored in freezer should be properly sized.   

·    Weight of a singl

e

 packa

g

e of frozen fo

o

d sho

u

ld  not 

exceed 2 kg.   

·  Please use


reusab

l

e pl

a

stic film, aluminum film for


packing food, or put food in containers.   

·    Food packages should not entrap too much air inside.   

·  Use bunge, clip, rope o

r

  freezing-resistant tape for 

sealing of food package.   

·  F

i

lm  welding devic

e

 can  be use

d

 to se

a

l the p

l

astic 

packages.  

·  Place the 

w

ide s

i

de  of food  package  downward to  

obtain a faster freezing process.   

·  


W

i

pe the packa

g

es dr

y

 before ad

d

ing them to the 

freezer, as they may stick together when frozen.   

·    If you ne

e

d to freeze foo

d

  which is alr eady partl y or 

totally tha

w

ed, pleas

e

 cook i

t

 before ad

d

ing it to the 

freezer again.   

·    Don’t use f

o

od  which  is a lready  expired, as the

y

 m

a

cause poisoning.   

8.Making ice cubes

 and

 ice cream 

4


Summary of Contents for RIF89

Page 1: ...Instruction manual for in column freezer Contact Caple on 0844 800 3830 or for spare parts www 4caple co uk Model code RIF89 ...

Page 2: ...ood as described in this User s Manual are free of toxic substances The symbol on the product or on its packaging indicates that this product may not be treated as household was te Instead it shall be handed over to the applicable collection point for the recycling of electrical and electronic equipm ent By ensuring this product is disposed of correctly you will help prevent potential negative con...

Page 3: ...es inside the food storage compartments of the appliance unless they are of the type recommended by the manufacturer Do not store explosive substances such as aerosol cans with a flammable propellant in this appliance 3 If the supply cord is damaged it must be replaced by a special cord or assembly available from the manufacturer or its service agent This appliance is not intended for use by perso...

Page 4: ...dard To avoid the risk of child entrapment please make sure your old refrigerator is inoperative and safe by removing the latches and bolt locks before disposal Important It must be noted that a refrigeration system contains refrigerants which require specialized waste disposal Contact your local waste disposal center for proper disposal of an old appliance and contact your local authority or your...

Page 5: ... the refrigerator c Make sure to remove film and tape on the cabinet and the door d Remove polystyrene chips if any around the refrigerator e Take out accessories and literature in the refrigerator f Clean the inside of the refrigerator with luke warm water and vinegar and then dry it with a soft cloth g Use the spanners supplied to adjust the leveling leg to ensure the refrigerator is stable Do n...

Page 6: ...lowing technical data Write down the technical data for later reference to avoid the need for moving the refrigerator when such data is needed Model Type Storage Liter Working voltage Volt Max input power W Watt Current Amp Energy consumption kWH 24hr Freezing capacity kg 24hr 5 Electric Connection The refrigerator should use a properly grounded outlet which should be checked by a qualified electr...

Page 7: ...y partly or totally thawed please cook it before adding it to the freezer again The high temperature of cooking process can eliminate most microbes 2 The higher the temperature regulator is set the lo wer the temperature within the freezer will be 3 Normally when food requires only short period of storage select a medium setting 4 Normally when food requires a long period of storage select a high ...

Page 8: ...nto electric parts in the refrigerator If a heat exchanger i e condenser is mounted on the back of refrigerator dust and lint should be removed regularly to enable efficient heat dissipation and avoid excessive power consumption Use a soft brush or a duster to clean the outside of heat exchanger The defrost water drains away through the gutter The drain hole should be cleaned regularly by use of a...

Page 9: ...t 0 Is the fuse broken Or in poor contact b Problem The inner compartment is not cool enough the compressor cycles on and off frequently Please check The refrigerator freezer compartment should stand still for at least 12 hours after installation to stabilize the refrigerant circulation system See Start up If it doesn t work unplug the refrigerator and tilt the refrigerator to one side for a while...

Page 10: ...ed Caple engineers The manufacturer is not responsible for the risk of damages or injuries due to failure to comply with this provision and the warranty will be voided The warranty and the list of service centers indicate the authorised after sales service providers for your appliance Please consult your dealer if the there is no service center in your neighborhood For faults or problems caused du...

Page 11: ...Installation guide Contact Caple on 0117 938 7420 or for spare parts www caple co uk ...

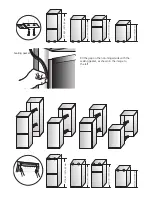
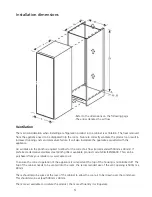
Page 12: ...pply D Make sure that the appliance is working correctly before placing any food in it WARNING DO NOT INSTALL THE APPLIANCE NEAR TO ANY HEAT SOURCES AND LEAVE AGAP OF AT LEAST 5 CM ABOVE IT INSTALLATION IN THE TALL UNIT HOUSING The dimensions of the tall unit housing must correspond to those illustrated on pages 4 and 5 Insert the appliance in the housing against the side panel adjacent to the ope...

Page 13: ...1776 00 1570 00 mm 1776 00 1570 00 mm Sealing gasket Fill the gap on the non hinged side with the sealing gasket as shown in the image to the left ...

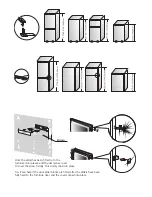
Page 14: ... fitted to to the furniture door please add the decorative cover to cover the screw fixings This simply clips into place Tip It can help if the door slider blocks are fitted after the sliders have been fully fixed to the furniture door and the covers cliped into place ...

Page 15: ...s required to allow for the correct air flow recommended 500mm x 40mm If preferred a decorative stainless steel plinth grille is available product code GRILL SENSE600 This can be purchased from your retailer or www caple co uk To ensure the correct operation of the appliance it is important the top of the housing is not blocked off The top of the cabinet needs to be vented into the room the recomm...

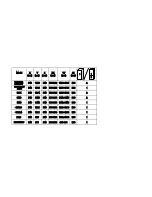
Page 16: ...0 550 560 1778 1785 560 1 1440 540 1440 540 550 560 1442 1449 560 2 1574 540 1574 540 550 560 1576 1580 560 2 1440 540 1440 540 550 560 1442 1449 560 1 RIF123 540 1221 540 550 560 1223 1230 560 1 RIL124 540 1221 540 550 560 1223 1230 1022 1028 560 1 1020 540 875 540 550 560 560 1 RIL891 RIF89 540 871 540 550 560 873 880 560 1 1 2 1 ...

Page 17: ...ssembly in such a way so that pin of the lower hinge is aligned with the appropriate hole of the lower door bracket 10 Attach the middle hinge on the other side of the appliance so that the lower pin of the middle hinge is aligned with the appropriate hole of the upper door bracket Position the second door assembly so that the upper pin of the middle hinge is aligned with the appro priate hole of ...

Reviews: