background image

20 Instruction manual RiF125

Please keep this instruction manual for future reference 

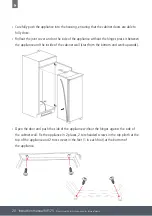
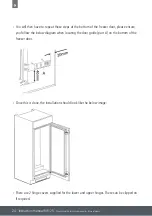
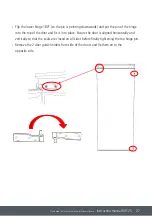
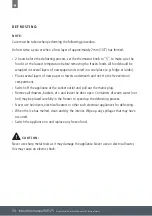
 ›  Carefully push the appliance into the housing, ensuring that the cabinet doors are able to 

fully close.

 ›  Rollout the joint cover and on the side of the appliance without the hinges press it between 

the appliance and the inside of the cabinet wall (start from the bottom and work upwards).

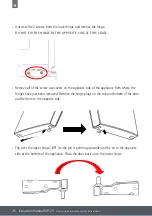
 ›  Open the door and push the side of the appliance without the hinges against the side of 

the cabinet wall. Fix the appliance in 2 places, 2 torx headed screws in the top plinth at the 
top of the appliance and 2 torx screws in the feet (1 in each foot) at the bottom of  
the appliance. 

15

EN - 14

Alarm light

In case of a problem within  the fridge, 

the alarm LED will illuminate red.

Temperature Adjustment Warnings

• It is not recommended that you operate

your fridge in environments colder than

10°C in terms of its efficiency.

• Do not start another adjustment while

you are already making an adjustment.

• Temperature adjustments should be

made according to the frequency of

door openings, the quantity of food

kept inside the fridge and the ambient

temperature in the location of your

fridge.

• In order to allow your fridge to reach

the operating temperature after being

connected to mains, do not open the

doors frequently or place large

quantities of food in the fridge. Please

note that, depending on the ambient

temperature, it may take 24 hours for

your fridge to reach the operating

temperature.

• A 5 minute delay function is applied to

prevent damage to the compressor of

your fridge when connecting or

disconnecting to mains, or when an

energy breakdown occurs. Your fridge

will begin to operate normally after 5

minutes.

• Your appliance is designed to operate

in the ambient temperature range

T/N  = 16°C - 43°C intervals stated in

the standards, according to the climate

class displayed on the information

label. We do not recommend operating

your appliance out of the stated

temperature limits in terms of cooling

effectiveness.

Do not block the air inlet and outlet openings 

when storing food, otherwise air circulation 

provided by the turbo fan will be impaired.

Turbo fan

EN - 14

Alarm light

In case of a problem within  the fridge, 

the alarm LED will illuminate red.

Temperature Adjustment Warnings

• It is not recommended that you operate

your fridge in environments colder than

10°C in terms of its efficiency.

• Do not start another adjustment while

you are already making an adjustment.

• Temperature adjustments should be

made according to the frequency of

door openings, the quantity of food

kept inside the fridge and the ambient

temperature in the location of your

fridge.

• In order to allow your fridge to reach

the operating temperature after being

connected to mains, do not open the

doors frequently or place large

quantities of food in the fridge. Please

note that, depending on the ambient

temperature, it may take 24 hours for

your fridge to reach the operating

temperature.

• A 5 minute delay function is applied to

prevent damage to the compressor of

your fridge when connecting or

disconnecting to mains, or when an

energy breakdown occurs. Your fridge

will begin to operate normally after 5

minutes.

• Your appliance is designed to operate

in the ambient temperature range

T/N  = 16°C - 43°C intervals stated in

the standards, according to the climate

class displayed on the information

label. We do not recommend operating

your appliance out of the stated

temperature limits in terms of cooling

effectiveness.

Climate 

Class

Ambient Temperature 

o

C

T

Between 16 and 43  (°C)

ST

Between 16 and 38  (°C)

N

Between 16 and 32  (°C)

SN

Between 10 and 32  (°C)

The Turbo Fan 

Do not block the air inlet and outlet openings 

when storing food, otherwise air circulation 

Instruction manual RiL1795

16

CAPLE FRESH  
(MAXI-FRESH PRESERVER)

Caple Fresh technology eliminates the ethylene
gas (a by product of fresh foods) inside the
vegetable draw
fresh foods shelf life, especially gr
Caple Fresh also blocks the bad smells produced
in the refrigerator.

- The Caple Fresh filter must be cleaned once a 

year
one day.

- When you want to clean the filter, remove the 

back side in the direction of the arrow.

- Don’t wet this part with water or detergent.

13

Caple Fresh (Maxi-fresh preserver)

Caple Fresh technology eliminates the ethylene gas (a 

byproduct of fresh foods) inside the vegetable  draw. By this 

method,  it maximizes the fresh foods shelf life, especially

green vegetables. Caple  Fresh also blocks the bad smells

produced  in  the refrigerator.

• The Caple Fresh filter must be cleaned once a year. It can be

cleaned by leaving in sunlight for one day.

• When you want to clean the filter, remove the back side in the

direction of the arrow.

USAGE INFORMATION

13

Caple Fresh (Maxi-fresh preserver)

Caple Fresh technology eliminates the ethylene gas (a 

byproduct of fresh foods) inside the vegetable  draw. By this 

method,  it maximizes the fresh foods shelf life, especially

green vegetables. Caple  Fresh also blocks the bad smells

produced  in  the refrigerator.

• The Caple Fresh filter must be cleaned once a year. It can be

cleaned by leaving in sunlight for one day.

• When you want to clean the filter, remove the back side in the

direction of the arrow.

• Don’t wet this part with water or detergent. 

Caple Fresh

(Maxi-fresh preserver)

USAGE INFORMATION

13

Caple Fresh (Maxi-fresh preserver)

Caple Fresh technology eliminates the ethylene gas (a 

byproduct of fresh foods) inside the vegetable  draw. By this 

method,  it maximizes the fresh foods shelf life, especially

green vegetables. Caple  Fresh also blocks the bad smells

produced  in  the refrigerator.

• The Caple Fresh filter must be cleaned once a year. It can be

cleaned by leaving in sunlight for one day.

• When you want to clean the filter, remove the back side in the

direction of the arrow.

• Don’t wet this part with water or detergent. 

Caple Fresh

(Maxi-fresh preserver)

USAGE INFORMATION

RIL1795_Larder Instruction Manual.indd   16

07/02/2017   10:35

RI5505 Fridge Freezer Instruction Manual.indd   15

RI5505 Fridge Freezer Instruction Manual.indd   15

05/02/2020   14:30

05/02/2020   14:30

> Carefully push the appliance into the housing, ensuring that the cabinet doors are able to 
fully close.

t the joint cover and on the side of the app

  Rollou 

liance without the hinges press it between the 

appliance and the inside of the cabinet wall (start from the bottom and work upwards).

or and push the side of the applian

> Open the do 

ce without the hinges against the side of cabinet 

wall. Fix the appliance in two places, 2 torx headed screws in the top plinth at the top of the 
appliance and 2 torx screws in the feet (1 in each foot) at the bottom of the appliance. 

>
Summary of Contents for RIF125

Page 1: ...Contact Caple on 0117 938 7420 for spare parts or www caple co uk Built in Freezer Instruction Manual RIF125 ...

Page 2: ...iche 11 Electrical Connection 12 Product Overview 13 Using the Appliance 14 Ventilation Requirements 17 Installation 18 Built in Installation 19 Installing the Furniture Door 23 Reversing the Furniture Door 25 Food Storage 28 Cleaning and Maintenance 33 Transport and Repositioning 35 Troubleshooting 36 Energy Saving Tips 39 Caple Contact Details 40 ...

Page 3: ...accordance with all applicable local and international standards and regulations This appliance is intended to be used in household and similar applications such as Staff kitchen areas in shops offices and other working environments Farm Houses By clients in hotels motels and other residential type environments Bed and breakfast type environments This appliance may only be used by persons includin...

Page 4: ...ce Never allow children to play with the appliance Cleaning and user maintenance should not be carried out by children without supervision Children aged from 3 to 8 years are allowed to load and unload refrigerating appliances Materials used for packaging nylon staplers Styrofoam etc may cause harmful effects to children they should be disposed of immediately Children can injure themselves on an o...

Page 5: ...iance malfunctioning To maintain the efficiency and safety of your appliance we recommend you always use original spare parts and to call only our authorised Caple Service agents in case of need Multi socket adapters and extension leads should not be used to connect the appliance to the mains electricity supply The electrical system of this appliance may be used safely only when it is correctly co...

Page 6: ...e refrigerator plug it must be replaced by the manufacturer a service agent or similarly qualified persons in order to avoid a hazard A specially grounded plug has been connected to the power cable of your refrigerator This plug should be used with a specially grounded socket of 13 amperes If there is no such socket in your house please have one installed by an authorised electrician I N S TA L L ...

Page 7: ...damaged during transportation Check the appliance for any damage In the case of any defect do not use the appliance and contact your retailer or Caple Service immediately Ensure that the supply cord is not wedged trapped or damaged during the installation If the supply cord is damaged it must be replaced by a Caple service technician or similarly qualified persons in order to prevent a hazard Neve...

Page 8: ...struction Do not place your appliance on a carpeted surface as this will prevent adequate ventilation When the appliance is not in use we recommend you turn it off and isolate it from the electrical supply This appliance must be used in the vertical position on a flat surface Do not use electrical appliances inside the food storage compartments of the appliance unless they are of the type recommen...

Page 9: ... quickly cool drinks do not leave bottles inside the freezer compartment for more than 1 hour otherwise they could burst C L E A N I N G A N D M A I N T E N A N C E Clean the appliance thoroughly before use Always switch off the appliance from the mains isolating the electrical supply before any cleaning or maintenance Do not use mechanical devices or other means to accelerate the defrosting proce...

Page 10: ...your old fridge or freezer has a lock break or remove the lock before discarding it because children may get trapped inside it and may cause an accident Be careful to avoid damaging the pipework before disposal e g by puncturing coolant channels bending pipework scratching the surface coating Symbol ISO 7010 W021 Warning Risk of fire flammable materials Symbol ISO 7010 W021 Warning Risk of fire fl...

Page 11: ...hold waste disposal service or the retailer where you purchased the product CE DECLARATIONS OF CONFORMITY This appliance has been manufactured to the strictest standards and complies with all applicable legislation Low Voltage Directive LVD and Electromagnetic Compatibility EMC UKCA DECLARATIONS OF CONFORMITY This appliance has been manufactured to the strictest standards and complies with all app...

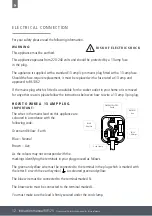
Page 12: ... be connected to the terminal marked L You must make sure the lead is firmly secured under the cord clamp BLUE Neutral Cord Cl or coloured green and yellow The blue wire must be connected to the terminal marked N The brown wire must be connected to the terminal marked L You must make sure the lead is firmly secured under the cord clamp 9 For your safety please read the following information WARNIN...

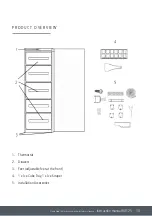
Page 13: ...n manual RiF125 Please keep this instruction manual for future reference P R OD UCT OV ERVIEW 1 Thermostat 2 Drawers 3 Feet adjustable feet at the front 4 1 x Ice Cube Tray 1 x Ice Scraper 5 Installation Accessories ...

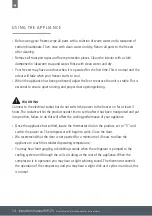
Page 14: ...ng closing WARNING Connect to the electrical socket but do not switch the power to the freezer on for at least 3 hours The coolant within the product needs time to settle after it has been transported and put into position failure to do this will affect the cooling performance of your appliance Once the appliance has settled locate the thermostat dial on the product set to 5 and switch the power o...

Page 15: ...lly During fast freezing press and hold the fast freezing button for 3 seconds then the function will be manually switched off immediately TEMPERATURE CONTROL DIAL The temperature in the appliance is controlled by the temperature control dial or thermostat located at the top of the appliance Rotate the control dial clockwise and anti clockwise to regulate the temperature inside the freezer 1 2 3 4...

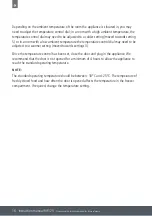
Page 16: ... low ambient temperature the temperature control dial may need to be adjusted to a warmer setting moved towards settings 3 Once the temperature control has been set close the door and plug in the appliance We recommend that the door is not opened for a minimum of 4 hours to allow the appliance to reach the standard operating temperature NOTE The standard operating temperature should be between 18 ...

Page 17: ...quired to allow for the correct air flow recommended 540mm x 50mm If preferred a decorative stainless steel plinth grille is available product code GRILL SENSE600 This can be purchased from your retailer or www caple co uk To ensure the correct operation of the appliance it is important the top of the housing is not blocked off The top of the cabinet needs to be vented into the room the recommende...

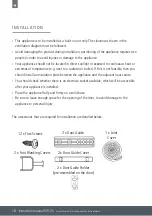
Page 18: ...y The accessories that are required for installation are detailed below IN STA LL A T ION This appliance is to be installed as a built in unit only The clearances shown in the ventilation diagram must be followed Avoid damaging the product during installation positioning of the appliance requires two people in order to avoid injuries or damage to the appliance Your appliance should not be located ...

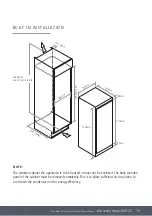
Page 19: ...appliance is to be housed in must not be enclosed The back wooden panel of the cabinet must be removed completely This is to allow sufficient air circulation to cool down the condenser unit for energy efficiency N S I O N S 560mm 1225 1233mm min 550mm 540mm 595mm 540mm min 50mm 1126mm 1224mm 1245 40mm 58mm Ventilation min 200cm in plinth ...

Page 20: ...bottom and work upwards or and push the side of the applian he do ce without the hinges against the side of cabinet he appliance in two places 2 torx headed screws in the top plinth at the top of the and 2 torx screws in the feet 1 in each foot at the bottom of the appliance 15 EN 14 Alarm light In case of a problem within the fridge the alarm LED will illuminate red Temperature Adjustment Warning...

Page 21: ...0 14 30 Apply the foot blanking covers by clipping them in to place on the feet at the bottom of the appliance The plastic stem on the foot caps are there as a guide of what the distance between the product and the edge of the cabinet should be approximately 42mm Snap off the plastic stem after installation Apply blanking covers by clipping them in to place at the top metal plinth at the top of th...

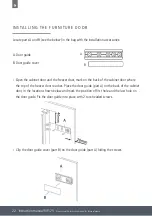
Page 22: ...ce with 2 torx headed screws Clip the door guide cover part B on the door guide part A hiding the screws A Door guide B Door guide cover A B INS TA LL ING T H E FURNITURE DOOR Locate parts A and B see the below in the bag with the installation accessories Open the cabinet door and the fridge door mark on the back of the cabinet door where the top of the fridge door reaches Place the door guide par...

Page 23: ... and place it on to the door guide part A any adjustment is needed use the clearance space in the screw slots of the door guide der on to the door guide part A Check that the cabinet door closes correctly Door Guide Holder Push the appliance door and the cabinet door together align the holes on the door de holder and the holes on the edge of the door and fix into place with the 2 screws t were rem...

Page 24: ...hese can be clipped on if required have to repeat these steps at the bottom of the fridge door please ensure you w diagram when locating the door guide part A on the bottom of the fridge door done the installation should look like the below image hinge covers supplied for the lower and upper hinges These can be clipped on have to repeat these steps at the bottom of the fridge door please ensure yo...

Page 25: ...ng it up and away from the appliance Do not fix the hinge to the opposite side 22 RI5505 Fridge Freezer Instruction Manual indd 22 RI5505 Fridge Freezer Instruction Manual indd 22 05 02 2020 14 30 05 02 2020 14 30 REVERSING THE FURNITURE DOOR To reverse the door you will need to tilt the appliance backward to access the lower hinge which holds the screws Do not tilt the appliance more than 45 and ...

Page 26: ...ix on to the opposite side at ppliance Place the door back on to the lower hinge Unscrew the 2 screws from the lower hinge and remove the hinge Do not fix the hinge to the opposite side at this stage Remove all of the screw cap covers on the opposite side of the appliance from where the hinges have just been removed Remove the hinge plugs on the top and bottom of the door and fix them to the oppos...

Page 27: ...l sides before finally tightening the top hinge pin Remove the 2 door guide holders from side of the doors and fix them on to the opposite side Flip the lower hinge 180 so the pin is pointing downwards and put the pin of the hinge into the top of the door and fix it in to place Ensure the door is aligned horizontally and vertically so that the seals are closed on all sides before finally tightenin...

Page 28: ...en food make sure that it has been stored under appropriate conditions and that the packaging is not damaged Frozen food should be transported in appropriate containers and placed in the freezer as soon as possible Do not purchase frozen food if the packaging shows signs of humidity band abnormal swelling It is probable that it has been stored at an unsuitable temperature and that the contents hav...

Page 29: ...ng period of time Therefore add small amounts of spices to food to be frozen or the desired spice should be added after the food has thawed The storage time of food is dependent on the type of oil used Suitable oils are margarine calf fat olive oil and butter Unsuitable oils are peanut oil and pig fat Food in liquid form should be frozen in plastic cups and other food should be frozen in plastic o...

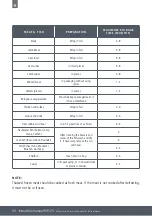
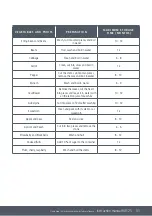
Page 30: ...n if it has a membrane Chicken and turkey Wrap in foil 4 6 Goose and duck Wrap in foil 4 6 Deer rabbit wild boar In 2 5 kg portions or as fillets 6 8 Freshwater fish Salmon Carp Crane Catfish After cleaning the bowels and scales of the fish wash and dry it If necessary remove the tail and head 2 Lean fish Bass Turbot Flounder 4 Fatty fishes Tuna Mackarel Bluefish Anchovy 2 4 Shellfish Clean and in...

Page 31: ...t into two pieces remove the core and boil in water 8 10 Spinach Wash and boil in water 6 9 Cauliflower Remove the leaves cut the heart into pieces and leave it in water with a little lemon juice for a while 10 12 Aubergine Cut into pieces of 2cm after washing 10 12 Sweetcorn Clean and pack with its stem or as sweetcorn 12 Apple and pear Peel and slice 8 10 Apricot and Peach Cut into two pieces an...

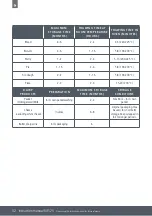
Page 32: ...astry 1 3 2 3 5 10 200 225 C Pie 1 1 5 3 4 5 8 190 200 C Filo dough 2 3 1 1 5 5 8 190 200 C Pizza 2 3 2 4 15 20 200 C DAIRY PRODUCTS PREPARATION MAXIMUM STORAGE TIME MONTHS STORAGE CONDITIONS Packet Homogenized Milk In its own packetwashing 2 3 Pure Milk in its own packet Cheese excluding white cheese In slices 6 8 Original packaging may be used for short term storage Keep wrapped in foil for long...

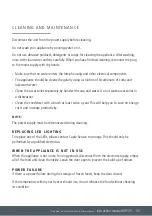
Page 33: ...ries separately by hand with soap and water Do not wash accessories in a dishwasher Clean the condenser with a brush at least twice a year This will help you to save on energy costs and increase productivity NOTE The power supply must be disconnected during cleaning REPLACING LED LIGHTING To replace any of the LEDs please contact Caple Service to arrange This should only be performed by a qualifie...

Page 34: ...lace several layers of new paper or towels underneath and next to the freezer door compartment Switch off the appliance at the socket outlet and pull out the mains plug Remove all drawers baskets etc and leave the door open Containers of warm water not hot may be placed carefully in the freezer to speed up the defrosting process Never use hairdryers electrical heaters or other such electrical appl...

Page 35: ...ay be kept for re transportation optional Fasten your appliance with thick packaging bands or strong cords and follow the instructions for transportation on the packaging Remove all movable parts shelves accessories vegetable bins and so on or fix them into the appliance against shocks using bands tape when re positioning or transporting Always carry your appliance in the upright position ...

Page 36: ...o the same socket The fuse has not blown The voltage is correct for the appliance There has been a power cut THE APPLIANCE PERFORMS POORLY CHECK IF You have not overloaded the appliance The freezer temperature set to MAX The door is closed perfectly There is no dust on the condenser There is enough space at the rear and side walls for ventilation THE INTERNAL TEMPERATURE OF THE APPLIANCE IS TOO CO...

Page 37: ...logged or the drip tray at the back of the appliance is full The pipe can be cleared by pouring hot water through You must ensure the appliance is turned off the plug is removed from the socket and a jug or bucket is in place to catch the flow of water SHORT CRACKING Heard when the thermostat switches the compressor on off COMPRESSOR NOISE Normal motor noise This noise means that the compressor op...

Page 38: ...r door opened frequently Humidity of the room gets in the freezer when the door is opened Humidity build up will be faster when you open the door more frequently especially if the humidity of the room is high IF THE DOORS ARE NOT OPENED AND CLOSED PROPERLY Do the food packages prevent closing of the door Are the door compartments shelves and drawers placed properly Are door joints broken or torn I...

Page 39: ...ise an insulating plate should be used 2 Allow warm food to cool before placing them inside the appliance 3 Avoid keeping the doors open for long periods and opening the doors too frequently as warm air will enter the appliance and cause the compressor to switch on unnecessarily often 4 Keep the covers of the different temperature compartments such as the crisper and chiller closed 5 The door gask...

Page 40: ...Caple Service Fourth Way Avonmouth Bristol BS11 8DW T 0117 938 1900 E service caple co uk www caple co uk ...

Reviews: