background image

GB

Automatic heating (or “heat-up” function)

This function facilitates cooking. You don’t have to be there permanently during cooking. The hob heats 
up automatically to full power and then returns to the selected level after a certain time (see table 1).

Tab. 1

Power level

Heat-up function (Time in minutes)

1

1

2

3

3

4.8

4

6.5

5

8.5

6

2.5

7

3.5

8

4.5

9

---

Activating automatic heating

1. Press the selection button (2) for the desired cooking area.
2. Select power level 9 with the Minus button, the use the Plus button to select level “A” “9”.  Afterwards 

set the desired level for contunation of cooking with the Minus button, e.g. level 6. The display will 
show alternatively “A” and “6” during the “automatic heating” function.

Example: 

Select power level 9 and activate the automatic heating function with the Plus button (display 

9). Then set level 6 for continuation of cooking with the Minus button.
With these settings the hob will be heated for 2.5 min. at level 9, the display will alternate “A” and “6” 
and will then return to continuation cooking level 6.

12

Summary of Contents for C895IBK

Page 1: ...Instruction manual Instruction manual Instruction manual for for for for dual dual dual dual fuel hob fuel hob fuel hob fuel hob Model code C895IBK C895IWH Contact Caple on 0844 800 3830 or for spare parts www caple co uk ...

Page 2: ......

Page 3: ...E IS NOT INTENDED FOR USE BY PERSONS INCLUDING CHILDREN WITH REDUCED PHYSICAL SENSORY OR MENTAL CAPABILITIES OR LACK OF EXPERIENCE AND KNOWLEDGE UNLESS THEY HAVE BEEN GIVEN SUPERVISION OR INSTRUCTION CONCERNING USE OF THE APPLIANCE BY A PERSON RESPONSIBLE FOR THEIR SAFETY CHILDREN SHOULD BE SUPERVISED TO ENSURE THAT THEY DO NOT PLAY WITH THE APPLIANCE Dear customer We thank you and congratulate yo...

Page 4: ...d above using the corresponding knob The electric spark between the ignition plug and the burner provides the ignition of the burner itself After ignition immediately release the push button and adjust the flame according to need For models with a thermoelectric safety system the burner is ignited as in the various cases described above keeping the knob fully pressed on the maximum position for ap...

Page 5: ...working area vinegar salt lemonjuice etc the wall baffle and the small covers mobile parts of the burner must be washed frequently with boiling water and detergent taking care to remove every possible encrustation Dry carefully and check that none of the burner holes are fully or partially clogged the electrical parts are cleaned with a damp cloth and are lightly greased with lubricating oil when ...

Page 6: ...to 25 If liquid overflows from the container it does not stick to the surface of the hob because this is just slightly warm Operating principle This is based on the electromagnetic properties of most cooking containers The electronic circuit governs the operation of the coil inductor creating a magnetic field The heat is transmitted by the container to the food The cooking process takes place as f...

Page 7: ...em cannot start Pan detection A certainty which distinguishes the knowledgeable use of technology in favour of the consumer 1 Power ON Power OFF 7 Timer display 2 Cooking zone 8 Dual circuit indicator led 3 Cooking zone 9 Timer indicator led 4 10 Triple circuit led 5 Timer 11 Booster 6 Setting display Fig 3 7 ...

Page 8: ... OFF time is composed of 10 seconds deselection time for a cooking zone at setting 0 and 10 seconds switch OFF time Switching a cooking zone ON and OFF If the control is ON the respective cooking zone can be selected by operating a cooking zone select key PLUS key of the respective cooking zone There is a static dot indication in the respective display If the cooking zone is hot 0 is displayed ins...

Page 9: ...00 to 1850W Ø200 from 2300 to 3000W This function may terminate ahead of time if The button for the P zone is touched If the temperature of the zone or system is too high If the pan is removed for more than 10 minutes Residual heat indicator It is meant to indicate to the user that the glass ceramic has a dangerous touch temperature in the circumference of a cooking zone The temperature will be de...

Page 10: ... cancel the key lock Unlocking for cooking purposes To unlock and operate the control it is required to operate the front right cooking zone select key and the MINUS key simultaneously L LOCKED in the display extenguishes and all cooking zones show 0 with a blinking dot Should a cooking zone be hot H is displayed instead of the static 0 After switching OFF the control the child safety feature is a...

Page 11: ...y pressing the power key twice Time programming on cooking zones When the control is switched ON an independent timer can be programmed for every cooking zone By selecting a cook zone with the cooking zone select key then selecting the setting and finally activating the timer select key the time can be programmed as a switch off function for a cooking zone Around the timer four LEDs are arranged T...

Page 12: ...desired cooking area 2 Select power level 9 with the Minus button the use the Plus button to select level A 9 Afterwards set the desired level for contunation of cooking with the Minus button e g level 6 The display will show alternatively A and 6 during the automatic heating function Example Select power level 9 and activate the automatic heating function with the Plus button display 9 Then set l...

Page 13: ...s for induction cast iron containers better with an enamelled bottom to avoid scratching the ceramic glass hob containers made of glass ceramic terracotta aluminium copper or non magnetic stainless steel austenitic are not recommended and are unsuitable Yes No No Fig 4 Maintenance Fig 5 Traces of foil food residues splashes of fat sugar or very sugary foods must be removed immediately from the hob...

Page 14: ...ted places in terms of the laws in force The quantity of air which is necessary for combustion must not be below 2 0 m3 h for each kW of installed power See table of burner power Positioning Fig 6 7 The appliance is made to be fitted into a counter top as show in the figure Apply the sealant supplied around the whole perimeter of the hob Installation over an oven is not recommended but if this is ...

Page 15: ...NIZIONE SIGILLANTE NELLA VERSIONE FILOTOP POSIZIONE GUARNIZIONE SIGILLANTE NELLA VERSIONE SEMIFILOTOP POSIZIONE GUARNIZIONE SIGILLANTE NELLA VERSIONE INOX PLANO FILOTOP N B For the Semi flush top version it is not necessary to lower the hob by 4 8 mm POSITION OF SEALANT IN THE FILOTOP VERSION POSITION OF SEALANT IN THE SEMIFILOTOP VERSION POSITION OF SEALANT IN THE INOX PLANO FILOTOP VERSION 15 ...

Page 16: ...s and metal pipes even flexible pipes so as to obtain counter stress the inner parts of the appliance N B when the installation has been carried out check the perfect sealing of the entire connection system by using a soapy solution Adaptation to varius types of gas Fig 9 Should the appliance be pre set for a different type of gas than available procreed as follows replace the injector Fig 9 with ...

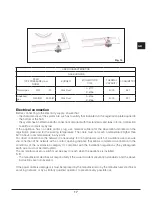
Page 17: ...late and for the working temperature The cable must not reach a temperature higher than 50 C above room temperature in any point For direct connection to the network it is necessary to fit an omnipolar switch of a suitable size to ensure disconnection of he network with a contact opening distance that allows complete disconnection in the conditions of the overtension category III compliant with th...

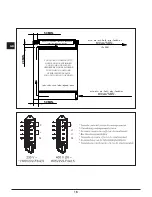
Page 18: ...tion inducción inductie indução aria air air Luft aire lucht ar 100 cm2 MIN ZONA FORNO O ARMADIETTO OVEN ZONE OR CUPBOARD ZONE FOUR OU PLACARD OFENBEREICH ODER SCHRANK ZONA HORNO O ARMARIO OVENRUIMTE OF KASTJE ZONA DO FORNO OU ARMÁRIO 50 MIN 50 MIN 20 MIN 2 x 500 N L PE N L2 L1 PE 18 ...

Page 19: ......

Page 20: ...Caple Fourth Way Avonmouth Bristol BS11 8DW www caple co uk ...

Reviews: