background image

CAPINTEC, INC. 

AreaExpert 

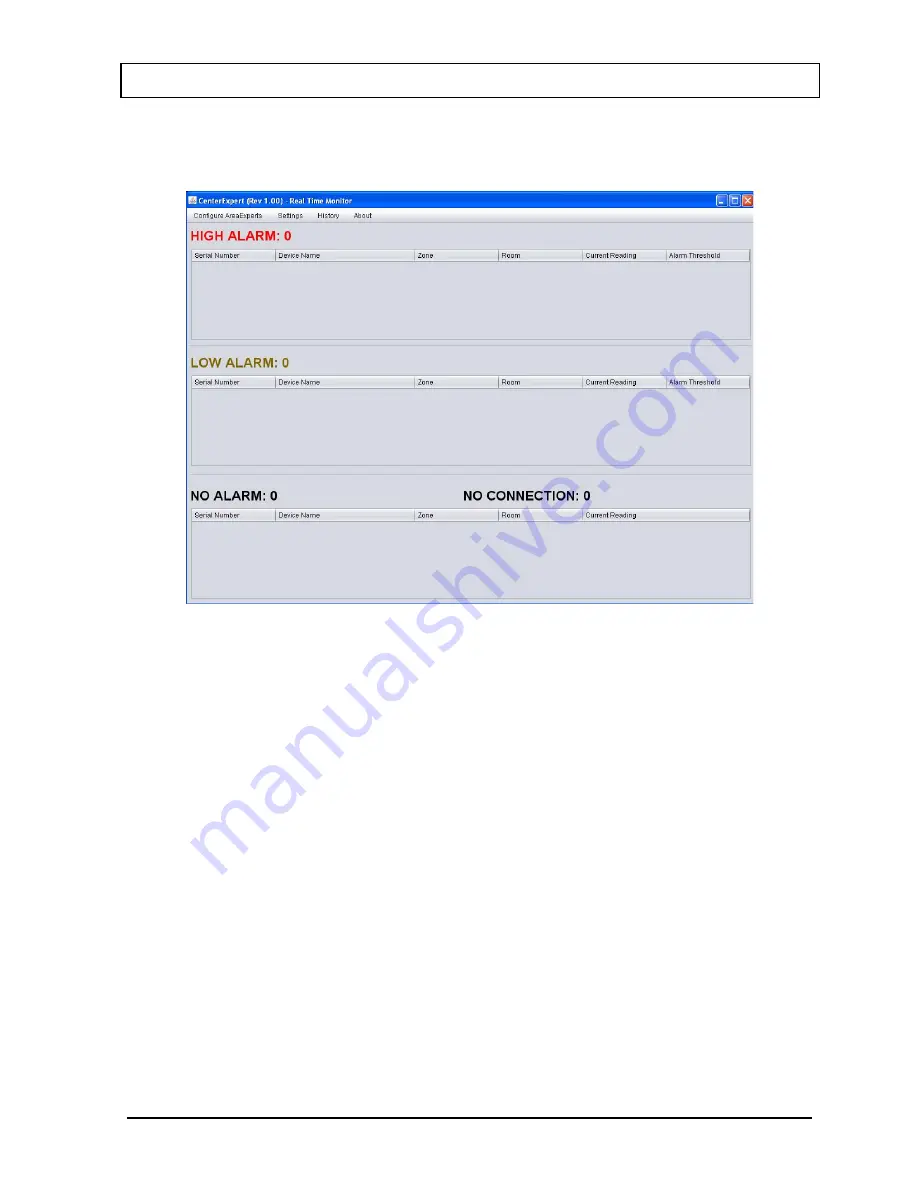
CenterExpert Main Screen 

When the CenterExpert is launched, the Main Screen appears: 


Main Screen 


The status and Current Reading of all AreaExperts in the CenterExpert will appear on 
the Main Screen 


Selecting CenterExpert Units 

The readings on the Main Screen can be displayed in mR/h or µSv/h. 


To select the unit, Click Settings 


Click on the desired unit. 

The ♦ symbol will appear in front of the selected unit. 


Note:  This selection is only for the display on the CenterExpert. It does not affect the 

display on the AreaExpert. 


Adding AreaExperts to the CenterExpert 

To add one or more AreaExperts to the CenterExpert: 


Click on Configure AreaExperts 


Click on Add AreaExpert to CenterExpert 

December 14 


29 

Summary of Contents for AreaExpert

Page 1: ... Inc Sales and Marketing and Customer Support 6 Arrow Road Ramsey NJ 07446 Phone 800 ASK 4CRC Fax 201 825 1336 Capintec Inc Only Authorized Service Center 620 Alpha Drive Pittsburgh PA 15238 Phone 800 227 6832 Fax 412 963 0610 Copyright 2014 Capintec Inc ALL RIGHTS RESERVED An Eczacɩbaşɩ Monrol company ...

Page 2: ......

Page 3: ...28 Installation 28 CenterExpert Main Screen 29 Adding AreaExperts to the CenterExpert 29 Removing AreaExperts from CenterExpert 31 Configuring a Single AreaExpert 32 Configuring Multiple AreaExpert 35 Viewing Alarm History 37 Viewing Data History 39 Viewing Statistics History 43 PERIODIC MAINTENANCE 45 DEVICE CLEANING 46 PACKAGE CONTENTS 46 TECHNICAL SPECIFICATIONS 46 DIMENSIONS mm 47 TROUBLESHOOT...

Page 4: ......

Page 5: ... complies with conditions written on the device s power label It is recommended that the device be connected to an Uninterruptable Power Supply UPS Any failure caused by connection to an inappropriate power supply shall void the warranty Verify that the device is OFF O before connecting to the power outlet Verify that the power cord is securely attached to both the power outlet and the device s po...

Page 6: ...iod shall be performed at no charge Failures caused by not complying with the conditions listed in the User s Guide are not covered by the warranty The device being subjected to abnormal physical and electrical impacts static discharge lightning fire and any other natural disasters are not covered by the warranty GENERAL INTRODUCTION The AreaExpert Area Radiation Monitor is a device designed for c...

Page 7: ...stograms can be viewed on the touchscreen by choosing the relevant time frame This information can be transferred to any data storage device over the USB connection It is possible to connect multiple area monitors over one network monitor the current measurement value of each area monitor and receive related reports through a PC optional When desired it is also possible to track area monitors plac...

Page 8: ...xpert typical wall mounting method DEVICE ACTIVATION Place the power switch to the ON I position Approximately one minute after powering on the device will be ready for the measurement 0 00 mR h will be displayed on the screen During power up if the power cord is plugged in the green LED will blink in short intervals and then switch to steady on A steady on LED indicates that the device is connect...

Page 9: ... for the details of the menus as well as for the changes on the LCD screen during operation ON OFF patterns for green LED status display Long blinking States that the battery charge level is higher than 20 Device is not connected to mains Short blinking States that the battery charge level is lower than 20 Device is not connected to mains Continuous ON state States that the device is connected to ...

Page 10: ...ser about the status of the device The icons and fields used in the Information Bar are described below Date This field displays the currently set date when the device menu is on the main screen reference the Setting the Date section on page 21 Back Button This button replaces the date field when viewing sub menus and is used to return to the previous menu Information Bar Measurement Unit Current ...

Page 11: ...s are disabled by CenterExpert Only the Shutdown button will be active The device is in the network connection request listening mode Low level alarm is muted Low High level alarms are muted o Battery Information Icons Device is connected to Mains power Device is running on battery power Charge level 80 Full charge Charge level 80 Full charge 80 Charge level 50 Charging 80 Charge level 50 50 Charg...

Page 12: ...han the set high limit value the bar scale is automatically adjusted as per the set value reference the Alarm Levels section on page 18 Current Status Chart This shows a histogram of the ionized radiation dose in the past one minute Numeric Display This shows the latest dose value along with the selected unit reference the Setting the Display Unit section on page 22 Full Screen Display Regardless ...

Page 13: ...e screen and the Current Status Bar and Current Status Chart will be displayed To switch back to the Numeric Display and Current Status Bar touch the Current Status Chart section for 5 seconds then touch the Numeric Display section for 5 seconds Statistics Screen The statistics screen displays a statistical presentation of the logged data and is described below under the Histogram and Alarm Log Sc...

Page 14: ...ed on the user defined high and low limit values and displays the average monthly values from the past 1 year Monthly Maximum This is colored chart based on the user defined high and low limit values and displays the maximum detected monthly values from the past one year Weekly Statistics Statistics from the past one year are shown on multiple screens The current week is displayed on the far right...

Page 15: ...rent day is displayed on the far right Daily Cumulative The Daily Cumulative screen presents cumulative radiation dose measured for a period of one year on a monthly basis This display offers a daily comparative study Daily Mean Average This is a colored chart based on the user defined high and low limit values and displays the daily average values from the past one year Daily Maximum This is a co...

Page 16: ...Cumulative screen presents cumulative radiation dose by the device during the selected day This display offers an hourly comparative study Colored based on the user defined high and low limit values Hourly Mean Average This is a colored chart based on the user defined high and low limit values and displays the hourly detected values for the selected day Name of the Chart Show Previous Days Button ...

Page 17: ...most recent alarm is placed at the top of the list Alarm logs begin by exceeding the low limit value and end by dropping below the low limit value The contents of an alarm log consist of the following parameters Maximum value detected during the log Start date and time of the log Total duration of the log The displayed logs are also stored in files separately reference the Backing Up Alarm Events ...

Page 18: ...it s setting the user can select one of the two silent modes o Half silent mode Only readings higher than high alarm limit are accompanied by an alarm sound o Full silent mode Neither high level nor low level alarms are accompanied by alarm sounds High level alarm has an on off pattern with higher frequency than that of low level alarm Select the High or Low alarm level to be set The Alarm Level S...

Page 19: ...rm cannot be zero or higher than the High Level alarm After saving the changes a notification message is displayed and the New Alarm Application Screen appears inquiring about keeping current data or deleting all data for the new alarm levels New Alarm Application Screen If the Delete all data for the new alarm level option is chosen upon touching the OK button all data statistics and alarm logs s...

Page 20: ...ne of the two language options Turkish or English Touch the OK button to activate the new setting Language Setting Screen Password Settings The default factory password is 12345 The password can be changed as follows Touch the Password button on the System Settings menu This screen displays the previously set password Enter the new password To abort changing the password touch the Cancel button To...

Page 21: ...ime of the device Touch the Time button on the System Settings menu Set the desired time by touching the up and down arrows To abort changing the time touch the Back button Touch the Confirm button to save the new time setting Time Setting Screen Setting the Date To change the currently set date of the device Touch the Date button on the System Settings menu To exit the Date Setting screen touch t...

Page 22: ...ate changes reference the Histogram section on page 13 Calibration Contact your supplier for detailed information about the calibration process Setting the Display Unit The device handles all logs including statistics and alarm logs based on the mR h unit Only the unit displayed on the Monitor Screen can be altered To change the displayed measurement unit Touch the Units button on the Settings Men...

Page 23: ... the Advanced Settings button then the Delete Operations button Touch the Delete All Data button A final confirmation message will appear on the screen before the deletion To delete all stored data touch the Confirm button This begins the deletion process for the device s per minute data This process may take several seconds To cancel data deletion exit the process by touching the Back button Dele...

Page 24: ... Warnings The device may upon exceptions that may occur during operation display a code number on the Information Bar In such a case do the following to delete the warning From the Settings Menu touch the Advanced Settings button then the Delete Operations button Touch the Delete Warning button A final confirmation message will appear on the screen before the deletion To delete all warnings touch ...

Page 25: ...blems and or data losses caused by not following the updating instructions and not abiding by the informational notes Note USB memory sticks to be used with the device should have the following properties Maximum 32GB capacity and up to version USB 2 0 With FAT or FAT32 file format Without any ROM partition or U3 technology Using Network Connection Listening Mode For all obtained data to be detect...

Page 26: ...memory device Two backup buttons are available Data Backup and Event Backup Data Backup Process To backup all per minute values and statistics data logged by the device on a USB memory device Verify that the device is powered by line voltage Data may be damaged by the battery running out of charge during the backup process Insert the USB memory device into the USB connector located below the scree...

Page 27: ...device into the USB connector located below the screen Verify that the USB icon appears on the Information Bar reference Information Icons on page 11 From the Settings Menu touch the Backup button Touch the Data Backup button to begin transferring the alarm event log files to the USB memory device This process may take several seconds A folder called AreaExpert will be created in the USB memory de...

Page 28: ...enterExpert program is under Programs Capintec Note If you get a message from Java that some Java features are being blocked click on the button to Allow Access Configuring AreaExpert for the CenterExpert The AreaExpert must be configured before it can be seen by the CenterExpert On the AreaExpert touch the Setup icon Enter the default password 12345 Touch the Advanced Settings button Touch the Ne...

Page 29: ...ings on the Main Screen can be displayed in mR h or µSv h To select the unit Click Settings Click on the desired unit The symbol will appear in front of the selected unit Note This selection is only for the display on the CenterExpert It does not affect the display on the AreaExpert Adding AreaExperts to the CenterExpert To add one or more AreaExperts to the CenterExpert Click on Configure AreaExp...

Page 30: ...matically added to the CenterExpert The network s Sub Net Address will be displayed Click the Scan and Add AreaExperts button The number of AreaExperts added will be displayed The details of the AreaExperts added will be displayed in the list Manually Add an AreaExpert AreaExperts can also be added manually Enter the AreaExpert s Serial Number in the Serial Number text box Enter the AreaExpert s c...

Page 31: ...xperts that have been added to the CenterExpert will be displayed on the Main Screen in the proper section with their readings displayed Removing AreaExperts from CenterExpert To remove one or more AreaExperts from the CenterExpert Click on Configure AreaExperts Click on Remove AreaExpert from CenterExpert Remove AreaExpert from CenterExpert The AreaExperts in the CenterExpert will be listed Decem...

Page 32: ...he list Returning to the Main Screen To return to the Main Screen click the Back button Configuring a Single AreaExpert To Configure an AreaExpert Click on Configure AreaExperts Click on Configure Single AreaExpert Configure Single AreaExpert To exit the screen click Back To see the list of AreaExperts in the CenterExpert Click on the drop down list 32 December 14 ...

Page 33: ... describe the AreaExpert Zone The AreaExpert may be assigned to a zone This field is optional The maximum number of characters in a zone name is 20 The name of the zone should describe the type of location e g Unrestricted The zone can be used to group all AreaExperts that have the same Low and High Alarms Room The AreaExpert may be assigned a room name This field is optional The maximum number of...

Page 34: ... the Low Alarm textbox The value must be less than the High Alarm Display Units This is to set the units on the AreaExpert Click on mR h of µSv h Language This is the language that is used on the AreaExpert Click on English or Turkish Screen Mode The readings on the AreaExpert can be Digital Graphical or both Click on Digits and Graphics Digits or Graphics Screen Lock The AreaExpert screen can be ...

Page 35: ...ing Multiple AreaExpert To Configure multiple AreaExperts Click on Configure AreaExperts Click on Configure Multiple AreaExperts Configure Multiple AreaExperts The AreaExperts in the CenterExpert are listed and checked Selecting AreaExperts To select which AreaExperts will be changed check the box in front of their Serial Numbers December 14 35 ...

Page 36: ...ick on mR h of µSv h Language This is the language that is used on the AreaExperts Click on English or Turkish Screen Mode The readings on the AreaExperts can be Digital Graphical or both Click on Digits and Graphics Digits or Graphics Screen Lock The AreaExperts screens can be locked Click on Unlock or Lock When Lock is selected the Lock icon will appear on the Information bar Submit Button Click...

Page 37: ...View The Alarm History for one or more AreaExperts may be viewed The AreaExpert s can be selected by Zone Room or Device Name The default is All AreaExperts Selecting by Zone The default is All Zones Click on the Zone drop down list to display the Zones To display AreaExperts in a particular Zone click on that Zone name Selecting by Room The default is All rooms December 14 37 ...

Page 38: ... for the following time periods Today Yesterday Current Week the past 7 days Previous Week the past 8 14 days Current Month Previous Month Date Range The default is today Click on the desired time period Date Range If Date Range is selected the starting date From and the ending date To must be entered Displaying the Alarm History When the desired AreaExpert s and the time period have been chosen c...

Page 39: ...displayed Alarm History click the Export CSV button A dialog box will appear to enter the file name When Save is clicked the displayed data will be saved in the entered file name Returning to the Main Screen To return to the Main Screen click the Back button Viewing Data History To view the Data History for an AreaExpert Click on History Click on View Data December 14 39 ...

Page 40: ...drop down list Click on the AreaExpert to view Selecting Time Period to View The Data History can be viewed for the following time periods Today Yesterday Current Week the past 7 days Previous Week the past 8 14 days Current Month Previous Month Date Range The default is today 40 December 14 ...

Page 41: ... be zoomed in expanded or zoomed out returned to previous time Marking the Zoom Area Click the left mouse button within the graph A vertical red line zoom line will appear Move the mouse and click the left button again A second vertical red line zoom line will appear To change the position of either line click the left mouse button near that line If you only want to zoom in from the origin to a gi...

Page 42: ...o zoom in from a zoom line to the end of the x axis move the mouse between the zoom line and the end of the x axis and click the right mouse button Zooming out To zoom out one level return to the previous graph move the mouse outside of the graph and click the right mouse button Clearing the Zoom line s To clear the zoom line s move the mouse outside the graph and click the left mouse button Print...

Page 43: ...ch data point in the full data set found by the Search will be saved in the csv file Returning to the Main Screen To return to the Main Screen click the Back button Viewing Statistics History Statistics may be viewed for Cumulative Exposure Maximum Exposure Rate and Mean Exposure Rate To view the Statistics History for an AreaExpert Click on History Click on View Statistics Statistics History Dece...

Page 44: ... For Daily the displayed data will begin on the entered date For Monthly the displayed data will begin on the month for the entered date Entering Number to Display The number of rows of data can be changed by the user For Hourly the default is 24 1 day For Daily the default is 30 30 day month For Monthly the default is 12 1 year Displaying the Statistics When the desired AreaExpert Statistics type...

Page 45: ...Alarm History To export the displayed Statistics History click the Export CSV button A dialog box will appear to enter the file name When Save is clicked the displayed data will be saved in the entered file name Returning to the Main Screen To return to the Main Screen click the Back button PERIODIC MAINTENANCE This product does not require periodic maintenance The operator of the device is obliga...

Page 46: ...v hr User optional Accuracy 10 Selectivity 55 µR hr Response time 1 second reaches 10 of continuous value in 3 5 sec Status LED displays 3 displays Power status Network or battery Low dosage speed High dosage speed Alarms Low High dosage speed Low battery Sound alarm High voltage level 550V Detector dead time 100 µs Contact Data exchange over USB and Ethernet Connection over local network and inte...

Page 47: ...itch to the ON I position Check line voltage Check the fuse If problem persists contact authorized technical service Resolution problems following an update Restart device according to the shutdown procedure If problem persists contact authorized technical service Device date and time values cannot be adjusted Contact authorized technical service GM Detector December 14 47 ...

Page 48: ...cycle dispose of the device according to local legislation It is obligatory to abide by the disposal laws of your current country or region when disposing of waste electronic devices CONTACT INFORMATION Manufacturer Moleküler Görüntüleme Tic ve San A Ş Headquarters 19 Mayıs Mah Dr Şevket Bey Sk No 5 34360 Şişli İstanbul TÜRKİYE Phone 90 212 219 5657 pbx Fax 90 212 219 4288 Factory Tübitak MAM Tekn...

Page 49: ...CAPINTEC INC AreaExpert CE DECLARATION OF CONFORMITY December 14 49 ...

Reviews: