

Installing the
Cape Cod
®
Wind Speed Indicator
fitted with optional
Peak Gust Register
PLEASE READ CAREFULLY BEFORE STARTING INSTALLATION.
Anyone with a ladder and a
few hand tools can easily do the job in an hour or two. If you prefer not to install the instrument
yourself, your television serviceman or electrician can do it for you. Regardless of who does the
installation,
the owner should become familiar with these instructions
. Incorrect installation or misuse
will shorten the life of the product and impair its performance.
The
Cape Cod
®
Wind Speed Indicator
consists of a wind-driven electrical generator outdoors,
connected by wire to an indicator dial indoors. The cup-type anemometer generates power varying with
the speed of the wind, and the dial electrically measures this power. The Peak Gust Register circuit
operates 24 hours/day, powered by a small 3-watt AC/DC adapter plugged into a regular household outlet.
Install this instrument and the
Cape Cod
®
Wind Direction Indicator
at the same time, if you have both, to take advantage of several
simplifications in the combined installation (Fig. 1).
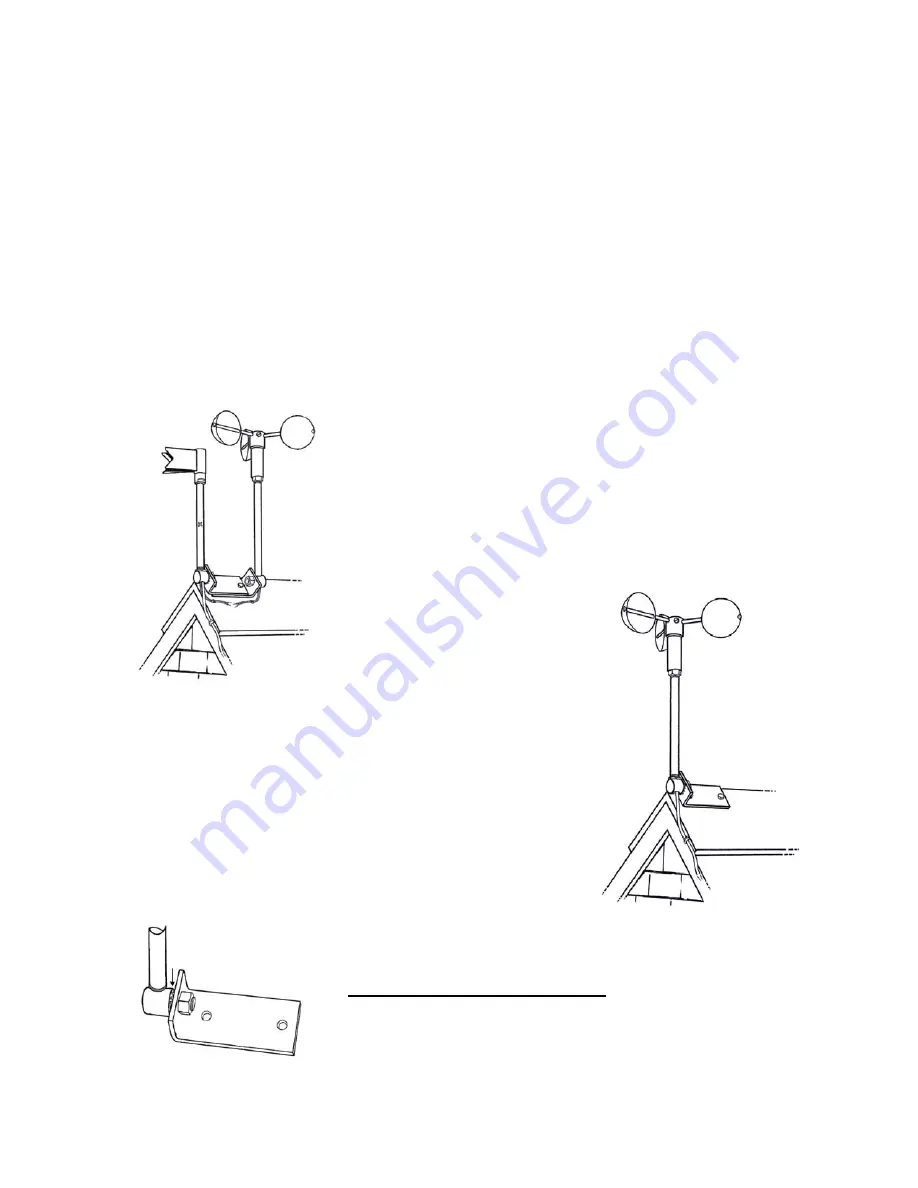
1. Place the cupwheel on the generator shaft with care, and
securely
tighten the set-screw. When tightening the set-screw, turn the unit
upside down and
grasp the cupwheel hub, not the generator
housing
, to avoid overloading the shaft and the self-aligning bear-
ings. After assembling the
cupwheel and generator, thread
the mounting pipe into the
bottom of the generator. Mount
the transmitter with the lag
screws provided, a couple of
inches in from the end of the
ridge on
top
of the highest roof
peak (Fig. 2), where a free flow of wind will be obtained from all
directions. The mounting assembly can be adjusted to accommo-
date any roof pitch. The 1" lag screws provided are for wooden
ridge boards; longer 2"x¼" lag screws should be used for asphalt
shingle ridge caps. (The mounting bracket can be super-imposed
over that of the wind
direction
indicator, aligning the two lag screw
holes, for a simpler and more compact roof installation; Fig. 1.) The
transmitter can be mounted on a chimney, if necessary, using lead
screw anchors, or it can be elevated further on a TV antenna mast
(send $5 to the address below for a "V"-bolt and bent pipe support
for offset mounting on your TV
mast).
Always keep the transmitter upright
, with the cupwheel in place
when out in the weather, to prevent water from entering the
generator. Be sure the toothed lock washer remains located between
the bracket and the mounting fitting (Fig. 3). Note
MAINTENANCE
below.
Fig. 2
Mount on top,
at the end of
highest ridge
Fig. 1
WIND
DIRECTION
TRANSMITTER
WIND
SPEED
TRANSMITTER
Fig. 3
LOCK WASHER
BASE
FITTING
BRACKET
3/8” HEX NUT
CUPWHEEL
GENERATOR
MOUNTING
PIPE
SET-SCREW