background image


EN - 38 


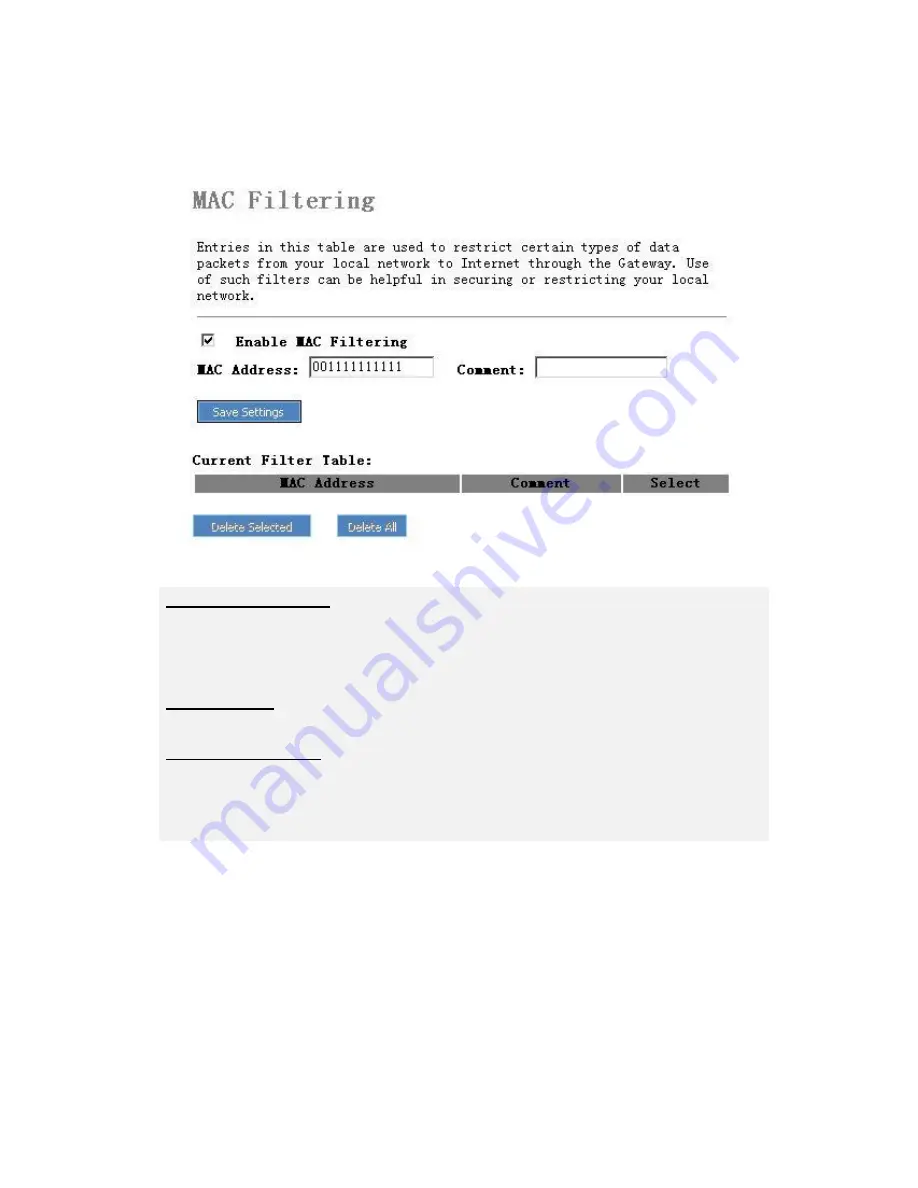
MAC Filtering 


Enable MAC Filtering 

Click on the option to enable 

MAC Filtering

 function. Type in 

MAC Address

 of 

client device in the appropriate text box to prohibit client network traffic. Type in 

Comment

 in the appropriate text box if necessary. 

Save Settings 

Click on 

Save Settings

 to save modifications. 

Current Filter Table 

Review all restricted 

MAC Addresses

 and their related attribute such as 

Comment

. Click on 

Select

 option and click on 

Delete Selected

 to remove the 

selected entity from the list. Click on 

Delete All

 to remove all entities.


Summary of Contents for CNP-WF514A

Page 1: ...EN 1 CNP WF514A Wireless Broadband Router User Manual ...

Page 2: ...INDOWS 2000 SETUP 8 WINDOWS 98 ME SETUP 8 DEVICE CONFIGURATION 10 CONVENIENT SETUP 11 LAN SETUP 16 INTERNET SETUP 18 WIRELESS 20 BASIC SETTING 20 ADVANCED SETTING 22 SECURITY 24 ACCESS CONTROL 27 WDS SETTINGS 28 SITE SURVEY 29 WPS 29 SYSTEM INFORMATION 31 STATUS 31 STATISTICS 32 SYSTEM LOG 32 APPLICATIONS GAMING 34 VIRTUAL SERVICE 34 DMZ 35 SECURITY MANAGEMENT 36 PORT FILTERING 36 ...

Page 3: ...AC FILTERING 38 URL FILTERING 39 URL FILTERING 40 DDNS 42 SYSTEM MANAGEMENT 43 TIME ZONE SETTING 43 UPGRADE FIRMWARE 44 SAVE RELOAD SETTINGS 44 PASSWORD 45 LOGOUT 45 TROUBLESHOOTING 46 APPENDIX 48 TECHNICAL SPECIFICATIONS 48 ...

Page 4: ...NOT attempt to disassemble or alter any part of the device that is not described in this guide Do NOT place the device in contact with water or any other liquids The device is NOT designed to be liquid proof of any sort In the event of liquid entry into device interior immediately disconnect the device from the computer Continuing use of the device may result in fire or electrical shock Please con...

Page 5: ...EN 5 Package Contents Product Image Item Name CNP WF514A Main Unit Standing Base Power Adapter Warranty Card Quick Guide Documentation CD ...

Page 6: ...atus indicator DC Jack Connects to power adapter WAN Connects to cable DSL modem or other Ethernet devices PC1 PC2 PC3 PC4 Connects to LAN port on PC or other Ethernet devices Default Reset device to factory default settings Antenna Transmits signals PC1 PC2 PC3 PC4 SYS WAN PC1 PC2 PC3 PC4 WAN Default Antenna DC Jack ...

Page 7: ... device by one CAT 5 Ethernet cable 5 Connect PC s with the LAN ports PC1 PC2 PC3 PC4 of the device by CAT 5 Ethernet cables One PC connects to only one port using one cable 6 Power on the cable or DSL modem 7 Plug in the power of the device The Power status indicator at the front panel of device will light up as soon as the power adapter is connected properly 8 Power on PC s Windows XP Setup 1 Cl...

Page 8: ...ties 4 Select TCP IP option and click on Properties The Properties dialog box will be displayed 5 Check Obtain an IP address automatically and Obtain DNS server address automatically options 6 Click Ok to confirm modifications Windows 98 ME Setup 1 Click on Start Settings Control Panel 2 Double click on Network icon The Network dialog box will be displayed 3 Please make sure that appropriate netwo...

Page 9: ...earch order box and Domain suffix search order box by selecting them and clicking on Remove Click on Disable DNS 9 Click Ok to confirm modifications NOTE To access the device via a wireless connection PC must be equipped with 802 11b or 802 11g wireless adapter PCI card The configuration should be set as below Operation Mode Infrastructure SSID Default Authentication Disabled Encryption Off ...

Page 10: ... management mode 1 Open a browser Internet Explorer browser only and type in 192 168 1 1 at the address bar and press Enter 2 Type guest at the user name text box and guest again at the password text box 3 The home page of web browser management mode will be displayed 4 Click on 10 different functions on the main router menu on the left The corresponding information will be displayed at right 5 Cl...

Page 11: ... Setup 1 Click on Convenient Setup function at the main router menu on the left 2 Click on Next to continue Convenient Setup process 1 Select and click on different connection mode options to adapt to desired function ...

Page 12: ...lect desired time zone from Time Zone Select drop down text box 2 Select time server from NTP server drop down text box to synchronize time setting 3 Click on Next to continue or Back to go back to previous page 4 Click on Cancel to exit 1 Type in device IP address and Subnet Mask in the corresponding textbox NOTE The default settings are 192 168 1 1 and 255 255 255 0 ...

Page 13: ...net connection method Static IP DHCP Client PPPoE and PPTP from WAN Access Type drop down text box 2 Type in required parameters if necessary NOTE Please consult IT professionals and or ISP provider to obtain necessary information 3 Click on Next to continue or Back to go back to previous page 4 Click on Cancel to exit ...

Page 14: ...ed SSID in the SSID text box 4 Check on Enable MAC Clone option if necessary 5 Click on Next to continue or Back to go back to previous page 6 Click on Cancel to exit 1 Select data encryption type None WEP WPA TKIP WPA2 AES and WPA2 Mixed from Encryption drop down text box 2 Type in or select required parameters if necessary 3 Click on Save Settings to save adjustment or Back to go back to previou...

Page 15: ...EN 15 1 Upon completion type in User Name and Password as indicated Click on OK to continue or Cancel to exit 2 Click on OK again to confirm setting adjustment 3 The device is now ready for use ...

Page 16: ... text box The field should be left blank if not connected to Internet DHCP Select Disabled to disable DHCP server function Select Client to received IP address from source DHCP server and Server to automatically assign IP address to all client devices connected at device LAN ports DHCP Client Range Specify the range of IP addresses allotted for DHCP to assign to clients connected to device Click o...

Page 17: ...the device at the appropriate text box 802 1 Spanning Tree Select Disabled or Enable to disable enable Spanning tree function Clone MAC Address Type in MAC address to replace factory default MAC address Save Settings Click on Save Settings to save modifications ...

Page 18: ...t IT professionals and or ISP provider to obtain necessary information Static IP option Type in IP address Subnet Mask and Default Gateway obtained from service provider in the appropriate text box DCHP Client option Type in Host Name in the text box if required PPPoE option Type in User Name Password Service Name Name of service provider obtained from service provider Select Connection Type of Co...

Page 19: ...mitted for network transmission It is recommended to use the default value of 1492 The value should be set in range of 1200 and 1500 if manual overrides are required Failure to comply may result in problems such as unable to send Email or fail to browse website Please consult ISP for more information DNS Server Settings Select Attain DNS Automatically option to automatically extract DNS server add...

Page 20: ...nto 7 categories as illustrated below Basic Setting Disable Wireless LAN Interface Click on the option to disable wireless function Uncheck to restore Band Select network Band of 2 4GHz B 2 4GHz G and 2 4GHz B G from the drop down text box It is recommended to maintain 2 4GHz B G network band to accommodate both types of connection Mode Select network Mode of AP Client WDS and AP WDS from the drop...

Page 21: ...nnel number Associated Clients Click on Show Active Clients to display all connected wireless client device s with attributes such as MAC Address of client device TX Packet RX Packet TX Rate Mbps Power Saving and Expired Time s Click on Refresh to update the table or Close to exit Enable MAC Clone Single Ethernet Client Click on Enable MAC Clone to copy MAC address of current PC used to configure ...

Page 22: ...nnecting to the device while Shared Key offers WEP encryption during authentication phase to associate with client device s Auto allows device to automatically adjust authentication type when associating with client device s Fragment Threshold Type in Fragment Threshold value from 256 to 2346 in the appropriate text box Fragment Threshold value determines the maximum size of packet during the frag...

Page 23: ...eless connection stability Long Preamble option allows better device wireless connection compatibility while Short Preamble option offers wireless connection performance Broadcast SSID Click on Broadcast SSID options to enable disable the function SSID will be broadcasted in the device signal coverage with function enabled IAPP Click on IAPP to enable disable the function SSID will be broadcasted ...

Page 24: ...one WEP WPA WPA2 and WPA2 Mixed to designated encryption type of wireless connection WEP option generates encryption key to enhance wireless connection security Please click on Set WEP Key and refer to below instructions for detailed setup procedure ...

Page 25: ...phase 4 Type in Encryption Key value in the appropriate text box Encryption key should be entered according to its corresponding key format as indicated in the Key Format option Key Length HEX Format ASCII Format 64 bit 10 hexadecimal digits 5 ASCII characters 128 bit 26 hexadecimal digits 13 ASCII characters 5 Click on Save Settings to confirm or Close to cancel Use 802 1x Authentication Click on...

Page 26: ...protocol to constantly change the encryption key NOTE TKIP Temporal Key Integrity Protocol utilizes a stronger encryption algorithm and includes Message Integrity Code while AES Advanced Encryption System utilizes a symmetric 128 bit block data encryption the strongest encryption currently available Pre Shared Key Format Select Pre shared Key Format Passphrase and Hex 64 characters from the drop d...

Page 27: ...o client device s listed MAC Address and Comment Type in MAC Address desired to be listed and Comment if necessary in the appropriate text box Click on Save Settings to confirm input and display the client device s on the list Current Access Control List Review allowed denied client device of wireless network access Click on Select option and click on Delete Selected to remove the selected entity ...

Page 28: ... s on the list Click on Set Security to adjust security settings and Show Statistics to review detailed information Current WDS AP List Review all connected AP device within the same wireless network Click on Select option and click on Delete Selected to remove the selected entity from the list Click on Delete All to remove all entities NOTE The function is only available when device is configured...

Page 29: ...ect Review all available AP device s within the range Click on Select option and click on Connect to selected AP device Click on Refresh to update the list NOTE The function is only available when device is configured in Client Mode WPS ...

Page 30: ...k on Start PBC to initiate Push Button Configuration sequence The device will be enabled of PBC activity in the next 120 seconds Save Settings Click on Start PBC to initiate Push Button Configuration sequence The device will be enabled of PBC activity in the next 120 seconds Current Key Info Review PBC related information such as Authentication type Encryption type and Key value Client PIN Number ...

Page 31: ...EN 31 System Information Status The Status section monitors the current status of the device including information such as System Wireless Configuration TCP IP Configuration and WAN Configuration ...

Page 32: ...EN 32 Statistics The Statistics section displays packet counters from transmission and reception on wireless and Ethernet network Click on Refresh to update data System Log ...

Page 33: ...wireless option to record wireless network entries only and DoS option to record Denial of Service entries only Click on Refresh to refresh log status or Clear to remove all previous entries Enable Remote Log Click on the option to enable remote monitoring and data logging of the device Type in Log Server IP Address in the appropriate text box to allow remote access Save Settings Click on Save Set...

Page 34: ... Select Protocol type TCP UDP and Both from the drop down text box and type in values of Port Range from the client device in the appropriate text box Type in Comment in the appropriate text box if necessary Save Settings Click on Save Settings to save modifications Current Virtual Service Table Review all virtual services and their related attributes such as Local IP Address Protocol Port Range a...

Page 35: ...lick on the option to enable DMZ Demilitarized Zone function Type in IP address of client device desired of all network traffic re route in the appropriate text box Save Settings Click on Save Settings to save modifications ...

Page 36: ...tside network Select Protocol type TCP UDP and Both from the drop down text box Type in Comment in the appropriate text box if necessary Save Settings Click on Save Settings to save modifications Current Filter Table Review all restricted Ports and their related attributes such as Protocol and Comment Click on Select option and click on Delete Selected to remove the selected entity from the list C...

Page 37: ...TCP UDP and Both from the drop down text box Type in Comment in the appropriate text box if necessary Save Settings Click on Save Settings to save modifications Current Filter Table Review all restricted IP Addresses and their related attributes such as Protocol and Comment Click on Select option and click on Delete Selected to remove the selected entity from the list Click on Delete All to remove...

Page 38: ...ent network traffic Type in Comment in the appropriate text box if necessary Save Settings Click on Save Settings to save modifications Current Filter Table Review all restricted MAC Addresses and their related attribute such as Comment Click on Select option and click on Delete Selected to remove the selected entity from the list Click on Delete All to remove all entities ...

Page 39: ...bsites in the appropriate text box to prohibit client device from accessing Save Settings Click on Save Settings to save modifications Current Filter Table Review all restricted URL Click on Select option and click on Delete Selected to remove the selected entity from the list Click on Delete All to remove all entities ...

Page 40: ...Prevention Click on the option to enable DoS Prevention function Click on various prevention measures and specify values if necessary Click on Select All to select all prevention options or Clear All to disable all prevention options ...

Page 41: ...EN 41 Enable Source IP Blocking Click on the option to block attacks from Source IP Type in Block time value in the appropriate text box Save Settings Click on Save Settings to save modifications ...

Page 42: ...address Select Service Provider DynDNS and TZO from the drop down text box Type in Domain Name User Name Email and Password Key as required by service provider NOTE Please consult with IT professional on how to obtain a static domain from DDNS service provider Save Settings Click on Save Settings to save modifications ...

Page 43: ... Zone Select Select Time Zone from the drop down text box Enable NTP client update Click on the option to enable NTP client update function Select NTP Server from the drop down text box or type in NTP Server IP address if necessary Save Settings Click on Save Settings to save modifications and Refresh to update current time ...

Page 44: ...wer off the device while firmware upgrade is in process Firmware upgrade will completely erase all user defined settings and restore device to factory default settings Save Reload Settings Save Settings to File Click on the option to save device configuration to a file stored in client device Load Settings from File Type in path or click on Browse to locate saved device configuration file in the ...

Page 45: ...o factory default settings Password User Name Type in desired User Name in the appropriate text box New Password Type in desired New Password in the appropriate text box Confirm Password Type in new password again in the appropriate text box to confirm Save Settings Click on Save Settings to save modifications Logout Click on Save Settings to logout from device ...

Page 46: ...mber password 1 Press and hold the reset button on the front panel of device for more than 5 seconds 2 Unplug power adapter and wait for 5 seconds before plugging it in again Device malfunctioning with cable DSL modem connection 1 Please check signal stability from cable DSL modem There should be a signal indicator on the modem displaying its connection status Contact ISP if the signal is bad 2 Pl...

Page 47: ...nd click on Properties 5 Type in the following information on the corresponding properites IP address 192 168 1 XXX where XXX is a number between 2 and 253 Subnet mask 255 255 255 0 Default gateway 192 168 1 1 Preferred DNS server 192 168 1 1 Alternate DNS server leave this property blank 6 Click on OK to confirm modifications ...

Page 48: ... RJ 45 Ports with switching function Cabling Type Cat 5 Ethernet Network Cable RF Power Output 15 2dBm Wireless Security WPA WPA2 WEP 64 128bit Wireless MAC Filtering LED Indicators SYS WLAN LAN Link Activity WAN Temperature Operating 0 to 40 C Storage 20 to 70 C Humidity Operating 10 to 85 non condensing Storage 5 to 90 non condensing Dimensions 135mm L X 95 4mm W X 28mm H Weight 210g Power DC 9V...

Reviews: