background image

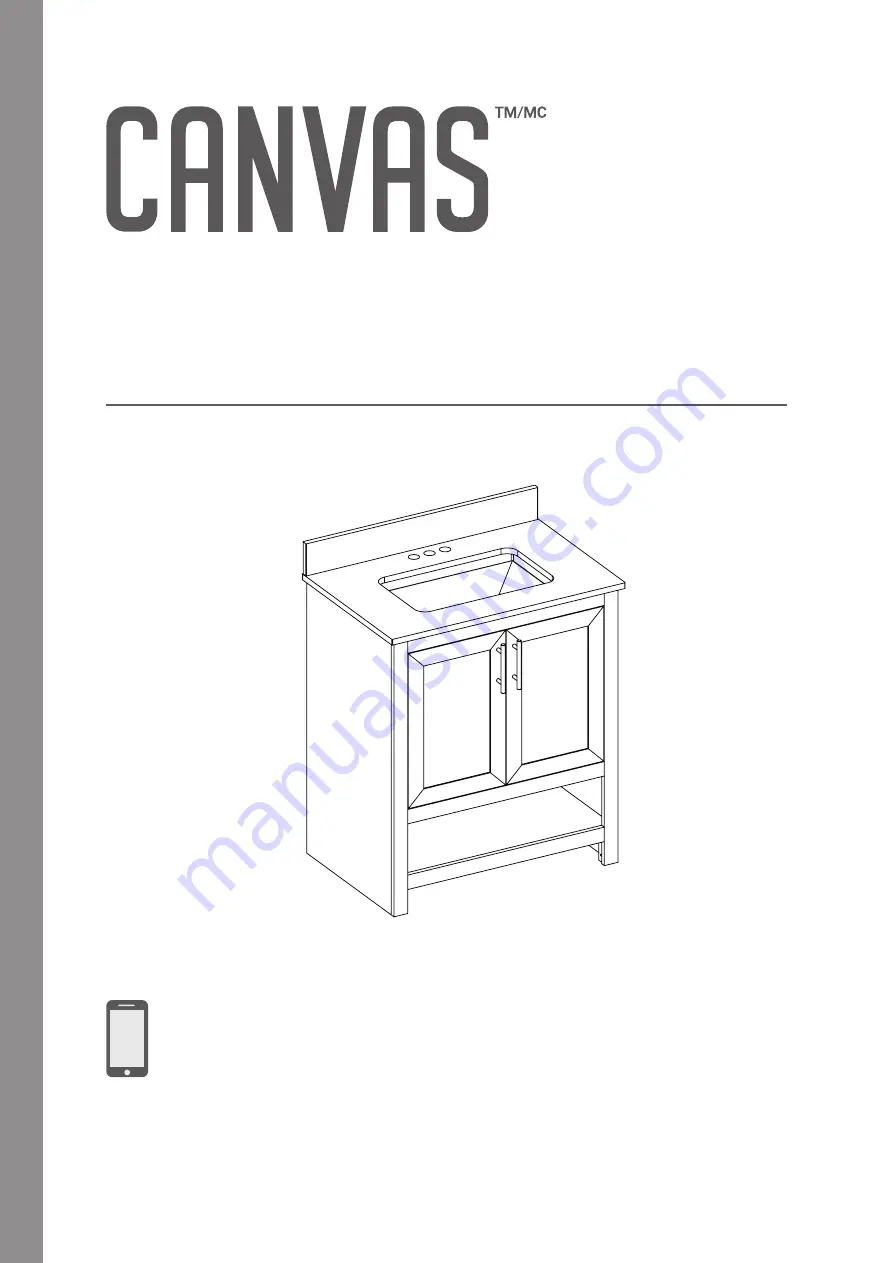
ASSEMBLY INSTRUCTIONS 

HAVING TROUBLE?

TOLL-FREE:

1-888-670-6684

IMPORTANT: Please read this manual carefully 

before beginning assembly of this product.  

Keep this manual for future reference. 

DOVER 30”


(76.2 CM) BATHROOM VANITY

PRODUCT NO. 063-6348-8

-GREY

063-6342-0

-WHITE

Summary of Contents for CTCDOVVNY-GR

Page 1: ...ROUBLE TOLL FREE 1 888 670 6684 IMPORTANT Please read this manual carefully before beginning assembly of this product Keep this manual for future reference DOVER 30 76 2 CM BATHROOM VANITY PRODUCT NO 063 6348 8 GREY 063 6342 0 WHITE ...

Page 2: ...iday décor and all your outdoor living essentials CANVAS makes it easy to refresh your space to reflect your unique style and the way you live every day We would love to hear from you and welcome your thoughtful feedback Visit our website at canadiantire ca to tell us about your experience and share your photos with us using myCANVASstyle Show us how you bring CANVAS products to life We can t wait...

Page 3: ...all parts on a level surface during assembly Add a layer of protective surface if needed Do not allow your children to climb or jump on furniture due to possible accident injury or death A child climbing on a piece of furniture can make it top heavy and cause the furniture to tip over Keep children and pets away during assembly Repairing and replacing parts should be done by a qualified technician...

Page 4: ...QUANTITY 7 Lower Back Stretcher 1 8 Middle Panel 1 9 Bottom Panel 1 10 Back Panel 1 11 Upper Front Stretcher 1 12 Bottom Front Stretcher 2 13 Left Door 1 1 Backsplash 1 2 Vanity Top 1 3 Side Panel Left 1 4 Side Panel Right 1 5 Upper Back Stretcher 1 6 Middle Back Stretcher 1 ...

Page 5: ...DOVER 30 76 2 CM BATHROOM VANITY 5 PARTS LIST ITEM DESCRIPTION THUMBNAIL QUANTITY 14 Right Door 1 ...

Page 6: ...DOVER 30 76 2 CM BATHROOM VANITY 6 EXPLODED PARTS 3 4 1 2 10 5 6 8 13 14 9 11 7 12 12 ...

Page 7: ...TY 7 HARDWARE LIST ITEM DESCRIPTION THUMBNAIL QUANTITY A Cam Lock 28 B Cam Bolt 28 G M4x12 mm Screw 24 H M3 5x15 mm Screw 12 C M8x30 mm Wood Dowel 24 D 1 4 x32 mm Bolt 2 E M4x25 mm Screw 2 F Handle with Bolts 2 I Slow Close Hinge 4 ...

Page 8: ...DOVER 30 76 2 CM BATHROOM VANITY 8 HARDWARE LIST ITEM DESCRIPTION THUMBNAIL QUANTITY J Hex Wrench 1 K Leveller 4 L Glue 1 ...

Page 9: ...MATERIALS Place packing materials back in the box Do not dispose of packaging materials until assembly is complete READ EACH STEP CAREFULLY Make sure you understand each step If you have any questions contact CANVAS customer service at 1 888 670 6684 toll free ASSEMBLE IN A CLEARED AREA Place all parts from the box on the floor in front of you on a clean dry level surface to protect the product as...

Page 10: ...WORKS 1 Screw cam bolt into the pre drilled small holes on panel Align the panels to be joined so that the cam bolt goes into the pre drilled hole on the edge of the second panel and protrudes into the hole that will house the cam lock 2 Insert the cam lock into pre drilled large hole on panel Make sure arrow on the cam lock is pointed toward the cam bolt 3 Once the cam bolt is connected inside ca...

Page 11: ...OM VANITY 11 STEP BY STEP GUIDE 11 X1 8 X1 9 X1 A X4 B X4 12 X2 9 8 12 12 A B C A B C C X4 STEP 1 Attach bottom front stretchers 12 to middle panel 8 and bottom panel 9 using cam locks A cam bolts B and M8x30 mm wood dowels C ...

Page 12: ... X1 A X2 B X2 6 X1 E X2 C X4 8 9 7 6 A B C C E STEP 2 Attach lower back stretcher 7 to bottom panel 9 using cam locks A cam bolts B and M8x30 mm wood dowels C Attach middle back stretcher 6 to middle panel 8 using M4x25 mm screws E and M8x30 mm wood dowels C ...

Page 13: ...G X8 I X4 13 X1 F X2 13 14 F G I Attach slow close hinges i to left door 13 and right door 14 using M4x12 mm screws G Remove preassembled bolts from handles F Attach drawer handles F to left door 13 and right door 14 securing with previously removed bolts STEP 3 ...

Page 14: ... 11 A X22 B X22 D X2 C X16 Attach upper back stretcher 5 upper front stretcher 11 and bottom panel assembly to side panel left 3 and side panel right 4 using cam locks A cam bolts B M8x30 mm wood dowels C and 1 4 x32 mm bolts D Note Make sure cam bolts B are completely seated J X1 STEP 4 ...

Page 15: ... 76 2 CM BATHROOM VANITY 15 STEP BY STEP GUIDE H X12 11 X1 11 4 H K Attach back panel 11 to behind the vanity assembly using M3 5x15 mm screws H Attach levellers K to the base of the vanity assembly STEP 5 K X4 ...

Page 16: ... G Attach the hinge bases of the left door 13 and right door 14 to the anity assembly using the pilot holes as a guide with M4x12 mm screws G Open and close the doors to make sure they are aligned and shut correctly If necessary adjust the screws for a good fit STEP 6 G X16 ...

Page 17: ...DOVER 30 76 2 CM BATHROOM VANITY 17 STEP BY STEP GUIDE Suggested way to attach vanity to wall Hardware NOT Provided STEP 7 ...

Page 18: ...DOVER 30 76 2 CM BATHROOM VANITY 18 STEP BY STEP GUIDE 2 X1 2 Silicone NOT Provided 3 Apply silicone around the edges of the vanity assembly to secure the vanity top 2 STEP 8 ...

Page 19: ...DOVER 30 76 2 CM BATHROOM VANITY 19 STEP BY STEP GUIDE 1 X1 1 Silicone NOT Provided 3 Apply silicone around the edges of backsplash 1 and attach it to vanity assembly STEP 9 ...

Page 20: ...TY 20 TECHNICAL DATA SPECIFICATIONS 30 76 2 cm 20 50 8 cm 34 1 2 87 6 cm 38 7 16 97 6 cm ASSEMBLED DIMENSIONS W x D x H 30 x 20 x 34 1 2 76 2 x 50 8 x 87 6 cm ASSEMBLED WEIGHT 104 72 lb 47 5 kg MAXIMUM WEIGHT CAPACITY 200 lb 90 7 kg ...

Page 21: ...LE LET US HELP YOU 1 Rinse vanity top with clean hot water frequently 2 Blot spills quickly and wash with mild soap and warm water 3 Check all nuts and bolts periodically for tightness When required tighten them again PROBLEM POSSIBLE CAUSES SOLUTION Vanity doors rub against another surface There is an uneven gap between the doors and cabinet Adjust the leg levellers to ensure the vanity combo is ...

Page 22: ...s in workmanship and materials Trileaf Distribution agrees to replace the defective product free of charge within the stated warranty period when returned by the original purchaser with proof of purchase This product is not guaranteed against wear or breakage due to misuse and or abuse Made in Vietnam Imported by Trileaf Distribution Trifeuil Toronto Canada M4S 2B8 ...

Page 23: ......

Page 24: ...ÉRO SANS FRAIS 1 888 670 6684 IMPORTANT Veuillez lire attentivement ce guide avant de procéder à l assemblage de ce produit Conservez ce guide aux fins de consultation ultérieure MEUBLE LAVABO DE 30 PO 76 2 CM DOVER N D ARTICLE 063 6348 8 GRIS 063 6342 0 BLANC ...

Page 25: ...u pour le plein air CANVASMD vous permet de rafraîchir facilement votre espace pour qu il reflète votre style unique et votre mode de vie Nous serions ravis de recevoir vos commentaires judicieux Visitez notre site Web à canadiantire ca pour nous communiquer de votre expérience et partagez vos photos avec nous en utilisant mycanvasstyle Montrez nous comment vous donnez vie à CANVASMD Nous avons hâ...

Page 26: ...assemblage Ajoutez une couche de protection de surface le cas échéant Ne laissez pas les enfants grimper ou sauter sur les meubles en raison de risques possibles d accident de blessure ou de mort Un enfant grimpant un meuble peut le rendre trop lourd et causer son renversement Tenez les enfants et les animaux à l écart lors de l assemblage La réparation et le remplacement des pièces doivent être e...

Page 27: ...ieur 1 10 Panneau arrière 1 11 Traverse avant supérieure 1 12 Entretoise avant inférieure 2 13 Left Door 1 LISTE DES PIÈCES ARTICLE DESCRIPTION ILLUSTRATION QUANTITÉ 1 Dosseret 1 2 Lavabo 1 3 Panneau latéral gauche 1 4 Panneau latéral droit 1 5 Traverse arrière supérieure 1 6 Traverse avant intermédiaire 1 ...

Page 28: ...MEUBLE LAVABO DE 30 PO 76 2 CM DOVER 5 LISTE DES PIÈCES ARTICLE DESCRIPTION ILLUSTRATION QUANTITÉ 14 Porte droite 1 ...

Page 29: ...MEUBLE LAVABO DE 30 PO 76 2 CM DOVER 6 VUE ÉCLATÉE 3 4 1 2 10 5 6 8 13 14 9 11 7 12 12 ...

Page 30: ...LLERIE ARTICLE DESCRIPTION ILLUSTRATION QUANTITÉ A Came de verrouillage 28 B Boulon à came 28 G Vis M4x12 mm 24 H Vis M3 5x15 mm 12 C Goujon de bois M8x30 mm 24 D Boulon 1 4 po x 32 mm 2 E Vis M4x25 mm 2 F Poignée avec boulons 2 I Charnière à fermeture lente 4 ...

Page 31: ...MEUBLE LAVABO DE 30 PO 76 2 CM DOVER 8 LISTE DE LA QUINCAILLERIE ARTICLE DESCRIPTION ILLUSTRATION QUANTITÉ J Clé hexagonale 1 K Pied de nivellement 4 L Colle 1 ...

Page 32: ...TÉRIAUX D EMBALLAGE Remettez les matériaux d emballage dans la boîte Ne les jetez pas avant d avoir terminé l assemblage LISEZ ATTENTIVEMENT CHAQUE ÉTAPE Assurez vous de bien comprendre chaque étape Si vous avez des questions contactez le service à la clientèle CANVAS au 1 888 670 6684 sans frais ASSEMBLEZ L ARTICLE DANS UNE ZONE DÉGAGÉE Placez toutes les pièces de la boîte sur le sol devant vous ...

Page 33: ... dans les petits trous prépercés sur le panneau Alignez les panneaux à assembler de sorte que le boulon à came entre dans le trou prépercé sur le bord du deuxième panneau et dépasse dans le trou qui abritera le verrou à came 2 Insérez le verrou à came dans le grand trou prépercé sur le panneau Assurez vous que la flèche sur le verrou à came est pointée vers le boulon à came 3 Une fois le boulon à ...

Page 34: ...X1 9 X1 A X4 B X4 12 X2 9 8 12 12 A B C A B C C X4 Fixez la traverse avant inférieure 12 au panneau central 8 et au panneau inférieur 9 au moyen des verrous à came A des boulons à came B et des goujons de bois M8x30 mm C GUIDE ÉTAPE PAR ÉTAPE ÉTAPE 1 ...

Page 35: ...erse inférieure du dos 7 au panneau inférieur 9 au moyen des verrous à came A des boulons à came B et des goujons de bois M8x30 mm C Fixez la tablette arrière centrale 6 au panneau central 8 au moyen des vis M4x25 mm E et des goujons de bois M8x30 mm C GUIDE ÉTAPE PAR ÉTAPE ÉTAPE 2 9 7 A B C ...

Page 36: ...s à fermeture lente I à la porte gauche 13 et à la porte droite 14 à l aide de vis M4x14 mm G Retirez les boulons préassemblés des poignées F Fixez les poignées de tiroir F à la porte gauche 13 et à la porte droite 14 en les fixant avec les boulons précédemment retirés GUIDE ÉTAPE PAR ÉTAPE ÉTAPE 3 ...

Page 37: ...ieur au panneau latéral gauche 3 et au panneau latéral droit 4 au moyen des verrous à came A des boulons à came B des goujons de bois M8x30 mm C et des boulons 1 4 po x 32 mm D Remarque Assurez vous que les boulons de came B sont complètement en place GUIDE ÉTAPE PAR ÉTAPE ÉTAPE 4 4 X1 5 X1 3 X1 A X22 B X22 D X2 C X16 J X1 A 9 8 5 4 3 B C D 11 ...

Page 38: ...30 PO 76 2 CM DOVER 15 H X12 11 X1 Fixez le panneau arrière 11 derrière le meuble lavabo au moyen des vis M3 5x15 mm H Fixez les pieds de nivellement K au bas du meuble lavabo GUIDE ÉTAPE PAR ÉTAPE ÉTAPE 5 11 4 H K K X4 ...

Page 39: ...ecet de la porte droite 14 au meuble lavabo en utilisant les avant trous comme guide au moyen des vis M4x12 mm G Ouvrez et fermez les portes pour vous assurer qu elles sont correctement alignées et fermées Si nécessaire ajustez les vis pour un bon ajustement GUIDE ÉTAPE PAR ÉTAPE ÉTAPE 6 14 13 G G X16 ...

Page 40: ...MEUBLE LAVABO DE 30 PO 76 2 CM DOVER 17 GUIDE ÉTAPE PAR ÉTAPE ÉTAPE 7 Méthode suggérée pour fixer le meuble lavabo au mur Quincaillerie NON incluse ...

Page 41: ...MEUBLE LAVABO DE 30 PO 76 2 CM DOVER 18 2 X1 2 3 Appliquez du silicone autour du bord supérieur du meuble lavabo pour fixer le lavabo 2 GUIDE ÉTAPE PAR ÉTAPE ÉTAPE 8 Silicone NON fourni ...

Page 42: ...MEUBLE LAVABO DE 30 PO 76 2 CM DOVER 19 1 X1 1 3 Appliquez du silicone autour les bords du dosseret 1 et fixez le au meuble lavabo GUIDE ÉTAPE PAR ÉTAPE ÉTAPE 9 Silicone NON fourni ...

Page 43: ... TECHNIQUE DONNÉES TECHNIQUES DIMENSION DE L ARTICLE larg x P x H 30 x 20 x 34 1 2 po 76 2 x 50 8 x 87 6 cm POIDS DE L ARTICLE 104 72 lb 47 5 kg AXIMUM WEIGHT CAPACITY 200 lb 90 7 kg 30 po 76 2 cm 20 po 50 8 cm 34 1 2 po 87 6 cm 38 7 16 po 97 6 cm ...

Page 44: ... une autre surface Il y a un écart inégal entre les portes et l armoire Ajustez les pieds de nivellement pour mettre d aplomb l ensemble du meuble lavabo Le plancher n est pas de niveau Le plancher n est pas de niveau Ajustez les pieds de nivellement pour mettre d aplomb l ensemble du meuble lavabo POUVONS VOUS AIDER APPELEZ NOUS NOUS POUVONS VOUS AIDER AVANT DE RETOURNER VOTRE ARTICLE Si vous ave...

Page 45: ...on et de matériau x Distribution Trifeuil consent à remplacer l article défectueux lorsqu il est retourné par l acheteur original accompagné de la preuve d achat au cours de la période de garantie convenue Exclusion usure ou bris causés par un usage abusif ou inapproprié Fabriqué au Vietnam Importé par Trileaf Distribution Trifeuil Toronto Canada M4S 2B8 GARANTIE LIMITÉE DE 1 AN ...

Page 46: ...MC INSPIRÉ PAR LE CANADA ...

Reviews: