background image


Zodiac FR100 

Page 11 of 27 


Operator Guide 

June 2014• Rev. 1.1 


1.


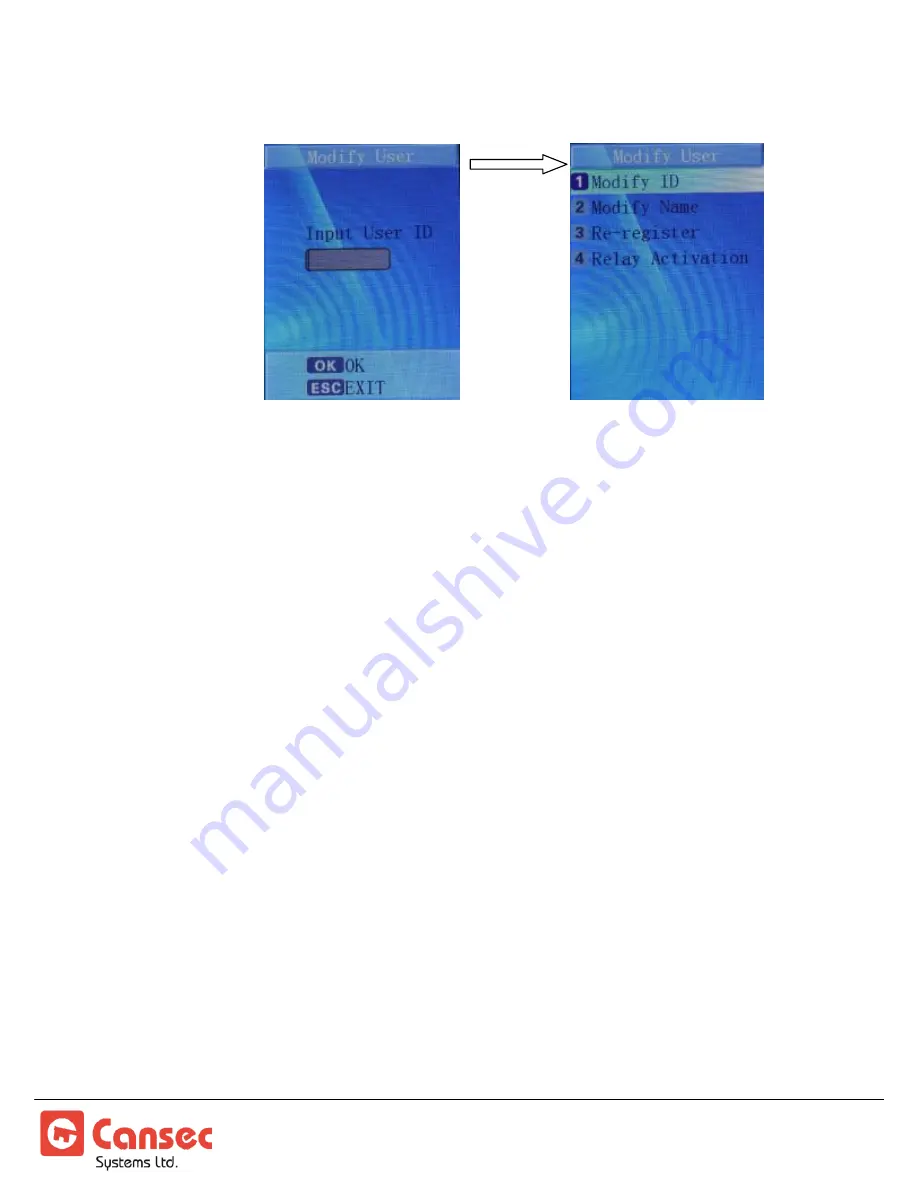
Modify ID 

Press “1” then Press “OK” to 
proceed or press “Esc” to cancel. 
Follow the on-screen instruction 
to enter new user ID. Record new 
user ID for future reference. 
 

2.


Modify Name 

Press “2”. Enter a new name. Use 
the alphanumeric keypad and 
“OK” buttons to select 
corresponding letters and use the 
up and down arrows to select 
lower or upper case letters. Press 
“OK” when done. 
 

3.


Re-Register 

Press “3”. Follow on-screen 
instruction to scan a face for re-
enrollment or re-registration. 
 

4.


Relay Activation 

(

Allows the user to activate the 

on-board relay after a successful 
face authentication. The reader 
is equipped with an on-board 
relay.

Press “4”. The prompt “Activate 
Relay?” appears. Press OK to 
enable relay activation or press 
“Esc” to disable relay activation. 


Summary of Contents for Zodiac FR100

Page 1: ...Zodiac FR100 OPERATOR GUIDE June 2014...

Page 2: ...T GUIDE 4 GETTING STARTED 6 Administrator Logon 6 FUNCTION MENU 7 Set Admin 7 User Management 9 Record Management 12 System Setting 15 System Information 20 Auto Test 22 SD Format 22 2013 2014 Copyrig...

Page 3: ...s and three dimensional facial recognition User enrollment within 60 seconds directly at the reader Stores 500 user templates Introduction Congratulations on your purchase of the Zodiac FR100 Face Rec...

Page 4: ...nrolling direct sunshine wearing sunglasses 1 Distance of 30 centimeters to 80 centimeters between face and reader is required 2 A white dashed line frame appears when the reader fails to detect a fac...

Page 5: ...n screen text prompt to turn left or right slightly or raise and lower head slightly to adjust facial position so that every facial characteristic will be acquired by the sensor 4 When wearing eyeglas...

Page 6: ...INISTRATOR LOGON The Administrator Logon is required to perform administrator tasks e g configuring reader settings and enrolling additional administrators or users Keypad Welcome Screen 1 From the re...

Page 7: ...nting the function menu Functions Menu Press the corresponding number from 1 to 7 on the keypad to access the following items on the Functions Menu The Esc button can be pressed repeatedly to return t...

Page 8: ...y be used to perform administrative tasks on the reader but cannot be used to gain access from the reader 4 If OK is pressed enter an ID for this user The ID must be in the range of 1 to 65535 Record...

Page 9: ...1 1 6 Press 1 to select Face as verification method to finish the enrollment 7 If necessary enroll additional administrators USER MANAGEMENT Allows administrators to register modify or delete users Fr...

Page 10: ...he User Management menu Follow on screen instruction to finish registering a new user e g input user ID and name Record ID for future reference 2 To modify a user s information press 2 from the User M...

Page 11: ...ttons to select corresponding letters and use the up and down arrows to select lower or upper case letters Press OK when done 3 Re Register Press 3 Follow on screen instruction to scan a face for re e...

Page 12: ...ID Press OK to confirm or press Esc to cancel To delete all users press 2 Press OK to delete all users or press Esc to cancel RECORD MANAGEMENT In standalone mode this feature allows system administr...

Page 13: ...1 1 From the Record Management menu press 1 for Record Inquiry Specify User ID or leave All to query all records Specify Start and End time Press OK to proceed and a list of records will be displayed...

Page 14: ...ement menu press 2 to delete all audit trail records Press OK to confirm or press Esc to cancel 3 From the Record Management menu press 3 to enable audit trail auto upload to host computer 4 From the...

Page 15: ...address of the host computer where the audit trail will be uploaded to SYSTEM SETTINGS System Settings allow system administrators to set various operational parameters such as IP address Wiegand out...

Page 16: ...Zodiac FR100 Page 16 of 27 Operator Guide June 2014 Rev 1 1 From the System Setting menu press 1 to set the volume for the reader s voice prompt Select an available value 1 to 4 for the volume level...

Page 17: ...ing and press 2 for Wiegand Output setting Press 1 to set IP address for the reader Press 2 to set the optional password This password 1 to 8 digits prevents unauthorized network access to the reader...

Page 18: ...u press 3 to set Date and Time Enter date followed by time in 24 hour format Enable or disable Daylight Saving Time From the System Setting menu press 4 to select Access Control Press 1 to enable or d...

Page 19: ...f 27 Operator Guide June 2014 Rev 1 1 Press 1 to enable reader tamper alarm or press 2 to disable reader tamper alarm Enter the number of seconds 1 to 60 for the relay to remain energized Applicable i...

Page 20: ...se and reset the reader to factory default setting SYSTEM INFORMATION System information displays the user capacity and the number of currently registered users It also displays the audit trail capaci...

Page 21: ...e 21 of 27 Operator Guide June 2014 Rev 1 1 Press 1 to display the number of registered users and audit trail record information Press 2 to display the IP address MAC address and the version informati...

Page 22: ...tion menu press 6 to access the Auto Test menu Press 1 to perform auto check SD FORMAT The format of a SD Secure Digital card may be carried out to ensure that the card is properly formatted by the re...

Page 23: ...Exxx TXT where xxx is the last 3 digits of the SN serial number found on the back of the reader or in the System Info menu 2 Export Users Note User information such as ID and face template will be exp...

Page 24: ...o a text file named USERALL TXT This file must not be manually modified or tampered with If user information exists on the reader they will be overwritten 7 Import User List The user list is used to b...

Page 25: ...e of 30 centimeters to 80 centimeters from the reader 2 The scanner will begin scanning for facial characteristics 3 Upon successful face authentication an access granted message will be displayed alo...

Page 26: ...Zodiac FR100 Page 26 of 27 Operator Guide June 2014 Rev 1 1 4 Upon an unsuccessful face authentication an access denied message will be displayed...

Page 27: ...oo low or too high will drastically affect facial recognition performance 1 Stand on the left side of the reader to avoid facial detection 2 Press 3 Use and arrows to adjust value 4 Press when done DE...

Reviews: