background image

75

Recording Audio

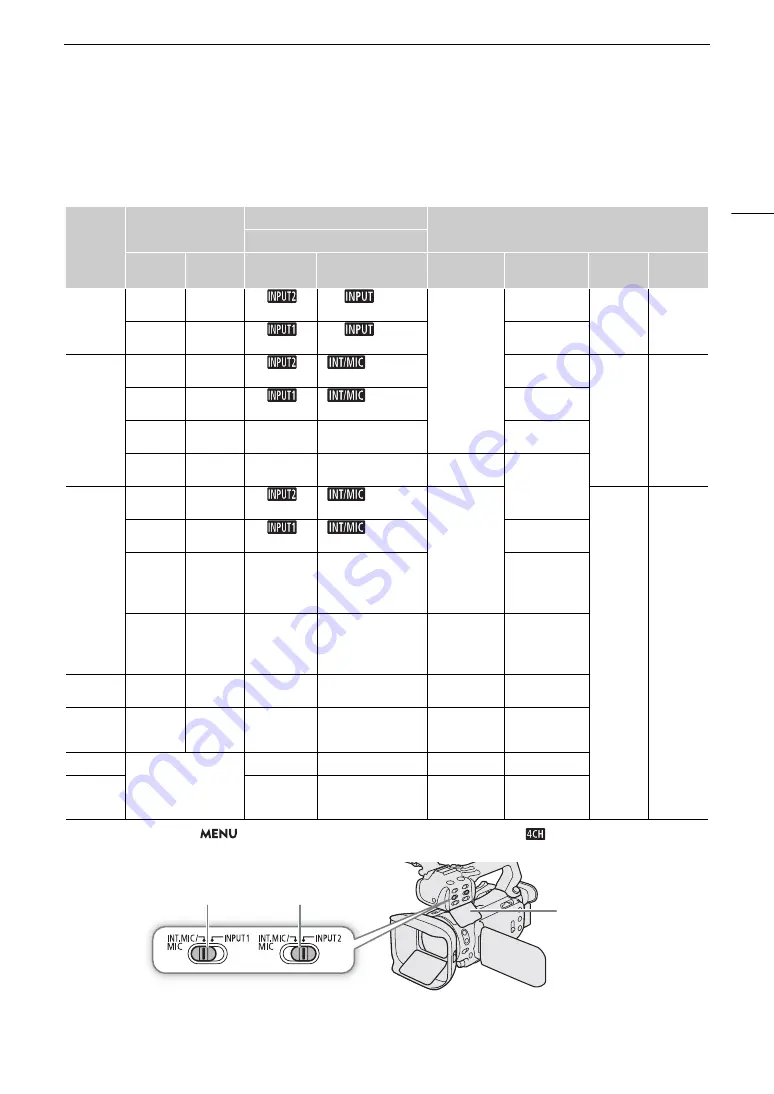
Audio Settings and Recorded Audio Channels

Which audio inputs are recorded to which audio channels is determined by a combination of menu settings, 
whether the handle unit is attached, and other audio-related controls on the camcorder. The following table gives 
an overview of the possible combinations. Refer also to the illustration following the table.

* For MP4 clips, only when 


>

 [

3

 Recording Setup] 

>

 [

¸

 Audio Format] is set to [

 LPCM 16bit 4CH].

Microphone 

connected 
to the MIC 

terminal

AUDIO IN switch

Menu settings

Recorded audio channels/audio sources

[

C


!

 Audio Setup] 

>

for 

INPUT 1

for 

INPUT 2

[CH2 Input]

[CH3/CH4 Input]*

CH1

CH2

CH3*

CH4*

INPUT1

INPUT2

[


INPUT 2]

[


INPUT 

Terminal]

INPUT 1 
terminal

INPUT 2 terminal

INPUT 1 
terminal

INPUT 2 
terminal

INPUT1

INPUT2

[


INPUT 1]

[


INPUT 

Terminal]

INPUT 1 terminal

Yes

INPUT1

INPUT2

[


INPUT 2]

[


Built-in  Mic/

MIC Terminal]

INPUT 2 terminal

MIC 

terminal (L)

MIC 

terminal (R)

INPUT1

INPUT2

[


INPUT 1]

[


Built-in  Mic/

MIC Terminal]

INPUT 1 terminal

INPUT1

INT.MIC/

MIC

MIC terminal 

(mono)

INT.MIC/

MIC

INPUT2

MIC terminal 

(mono)

INPUT 2 terminal

No

INPUT1

INPUT2

[


INPUT 2]

[


Built-in  Mic/

MIC Terminal]

INPUT 1 
terminal

Built-in 

microphone 

(L)

Built-in 

microphone 

(R)

INPUT1

INPUT2

[


INPUT 1]

[


Built-in  Mic/

MIC Terminal]

INPUT 1 terminal

INPUT1

INT.MIC/

MIC

Built-in 

microphone 

(mono)

INT.MIC/

MIC

INPUT2

Built-in 

microphone 

(mono)

INPUT 2 terminal

Yes

INT.MIC/

MIC

INT.MIC/

MIC

MIC terminal (L)

MIC terminal (R)

No

INT.MIC/

MIC

INT.MIC/

MIC

Built-in 

microphone (L)

Built-in 

microphone (R)

Yes

Handle unit not attached

MIC terminal (L)

MIC terminal (R)

No

Built-in 

microphone (L)

Built-in 

microphone (R)

AUDIO IN switches (audio input selection)

for INPUT 1

for INPUT 2

Audio controls cover

Summary of Contents for XA70

Page 1: ...4K Camcorder Instruction Manual NTSC PUB DIE 0572 000 ...

Page 2: ...o a customizable button and adjust those functions with the accompanying dial A 91 Additionally the camcorder also features 5 assignable buttons on the camcorder and one onscreen assignable touch button to which you can assign a variety of functions to access them with ease A 92 Infrared recording Record in darkness using infrared recording A 85 With the built in infrared light on the handle unit ...

Page 3: ...look for example produces a more natural perceived resolution while the Wide DR look applies a gamma curve with a very wide dynamic range and an appropriate color matrix Custom picture settings A 94 Select one of the preset color settings or set the combination of gamma curve color space and color matrix that you wish to use Then you can adjust a number of other image related parameters in detail ...

Page 4: ...4 ...

Page 5: ...king Clips Recorded with Canon Log 3 Gamma View Assistance 41 Video Configuration Video Format Resolution Bit Rate and Frame Rate 42 Selecting the Video Format 42 Selecting the Resolution and Bit Rate 42 Selecting the Frame Rate 42 Slow Fast Motion Recording 44 Adjusting the Focus 45 Manual Focus 45 AF Boosted MF 49 Continuous AF 50 Changing the AF Frame Size 50 Face Detection Tracking 51 Zooming ...

Page 6: ... 103 Playback 103 The Playback Index Screen 103 Changing the Index Screen 103 Playing Back Recordings 104 Playback Controls 105 Adjusting the Volume 105 Displaying Clip Information 106 Clip and Photo Operations 107 Deleting Clips and Photos 107 Trimming MP4 Clips 108 Copying Clips and Photos 109 6 External Connections 111 Video Output Configuration 111 Video Output Configuration Recording 111 Vide...

Page 7: ... the Camcorder Before making important recordings for the first time make test recordings using the video configuration s you plan to use to check that the camcorder operates correctly Should it fail to operate correctly refer to Troubleshooting A 129 Copyright notice Unauthorized recording of copyrighted materials may infringe on the rights of copyright owners and be contrary to copyright laws No...

Page 8: ...power switch shooting CAMERA or playback MEDIA mode For details refer to Turning the Camcorder On and Off A 24 Position of the mode switch For details refer to Changing the Camcorder s Operating Mode A 25 Video format MP4 or XF AVC For details refer to Selecting the Video Format A 42 This indicates to press the MENU button Brackets indicate text as it appears on the camcorder s screen menu options...

Page 9: ...llowing accessories are supplied with the camcorder Handle unit incl screws Microphone holder unit incl screws PD E1 USB Power Adapter BP 820 Battery Pack Cable Clamp comes pre attached to the camcorder Lens cap Lens hood with lens barrier Quick Guide ...

Page 10: ...recording button A 37 Assignable button 4 A 92 4 Lens barrier switch A 35 5 Lens hood A 21 6 Focus Zoom ring A 45 53 7 CUSTOM customizable dial A 91 8 CUSTOM customizable button A 91 9 Focus Zoom ring switch A 45 53 10 INFRARED switch A 85 11 DISP onscreen display button A 39 BATT INFO battery information button A 18 1 7 8 9 10 11 2 3 4 5 6 ...

Page 11: ...ntroller A 86 or commercially available remote controllers 3 Built in speaker A 105 4 Lens hood release button A 21 5 Grip belt A 23 6 USB terminal A 88 7 HDMI OUT terminal A 113 114 8 headphones terminal A 82 116 9 z SDI OUT terminal A 113 10 MIC terminal A 76 11 Cable clamp A 18 2 7 9 10 11 3 4 1 5 6 8 ...

Page 12: ...ssignable button 2 A 92 5 LCD touch screen A 22 6 Serial number 7 Viewfinder A 22 8 ACCESS card access indicator A 35 9 Dioptric adjustment lever A 22 10 MAGN magnification button A 48 Assignable button 5 A 92 11 Strap mount A 23 12 REC start stop recording video button A 35 13 Battery attachment unit A 17 1 7 8 9 10 11 12 13 2 3 4 5 6 ...

Page 13: ...r A 17 3 Power switch A 24 4 Cold shoe Handle attachment unit A 20 5 Built in stereo microphone A 74 6 Grip zoom rocker A 53 7 Mode switch A 25 8 Card compartment cover A 32 9 SD card slot 2 10 SD card slot 3 11 SD CARD open the card compartment cover switch A 32 1 6 8 9 10 11 7 2 3 4 5 ...

Page 14: ...Names of Parts 14 1 Socket for tripod s anti rotation pin 2 Tripod socket A 136 For use with tripods with a mounting screw up to 6 3 mm 0 25 in long 3 BATTERY RELEASE switch A 18 4 Eye cup A 22 1 3 4 2 ...

Page 15: ...O IN switches audio input selection for CH1 left and CH2 right A 76 77 8 INPUT 1 left INPUT 2 right switches audio source selection A 76 9 INPUT terminals INPUT 1 right INPUT 2 left A 76 10 Infrared light A 85 11 Tally lamp A 36 12 Audio controls cover A 78 13 Handle unit front screw A 20 14 Handle unit rear screws A 20 Microphone Holder Unit A 20 76 1 Microphone lock screw 2 Microphone holder 3 M...

Page 16: ...Names of Parts 16 ...

Page 17: ...n minutes on the screen For more accurate readings when using a battery pack for the first time charge it fully and then use the camcorder until the battery pack is completely depleted 1 Connect the USB power adapter to the camcorder and plug the power cord into a power outlet 2 Attach the battery pack to the camcorder 3 Charging will start when the camcorder is turned off The POWER CHG charge ind...

Page 18: ...y charge is too low the battery information screen may not appear Using a Power Outlet You can power the camcorder directly from a power outlet using the USB power adapter 1 Plug the USB power adapter into a power outlet 2 Attach the cable clamp to the grip belt and use it to secure the cable The ferrite core should be placed between the USB plug and the cable clamp 3 Connect the USB plug to the D...

Page 19: ...rt The battery pack will be charged only when the camcorder is off If the power supply was disconnected while charging a battery pack make sure the POWER CHG indicator has gone out before restoring the power supply If remaining battery time is an issue you can power the camcorder using the USB power adapter so the battery pack will not be consumed While recording it is recommended to attach a batt...

Page 20: ...e Unit The camcorder is functional even if you remove the handle unit However to use the INPUT terminals A 76 infrared light A 85 and tally lamp A 35 the handle unit must be correctly attached to the camcorder 1 Attach the microphone holder unit to the handle unit Use a commercially available Phillips head crosshead screwdriver and the two supplied screws 2 Align the handle unit with the handle at...

Page 21: ... on the top of the lens 햲 and then turn the lens hood clockwise until it stops with a click 햳 Be careful not to deform the lens hood Make sure that the lens hood is aligned with the thread To remove the lens hood 1 Press and hold the lens hood release button and turn the lens hood counterclockwise 2 Place the lens cap back on the lens NOTES About the lens cap Use the supplied lens cap when carryin...

Page 22: ...orten the effective usage time of the battery pack When the LCD panel is rotated 180 degrees toward the subject you can use the Display Setup LCD Mirror Image setting to flip the screen s image horizontally so it shows a mirror image of the subject For details about how to take care of the LCD screen refer to Safety Instructions and Handling Precautions A 136 Cleaning A 139 Using the Viewfinder Ad...

Page 23: ... Make sure you keep the eye cup attached when using the camcorder If you wear glasses you may find the viewfinder easier to use if you flip back the outer edge of the eye cup toward the camcorder body Adjusting the Grip Belt and Using Straps Fasten the grip belt Adjust the grip belt so that you can reach the grip zoom rocker with your index finger and the REC button with your thumb To attach an op...

Page 24: ...g back recordings Select the operating mode using the power switch To turn on the camcorder Set the power switch to CAMERA for mode A 35 or MEDIA for mode A 103 To turn off the camcorder Set the power switch to OFF NOTES When you turn on the camcorder the POWER CHG indicator will illuminate in green You can set B System Setup POWER LED to j Off so the power indicator does not illuminate mode mode ...

Page 25: ...tyle A 35 Auto mode Set the mode switch to N With this mode the camcorder takes care of all the settings while you concentrate on recording This operating mode is suitable if you just prefer not to bother with detailed camcorder settings Manual mode Set the mode switch to n With this mode you can enjoy full access to menus settings and advanced functions ...

Page 26: ...he rest of the steps in this procedure In some screens the date will be displayed in short form numbers instead of month names or only the day and month but it will still follow the order you selected 6 Touch 24H to use 24 hour clock or leave it unselected to use 12 hour clock AM PM 7 Touch OK to start the clock and close the setup screen NOTES With the following settings you can change the time z...

Page 27: ...s New York In addition the camcorder is able to retain the date and time of an additional location This is convenient when you travel so that you can set the camcorder to match the time of your home location or that of your travel destination Refer to Setup Menus A 28 for details on how to navigate the menu to complete this procedure 1 Select Time Zone DST B System Setup Time Zone DST 2 Select to ...

Page 28: ...desired menu item Language H in the example If the desired menu item does not appear in the menu page displayed drag your finger left right to scroll through other menu pages For main procedures the page number may be given in the manual in the example If you know the page number you can touch the number icon at the top left of the screen to open directly the desired menu page The page number may ...

Page 29: ...o highlight the X button and press SET to close the menu NOTES Touching X or pressing the MENU button at any time closes the menu Unavailable items may appear grayed out FUNC Menu In mode the FUNC menu offers a quick way to control various shooting related functions such as white balance exposure focus etc Available functions are more limited in mode To use the touch panel 1 Touch FUNC on the shoo...

Page 30: ...Using the Menus 30 NOTES Depending on the selected function other buttons adjustment dials and other controls may appear on the screen These are explained in the respective section of the manual ...

Page 31: ...3 To record XF AVC clips we recommend using SD cards rated SD Speed Class 10 or UHS Speed Class U1 or U3 IMPORTANT After repeatedly recording deleting and editing clips if the SD card is fragmented you may notice slower writing speeds to the card and recording may even stop In such case save your recordings and initialize the card with the camcorder Be sure to initialize SD cards especially before...

Page 32: ...nserting or removing a card with the camcorder on may result in permanent data loss SD cards have front and back sides that are not interchangeable Inserting a card facing the wrong direction can cause a malfunction of the camcorder Be sure to insert the card as described in step 3 Initializing an SD Card Initialize SD cards when you use them with this camcorder for the first time You can also ini...

Page 33: ...r card without interruption when the card you are using becomes full 1 Select Dual Relay Recording 3 Recording Setup Dual Relay Recording 2 Select 4 Dual Recording or Relay Recording or Relay Recording and then select X When dual recording is activated the status of both cards will appear at the top right of the screen When relay recording is activated the card icon will change to or Select Standa...

Page 34: ... thumbnail image 3 When prompted to recover the data select Yes The camcorder will attempt to recover the corrupted data 4 When the confirmation message appears select OK NOTES In the index screen recovered MP4 clips appear with a special playback icon instead of the usual thumbnail This procedure may delete clips shorter than 0 5 seconds in length In some cases it may not be possible to recover t...

Page 35: ...utomatically adjust various settings for you In mode you can manually adjust the focus exposure and many other settings according to your needs and preferences 1 Open the lens barrier Set the lens barrier switch to OPEN 2 Set the mode switch to the desired position Set it to N mode or n mode according to how you want to use the camcorder 3 Set the power switch to CAMERA The POWER CHG indicator wil...

Page 36: ...a lock lever to prevent accidental operation Set the lock lever to C in cases such as when you do not want a recording inadvertently paused or do not plan to use this REC button Return the lever to its previous position to enable use of the REC button again You can have the custom picture settings in use saved with the recorded XF AVC clips A 97 The maximum continuous recording time of a single cl...

Page 37: ...C A N O N _ 0 1 1 2 3 4 6 7 5 1 Camera index One character A to Z that identifies the camcorder used 2 Reel number 3 characters 001 to 999 that identify the card used The number is assigned automatically but you can set the initial number After you insert a new card just purchased or initialized the number advances by one when the first recording is made 3 Clip number 4 characters C001 to D999 The...

Page 38: ... setup screen appears with an orange selection frame on the leftmost digit Select Reset to reset the reel clip number to 001 and return to the previous screen 2 Select Í or Î to set the first digit and then select the next field Change the rest of the digits in the same way 3 After entering all the digits of the clip reel number select OK Select Cancel to close the screen without changing the numb...

Page 39: ...ome of the following AF frames Top of the screen Icon Display Description N mode A 25 n H I Q K L M R S T Shooting mode A 60 Infrared recording A 85 00 00 00 00 00 00 00 00 Time code A 71 Ñ Ü in red Recording operation A 35 Ñ record standby Ü recording z Pre recording A 84 in yellow Image stabilization A 57 Continuous AF frame always in white A 50 AF Boosted MF frame in yellow manual adjustment ra...

Page 40: ...n A 65 0 0 0 Exposure lock A 65 00 0dB Gain value A 62 00 0dB value in orange AGC limit A 59 ND 1 00 ND filter A 67 Face detection tracking A 51 D 000ft Focus A 45 While adjusting the focus the estimated focusing distance will be displayed next to the icon to Custom Picture A 94 Look A 70 É 00000K White balance A 68 color temperature View Assistance A 41 Backlight correction A 66 O N Peaking A 48 ...

Page 41: ...he camcorder screen it will not affect your recordings or the video signal output from the various terminals 1 Select LCD VF View Assistance Display Setup LCD VF View Assistance 2 Select On will appear on the screen x0 00 x0000 Slow fast motion recording A 44 º Frame rate A 42 Video format A 42 0000x0000 Resolution A 42 000Mbps Bit rate Settings optimized for an optional conversion lens A 123 Time...

Page 42: ...t Movie Format 3 Recording Setup Movie Format 2 Select MP4 or XF AVC and then select X Selecting the Resolution and Bit Rate 1 Select Resolution or Resolution 3 Recording Setup Resolution or Resolution 2 Select the desired option and then select X The selected resolution and bit rate will appear on the right of the screen Selecting the Frame Rate 1 Select Frame Rate or Frame Rate 3 Recording Setup...

Page 43: ...rder uses a variable bit rate VBR that is adjusted automatically according to the recorded subject For this reason actual recording times may vary depending on the subject For details on approximate recording times refer to the Reference Tables A 145 Resolution Bit rate Frame rate 59 94P 59 94i 29 97P 23 98P 3840x2160 160 Mbps 1920x1080 45 Mbps ...

Page 44: ...Free Run the time code running mode will be changed automatically to Rec Run when slow fast motion recording is activated When slow fast motion recording is turned off the time code running mode will return to its previous setting The time code signal cannot be output from the SDI OUT terminal z only or HDMI OUT terminal The maximum continuous recording time of a single clip using slow motion reco...

Page 45: ... of the screen 3 Turn the focus zoom ring to adjust the focus The approximate focusing distance will appear on the left of the screen while you operate the focus zoom ring To focus by touching a subject on the screen Touch focus 2 Open the focus screen FUNC Focus 3 Touch the desired point inside the focus frame The I mark will flash on the selected subject The camcorder will focus automatically an...

Page 46: ...red preset focus position 3 Adjust the focus as necessary using touch focus or the focus zoom ring Only the distance displayed inside the focus frame will change as you focus 4 Select to return to the preset focus position will be grayed out while adjusting the focus or zoom Select the focus preset button to turn off focus preset NOTES NOTES The preset focus position will be canceled when the camc...

Page 47: ...ch the desired point on the screen to move the focus guide and focus on a different subject NOTES NOTES When the focus guide frame turns green the subject is correctly focused With subjects or in situations where autofocus may not work well A 51 the focus guide may not be displayed correctly The focus guide cannot be used in the following cases While the focus is being adjusted automatically using...

Page 48: ... and the center of the screen is magnified 2 times The magnification frame displayed at the bottom right corner of the screen shows the approximate part of the image shown magnified 2 If necessary move around the magnification frame to check other parts of the image Drag your finger on the screen or push the joystick ÝÞ 3 Press the MAGN button or select X to cancel the magnification If one of the ...

Page 49: ...tivate the autofocus will appear on the left of the screen 3 Set the AF frame size to r Large or s Small A 50 4 Select AF Mode v Camera Setup AF Mode 5 Select AF Boosted MF and then select X When the focus is in the manual adjustment range the focus frame will appear in yellow If necessary change the size and position of the AF frame A 50 6 Turn the focus zoom ring to adjust the focus Focus manual...

Page 50: ... the screen Changing the AF Frame Size By default when autofocus is used the camcorder focuses on a subject at the center of the screen and no AF frame is displayed You can select to display an AF frame and change its size and position to focus on a specific area or subject 1 Select AF Frame Size v Camera Setup AF Frame Size 2 Select the desired option and then select X Options NOTES NOTES When th...

Page 51: ...ell on the following subjects or in the following cases In such case focus manually When the Gamma setting in the custom picture file A 98 or look A 70 is set to Canon Log 3 or BT 709 Wide DR When subjects at different distances appear in the picture Face Detection Tracking When face detection tracking is activated the camcorder will detect the subject s face and automatically adjust the focus1 an...

Page 52: ... turn face detection tracking off When face detection tracking is activated the slowest shutter speed used by the camcorder is 1 30 1 24 if the frame rate is set to 23 98P Touching somewhere with a color or pattern unique to the subject will make it easier to track However if there is another subject in the vicinity that shares similar characteristics to the selected subject the camcorder may star...

Page 53: ...M 2 Turn the focus zoom ring to adjust the zoom Turn the focus zoom ring slowly for a slow zoom turn it faster for faster zooms The zoom bar that appears on the screen indicates the approximate zoom position NOTES NOTES You can customize the operation of the focus zoom ring with the v Camera Setup Focus Zoom Ring Operation and Zoom Ring Direction settings If you turn the focus zoom ring too quickl...

Page 54: ...ns operation sounds You can use the v Camera Setup Grip Zoom Operation setting to disable the grip zoom rocker s operation To use high speed zoom in standby mode When high speed zoom is activated and v Camera Setup Grip Zoom Speed is set to Y variable zoom speed in record standby mode you will be able to zoom at the highest speed available Z Fast Nevertheless the zoom speed while recording will be...

Page 55: ... the v Camera Setup Handle Zoom Operation setting to disable the handle zoom rocker s operation Using an Optional Remote Controller The zoom speeds when using the RC V100 Remote Controller or a commercially available remote control connected to the REMOTE terminal are different Zoom speeds for remote operation Handle Zoom Speed setting Zoom Speed Level setting Slow Normal Z Fast 1 slowest 4 min 38...

Page 56: ...2 Select Digital Tele conv and then select X 3 Open the onscreen zoom controls FUNC R Zoom 4 Select digital tele converter and then select X The center of the screen will be enlarged approximately 2 times and the icon will appear on the left of the screen Select again before closing the screen to turn off the digital tele converter NOTES NOTES You can attach the optional TL U58 Tele converter and ...

Page 57: ...de angle Powered IS Powered IS is most effective when you are stationary and zooming in on far subjects using high zoom ratios the more you approach the telephoto end This mode is not suitable for tilting and panning shots Dynamic IS or Standard IS 1 Select Image Stabilizer v Camera Setup Image Stabilizer 2 Select Standard Standard IS or Dynamic Dynamic IS and then select X Select Off instead to t...

Page 58: ...ff You can change the operation of the POWERED IS button long press or toggle on off with the v Camera Setup Powered IS Button setting The angle of view will change when Image Stabilizer is set to an option other than Dynamic When using Dynamic IS the edges of the picture may be adversely affected ghosting artifacts and or dark areas may appear when compensating for a high degree of camcorder shak...

Page 59: ... finger along the dial to set the desired maximum gain value You can select an AGC limit from 0 0 dB to 38 0 dB If FUNC Looks is set to Wide DR or the gamma curve component of the Gamma Color Space setting in the custom picture file A 94 is set to BT 709 Wide DR or Canon Log 3 the lowest AGC limit that can be set will be 9 0 dB 3 Select X When an AGC limit is set and the maximum gain value will ap...

Page 60: ...n 63 Shutter Pri AE Set the shutter speed manually while the camcorder automatically adjusts the aperture and gain 63 Aperture Pri AE Set the aperture and ND filter manually while the camcorder automatically adjusts the shutter speed and gain 64 n Manual Exposure Set the shutter speed aperture and gain manually for full control over the exposure 62 Special Scene modes These shooting modes offer pr...

Page 61: ...k the image on the screen R Low Light Moving subjects may leave a trailing afterimage Picture quality may not be as good as in other modes White points may appear on the screen Autofocus may not work as well as in other modes In such case adjust the focus manually R Low Light T Fireworks To avoid camcorder blur blur due to the camcorder moving we recommend using a tripod T Fireworks To record fire...

Page 62: ...l 5 Select X Available settings 1 Available values depend on the zoom position F2 8 to F11 at full wide angle F4 5 to F11 at full telephoto Aperture values displayed on the screen are for reference only 2 During slow fast motion recording available values will vary depending on the selected slow fast motion rate 3 Only when the frame rate is 23 98P 4 From 9 0 dB when FUNC Looks is set to Wide DR o...

Page 63: ...ally sets the shutter speed aperture and gain for clips but you will have the option to use other functions that are not available in mode Set the shooting mode to Programmed AE A 60 Automatic Exposure Shutter Priority With this shooting mode you set the shutter speed manually for example to capture fast moving subjects in sharp focus or to obtain a brighter image in low light situations The camco...

Page 64: ...can touch the screen to optimize the exposure for a specific subject or area The camcorder will automatically adjust the exposure for the selected point and lock the exposure settings You can even touch a bright area of the image to make that point the 100 brightness level and so try to avoid overexposure Highlight AE This function cannot be used when the shooting mode is set to n or T Fireworks 1...

Page 65: ... the screen Exposure Compensation You can compensate the exposure that was set using automatic exposure in order to darken or lighten the image This function can only be used when the shooting mode is set to or 1 Open the exposure screen FUNC y Exposure Comp If the exposure was locked select to release the exposure lock 2 Drag your finger along the dial to compensate the exposure You can set a com...

Page 66: ...4 is set to BT 709 Wide DR Canon Log 3 or EOS Std And also the shooting mode was set to n or the exposure settings have been locked When infrared recording is activated Backlight correction will be deactivated in the following cases When the power switch mode switch or INFRARED switch is operated When the shooting mode is changed When the frame rate video format or look is changed When the custom ...

Page 67: ...if the ND filter setting is not appropriate an ND warning icon will start flashing next to the ND filter setting The gain value is too high The aperture is too closed Change the ND filter setting so the ND filter display stops flashing to mitigate the effect of such conditions When the optional RC V100 Remote Controller is connected to the camcorder the RC V100 s ND filter indicator will flash as ...

Page 68: ...et 2 3 Point the camcorder at a gray card or white object so that it fills the frame at the center of the screen and then select Å When the Å icon inside the frame stops flashing the procedure is completed The setting is retained even if you turn off the camcorder 4 Select X Options NOTES NOTES When you select a custom white balance Do not use the digital zoom range light blue area of the zoom bar...

Page 69: ...ts in the following cases Changing lighting conditions Close ups Subjects in a single color sky sea or forest Under mercury lamps certain types of fluorescent lights and LED lights White balance is not available when infrared recording is activated If you set an assignable button to Ä WB Priority A 92 you can press the button to switch to a frequently used white balance setting pre selected with t...

Page 70: ... adjustment bar The sharpness contrast and color depth can be adjusted as follows Sharpness 0 softer image to 7 sharper image Contrast 4 low contrast to 4 high contrast Color Depth 4 shallower colors to 4 richer colors 5 Select X Not available for Wide DR Not available for Monochrome Options NOTES NOTES When using the Wide DR look the lowest available gain setting is 9 0 dB As such when shooting o...

Page 71: ...ding Setup Initial Time Code The time code setting screen appears with an orange selection frame indicating the hours Select Reset to reset the time code to 00 00 00 00 and return to the previous screen If the running mode is set to Free Run the time code will be reset the moment you select the button and keep running continuously from 00 00 00 00 2 Select Í or Î to set the value for the hours and...

Page 72: ... automatically and cannot be changed When you mix drop frame and non drop frame time codes there might be a discontinuity in the time code at the point where the recording starts When slow fast motion recording is activated the time code signal cannot be output from the SDI OUT terminal z only or HDMI OUT terminal When you are using the Free Run running mode the time code will continue running as ...

Page 73: ...ding Setup User Bit Type Setting i The user bit setting screen appears with an orange selection frame on the leftmost character Select Reset to reset the user bit to 00 00 00 00 and return to the previous screen 2 Select a character you want to change and then select Î or Í to change it as necessary Change the rest of the characters in the same way 3 Select OK and then select X Select Cancel to cl...

Page 74: ... can record this audio signal on an external recorder Open the audio controls cover to change audio settings using the controls on the handle unit Requires that the handle unit be correctly attached to the camcorder Selecting the Audio Format of MP4 Clips When recording MP4 clips you can set the audio format to AAC 2 channels 16 bit or LPCM linear PCM 4 channels 16 bit When the resolution is set t...

Page 75: ...INPUT 2 terminal INPUT1 INPUT2 INPUT 1 INPUT Terminal INPUT 1 terminal Yes INPUT1 INPUT2 INPUT 2 Built in Mic MIC Terminal INPUT 2 terminal MIC terminal L MIC terminal R INPUT1 INPUT2 INPUT 1 Built in Mic MIC Terminal INPUT 1 terminal INPUT1 INT MIC MIC MIC terminal mono INT MIC MIC INPUT2 MIC terminal mono INPUT 2 terminal No INPUT1 INPUT2 INPUT 2 Built in Mic MIC Terminal INPUT 1 terminal Built ...

Page 76: ...d insert the microphone 햳 2 Tighten the lock screw and put the microphone cable through the microphone cable clamp under the microphone holder 햴 3 Plug the microphone cable into the desired INPUT terminal 햵 or the MIC terminal 햶 Recording Audio from the INPUT Terminals to CH1 CH2 1 Set the corresponding AUDIO IN switch to INPUT 1 or INPUT 2 You can record the audio input from the INPUT terminals a...

Page 77: ...H3 CH4 A 75 1 Select CH3 CH4 Input C Audio Setup CH3 CH4 Input 2 Select the desired option and then select X When Built In Mic MIC Terminal is selected the camcorder will record audio from the built in microphone unless an external microphone is connected to the MIC terminal Recording Audio from the Built In Microphone or MIC Terminal to CH1 CH2 1 If the handle unit is connected to the camcorder s...

Page 78: ... controls cover to prevent the audio controls from being changed inadvertently Automatic Level Control ALC Linking or separating the audio adjustment of CH1 CH2 or CH3 CH4 INPUT terminals MIC terminal When the INPUT 1 and INPUT 2 switches are both set to the same type of audio source line input or microphone you can link the audio level adjustment for both inputs with the C Audio Setup INPUT 1 2 A...

Page 79: ... must use the audio screen to adjust the audio recording levels for CH1 and CH2 as well 1 Open the audio screen FUNC C Audio 2 Select the channel or pair of channels to adjust 3 Select Automatic or ö Manual If you selected automatic adjustment skip to step 5 If you selected manual adjustment continue the procedure to adjust the audio recording level 4 Touch and hold Ï or Ð to adjust the recording ...

Page 80: ...the screen Microphone Input Sensitivity Built in Microphone When using the built in microphone you can adjust the input sensitivity 1 Select Built in Mic Sensitivity C Audio Setup Built in Mic Sensitivity 2 Select the desired option and then select X Options Microphone Attenuator Built in Microphone When using the built in microphone you can activate the built in microphone s attenuator 20 dB to p...

Page 81: ...the microphone attenuator 20 dB for an external microphone connected to the MIC terminal to prevent audio distortions when the audio level is too high 1 Select MIC Att C Audio Setup MIC Att 2 Select i On and then select X å appears on the right of the screen Low Cut Filter MIC Terminal When one of the audio channels is set to the built in microphone MIC terminal you can activate the low cut filter...

Page 82: ...me C Audio Setup Headphone Volume 2 Select Ô or Õ to adjust the volume and then select X You can also drag your finger along the volume bar To adjust the volume during playback During playback you can also adjust the headphones volume in the same way you adjust the speaker s volume A 105 IMPORTANT When using headphones make sure to lower the volume to an appropriate level Operating modes ...

Page 83: ...d will be recorded when you press the REC button NOTES NOTES You cannot change the type of color bars while recording Color bars cannot be used together with slow fast motion recording Not available when the gamma curve component of the Gamma Color Space setting in the custom picture file is set to Canon Log 3 Audio Reference Signal The camcorder can output a 1 kHz audio reference signal with the ...

Page 84: ...nds of having turned on pre recording or having finished the previous recording Pre recording cannot be used together with slow fast motion recording Pre recording will be deactivated in the following cases When the power switch or mode switch is operated When a menu is opened When the shooting mode white balance or look is changed When the card compartment cover is opened or the card selected for...

Page 85: ...tivated the following apply The aperture remains fully open the ND filter remains retracted and the camcorder switches to automatic shutter speed and gain Exposure compensation is set to automatic and the AGC limit backlight correction both automatic and constant and face detection tracking are deactivated The camcorder switches to autofocus initially with the AF mode fixed at continuous AF but yo...

Page 86: ... and use the remote controller refer to its instruction manual 1 Turn off the camcorder and connect the optional RC V100 Remote Controller to the camcorder 2 Turn on the camcorder in mode and select REMOTE Terminal B System Setup REMOTE Terminal 3 Select RC V100 REMOTE A and then select X Options NOTES NOTES The following controls on the remote controller will not operate the camcorder SHUTTER SEL...

Page 87: ...figuration A 42 2 Select B System Setup USB Mode Video Output UVC 3 Connect the camcorder to a computer Video will be displayed on the software in use 4 Open the desired compatible software on the computer 5 When the connection ends disconnect the USB cable from the camcorder NOTES NOTES Audio is not output This function cannot be used while shooting photos Operating modes Recording video configur...

Page 88: ...t on your person For details about connecting and using the receiver refer to the GP E2 Instruction Manual Supplied with the receiver Activating the GPS Receiver 1 Set the USB mode to GP E2 B System Setup USB Mode GP E2 2 Turn on the receiver The icon appears on the left of the screen and will flash as the receiver tries to acquire satellite signals When satellite signals are correctly acquired th...

Page 89: ...with others or when uploading them to the Web Do not leave the GPS receiver near strong electromagnetic fields such as near powerful magnets and motors NOTES NOTES The GPS information recorded with clips corresponds to the location at the start of the recording Do not place cables connected to the SDI OUT terminal z only or HDMI OUT terminal near the receiver Doing so may negatively affect the GPS...

Page 90: ...Using the Optional GP E2 GPS Receiver 90 ...

Page 91: ...hted in orange NOTES You can also use the B System Setup CUSTOM Dial Button setting to select the assigned function Options Operating modes IRIS SHTR GAIN When the shooting mode is set to or turn the CUSTOM dial to adjust the shutter speed or aperture value respectively When the shooting mode is set to n press the CUSTOM button repeatedly to select the value you wish to adjust aperture value shutt...

Page 92: ... button and while holding it pressed down press the assignable button whose function you wish to change Onscreen assignable button Select Onscreen Assignable Button B System Setup Onscreen Assignable Button A list of available functions appears with the current function assigned to the button highlighted 2 Select the desired function and then select X If necessary select Í Î to scroll up down 3 Pr...

Page 93: ...lways On Turns the constant backlight correction function on off 66 Powered IS Turns powered IS on off 57 Ä White Balance Switches between white balance adjustment methods in order 68 Å Set WB 1 Registers a custom white balance setting 68 WB Priority Switches between the current white balance setting and a priority white balance setting Press and hold this button only physical assignable buttons t...

Page 94: ... they can be edited NOTES To use the settings of a custom picture file saved on a card copy the file to the camera in advance A 96 Shooting modes cannot be used when infrared recording is activated About the logarithmic gamma curves Canon Log 3 settings These gamma curves require post production processing They were designed to make the most of the imaging sensor characteristics in order to obtain...

Page 95: ...ing Editing a Custom Picture File s Settings You can adjust the image characteristics of the custom picture file selected You can also rename protect or reset custom picture files Be sure to remove the protection before editing a custom picture file Adjusting the Image Parameters 1 Select i 2 Select the image parameter you want to adjust Refer to Available Custom Picture Settings A 98 for details ...

Page 96: ...T NOTES Custom picture files are exclusively compatible for use only with the same camera model Replacing a File in the Camera with a File on a Card 1 Select Load i Save File 7 Load 2 Select the file with the settings that you want to replicate and then select OK The file in the camera will be overwritten by the one on the card 3 When the confirmation message appears press SET Using the virtual ke...

Page 97: ...stom Picture File in Clips CAMERA Mode When you record in XF AVC format after having set custom picture settings you can have the custom picture file embedded in the metadata and saved along with the clips Select Æ Recording Setup Add File i On ...

Page 98: ...duction Camera Reproduces colors more suitable for motion picture production EOS Std Approximates the look of an EOS interchangeable lens camera when the picture style is set to Standard Video Reproduces colors with a contrast suitable for TV broadcasting Black Master Pedestal 50 to 50 0 Increases or decreases the black level Higher settings will make dark areas brighter but decrease contrast This...

Page 99: ...revent parts of the image from being overexposed Automatic Set this setting to On to enable the automatic adjustment of the Knee settings Slope Determines the slope of the gamma curve above the knee point Point Sets the knee point of the gamma curve Saturation Adjusts the color saturation in the highlights Sharpness Level 10 to 50 0 Sets the sharpness level of the video output signal and the recor...

Page 100: ...Area Off Area A Area B Area A B The camera detects areas with certain color characteristics color phase chroma area and Y level and corrects them when recording You can set the color correction for up to two different areas A and B and apply the color correction to either one Area A or Area B or both of them Area A B While color correction is activated parts of the image that are not detected as h...

Page 101: ...Black Master Pedestal Master Black Red Master Black Blue Black Gamma Level Knee Automatic Slope Point only when Knee Activate is set to On Sharpness Level White Balance R Gain B Gain Other Functions Over 100 Through Press Clip Determines how the camera handles video signals exceeding 100 This setting is not available when the gamma curve component of the Gamma Color Space setting is set to one of ...

Page 102: ... Save 3 Select Yes The camcorder s menu settings will be saved to the card If menu settings were previously saved the old file will be overwritten by the current menu settings 4 When the confirmation message appears select OK Loading Menu Settings 1 Insert the card with the desired menu settings file into the camcorder s SD card slot B 2 Select Load B System Setup Backup Menu 7 Load 3 Select Yes T...

Page 103: ... the index screen Changing the Index Screen Change the index screen to play back a different type of recording y clips or photos clips in a different format MP4 clips or XF AVC clips or recordings on a different card 6 or 7 Select the index screen button and then select the desired index screen Operating modes 3 4 5 6 1 2 2 1 y Clip index screen Photo index screen 2 Display the next previous index...

Page 104: ...file names have been changed NOTES You can turn off the recording date and time display or change the information displayed with the É Playback Setup Data Code setting The icon in the name of the setting and available options depend on the type of recording being played back Depending on the recording conditions you may notice brief stops in video or sound playback between clips 1 7 8 9 10 11 12 1...

Page 105: ...S You can select the audio channels output from the headphone terminal and built in speaker A 116 Playback type Operation Onscreen icon Fast playback During playback select Ø Select repeatedly to increase the playback speed to approximately 5x 15x 60x the normal speed During fast playback select Ð to return to playback at normal speed x00 Øx00 Slow playback Select Ö Õ Select repeatedly to change t...

Page 106: ...nal GP E2 GPS receiver was used when recording the clip 1 3 4 5 2 6 7 8 9 10 1 File number MP4 clips A 125 Clip s file name XF AVC clips A 37 2 Display the information for the previous next clip 3 Clip number Total number of clips 4 Slow fast motion rate A 44 5 Look A 70 Custom picture A 94 6 Date and time at the start of recording 7 Clip duration 8 Frame rate A 42 and video format A 42 9 Resoluti...

Page 107: ...te A checkmark will appear on the recordings you select The total number of selected clips photos will appear next to the icon Select a selected clip or photo to remove the checkmark To remove all checkmarks at once select Remove All Yes 2 After selecting all the desired recordings select OK Options Deleting a Single Clip 1 Play back the desired clip A 104 2 Touch the screen to display the playbac...

Page 108: ...ll appear on the screen A 105 Use any special playback modes as necessary to locate the desired point 4 Select the desired trimming options and trim the clip Trim Trim Before Marker or Trim After Marker Save as New or Overwrite With the first set of options you can select respectively to trim before or after the mark With the second set of options you can select respectively to save the trimmed cl...

Page 109: ...k To remove all checkmarks at once select Remove All Yes 2 After selecting all the desired recordings select OK Options Copying a Single Photo 1 Play back the desired photo A 104 2 Touch the screen to display the playback controls and then copy the photo FUNC Copy 6 7 or Copy 7 6 Proceed Yes 3 Drag your finger left right to select another photo to copy or select X NOTES In the following cases you ...

Page 110: ...Clip and Photo Operations 110 ...

Page 111: ...ut signal will change automatically depending on the capabilities of the external monitor 4 XF AVC clips only 5 MP4 clips only Operating modes Recording video configuration Scan mode1 Maximum output resolution2 Video output configuration Resolution Frame rate Resolution Frame rate Color sampling 3840x2160 29 97P 23 98P P 1920x1080 1920x1080 Same as the recording YCbCr 4 2 2 8 bit 1280x720 59 94P 1...

Page 112: ...uration Resolution Frame rate Resolution Frame rate Color sampling 3840x2160 29 97P 23 98P P 3840x21603 3840x21603 Same as the recording3 YCbCr 4 2 2 8 bit4 1920x1080 1920x1080 Same as the recording 1280x720 59 94P 1280x720 59 94P PsF 1920x1080 HDMI output 59 94i z SDI output 29 97PsF 59 94i 1920x1080 59 94P 29 97P 23 98P P 3840x21603 1920x10803 Same as the recording3 1920x1080 1920x1080 Same as t...

Page 113: ...ding command signal You can also output the camcorder s onscreen displays A 127 1 Select Output Terminal Display Setup Output Terminal 2 Select ø SDI and then select L 3 Select SDI Output Display Setup SDI Output 4 Select the desired option and then select L 5 Select 3G SDI Mapping Display Setup 3G SDI Mapping 6 Select the desired option and then select X You can select a video output signal compl...

Page 114: ...rding Setup HDMI Time Code 6 Select i On and then select X NOTES z The camcorder cannot output signals to the SDI OUT terminal and HDMI OUT terminals simultaneously The HDMI OUT terminal on the camcorder is for output only Do not connect it to an HDMI output terminal on an external device as this may damage the camcorder Correct operation cannot be guaranteed when connecting the camcorder to DVI m...

Page 115: ...evices that support only interlaced scanning you can change the scan mode of the video signal output from the SDI OUT terminal z only or HDMI OUT terminal 1 Select SDI HDMI Scan Mode or HDMI Scan Mode Display Setup SDI HDMI Scan Mode z or HDMI Scan Mode 2 Select the desired option and then select X ...

Page 116: ...ired option and then select X For MP4 clips In mode these options are available only during 4 channel audio recording NOTES If you set an assignable button to œ Monitor Channels A 92 you can press the button to toggle between the audio channel output options MP4 audio format1 Audio configuration of the recorded clips Audio output configuration z SDI OUT terminal HDMI OUT terminal2 LPCM 16bit 4CH 4...

Page 117: ...The audio signal output from the HDMI OUT terminal will be 2 channel linear PCM audio 16 bit You can select the pair of audio channels that are output from the terminal 1 Select HDMI Channels Audio Setup HDMI Channels 2 Select the desired option and then select X ...

Page 118: ...Audio Output 118 ...

Page 119: ...l Canon website Check the download page for the system requirements and latest information You will find detailed instructions about installing and uninstalling the software in the Read This First file Install MP4 Join Tool pdf included in the compressed file you download For details about using the software refer to the instruction manual PDF file that is installed with the software Saving XF AVC...

Page 120: ...Working with Clips on a Computer 120 ...

Page 121: ...ment dial 0 0 dB to 39 0 dB Zebra pattern button Off z 70 100 A 62 AGC Limit n set a limit Turn on off off when n is selected Gain limit adjustment dial 0 0 dB to 38 0 dB A 59 y Exposure Comp Touch exposure frame i Touch exposure settings Normal Highlights Zebra pattern button Off z 70 100 AE lock Turn on off off A 62 White Balance Automatic Daylight É Tungsten Color Temperature Set 1 Set 2 A 68 B...

Page 122: ...ically switch to digital zoom once you zoom beyond the optical zoom range With the digital zoom the image is digitally processed so the image resolution will deteriorate the more you zoom in Zoom Speed Level Z Fast Normal Slow A 54 Grip Zoom Operation Enable Disable A 53 Grip Zoom Speed Y variable speed X constant speed when X is selected Zoom speed adjustment bar 1 to 16 8 A 54 Handle Zoom Operat...

Page 123: ...ngth of the lens by a factor of approx 0 8 The approximate focusing distance displayed on the screen will change depending on the setting Select j Off when a conversion lens is not attached to the camcorder When a setting other than j Off is selected v Camera Setup AF Mode will not be available Image Stabilizer Off Standard Dynamic A 57 Powered IS Button Î Press and Hold Ï Toggle On Off Determines...

Page 124: ...2 x4 x10 x20 x60 x120 x600 x1200 A 44 Available Space in Memory Used Space in Memory 6 SD card A 7 SD card B Displays a screen where you can check the SD card s total space and speed class as well as the following information mode only Available space and estimates for remaining recording time MP4 clips XF AVC clips and remaining number of photos Estimates are based on current settings mode only A...

Page 125: ...the folder numbered 101 was created on November 3 Each folder can contain up to 500 files MP4 clips and photos combined When that number is exceeded a new folder is created automatically Understanding file numbers An example file number is 101 0107 The first 3 digits indicate the folder number where the MP4 clip or photo is stored and the last 4 digits indicate the consecutive number assigned to t...

Page 126: ...gnal LCD Brightness Brightness adjustment bar darker brighter Changing the brightness of the screen does not affect the brightness of your recordings or the brightness of the playback image on a TV LCD Backlight Max Brightness Bright Normal Dim VF Luminance High Normal Changes the LCD screen s backlight level to one of four levels or the viewfinder s luminance level to one of two levels affecting ...

Page 127: ... off 12 hour clock off A 26 In Date Format options Y year M month D day POWER LED Tally Lamp ACCESS LED i On j Off These settings determine whether the following LEDs and indicators will illuminate POWER LED The green POWER CHG indicator Tally Lamp When this setting is set to i On the tally lamp illuminates while the camcorder is recording the remaining battery charge is too low or a card is full ...

Page 128: ...quired from GPS For more details refer to the receiver s instruction manual GPS Information Display Displays the current GPS information For more details refer to Viewing GPS Information in the receiver s instruction manual Certification Information Displays certification logos that apply to this camcorder Firmware Displays the current firmware version of the camcorder This option is usually unava...

Page 129: ...ttery life Buy a new battery pack Recording Pressing the REC button will not start recording You cannot record while the camcorder is writing previous recordings to a card while the ACCESS indicator is illuminated in red Wait until the camcorder has finished The card is full Delete some recordings A 107 or initialize the card A 32 to free some space File numbers for MP4 clips and photos have reach...

Page 130: ... some operations may take longer than usual Save your recordings A 119 and initialize the card A 32 Cannot copy clips photos You may not be able to copy clips photos recorded or edited using another device and then transferred to a card connected to the computer There is not enough available space on the destination card or it already contains the maximum number of XF AVC clips 999 clips Delete so...

Page 131: ...rizontal bands appear on the screen This is a phenomenon typical of CMOS image sensors when recording under some types of fluorescent mercury or sodium lamps This is not a malfunction You may be able to reduce the symptoms by setting Camera Setup Flicker Reduction to Automatic or by setting the shutter speed to a value matching the frequency of the local electrical system 1 100 for 50 Hz systems 1...

Page 132: ... a TV is located keep a distance between the USB power adapter and the power or antenna cables of the TV Playback looks fine on the camcorder but there is no image on the external monitor The camcorder is not connected correctly to the external monitor Make sure you are using the correct connection A 113 The video input on the external monitor is not set to the video terminal to which you connecte...

Page 133: ...y card Clips cannot be recorded on a 512 MB or smaller card Use a recommended card A 31 Cannot trim the clip MP4 clips that were recorded or copied using other devices cannot be trimmed Charge the battery pack Battery pack is depleted Charge the battery pack Check the memory card Cannot access the card Check the card and make sure it is inserted correctly A card error occurred The camcorder cannot...

Page 134: ...tedly recording deleting and editing clips fragmented memory it will take longer to write data on the SD card and recording may stop Save your recordings A 119 and initialize the card A 32 Some clips could not be deleted Clips that were protected edited with other devices and then transferred to a card connected to the computer cannot be deleted with this camcorder Some clips require data recovery...

Page 135: ...ions when using a battery charger or USB power adapter Do not plug in or unplug the product with wet hands Do not use the product if the power plug is not fully inserted into the power outlet Do not expose the power plug and terminals to dirt or let them come into contact with metallic pins or other metal objects Do not place heavy objects on the power cord Do not damage break or modify the power ...

Page 136: ...nd hit an object Handle the touch screen with care Do not apply excessive force and do not use ballpoint pens or other hard tipped tools to operate the touch screen This may damage the touch screen s surface Do not attach protective film on the touch screen The camcorder features a capacitive touch screen so you may not be able to correctly operate the touch screen with an additional protective la...

Page 137: ...cking up the recordings on the SD card onto your computer Data may be corrupted or lost due to card defects or exposure to static electricity Canon shall not be liable for lost or corrupted data Do not touch or expose the terminals to dust or dirt Do not use SD cards in places subject to strong magnetic fields Do not leave SD cards in places subject to high humidity and high temperature Do not dis...

Page 138: ...e or chemical burn hazard if mishandled Do not disassemble modify immerse in water heat above 100 C 212 F or incinerate the battery Do not insert the battery into the mouth If swallowed seek medical assistance immediately The battery case may break and the battery fluids may cause internal injuries Keep the battery out of the reach of children Do not recharge short circuit or insert the battery in...

Page 139: ...se may damage the camcorder Condensation may form in the following cases When the camcorder is moved quickly from cold to warm places When the camcorder is left in a humid room When a cold room is heated rapidly To avoid condensation Do not expose the camcorder to sudden or extreme changes in temperature Remove the SD cards and battery pack Then place the camcorder in an airtight plastic bag and l...

Page 140: ...You can also obtain genuine accessories for your Canon camcorder by calling 1 800 828 4040 Canon U S A Information Center Use of genuine Canon accessories is recommended The message Battery communication error is displayed if you use a non genuine Canon battery pack and user response is required Note that Canon shall not be liable for any damages resulting from accidents such as malfunction or fir...

Page 141: ...th Intelligent System CG 800 Battery Charger Use the battery charger to charge the battery packs It plugs directly into a power outlet without a cable TL U58 Tele Converter The minimum focusing distance at full telephoto with the tele converter is 1 3 m 4 3 ft The tele converter cannot be used together with the supplied lens hood WA U58 wide attachment The wide attachment cannot be used together w...

Page 142: ...YCbCr 4 2 0 8 bit Recording Media not included SD SDHC SD High Capacity or SDXC SD eXtended Capacity card 2 slots SD card B is used also to save custom picture files and the camcorder settings file Image Sensor 1 0 inch single plate CMOS sensor Effective pixels 8 290 000 pixels 3840x2160 LCD Touch Screen 3 5 in wide color 2 760 000 dots 100 coverage capacitive touch screen operation Viewfinder 0 3...

Page 143: ... to Hi Speed USB USB 2 0 MIC Terminal 3 5 mm stereo mini jack unbalanced plug in power supply available Sensitivity 65 dBV auto volume full scale 12 dB Microphone attenuator 20 dB Plug in power supply 2 4 V DC INPUT Terminals INPUT 1 and INPUT 2 on the handle unit XLR jack pin1 shield pin2 hot pin3 cold 2 sets balanced Sensitivity For microphone input 60 dBu manual volume center full scale 18 dB M...

Page 144: ...ted output 5 0 V DC 3 0 A 9 0 V DC 3 0 A Operating temperature 0 40 C 32 104 F Dimensions 58 6 x 33 5 x 101 9 mm 2 31 x 1 32 x 4 01 in Weight 200 g 7 05 oz BP 820 Battery Pack Battery Type Rechargeable lithium ion battery compatible with Intelligent System Nominal Voltage 7 4 V DC Nominal Capacity 1 780 mAh Rated Capacity minimum 13 Wh 1 700 mAh Operating Temperature 0 40 C 32 104 F Dimensions 30 ...

Page 145: ...as used Typical recording times measure recording times with repeated operations such as start stop recording zooming and turning the camcorder on off The effective usage time of the battery pack may decrease when using a bright screen setting when recording in cold surroundings etc MP4 audio format Resolution bit rate SD card 8 GB 16 GB 32 GB 64 GB 128 GB AAC 16bit 2CH 3840x2160 150 Mbps 5 min 10...

Page 146: ...ording typical 80 min 125 min Playback 215 min 320 min 1920x1080 17 Mbps Recording maximum 150 min 225 min Recording typical 80 min 125 min Playback 195 min 295 min 1280x720 8 Mbps 59 94P Recording maximum 130 min 195 min Recording typical 70 min 110 min Playback 200 min 305 min XF AVC clips 3840x2160 160 Mbps 29 97P Recording maximum 130 min 195 min Recording typical 70 min 110 min Playback 170 m...

Page 147: ...rding typical 85 min 125 min Playback 230 min 340 min 1920x1080 17 Mbps Recording maximum 155 min 230 min Recording typical 85 min 130 min Playback 210 min 310 min 1280x720 8 Mbps 59 94P Recording maximum 130 min 195 min Recording typical 70 min 110 min Playback 215 min 320 min XF AVC clips 3840x2160 160 Mbps 29 97P Recording maximum 135 min 200 min Recording typical 70 min 110 min Playback 180 mi...

Page 148: ...ng 35 Recovering 34 Saving to a computer 119 XF AVC clip name format 37 Color bars 83 Condensation 139 Connection to external devices 113 Conversion lenses 123 Copying recordings 109 CUSTOM button 91 CUSTOM dial 91 Custom picture 94 D Date and time 26 DC IN terminal 17 Deleting recordings 107 Digital tele converter 56 Drop frame time code 72 Dual recording 33 E Exposure Exposure compensation 65 Ex...

Page 149: ...oting mode 63 Peaking 48 Phantom power microphone 76 Photos Copying 109 Deleting 107 Photo numbering 125 Recording 35 Viewing 103 Playback 103 Portrait shooting mode 60 Power supply 17 Powered IS 57 Pre recording 84 Priority white balance 123 PsF forced 1080i output 115 Push auto iris 63 R Rec run time code 71 Recording 35 Reference tables charging usage and recording times 145 Relay recording 33 ...

Page 150: ...nable button 92 Trimming MP4 Clips 108 Tripod 14 136 Troubleshooting 129 Tv shooting mode 63 U USB power adapter 17 USB terminal 88 User bit 73 V Video configuration 42 Video format XF AVC MP4 42 Video output configuration 111 119 View assistance 41 Viewfinder 22 Volume 105 W White balance 68 Wide DR 70 Z Zebra pattern 66 Zoom 53 Digital zoom 122 High speed zoom 54 Zoom speed 54 ...

Page 151: ...ft This product is licensed under AT T patents for the MPEG 4 standard and may be used for encoding MPEG 4 compliant video and or decoding MPEG 4 compliant video that was encoded only 1 for a personal and non commercial purpose or 2 by a video provider licensed under the AT T patents to provide MPEG 4 compliant video No license is granted or implied for any other use for MPEG 4 standard THIS PRODU...

Page 152: ...nty covers all defects encountered in normal use of the Equipment and does not apply in the following cases A Loss or damage to the Equipment due to abuse mishandling accident improper maintenance use of non Canon accessories or failure to follow operating maintenance or environmental instructions prescribed in Canon USA s user s manual B If the Equipment is defective as a result of leaking batter...

Page 153: ...l use of the Equipment and does not apply in the following cases A Loss or damage to the Equipment due to abuse mishandling accident improper maintenance use of non Canon accessories or failure to follow operating maintenance or environmental instructions prescribed in Canon Canada s user s manual B If the Equipment is defective as a result of leaking batteries sand dirt or water damage C If defec...

Page 154: ...on Inc 30 2 Shimomaruko 3 chome Ohta ku Tokyo 146 8501 Japan The information in this document in verified as of September 2022 Subject to change without notice Visit your local Canon website to download the latest version ...

Reviews: