background image

11

Enabling the wireless LAN function of 
the computer

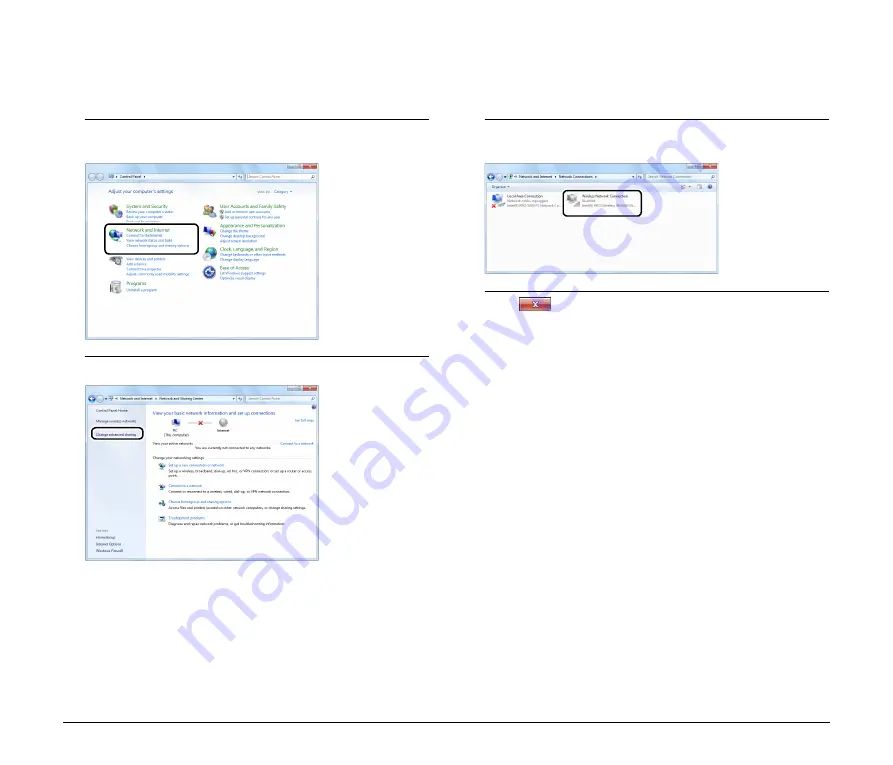
To make a Wi-Fi connection, turn on the computer’s wireless LAN function.

1

Click the Start button - [Control Panel] - [View network 
status and tasks].

2

Click [Change adapter settings].

3

If the [Wireless Network Connection] icon is [Disabled], 
double-click the icon.

4

Click 

 to close the settings screen.

Summary of Contents for WA10

Page 1: ...tions 4 About This Device 6 Setup 8 About Wi Fi Connections 10 Connecting Using the Wireless Settings of the Computer 13 Selecting and Connecting to a Destination Access Point 15 Specifying and Connecting to an Access Point 18 Connecting Using WPS 20 Connecting to Another Device with One to One Connection 21 Connecting to the Wired Network 23 Scanning with the CaptureOnTouch Job Tool from a Smart ...

Page 2: ...DATA IS INTACT THE MAXIMUM LIABILITY OF CANON ELECTRONICS INC UNDER THIS WARRANTY IS LIMITED TO THE PURCHASE PRICE OF THE PRODUCT COVERED BY THE WARRANTY FCC REGULATIONS For North America Network Adapter Model 6830020 6830040 This device complies with Part 15 of FCC Rules and Industry Canada licence exempt RSS standard s Operation is subject to the following two conditions 1 this device may not ca...

Page 3: ...Subpart B of Part 15 of FCC Rules Do not make any changes or modifications to the equipment unless otherwise specified in the manual If such changes or modifications should be made you could be required to stop operation of the equipment Canon U S A Inc One Canon Park Melville NY 11747 U S A Tel No 1 800 OK CANON 1 800 652 2666 This transmitter must not be co located or operated in conjunction wit...

Page 4: ...equipment for mobile device identification used in industrial production lines requiring licensing specific low power radio stations that do not require licenses amateur radio stations and others all afterwards called other stations When using be aware of the following 1 Before using this device check whether other stations are operating 2 If radio frequency interference occurs between this device...

Page 5: ...ss Output WA10 JP 2999C001 3126C001 Japan IEEE 802 11b g n Channels 1 to 11 2 412 to 2 462 GHz EIRP 11 48 dBm WA10 USA 2999C002 3126C002 USA Canada Mexico Brazil Argentina Colombia Peru Panama WA10 EU 2999C003 3126C003 Austria Belgium Bulgaria Cyprus Czech Republic Denmark Estonia Finland France Germany Greece Hungary Ireland Italy Latvia Lithuania Luxembourg Malta Netherlands Poland Portugal Roma...

Page 6: ... B WPS Reset button Press to connect with a WPS compatible access point Hold this button while turning the device on and keep holding until it starts up to return the device to its factory default state C Wireless On Off button Holding this button for five seconds switches between wired LAN and Wi Fi connection methods Hold this button while turning the device on and keep holding until it starts u...

Page 7: ...p 10 DHCP setting on in wired LAN mode Lit red Initializing setup Blinking green WPS executing Blinking red WPS Error Lit orange Starting up in AP mode See Network modes p 10 DHCP setting off in wired LAN mode Unlit Wireless LAN stopping 4 Status Lit green Transferring data Lamps Meaning ...

Page 8: ...are visit the Canon support website 2 Connecting to the Scanner A Connect the supplied USB cable to the USB ports on the device and the scanner When connecting the device to a scanner that supports USB 3 0 3 1 use the USB cable supplied with the scanner B Connect the supplied power relay cable to the power output connector on the device and the power connector on the scanner C For wired LAN connec...

Page 9: ... is attached to the device attach the cord cover as well to prevent disconnection of the stand About Wi Fi Connection Software To establish a Wi Fi connection the WA10 Wireless Connection Tool can be run from the bundled Setup disc System requirements Supported operating systems Windows 7 Service Pack 1 or later 32 bit and 64 bit editions Windows 8 1 32 bit and 64 bit editions Windows 10 32 bit an...

Page 10: ... setup disc into the computer s disc drive On the software setup disc execute WA10WifiConnectionTool exe CAUTION The WA10 Wireless Connection Tool requires that NET Framework 4 5 2 or higher be installed You can install it by running NDP452 KB2901907 x86 x64 AllOS ENU exe on the disc Hint Click Version Information to display WA10 Wireless Connection Tool version information Click Environmental set...

Page 11: ... connection turn on the computer s wireless LAN function 1 Click the Start button Control Panel View network status and tasks 2 Click Change adapter settings 3 If the Wireless Network Connection icon is Disabled double click the icon 4 Click to close the settings screen ...

Page 12: ...s point from the destination list for this device s connection See Selecting and Connecting to a Destination Access Point p 15 Configure the device manually according to your network environment See Specifying and Connecting to an Access Point p 18 If the wireless access point is WPS compatible connection to the device can be made using the WPS feature See Connecting Using WPS p 20 Search for the ...

Page 13: ... 1 If the device is powered on turn it off Turning off the scanner also turns off the device 2 Enable the wireless LAN function of the computer For details see Enabling the wireless LAN function of the computer p 11 This step is not necessary if the wireless LAN function is already enabled Skip to step 3 3 Run the WA10 Wireless Connection Tool On the software setup disc execute WA10WifiConnectionT...

Page 14: ...settings and click Next The connection is established When successfully connected Success is displayed on the result screen This completes configuration Hint When normal connection fails Failed is displayed on the result screen To reconfigure click Return to main screen and retry the operation from the beginning ...

Page 15: ...ng off the scanner also turns off the device 2 Enable the wireless LAN function of the computer For details see Enabling the wireless LAN function of the computer p 11 This step is not necessary if the wireless LAN function is already enabled Skip to step 3 3 Run the WA10 Wireless Connection Tool On the software setup disc execute WA10WifiConnectionTool exe p 10 4 Click Start 5 Hold the Wireless O...

Page 16: ...t the device to configure and click Next 8 Select Setup by selecting from list and click Next A list of access points detected by the computer is displayed 9 From the list select the access point to connect to and click Next ...

Page 17: ...ion is established When successfully connected Success is displayed on the result screen This completes configuration Hint When normal connection fails Failed is displayed on the result screen To reconfigure click Return to main screen and retry the operation from the beginning ...

Page 18: ...e scanner also turns off the device 2 Enable the wireless LAN function of the computer For details see Enabling the wireless LAN function of the computer p 11 This step is not necessary if the wireless LAN function is already enabled Skip to step 3 3 Run the WA10 Wireless Connection Tool On the software setup disc execute WA10WifiConnectionTool exe p 10 4 Click Start 5 Hold the Wireless On Off but...

Page 19: ...he SSID B Select the type of security C Enter the security key 10 Click Next The connection is established When successfully connected Success is displayed on the result screen This completes configuration Hint When normal connection fails Failed is displayed on the result screen To reconfigure click Return to main screen and retry the operation from the beginning ...

Page 20: ...ireless On Off button while turning the device on to start it up in AP mode Turning on the scanner also turns on the device Hold the Wireless On Off button until the Connection lamp lights orange CAUTION The device s factory default setting is AP mode 4 Press the WPS button on the access point to activate the connection waiting state See the instructions for your access point CAUTION This device c...

Page 21: ...l on the side of the device 3 Enable the wireless LAN function of the computer For details see Enabling the wireless LAN function of the computer p 11 This step is not necessary if the wireless LAN function is already enabled Skip to step 4 4 Hold the Wireless On Off button while turning the device on to start it up in AP mode Turning on the scanner also turns on the device Hold the Wireless On Of...

Page 22: ...Fi connection with the device A Click the icon in the taskbar to display a list of available wireless networks B Select the SSID from step 2 in the list then click Connect C Enter the security key shown on the label on the side of the device then click OK ...

Page 23: ...roperly and ready for use by performing the following and starting the Driver Setting Tool Hint This section describes operations for when the DR M160II is being used When using a different model replace any instance of the model name with that of the model you are using 1 Hold the Wireless On Off button for five seconds Operation switches to wired LAN mode and the Wireless lamp turns off 2 Click ...

Page 24: ...ce in the Network Setting screen of the web menu For details see Using the Web Menu p 37 Device Setting to Specify a Static IP Address Configure the settings as follows 1 Hold the Wireless On Off button for five seconds Operation switches to wired LAN mode and the Wireless lamp turns off 2 Hold the Wireless On Off button and the WPS Reset button for five seconds The device s DHCP setting will be d...

Page 25: ...jobs registered by CaptureOnTouch on each computer CAUTION CaptureOnTouch Job Tool compatibility requires CaptureOnTouch version 4 2 or later Preparation Before Scanning Install the CaptureOnTouch Job Tool on your smart device connect the WA10 to a computer and connect your smart device to the network 1 Install the CaptureOnTouch Job Tool application on your smart device For iOS devices download t...

Page 26: ... Apps screen appears 3 Tap COTJT The App info screen appears 4 Tap Permissions iOS devices 1 Tap Settings The Settings screen appears 2 Tap COTJT The access permission setting screen is displayed 3 Tap Photos and select Add Photos Only or Never Job Scanning from the App You can register a job in the CaptureOnTouch Job Tool and execute scanning according to the job s scan settings Scanned data is s...

Page 27: ...ed folder in which the scanned data is to be saved To scan A3 size documents on the DR M1060 set Page Size to Detect Page Size Hint You can register multiple jobs Up to 99 jobs can be registered 4 Tap the registered job s icon Scanning is executed and the scanned data is saved in the shared folder of the specified computer 5 Tap to save the scanned data in the smart device Scanned data is saved in...

Page 28: ...ancel editing tap the job icon again or tap Deselect 2 Tap The Edit screen appears 3 Change the settings in Job name and Scan setting and tap SAVE The settings are saved Deleting jobs You can delete registered jobs 1 Press and hold the icon of a job you want to delete appears to indicate it is ready to be deleted Hint To cancel the selected state tap the selected job icon ...

Page 29: ...For details see Displaying the Web Menu of This Device p 37 5 Tap OK All registered jobs are registered in the scanner at once CAUTION The number of jobs that can be copied depends on the scanner 6 Select the job number on the scanner and press the start button Scanning executes according to the scan settings of the selected job number During scanning the power light of the device blinks blue It l...

Page 30: ...enu of This Device p 37 5 Tap OK Jobs deleted from the CaptureOnTouch Job Tool are deleted from the scanner Job Scanning from a PC When there is one or more computer on the same network you can use the CaptureOnTouch Job Tool to select and execute jobs registered by CaptureOnTouch on each computer CAUTION Scanning cannot be executed with this operation if a job registered in CaptureOnTouch Job Too...

Page 31: ... be selected unless CaptureOnTouch is running 5 Tap the job number to execute and tap Scan Scanning executes according to the scan settings of the selected job number Hint Using the CaptureOnTouch favorite on the computer selected in the above figure the job is registered as shown below Only the favorites that are registered to the scanner s job buttons using CaptureOnTouch can be operated from Ca...

Page 32: ...CAUTION The CaptureOnTouch Job Tool for Windows requires that NET Framework 4 5 2 or higher be installed Preparation Before Scanning Install the CaptureOnTouch Job Tool on the computer and connect it and the WA10 to the network 1 Install the CaptureOnTouch Job Tool application on the computer 2 Connect the WA10 to a Wi Fi or wired network For details see About Wi Fi Connections p 10 Connecting to ...

Page 33: ...scan A3 size documents on the DR M1060 set Page Size to Detect Page Size Hint You can register multiple jobs Up to 99 jobs can be registered 4 Click the registered job s icon then click Scan Scanning is executed and the scanned data is saved in the shared folder of the specified computer Editing job settings You can edit the settings of registered jobs 1 Click the icon of the job you want to edit ...

Page 34: ... are saved Deleting jobs You can delete registered jobs 1 Click the icon of the job you want to delete 2 Click The selected job s is deleted Deleting all jobs You can delete all registered jobs at once 1 Click Delete All A confirmation message appears 2 Click OK All jobs are deleted ...

Page 35: ...according to the scan settings of the selected job number During scanning the power light of the device blinks blue It lights steadily blue when scanning and data transmission are completed CAUTION If the scanner does not detect the document there is no document in the feeder when scanning starts the Connection lamp lights orange If data cannot be sent such as because of an invalid destination a t...

Page 36: ...r click Copy job registration settings 4 Enter the administrator password Enter the same password as for the Web menu For details see Displaying the Web Menu of This Device p 37 5 Click OK Jobs deleted from the CaptureOnTouch Job Tool are deleted from the scanner ...

Page 37: ...h HTTP 1 0 RFC1945 HTML 3 0 The operating status of the connected scanner is automatically refreshed every 30 sec Displaying the Web Menu of This Device Hint This section describes operations for when the DR M160II is being used When using a different model replace any instance of the model name with that of the model you are using 1 Click All Programs Canon scanner name Driver Setting Tool in the...

Page 38: ...pears Specifying the Device s IP Address to Display the Web Menu Enter the device s IP address in the address bar of the web browser and press the Enter key Example Enter 192 168 0 10 displayed as http 192 168 0 10 The device s web page opens and the login screen is displayed The Device information screen appears immediately after you log into the web menu allowing you to view the current settings...

Page 39: ... Value DHCP Enable ON disable OFF the DHCP protocol To assign an IP address using DHCP the DHCP server must be running in your subnetwork ON IP Address Set the IP address of the device If DHCP is enabled the IP address obtained from it will be applied The value must be four decimal numbers separated by dots and expressed in the xxx xxx xxx xxx format 192 168 0 10 Subnet Mask Set the subnet mask of...

Page 40: ... xxx xxx format Also the gateway needs to be running in the same subnetwork as the device 192 168 0 1 Item Description Default Value Item Description Default Value mDNS Enable disable multicast DNS This setting allows scanning applications to search for and automatically connect to this device and its connected scanner Enable the setting under normal circumstances When the setting is disabled you ...

Page 41: ...l Item Description Default Value Current Password Enter the current password None New Password Set the administrator password up to 32 characters This password is used for authentication when configuring settings in a web browser None New Password Confirmation Used to confirm the password None Item Description Initialize Restore the device s factory default settings If you click Initialize and the...

Page 42: ...LICENSE LGPL or proprietary licenses You can view the original text of a software license via the device s web menu 1 Follow the steps in Displaying the Web Menu of This Device p 37 and display the Device information screen 2 Click to display the next page of the Device information screen 3 Click Download for Third party license ...

Page 43: ...irm that the version of the installed scanner driver is compatible with this device Wired LAN Confirm that the network cable is connected properly Confirm that the device is not in Wi Fi mode Wi Fi Confirm that the device is not in wired LAN mode Is the device located too far from the access point Connection is not possible if the distance is too far For details please contact your network adminis...

Page 44: ... must be registered Automatic connection to the network is not possible Wired LAN If your network environment supports DHCP consult your network administrator If your network environment does not support DHCP configure the IP address manually The network disconnects during use Wired LAN Check the condition of the cable connection Check the status of network traffic When a heavy load is placed on t...

Page 45: ... IEEE802 11g Up to 54 Mbps IEEE802 11n Up to 72 2 Mbps Security WPA PSK TKIP AES WPA2 PSK TKIP AES WEP open Easy setting WPS Dimensions 116 mm x 93 6 mm x 28 8 mm 4 57 x 3 69 x 1 13 W x D x H without cord cover Mass Approx 179 g 0 4 lb main body only Power supply AC adapter use the adapter supplied with the scanner Power consumption Max during operation 7 0 W During standby 4 5 W During power off ...

Page 46: ......

Page 47: ......

Page 48: ...sch Schalter Aus Español Interruptor apagado Nederlands Schakelaar Off Türkçe Anahtar Kapalı Power off no standby current Hors tension pas de courant de veille Alimentazione assente nessuna corrente di standby Ausgeschaltet ohne Ruhestromaufnahme Máquina apagada sin corriente en espera Uit geen stand byverbruik Güç kapalı bekleme akımı yok English Switch Standby Français Commutateur Veille Sous ho...

Page 49: ...nçais Italiano Apparecchio classe II Deutsch Gerät der Schutzklasse II Español Equipo de clase II Nederlands KlasseII apparatuur Türkçe Sınıf II ekipman Équipement de classe II Indicates this is Class II equipment Indica che questo è un apparecchio di classe II Gibt an dass das Gerät der Schutzklasse II entspricht Indica que se trata de un equipo de clase II Geeft aan dat deze apparatuur in Klasse...

Page 50: ...önlemi English Français Symbole CC DC symbol Indicates direct current Italiano Simbolo corrente continua C C Indica la corrente continua Deutsch Gleichstrom Symbol Español Símbolo CC Nederlands DC pictogram Türkçe DC sembolü Indique qu il s agit de courant continu Kennzeichnet Gleichstrom Indica corriente continua Geeft gelijkstroom aan Düz akımı gösterir English Français Italiano Deutsch Español ...

Page 51: ...MISSISSAUGA ROAD BRAMPTON ONTARIO L6Y 5Z7 CANADA CANON EUROPA N V BOVENKERKERWEG 59 1185 XB AMSTELVEEN THE NETHERLANDS CANON AUSTRALIA PTY LTD BUILDING A THE PARK ESTATE 5 TALAVERA ROAD MACQUARIE PARK NSW 2113 AUSTRALIA CANON SINGAPORE PTE LTD 1 FUSIONOPOLIS PLACE 15 10 GALAXIS SINGAPORE 138522 CANON INDIA PVT LTD 7TH FLOOR TOWER B DLF CYBER TERRACES DLF PHASE III GURGAON 122002 HARYANA INDIA ...

Reviews: