background image

2-10

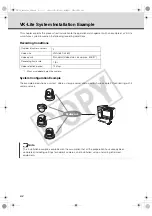
VK-Lite System Installation Example

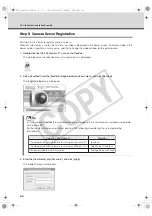
7. Select a camera server to register, and then click [Add Camera Server].

The [

Add Camera Server

] dialog box is displayed. 

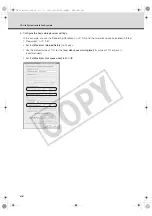
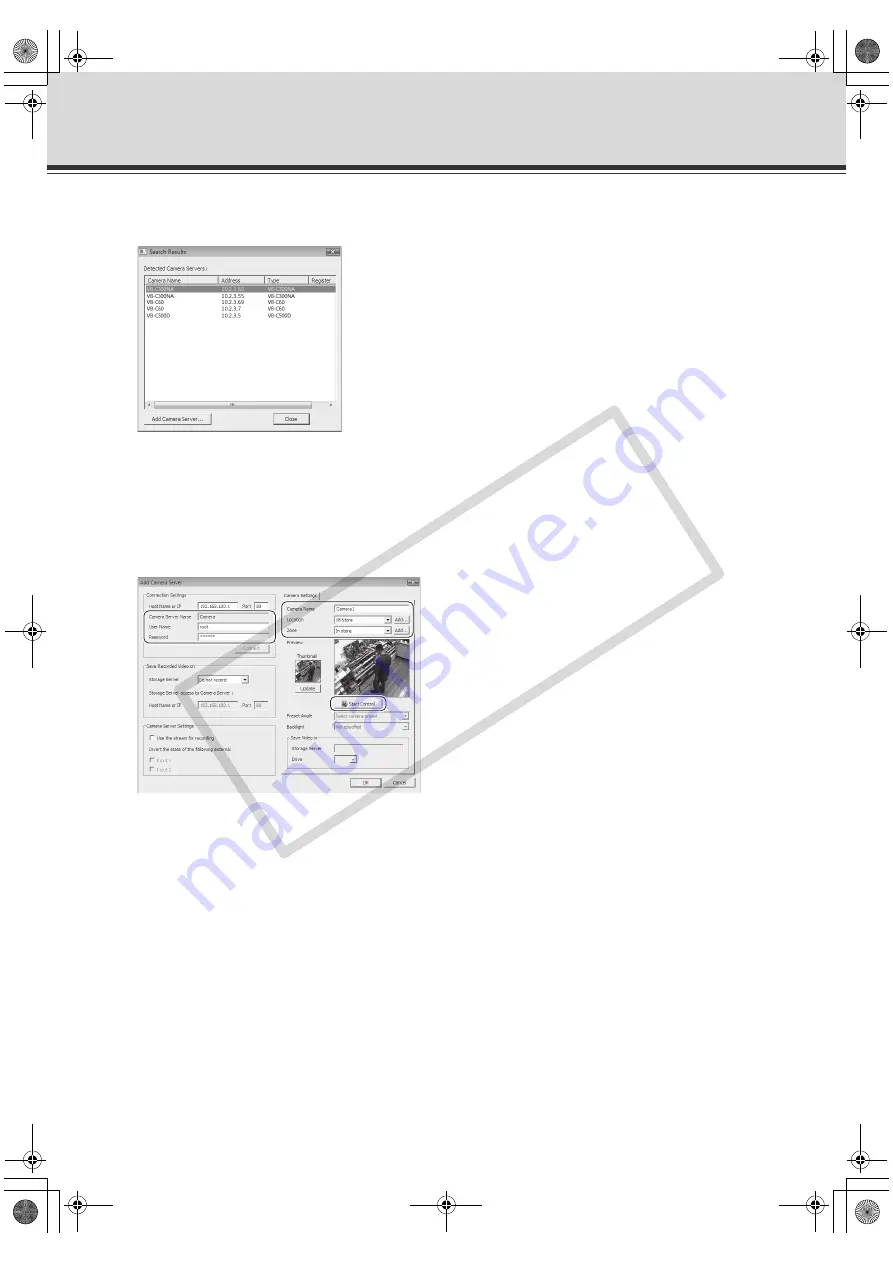
8. Configure the following settings in the [Add Camera Server] dialog box. 

• Enter the [

User Name

] and [

Password

], and then click [

Connect

]. Make sure that the live view is 

displayed in the [

Preview

] window.

• Enter the [

Camera Name

], and select the [

Location

] and [

Zone

] of the camera.

• Click [

Start Control

], and adjust the viewing angle of the camera.

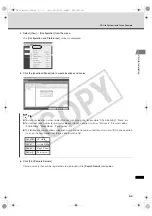
9. Click [OK].

Now, the camera server has been registered. The registered camera server information is displayed in the 
right list of the screen.

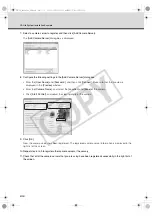
10. Repeat step 6 to 9 to register other camera servers, if necessary.

11. Check that all of the camera servers that you are using have been registered successfully in the right list of 

the screen.

VK-64_SetGuide_US.book  10 ページ  2009年3月4日 水曜日 午後3時19分

CO

PY

Summary of Contents for VK-16 v2.1

Page 1: ...Network Video Recorder VK 64 VK 16 VK Lite Setup Guide Ver 2 1 VK 64_SetGuide_US book i COPY...

Page 2: ...ting from operation To Customers Disclaimer Software defect may cause an error in recording and damage or loss of recorded data Canon bears no responsibility for any loss or damage resulting from oper...

Page 3: ...G MAY BE OBTAINED FROM MPEG LA LLC SEE HTTP WWW MPEGLA COM This product is licensed under AT T patents for the MPEG 4 standard and may be used for encoding MPEG 4 compliant video and or decoding MPEG...

Page 4: ...er 1 VK 64 VK 16 Installation Setup Procedure 1 2 Chapter 2 VK Lite Installation VK Lite System Installation Example 2 2 Step 1 Preparation 2 3 Step 2 Camera Server Installation and Setup 2 3 Step 3 I...

Page 5: ...for installation and operation First read this guide up to Specification Comparison of VK 64 VK 16 and VK Lite And then read VK 64 VK 16 Installation or VK Lite Installation depending on the software...

Page 6: ...amera servers and play recorded videos saved on storage servers using the viewer software Product Type Network Video Recorder VK 64 Up to 64 camera servers can be registered to Network Video Recorder...

Page 7: ...grade from Older Versions To upgrade from an older version v1 1 v1 2 v1 3 v1 4 or v2 0 to v2 1 download the free patch installer from our website License keys used for the older versions can also be u...

Page 8: ...C60 VB C300 VB C50 series VB C10 R VB150 VB C500D VB C60 VB C300 VB C50 series Automatic camera server search Storage Server Recording format JPEG MPEG 4 JPEG only Max recording frame rate 30 fps 1 5...

Page 9: ...figure a system with one PC as both a storage server and a viewer This configuration is recommended for a system with multiple camera servers Case1 Viewing and Recording on a Single PC Case2 Using One...

Page 10: ...can connect to a single server In all up to 192 camera servers can be operated in one system You can operate a system with a combination of storage servers and VK 64 VK 16 or VK Lite You can also use...

Page 11: ...cannot be recorded z Please be sure to read the following reference page for notes on each version of Windows OS z When using a NAS server take note of the following points Use recommended NAS servers...

Page 12: ...xii Important Before Starting Operation VK 64_SetGuide_US book xii COPY...

Page 13: ...VK 64 VK 16 Installation Setup Procedure VK 64_SetGuide_US book 1 COPY...

Page 14: ...details on how to connect the camera Install the VK 64 VK 16 storage server software and viewer software onto the PC for storage server and the PC for viewer See Chapter 2 Installation Configure the s...

Page 15: ...tering layouts of the viewing area You can register multiple layouts and switch them at a fixed time interval so it is possible to build large scale monitoring systems You can also set an upper limit...

Page 16: ...1 4 Setup Procedure VK 64_SetGuide_US book 4 COPY...

Page 17: ...VK Lite Installation System Installation Example VK 64_SetGuide_US book 1 COPY...

Page 18: ...ow shows a system where a storage server and a viewer share a single PC connecting with 4 camera servers Number of camera servers 4 Video size VGA 640 x 480 Video quality Standard Video data size appr...

Page 19: ...ings such as the IP address setting See Start Guide for details of initial camera server settings Required free hard disk space No of cameras x Video data size x Recording frame rate x Video retention...

Page 20: ...d the agreement carefully and then select the radio button saying I accept the terms in the license agreement and click Next to continue 3 Both of the following applications are displayed Viewer Stora...

Page 21: ...Configuration v2 1 icon on the Desktop The Login dialog box is displayed 2 Enter your user name and password and click Login The Storage Server Configuration dialog box is displayed Tip If you are ru...

Page 22: ...he Recording Conditions P 2 2 and the hard disk space calculated in Step 1 Preparation P 2 3 Set the Maximum retained history to 14 days Use the default value of 10 for the Low disk space warning leve...

Page 23: ...Administrator checkbox 5 Click Apply The changes are saved Note It is strongly recommended that before operation you change the user name admin and password created after installation Tip The followin...

Page 24: ...om the Master Storage Server pull down menu and click Connect The Login dialog box is displayed 3 Enter the User Name and Password and click Login The Viewer Screen is displayed Tip In this example lo...

Page 25: ...lts dialog box Tip z You can set location names to identify each monitoring site for example Office Building Store etc z You can set zone names for particular places in each Location such as Entrance...

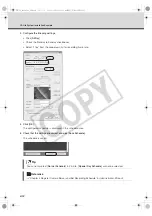
Page 26: ...ayed in the Preview window Enter the Camera Name and select the Location and Zone of the camera Click Start Control and adjust the viewing angle of the camera 9 Click OK Now the camera server has been...

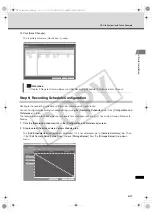
Page 27: ...e following example shows a normal schedule for continuous recording at 1 fps all day through Monday to Sunday 1 Click the Recording Schedules tab in the Configuration and Preferences screen 2 Drag to...

Page 28: ...rame rate 4 Click OK The configured schedule is displayed in the schedule area 5 Check that the settings are correct and click Save Schedule The schedule is saved Tip You can only select Normal Schedu...

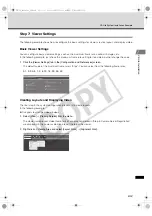
Page 29: ...e Configuration and Preferences screen The default value of the maximum frame rate is 5 fps You can select from the following frame rates 0 1 0 2 0 5 1 2 5 10 15 20 25 30 Creating Layouts and Displayi...

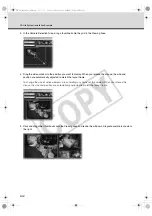
Page 30: ...use the size and position are automatically adjusted to match the layout frame To change the size of video windows click and drag any corner of the window When you release the mouse the size and posit...

Page 31: ...mation see Administrator s Manual provided on the supplied CD ROM Tip z The aforementioned example shows a layout example using Default Shared Layout displayed by default You can create and save new l...

Page 32: ...rive Hunghom Kowloon Hong Kong CANON AUSTRALIA PTY LTD 1 Thomas Holt Drive North Ryde Sydney N S W 2113 Australia CANON EUROPA N V Bovenkerkerweg 59 61 P O Box 2262 1185 XB Amstelveen The Netherlands...

Reviews: