Canon VIXIA HFG20 Manual To Using Download Page 6

file:///Volumes/Untitled/Camera%20Info/HFG20/guide%20to%20the%20hfg20.html[4/15/13 1:15:17 PM]

for Movies] > The Internal Memory Icon (to go from internal to card slot A, or both) or  [A] (to go

from A to B slots).

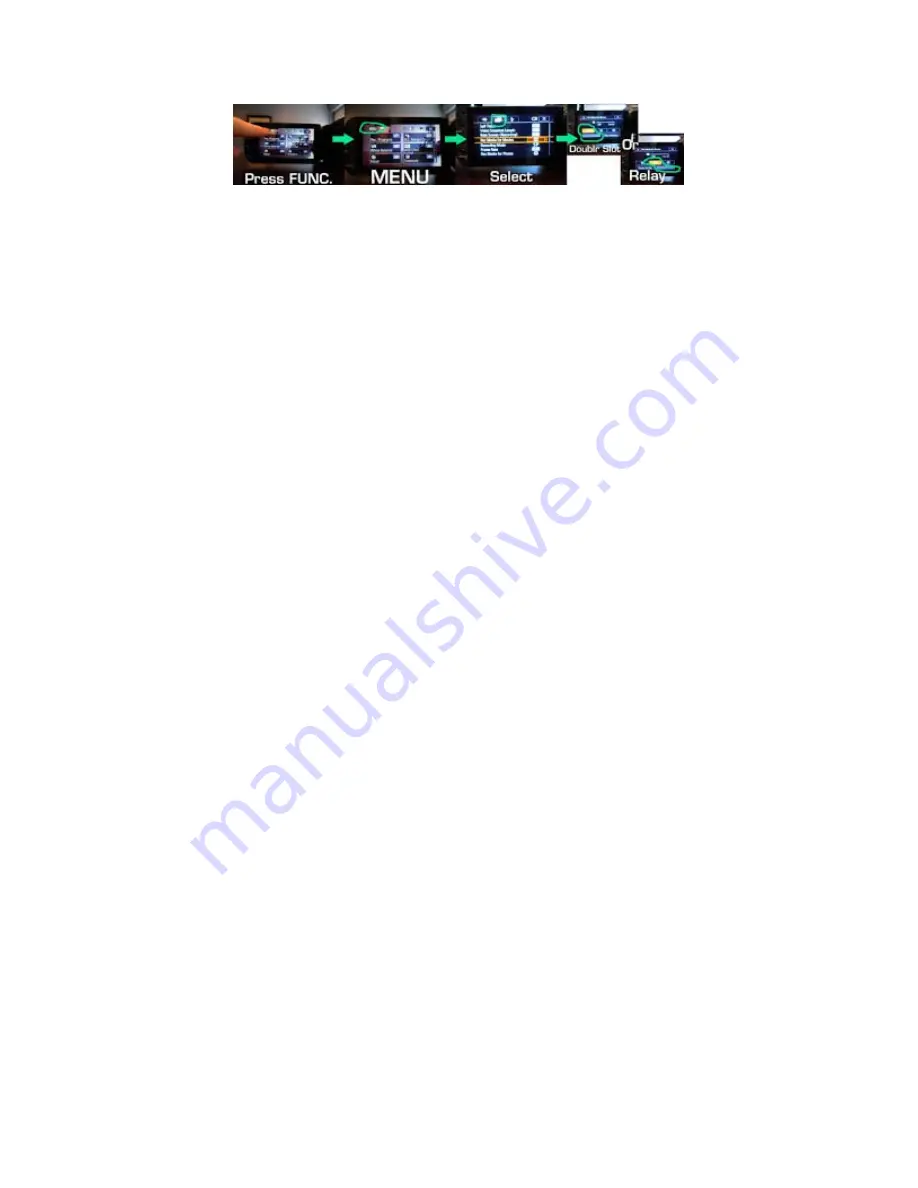
3. Touch the desired option and then touch [X]

Any of the following actions will deactivate the relay recording function:

• Turning off the Camcorder.

• Opening the double memory card slot cover.

• Changing the position of the mode switch. 

• Changing the camcorder's operating mode.

• Changing the memory used for recording movies.

I recommend using relay recording when you are out filming your hunt. A) Until you run

out of memory on the internal, A and B memory cards you will not have to fidget with

turning your camera off, and switching out memory cards. This cuts down on time and

sound, both critical to hunting situations. Remember to reset the relay recording if you

do any of the things mentioned above!

Double Slot Recording:

Double slot recording allows you to record the same scene simultaneously to both memory cards.

This is a convenient way to make a backup copy of your recording while you record.

1. Insert Memory Cards into memory card slot A and memory card slot B.

2. Open the [Rec Media for Movies] screen (directions above)

3. Activate double slot recording by selecting the [A] > [Double Slot Rec] > [ON]

4. Touch [X].

The double D icon will appear on the screen that allows you to see that the Double Slot Recording

option is selected.

If you have the means of buying more SD cards then just two, I would recommend you

use the Double Slot Recording method while out in the field to give you instant backup

of everything that you recorded. I, personally, like having the same size SD cards in

both the A and B slots, because that way I am not loosing recording time on one card. A

good thing about the Double Slot Recording is that if an error occurs on one of the

cards while recording, the other SD card will keep on recording. Of course, you can not

use both the Relay Recording and the Double Slot recording at the same time and you

will have to make a personal decision on that one based on how long you will be

filming, the conditions, and SD card availability. 

Initializing the Memory:

Initialize memory cards when you use them with this camcorder for the first time. You can also

initialize a memory card or the built-in memory to permanently delete all the recordings it

contains. At the time of purchase, the built-in memory comes pre-intialized and contains music

files for use as background music and images for use with the image mix function (image mix

frames).

Summary of Contents for VIXIA HFG20

Page 1: ...sure that the camera is turned off to charge and plug the compact power adapter to the camcorder s DC IN Terminal on the back of the camera When you first charge your battery charge it all the way Wait until you fully exhaust the battery to re charge it again Using the Viewfinder In some situations it might be easier to use the viewfinder to view what you are recording You can also use the viewfin...

Page 2: ...t appear on the touch screen change dynamically depending on the operation mode and the task you are performing With the intuitive touch screen interface you have all the controls at your fingertips You can also use the supplied stylus pen for more precise operation Remember in cold situations you will most likely be wearing gloves the stylus pen is what I recommend using in those situations You m...

Page 3: ...he following functions are available in AUTO mode Zoom Quick Start Video Snapshot Advanced image stabilization modes to shoot video while walking or to stabilize the shot while zooming in on faraway subjects telephoto Face detection to get beautiful shots of people every time tracking the subject even if the person moves Touch Track to track other moving subjects keeping them in focus and using th...

Page 4: ... menus 3 touch the tab of the desired menu 4 Drag your finger up and down to bring the setting you want to change into the orange selection bar Menu items that are not available appear grayed out You can touch any menu item on the screen to bring it directly into the selection bar 5 When the desired menu item is inside the selection bar touch the orange frame on the right 6 Touch the desired optio...

Page 5: ...inserting and removing SD cards Selecting the Memory for the Recordings You can select to record your movies and photos in the built in memory or on a memory card The default memory for recording both is the built in memory 1 Select FUNC MENU the film strip category Rec Media for Movies or Rec Media for Photos depending on the function of the camcorder 2 Touch the symbol to bring up your options Y...

Page 6: ...e Rec Media for Movies screen directions above 3 Activate double slot recording by selecting the A Double Slot Rec ON 4 Touch X The double D icon will appear on the screen that allows you to see that the Double Slot Recording option is selected If you have the means of buying more SD cards then just two I would recommend you use the Double Slot Recording method while out in the field to give you i...

Page 7: ... memory card Windows users Use the supplied PIXELA s software For details refer to the Software Guide PDF file of the supplied PIXELA s software MAC OS users Use Finder to transfer music files from the MUSIC folder on the supplied Camcorder Supplement Disc to the memory card Quick Start Function When you close the LCD panel with the camcorder on the camcorder enters the standby mode In standby mod...

Page 8: ... retains the last setting used even if you set the camcorder to AUTO mode Selecting the Frame Rate You can change the frame rate the number of frames recorded per second to change the look of your movies 1 Open the Frame Rate screen by touching FUNC MENU Film Strip Icon scroll to Frame Rate 2 Touch the desired frame rate and then touch X Frame Rate options 60i standard 60 fields per second interla...

Page 9: ...he focus manually as necessary 4 Turn the focus ring to adjust the focus The center of the screen will be magnified to help you focus more easily You can also turn off the function by going to the Wrench icon Video Camera icon Focus Assistance setting The focusing distance displayed will change as you adjust the focus You can change the units used for distance display by changing the Wrench Icon D...

Page 10: ...UNC MENU Video camera symbol Face Detection Tracking 2 Touch ON and then touch X If there is more than one person in the picture the camcorder will automatically select one person it determines is the main subject The main subject is indicated by a white face detection frame and the camcorder will optimize the settings for that person Other faces will have gray frames Touch a different face on the...

Page 11: ...h the up or down arrows or drag your finger along the bar to select a constant speed 5 Touch X Using the Touch Screen s Zoom Controls 1 Display the zoom controls on the touch screen by touching FUNC ZOOM Then the zoom controls will appear on the left side of the screen 2 Touch the zoom controls to operate the zoom 3 Touch X to hide the zoom controls Automatic Gain Control AGC Limit When recording ...

Page 12: ...ture and how to manipulate it check out our Manipulating Depth of Field Blog HERE Available shutter speed settings 1 8 1 15 1 30 1 60 1 100 1 250 1 500 1 1000 1 2000 Exposure Adjustment At times when filming out doors backlit subjects may appear too dark underexposed or subjects under very strong lights may appear too bright or glaring overexposed In such cases adjusting the exposure will correct ...

Page 13: ...our zebra level 70 or 100 3 Touch below the wrench symbol where it is a zebra icon with a 70 or 100 and then touch X Your zebra pattern will appear on the overexposed areas of the picture Touch again to turn off the zebra pattern You can use the Zebra Pattern as a way to determine what is being overexposed You can then go in and change the F stops and Shutter Speed to help expose those areas in th...

Page 14: ...Set a custom White Balance Set 1 or Set 2 Point the camcorder at a white object so it fills the whole screen and touch Set WB The camcorder will retain the custom white balance even if you turn it off Other options Pictures are used to demonstrate the color difference under each setting Automatic The camcorder automatically sets the white balance for natural looking colors Daylight To record outdo...

Page 15: ...rd under warm white cool white or warm white type 3 wavelength fluorescent lighting Fluorescent H To record under daylight or daylight type 3 wavelength fluorescent lighting Tungsten To record under tungsten and tungsten type 3 wavelength Fluorescent lighting Color Temperature Allows you to set the color temperature between 2 000K and 15 000K ...

Page 16: ...al the audio level indicator and current audio recording level will appear on the screen If you are using an external microphone as well you can see that audio level indicator by going to FUNC MENU Video camcorder symbol Audio Mix set it to on Touch the A Automatic to return the camcorder to automatic audio recording levels Audio is VERY IMPORTANT when it comes to recording Without being able to m...

Page 17: ...y you can adjust the shutter speed or aperture value with the CUSTOM Dial Manual Exposure When you set the recording program to M Manual Exposure press CUSTOM to toggle between the aperture value shutter speed and gain Next use the CUSTOM dial to adjust the setting AGC Limit When you set the AGC Limit in the FUNC Panel to M Manual you can adjust the AGC limit with the Custom Dial Press CUSTOM firs...

Page 18: ...off AF MC Switches between autofocus and manual focus This option is available only for assignable button 1 Powered IS Turns Powered IS on off This option is available only for assignable button 2 Off Does not assign a function to the assignable button On the Canon VIXIA HFG20 the assignable button number 2 is pre selected for Pre Record This Pre Record allows you to capture 3 seconds of video bef...

Reviews: